1. Introduction
This document is intended for Techila Administrators and contains instructions on how to manage a Techila Distributed Computing Engine (TDCE) environment. If you are unfamiliar with TDCE terminology or the operating principles of the TDCE technology, information on these can be found in Introduction to Techila Distributed Computing Engine.
Managing a TDCE environment includes the following tasks:
-
Adding new Techila Workers to the TDCE environment
-
Managing existing Techila Workers and Techila Worker Groups and configuring Policies for the Techila Workers
-
Creating and signing Techila Keys for End-Users
-
Creating Runtime Bundles and transferring them to the Techila Server
-
Updating the Techila Server Software with Service Packs
This document provides instructions on how to perform these tasks using the following tools:
-
Techila Web Interface - a graphical web-based interface that is used to perform the majority of tasks related to maintaining a TDCE environment.
-
Techila Command Line Interface (CLI) - a command line tool that is used to add new End-Users to the TDCE environment. The Techila CLI also contains a subset of administrator commands that can be used to e.g. add new End-Users to the TDCE environment.
-
Techila Keytool - a tool that is used to create Techila Keys, which are used to verify user identities of End-Users and Administrators in a TDCE environment.
The structure of this document is as follows:
Techila Distributed Computing Engine Overview contains important information regarding the Techila Server, including the main components and aliases available on the Techila Server.
Techila Distributed Computing Engine Fundamentals includes an overview of several key concepts related to TDCE. These concepts include Techila Worker Groups and Policy Groups, which are used in resource management; Techila Keys, which are used to verify the identities of Techila End-Users and for signing computational packages, called Bundles. This Chapter also includes a brief introduction on the different states of Techila Workers and Jobs.
Administrative Tasks contains instructions for performing some of the most frequently encountered tasks related to managing a TDCE environment. These tasks include adding a new End-User to the TDCE system as well as adding new Techila Worker computers to the system. This Chapter also contains instructions for updating the Techila Server using Service Packs and for updating the Techila License. The concept of Runtime Bundles is also introduced.
Techila Web Interface and Admin contain a more detailed explanation of the Techila Web Interface. Pages are examined individually and the functionality associated with each page is explained. Admin focuses on the pages found in the administrator section while Techila Web Interface provides a more general Description on the other Techila Web Interface pages.
Chapters 8 through 16 contain procedures for performing various tasks. These tasks range from changing the alternative name, or alias, of a Techila Worker to enabling peer to peer transfers in a TDCE environment. Procedures are divided into different Chapters based on what the procedure performs. For example, procedures used to manage Policies and Policy Rules can be found in Managing Policies.
2. Techila Distributed Computing Engine Overview
2.1. Techila Server Components
Depending on your Techila Server configuration, the Techila Server consists of following main software components:
| Component | Techila Virtual Server, Amazon AWS EC2 Techila Server, Google Cloud Platform Techila Server |
|---|---|
Operating System |
Debian GNU / Linux |
Web Server |
Apache |
Database Server |
PostgreSQL |
Techila Server |
Techila Server |
Techila Technologies will provide updates to the Techila Web Interface and the Techila Server. Techila Technologies will also provide updates to Java used by the Techila Server.
Updates to PHP, Apache, PostgreSQL and Linux Kernel are included with the operating system platform updates.
The firewall is pre-configured, allowing connections to the following TCP ports:
-
22 (SSH)
-
80 (HTTP)
-
443 (HTTPS)
-
20001 (Techila Command Channel)
-
20002 (Techila Data Channel)
-
25001 (Techila Management)
-
25002 (Techila Management Duplex mode)
It is advisable to configure the firewall to only allow HTTPS and SSH connections from IP addresses that should be granted access to the Techila Server. The firewall configuration settings can be found in the /etc/firewall directory on the Techila Server.
2.2. Techila Web Interface
Techila Web Interface is a graphical web user interface, which is used to perform frequently used management tasks required in administrating a TDCE system. These tasks include, but are not limited to, configuring Policy and Techila Worker Groups, assigning computational resources to End-Users and creating accounts for End-Users for the Techila Web Interface.
2.3. Techila Command Line Interface
The Techila Command Line Interface (CLI) enables use of Java-based Techila Management Interface commands from an operating system’s command prompt. Techila CLI functionality can be accessed using techila.jar application included in the Techila SDK.
The Techila CLI also has a set of admin commands, which can be used to perform administrative tasks in the TDCE environment. More information about the admin command can be found in Techila Command Line Interface for Administrators.
From an administrative point of view, the Techila CLI can also be used to create Runtime Bundles, which are used in computational Projects created by End-Users.
2.4. Techila-admin Aliases
Note! Information in this Chapter is not applicable if your Techila Server is deployed to a public cloud environment.
Aliases are simple and an efficient method for accessing frequently used Techila command line tools. When logged on the Techila Server as the user techila-admin, you have access to the following aliases:
-
mgmt
-
tkeytool
The alias mgmt executes the techila.jar application, which is used to access the Techila CLI. The alias tkeytool executes the keytool.jar application, which is used to access the Techila Keytool.
To execute the Techila Keytool directly from the command line, use command:
java -jar <full path to>/keytool.jar
To execute the Techila CLI directly from the command line, use command:
java -jar <full path to>/techila.jar
2.5. Using the Techila SDK on the Techila Server
Note! Information in this Chapter is not applicable if your Techila Server is deployed to a public cloud environment.
If you plan on using the Techila command line tools while logged on to the Techila Server as the techila-admin user, please update the Techila SDK on the Techila Server.
The Techila SDK on the Techila Server can be updated by extracting the latest Techila SDK to following directory, which will overwrite the existing files with new versions.
/home/techila-admin/
More information on configuring the techila_settings.ini file can be found in Introduction to Techila Distributed Computing Engine.
2.6. Keeping the Techila Server Operating System Up-To-Date
The Techila Server’s operating system platform can be updated using operating system’s command line interface. It is good practice to inform Techila End-Users before updating the operating system, as updating the operating system may require rebooting the system.
To update the Techila Server’s operating system platform, please perform following steps. Commands will need to be executed as root user or using sudo command:
-
Update the database of available packages using command:
aptitute update -
Download and install changed packages using command:
aptitude upgradeMore information on the commands used these steps can be found at the following address: https://wiki.debian.org/DebianPackageManagement#Upgrading_your_system
2.7. Techila License
Techila Technologies offers a floating license model. This gives the customer the possibility of installing the Techila Worker software on any number of computers. The Techila Server will ensure that the number of cores performing computations at the same time does not exceed the license (on average) and that the fastest cores are used. This flexible license policy means that the customer can optimize the performance of their TDCE environment and maximize the availability of computational resources.
For example, consider a customer with a Techila License for 500 cores who has installed the Techila Worker software on 800 computers. Computational tasks will be automatically processed on 500 of the most efficient cores. Installing the Techila Worker software on more computers than covered by the license also helps to ensure that the maximum available number cores is always available. In the example above, maximum number of cores would be able to participate in computations even if 20% of the computers were turned off or otherwise unavailable.
Information on your Techila License is visible to administrators in the Status page of the Techila Web Interface.
2.8. Creating an SSL Certificate for Techila Web Interface
By default, the SSL certificate on the Techila Web Interface is not signed by a trusted Certificate Authority (CA). This causes web browsers to produce an error message notifying the user of potential problems when connecting to the Techila Web Interface.
This Chapter contains instructions on how to create a signed SSL certificate.
Before continuing, please make a backup copy of the SSL Certificate and Key files located at the following paths:
-
SSLCertificateFile: /opt/techila/server/certs/gui.crt
-
SSLCertificateKeyFile: /opt/techila/server/certs/gui.key
The following steps describe how to create a signed SSL certificate. This guide is based on the instructions found at the Apache website (http://httpd.apache.org/docs/2.0/ssl/ssl_faq.html#realcert).
-
Log in as
techila-adminto the Techila Server. -
Create a temporary working directory (e.g. /home/techila-admin/crtgen) with command:
mkdir /home/techila-admin/crtgen
-
Change your current working directory to the temporary working directory with command:
cd /home/techila-admin/crtgen
-
Create a Techila Server RSA private key the with command:
openssl genrsa -des3 -out gui.key 1024
-
Create a Certificate Signing Request (CSR) with the Techila Server RSA private key with command
openssl req -new -key gui.key -out gui.csr
-
Fill in the required information that will be incorporated into your certificate request.
-
Send the Certificate Signing Request (gui.csr) to a Certifying Authority to be signed. The CSR can be signed by a commercial CA or a private CA applicable to your organization.
-
After the CSR has been processed, a SSL Certificate file (.crt) and a SSL Certificate Key file (.key) should be available.
-
Move the Certificate file (.crt) and a SSL Certificate Key files (.key) to the following path:
/opt/techila/server/certs/
-
Modify the file
/opt/techila/server/gui/virtualhostto use the new Certificate files. -
Restart apache with the following system command:
service apache2 restart
2.9. Enabling DHCP on the Techila Server
Note! The procedure described in this Chapter might not be applicable if your Techila Server is deployed to a public cloud environment.
This Chapter contains instructions on how to enable DHCP on the Techila Server. Note! If you are running a Virtual Techila Server, DHCP is enabled by default.
When configuring the Techila Server to use DHCP, ensure that the DHCP server provides the same IP address to the Techila Server every time. This is required in order for the Techila Workers to connect to the Techila Server.
When installing Techila Workers in a DHCP environment, the DNS-name of the Techila Server should be used.
-
Log in to the Techila Server as
techila-admin -
Open file
/etc/network/interfaceswith a text editor (as root via sudo) e.g. by using command:sudo nano /etc/network/interfaces
-
Remove the lines containing the static IP address and other network configurations for eth0 and replace with the following definition:
iface eth0 inet dhcp
Below is an example DHCP configuration for eth0.
Example DHCP network configuration for eth0 iface eth0 inet dhcp More information on configuring the network address on a Debian operating system can be found from the following address:
-
Save changes and exit the editor.
-
Reboot the Techila Server with command:
sudo reboot
2.10. Configuring a Static IP Address for the Techila Server
Note! The procedure described in this Chapter might not be applicable if your Techila Server is deployed to a public cloud environment.
This Chapter contains instructions on how to configure a static IP address for the Techila Server.
-
Log in to the Techila Server as
techila-admin -
Open file
/etc/network/interfaceswith a text editor (as root via sudo) e.g. by using command:sudo nano /etc/network/interfaces
If needed, remove the lines containing the dhcp configuration and replace with the following parameters:
iface eth0 inet static
address <IP address of the Techila Server>
netmask <netmask value>
broadcast <broadcast address>
network <network address>
gateway <gateway address>
Below is an example static IP address configuration for eth0.
Example static network configuration for eth0
iface eth0 inet static
address 10.50.1.3
netmask 255.255.255.0
broadcast 10.50.1.255
network 10.50.1.0
gateway 10.50.1.4
More information on configuring the network address on a Debian operating system can be found from the following address:
-
Save changes and exit the editor.
-
Reboot the Techila Server with command:
sudo reboot
3. Techila Distributed Computing Engine Fundamentals
3.1. Techila Keys
The identity of Techila Administrators and End-Users in a Techila Distributed Computing Engine (TDCE) environment is verified with public and private key-pairs. As an Administrator with access to an Administrator Key, you are able to create the following types of Techila Keys:
-
End-User Key
-
Sub-Administrator Key
Techila Keys are created with the Techila Keytool, which is similar to the Java Keytool. Java Keytool is a key and certificate management utility included in the Java Development Kit (JDK) package. The Techila Keytool stores keys in a Java Key Store (JKS) format, which enables keystore files to be password protected. Keystore files generated with the Techila Keytool can also be accessed with the JDK Keytool.
Keys used in a TDCE environment can be divided into six categories:
-
Administrator Keys
-
End-User Keys
-
Techila Server Keys
-
Techila Timestamping Server Key
-
Techila Root Key
-
Techila Worker Keys
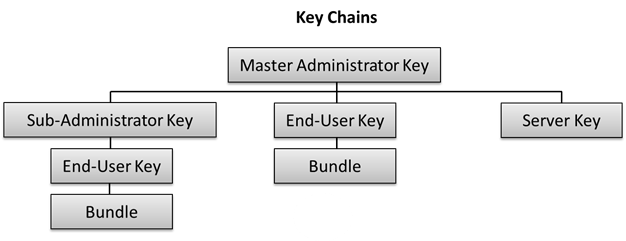
These Keys form a hierarchy, where each Key is signed by an upper level Key. This hierarchy is illustrated in the image below.
3.1.1. Administrator Keys
Administrator Keys are used for signing other Keys that are used in the TDCE environment. Administrator Keys include two different types of Keys:
-
Master Administrator Key
-
Sub-Administrator Key
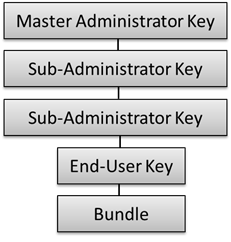
The Master Administrator Key is created and signed automatically during the Techila Server installation. Sub-Administrator Keys can be created by signing the key with the Master Administrator Key or with an existing Sub-Administrator Key. All signed Keys will function in a similar manner, the only difference is a longer signed chain as illustrated in Figure 3.
The procedure for creating a new Administrator Key is described in Adding a New Techila Administrator.
3.1.2. End-User Keys
Typically, the majority of Keys created by a Techila Administrator are signed End-User Keys. These keys are used by End-Users to sign Bundles, which are used to transfer computational data during Projects. Each End-User should have access to one End-User Key, which is created and signed by an Administrator.
End-User Keys must be signed with an Administrator Key in order for them to be used for signing Bundles. If an unsigned End-User Key is used to sign a Bundle, Techila Server will not accept End-User attempts to upload the Bundle.
The procedure for creating a signed End-User Key and giving the End-User access to the TDCE environment is described in Adding a New End-User.
3.1.3. Techila Server Key
The Techila Server Key is used to authenticate the Techila Server to the Techila Workers. The Techila Server Key will be automatically created and signed during the Techila Server installation process. The Techila Server Key is stored in the database on the Techila Server and will be used automatically when validating Techila Worker Keys.
3.1.4. Techila Timestamp Server Key
The Techila Timestamp Server Key is used automatically to timestamp signed Bundles. Time-stamped Bundles will pass signature verification even when the End-User Key used to sign the Bundle has expired, as long as the timestamp is within the validity period of the signing End-User Key. The Techila Timestamp Server Key is automatically created and signed during the Techila Server installation process and stored in a database on the Techila Server.

3.1.5. Techila Worker Keys
Techila Worker Keys are used to authenticate the Techila Worker to the Techila Server. A Techila Worker Key is generated automatically on a Techila Worker during the Techila Worker software installation procedure. After the installation procedure, the Techila Worker will automatically establish a connection with the Techila Server. During the initialization, the Techila Server requests the Techila Worker Key from the Techila Worker and stores it in the database.
Depending on the value of the configuration parameter Workers: Trust Keys Automatically, the Techila Worker Key will either listed as trusted or untrusted in the Techila Web Interface. The value of the configuration parameter can be adjusted in the Techila Web Interface in the Advanced menu-item in the Techila Server Security X509DB table.
In order for the Techila Worker to participate in Projects, the state of the Techila Worker Key needs to be trusted. The procedure for changing the state of the Techila Worker key can be found in Changing a Techila Worker Key Status to Trusted or Untrusted.
Techila Workers will automatically generate new keys when the keys reach a maturity of 75% of the validity period.
3.1.6. Techila Root Key
The Techila Root Key is used to validate Core Bundles used by the TDCE system. Core Bundles are bundles that contain all the core functionality of the TDCE system including, but not limited to, components required for communication, database handling and security features. All Core Bundles and updates to Core Bundles are signed with a Developer Key, which has a signed path leading to the Techila Root Key.
This means that only Core Bundles that originated from developers at Techila Technologies can be used in a TDCE system. This is illustrated in the image below.

The Techila Root Key is used automatically when validating Core Bundles or other updates to the TDCE system.
3.2. Resource Management
Resources in a TDCE environment are managed using two different group structures called Techila Worker Groups and Policy Groups. Techila Worker Groups provide a flexible method for granting, or limiting, End-Users' access to computational resources. Policy Groups on the other hand are used to control the behaviour of these computational resources in different situations.
Newly added Techila Workers can also be automatically managed by using Auto Assignment, which enables Techila Workers to be automatically assigned to specified Techila Worker and/or Policy Groups. All of these features are managed by using the Administrator view of the Techila Web Interface.
3.2.1. Techila Worker Groups
Techila Worker Groups are groups of individual Techila Workers. Techila Worker Groups are used to control End-Users' access to Techila Worker computers. Access to computational resources is granted by assigning Techila Worker Groups to the End-User. Respectively access to a specific Techila Worker Group can be removed by unassigning the Techila Worker Group from the End-User. By default, all Techila Workers are always assigned to the All Workers Techila Worker Group.
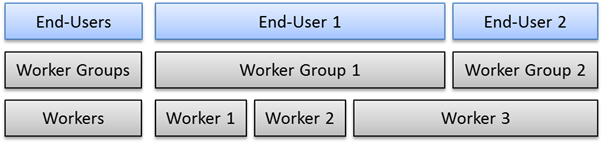
The image below illustrates how an End-User’s access to Techila Workers is determined.
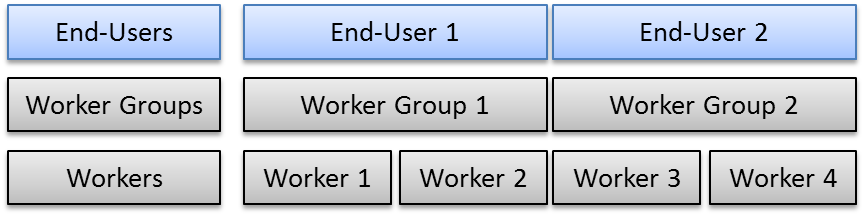
One or more Techila Worker Groups can be assigned to End-Users and a Techila Worker Group can be assigned to several End-Users. This is illustrated in the image below.
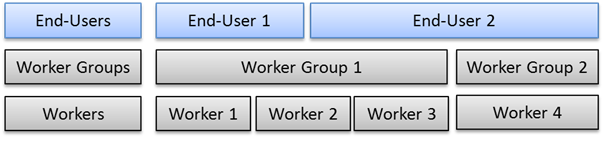
A Techila Worker can also belong to one or more Techila Worker Groups. This is illustrated in the image below.
Techila Workers and End-Users can have associations with several different Techila Worker Groups, meaning it is possible to implement flexible configurations. Resources can be, for example, provided by a functional basis, e.g. based on the Techila Worker processor architecture or operating system.
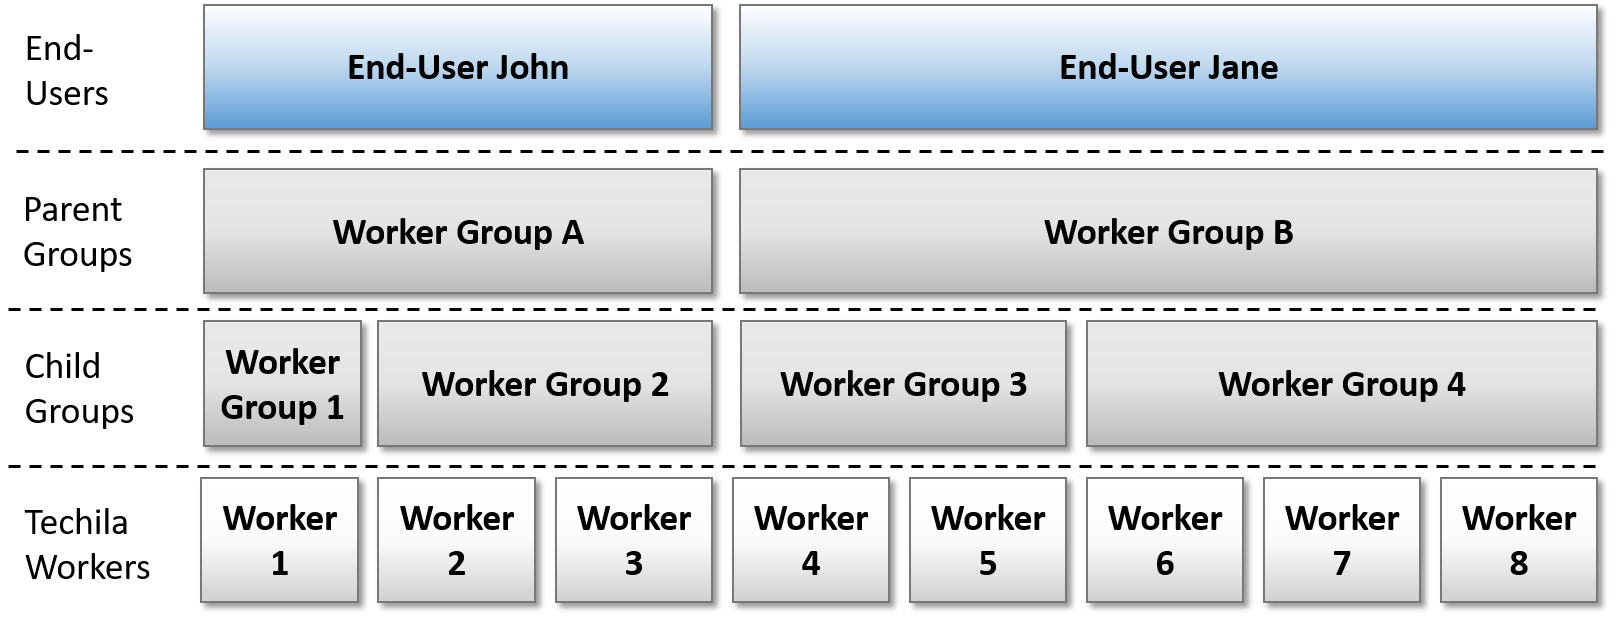
Techila Worker Groups can be placed in a hierarchical structure by placing the Worker Groups in Parent and Child groups. This allows managing large amounts of Techila Workers as illustrated in the image below.
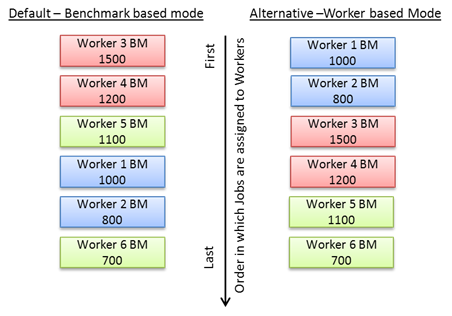
Techila Worker Groups can be also assigned priority values or a Techila Worker Group can be defined as the End-User’s Home Group. Home Groups and priority values are used to determine the Job allocation order when the Alternative (Techila Worker based) Prioritization Mode is used. With the Alternative Mode, Jobs are assigned to computational resources in the following order:
-
Home Groups listed in ascending order
-
Techila Worker Groups listed in ascending order
The image below illustrates a situation where six Techila Workers are divided into three Techila Worker Groups, one of which is the End-User’s Home Group. The remaining Techila Worker Groups, Techila Worker Group 1 and Techila Worker Group 2 are assigned different priority values. A Benchmark (an internal metric used to evaluate the CPU performance of a Techila Worker) value associated with each Techila Worker is also included.

Using the situation illustrated above, the differences between the Default (Benchmark based) and Alternative (Techila Worker based) prioritization Modes are illustrated below.
3.2.2. Managing End-User Access to Computational Resources Using Child And Parent Groups
Making an entire Techila Worker Group available for a group of End-Users can be easily done by setting the desired Techila Worker Group as a Parent Group of a Techila Worker Group that is already assigned to the End-User. Respectively, removing access to a Techila Worker Group from a group of End-Users can be done by removing the Parent Group ←→ Child Group connection. Using Parent and Child Groups to manage access to computational resources reduces the amount of administrative work, as access rights can be done on a group basis, instead of assigning Techila Worker Groups to specific End-Users.
3.2.3. Policy Groups
Policy Groups are used to control the behaviour of Techila Worker computers. Policy Groups consist of a number of Policy Rules, which determine how the Techila Worker behaves in different situations, e.g. when an interactive user logs on to the Techila Worker.
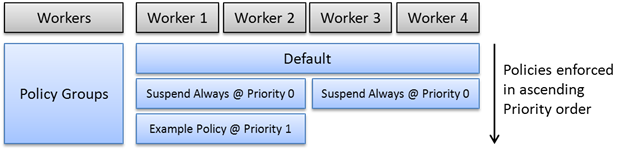
By default, all new Techila Workers added to a TDCE environment are assigned to the Default Policy Group. This is illustrated below.

The Default Policy Group imposes strict rules on when computations can be performed on a Techila Worker. With the Default Policy Group, computations will be terminated on a Techila Worker in the following situations:
-
An interactive user logs on
-
Mouse or keyboard activity is detected
-
msiexec.exe or setup.exe processes are detected
Each Policy Group is assigned a priority value, which determines the order in which the Rules of the Policy Groups are enforced. An exception to this is the Default Policy Group, which is always enforced first on the Techila Workers. This means that Policy Groups with different Priorities can be used modify the behaviour of individual Techila Workers. This is illustrated below.
3.2.4. Auto Assignment
The Auto Assignment feature can be used to automatically assign Techila Workers to Techila Worker Groups and/or Policy Groups. When using the Auto Assignment method, the Group affiliation of an individual Techila Worker can be determined for example with the processor architecture, operating system, hostname or by a variety of other hardware specifications. This is achieved by using a Lightweight Data Access Protocol (LDAP) filter as an Auto Assignment Rule to select Techila Workers matching the search criteria.
For example, all Linux Techila Workers with more than 2 Gigabytes of memory could be assigned to a Techila Worker Group and/or Policy Group with the following Auto Assignment Rule:
(&(osname=Linux)(memory>=2147483648))
The procedure for creating Auto Assignment Rules for assigning Techila Workers to Techila Worker Groups and Policy Groups can be found in the following Chapters:
3.3. Disk Space Usage on the Techila Server
The majority of disk space usage on the Techila Server results from storing Bundles in the Bundle Repository and from storing results completed Projects. The amount of free and used disk space is displayed in the Status page of the Techila Web Interface as illustrated below.
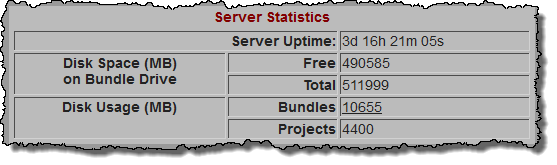
Status page of the Techila Web Interface.If configured, an e-mail notification will be sent to the Administrator if the amount of free disk space drops below a pre-defined level. The settings of the Techila Server Mail Handler can be configured from the Admin section in the Techila Web Interface.
The amount of free disk space on the Techila Server can be increased by removing completed Projects or by deleting Bundles from the Bundle Repository. Note that Removing Projects will also remove the Project results, respectively, deleting a Bundle will make it unavailable for future use.
The procedures for freeing up disk space can be found in the following Chapters:
3.4. Techila Worker Statuses
Techila Workers in a TDCE environment have different statuses, which reflect their current state. These statuses are:
-
Initializing
-
Running
-
Inactive
-
Stopped
-
Suspended
These statuses, excluding the Inactive status, will be visible in the applicable tables when viewing pages displaying more detailed information on Techila Workers. Inactive Techila Workers will be listed in a separate table on the applicable pages.
3.4.1. Initializing
The Initializing status indicates that a communication break has occurred between the Techila Server and the Techila Worker. Communication breaks can result for example from restarting the operating system of the Techila Worker computer.
3.4.2. Running
The Running status indicates that the Techila Worker is able to process computational Jobs. The Running status is the normal status of a Techila Worker.
3.4.3. Inactive
The Inactive status indicates that the Techila Worker is not connected to the TDCE environment. Typical causes for the inactive status are:
-
The computer on which the Techila Worker is installed is turned off
-
The Techila Worker process is not currently running
-
There is no network connection between the Worker and the Techila Server
3.4.4. Stopped
The Stopped status indicates that the Worker is not able to accept computational Jobs. The status of a Techila Worker can be set to Stopped by clicking the Stop button in the Techila Web Interface. Jobs that are currently being processed on the Worker when the stop command is issued will be completed.
3.4.5. Suspended
The Suspended status of the Techila Worker indicates that Policy Rules enforced on the Techila Worker are preventing Jobs from being assigned to the Techila Worker.
3.5. Job Statuses
Jobs in a TDCE environment have different statuses, which indicate the state of the Job. These statuses are:
-
Waiting
-
Expired
-
Working
-
Ready
-
Cancelled
These statuses will be visible in the Techila Web Interface when viewing any of the pages displaying more detailed Job related information. The lifecycle of a computational Job typically consists of the following states.
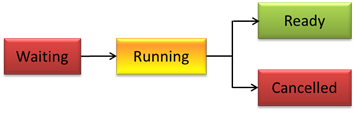
3.5.1. Waiting
The Waiting status indicates the Job is waiting for computational resources to become available.
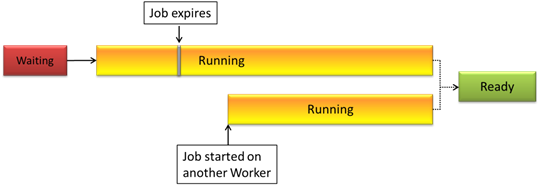
3.5.2. Expired
Jobs that consume an exceedingly large amount of real time compared to other Jobs in the same Project will be assigned the Expired status. If there are free computational resources in the TDCE system, an expired Job may be started on another Techila Worker. This means that several Techila Workers can be computing the same Job simultaneously.
3.5.3. Working
The Working status indicates that the Job is being computed on a Techila Worker.
3.5.4. Ready
The Ready status indicates that the Job was completed successfully.
3.5.5. Cancelled
The Cancelled status indicates a Job was not completed successfully and was cancelled due to too many errors. The Techila Worker on which the error was generated will be automatically removed from the Project, meaning no further Jobs belonging to the Project will be assigned to that specific Techila Worker. Techila Workers that have been removed from the Project will be listed in the Inactivated Techila Workers table visible on the Project ID page.. If a Techila Worker generates a substantial amount of errors in several Projects, the Techila Worker will not be able to participate in any Projects before the error counter of the Techila Worker is reset.
3.6. Peer-To-Peer Transfers
TDCE enables the use of peer-to-peer (P2P) transfers when transferring large Bundles. Principally P2P transfers are implemented by segmenting large Bundles into smaller slices. These smaller slices are then transferred between Techila Workers, reducing the amount of network traffic originating from the Techila Server. Several of the settings related to P2P transfers can be configured from the Techila Web Interface, including the size of a single slice and the maximum allowed distance (in network hops) between Techila Workers when performing P2P transfers.
The network topology of the P2P environment is discovered by sending and receiving multicast packages. By adjusting the amount of allowed network hops, it is possible to limit the distance the Techila Workers are visible to each other. For example, when the maximum allowed amount of allowed network hops is set to one (1), the multicast packets reach only the Techila Workers in the very same network segment.
The procedure for enabling P2P transfers can be found in Enabling P2P Transfers.
4. Administrative Tasks
This Chapter describes some of the most typical administrative tasks related to managing a Techila Distributed Computing Engine (TDCE) environment.
4.1. Adding a New End-User
This Chapter contains instructions on how to add a new End-User to the TDCE system. New End-Users can be added by using one of the tools below:
4.1.1. Adding a New End-User Using the Techila Admin CLI
This Chapter contains instructions for adding an End-User to the TDCE system using the Techila Admin CLI.
Note! In order to use the Techila CLI admin commands, you will need to have the Techila SDK available and configured properly. Instructions for configuring and testing the Techila SDK can be found in Techila Command Line Interface for Administrators.
For more information about other Techila CLI admin commands, please see Techila Command Line Interface for Administrators.
-
Java installed on the computer you are using to create End-User Keys
-
Techila SDK configured to use Techila Admin CLI commands
-
Access to an Administrative Key
-
Administrative access to the Techila Web Interface
Process
-
Launch a command prompt/terminal and navigate to
<full path>\techila\libin the Techila SDK.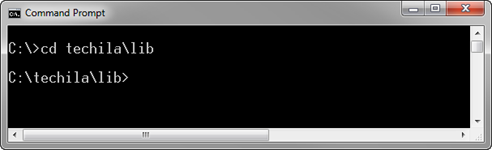 Figure 16. A command prompt window.
 -
Create a new End-User with the Techila Admin CLI
addusercommand. The general syntax of the command is shown below. Optional parameters are enclosed in square brackets [].java -jar techila.jar admin adduser [adminkeystore=<keystore>] [index=<indexfile>] [adminalias=<alias>] [adminpass=<password>] [userkeystore=<keystore.jks>] [useralias=<useralias>] login=<login> username="<user name>" [dn=<DN>] userpass=<userpass> [group="<worker group>"] [validity=<validity period>] [keyonly=<true|false>]
Default values of the optional parameter are shown below:
Parameter Default Value Description adminkeystore
/home/techila-admin/admin/admin.jks
Location of the keystore that contains the admin key
index
<path of admin.jks>/index.xml
By default, the index.xml will be read from the same directory as defined in
adminkeystoreadminalias
admin
The alias of the admin key in the admin keystore
adminpass
adminpass
The password of the admin keystore file
userkeystore
<userlogin>.jks
The name of the End-User Keystore that will be created. By default, the name same as defined in the parameter
userloginuseralias
<userlogin>
The alias of the End-User Key that will be created. By default, the alias will be same as defined in the parameter
userlogindn
CN=<username> <system clock timestamp in milliseconds>
The distinguished name of the End-User Key. By default, value will be set based on the
usernameparameter and the system clock timestampgroup
All Workers
Techila Worker Groups that will be assigned to the End-User. By default, the
All WorkersTechila Worker Group will be assigned.validity
365
The validity of the End-User Key. By default the validity period is 365 days.
An example syntax for the
addusercommand is shown below.java -jar techila.jar admin adduser adminkeystore=C:\techila\subadmin1.jks adminalias=admin adminpass=adminpass userkeystore=C:\techila\johndoe.jks userpass=userpass123 useralias=johndoe validity=365 login=johndoe username="John Doe" group="Example Worker Group" keyonly=false
The parameters used in the example command are explained below.
The first three parameters (
adminkeystore,adminalias,adminpass) in the example are used to define which Administrator Key is accessed. The syntax used accesses the Administrator Key in theC:\techila\subadmin1.jkskeystore file. This keystore contains the aliasadminand the password used to access the keystore isadminpass.The following four parameters (
userkeystore,useralias,userpass,validity) in the example define the properties of the End-User Key that will be created. The syntax used will create a keystore file inC:\techila\johndoe.jks. The alias of this keystore will be set tojohndoeand the keystore will be protected with the passworduserpass123.The remaining parameters used in the example define the properties of the Techila Web Interface account that will be created for the End-User. The syntax used will create a Techila Web Interface account with the login
johndoe(loginparameter) and passworduserpass123(userpassparameter). NameJohn Doe(usernameparameter) will be displayed when the user is logged in the Techila Web Interface. The Techila Worker Group namedExample Worker Group(groupparameter) will be automatically assigned to the End-User. The validity period of the End-User Key will be365, which means 365 days. The value of thekeyonlyparameter isfalse, meaning both the End-User Key and Techila Web Interface account will be created. -
After executing the command, you will be prompted for the End-User Keystore password. Note! This is the password of the End-User Key that is assigned to your administrative Techila Web Interface account, not the End-User password specified in the command above.
Enter the password and click
OKto continue. Figure 17. Entering the keystore password.
 -
After you have entered the keystore password, the End-User Key and Techila Web Interface account will be created. After the command has been executed, the view should resemble the one shown below.
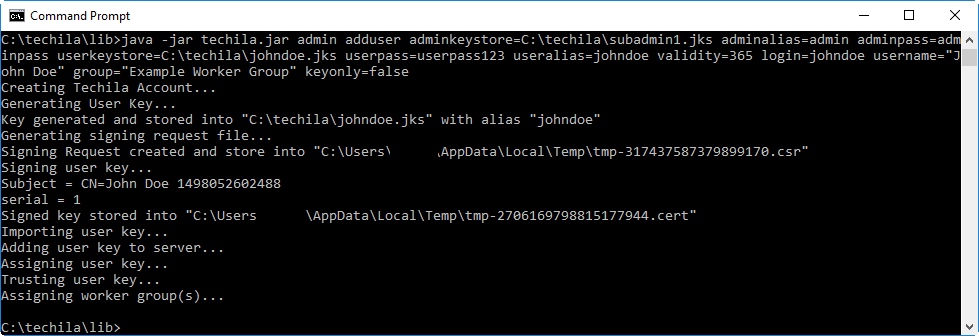 Figure 18. View after executing the
addusercommand.
The End-User Key is now ready for use and can be used for creating computational Projects. Please note that in order for End-User to be able to create computational Projects, you will need to give the End-User the following information and files:
-
The keystore containing the End-User Key. The location and name of the file were defined in Step 2 with parameter
userkeystore. -
The password of the keystore. This is the password that was specified in Step 2 with parameter
userpass. -
The network address of the Techila Server
-
The port of the Techila Server (default 25001 and 25002)
4.2. Adding a New Techila Administrator
A Techila Administrator has an Administrator Key and administrative access to the Techila Web Interface. Adding a new Administrator to the TDCE system consists of two steps, which are described in the following Chapters:
4.2.1. Creating a Signed Administration Key
This procedure describes how to create a signed Administrator Key. Having access to a keystore containing an Administrator Key is required in order to create new End-User Keys.
Prerequisites
-
Techila SDK
-
Java installed on the computer you are using to create End-User Keys
-
Access to an Administrator Key
-
Administrative access to the Techila Web Interface
-
The
hostnameparameter in thetechila_settings.inifile must contain the network address of the Techila Server-
Open a command prompt and navigate to the
<full path>\techila\lib -
Launch the Techila Keytool using command:
java -jar keytool.jar admingui
-
Click
Open existing admin key for signing other keys. Figure 19. The Main Menu of the Techila Keytool.
 -
After clicking the button, a file dialog window will be displayed. Select the keystore file containing the Administrator Key and insert the keystore password to the Keystore Password field. Click
Open.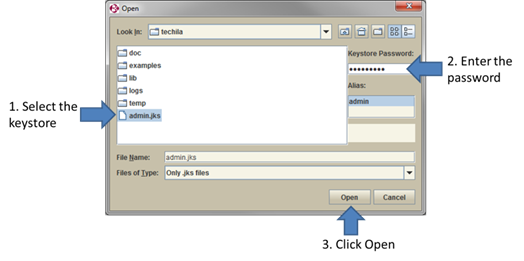 Figure 20. The Administrator Key, as well as other Keys, can be recognized from the .jks suffix
 -
The Techila Keytool main Click on
Create a new admin key and sign it.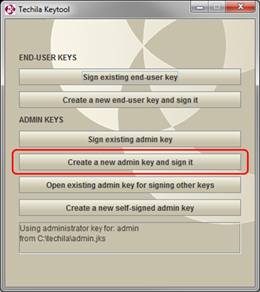 Figure 21. Information on the selected Administrator Key will be displayed at the bottom of the Main Menu window
 -
A create new key dialogs opens. Fill in the required information:
-
First Name
-
Last Name
-
Alias
-
-
After filling in the required fields, click
Generate Keyto continue.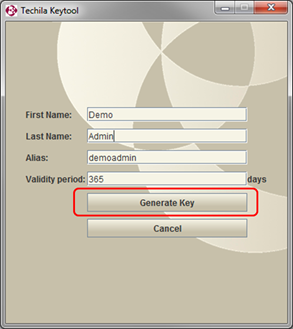 Figure 22. Fill in required fields and click
Generate Key. -
A dialog opens prompting a location for the keystore file and a password. Choose a location for the file in and insert a password for the keystore. Click
Saveto create the keystore file.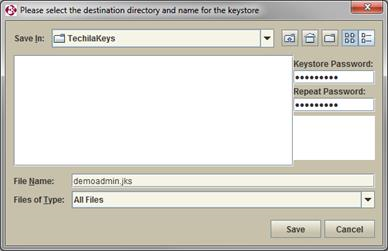 Figure 23. Choose a suitable location where to save the keystore file.
 -
A dialog opens displaying information that a keystore file was created.
Note! You do not need to send the key to the Techila Server.
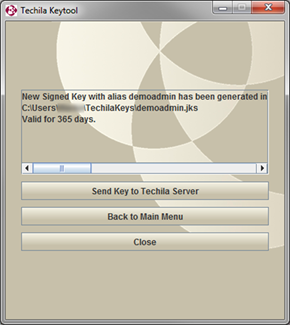 Figure 24. After the keystore has been created, the validity period and location of the keystore will be displayed.
The new Administrator Key is now ready for use and can be used to sign End-User Keys or Administrator Keys. Note that the Administrator Key should not be transferred to the Techila Server.
-
4.2.2. Creating a Techila Web Interface Account with Administrative Rights
This procedure describes how to create a Techila Web Interface account with administrative rights. Administrative access is required in order to access the Admin section in the Techila Web Interface.
-
Open Techila Web Interface and login as Administrator.
 Figure 25. The Admin section will be visible after logging in as an administrator.
 -
Navigate to the
End-Users→End-User Listpage using the Menu Bar. Figure 26. Clicking on the
AdminMenu-Item will automatically redirect your browser to theEnd-User Listpage. -
Fill in the required information in the
New End-Usertable, which is located at the bottom of theEnd-User Listpage.-
Login
-
End-User Name
-
GUI Password
Tick the checkboxes in the
Bundles,ProjectsandAdmincolumns. Figure 27. Enter the required information to the
Login,End-User NameandGUI Passwordfields. Ticking the checkbox in theAdmincolumn will give the End-User administrative access to the Techila Web Interface.
-
-
Click
SUBMITto create the user account. Figure 28. Create the user account.
The new user account will be displayed in the
End-Userstable. The account now has administrative access to the Techila Web Interface. Figure 29. The ticked
Admincheckbox indicates that the newly created account has administrative access to the Techila Web Interface.
4.3. Adding a New Techila Worker
Adding a new Techila Worker to the TDCE system consists of two phases:
-
Installing the Techila Worker software on a computer
-
Trusting the Techila Worker Key in the Techila Web Interface
Instructions on installing the Techila Worker software can be found in the following documents:
After successfully installing the Techila Worker software on a Techila Worker, the Techila Worker will automatically connect to the Techila Server and the Techila Worker Key will be listed in the Worker Keys page of the Techila Web Interface. Rebooting the computer after installing the Techila Worker software is not required.
The following procedure describes how to change the state of the new Techila Worker Key to trusted using the Techila Web Interface:
-
Open Techila Web Interface and login as Administrator.
 Figure 30. The Admin Menu-Item will be visible when logging in as an administrator.
 -
Click
Admin -
Click
KeysThe
Worker Keyspage will open. In the example below, there is one untrusted Techila Worker Key: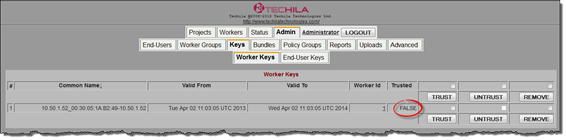 Figure 31. The Worker Keys table contains a list of Techila Worker Keys in the Techila Distributed Computing Engine environment. The
Trustedcolumn indicates whether or not a Techila Worker Key is trusted by the Techila Server. By default, new Techila Worker Keys are trusted by the Techila Server. -
Tick the checkbox next to the Techila Worker Keys you wish to trust and trust the Keys by clicking the
TRUSTbutton.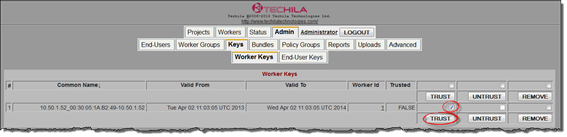 Figure 32. In this figure, all Techila Worker Keys are trusted, as indicated by the
Trustedcolumn.After clicking the button, the status of the Techila Worker Key will change to
trustedas illustrated below. Figure 33. Trusted Techila Worker Keys have the value
TRUEin theTrustedcolumn.By default, the Techila Worker will now automatically perform a benchmark test, which may take a few minutes. After the benchmark test is complete, the Techila Worker is ready to receive computational Jobs. The Techila Worker is also automatically assigned to the Techila Worker Group
All Workers.
4.4. Updating the Techila Server Using Service Packs
The TDCE system is kept up-to-date by installing Service Packs provided by Techila Technologies. Service Packs are released approximately twice per year. Service Packs can be recognized from the .sp suffix. Updates included in the Service Pack will be automatically applied to the Techila Workers after the Service Pack has been uploaded to the Techila Server and approved.
Latest Service Packs can be downloaded from the Techila URLs given by Techila support staff.
Note! Latest Techila Service Packs are delivered in a ZIP-file. If you have downloaded the ZIP-file, you will need to extract the ZIP-file in order to get access to the .sp file. Extract the ZIP-file before starting the procedure described below.
The procedure for updating the Techila Server using a Service Pack is described below:
-
Log in as an Administrator to the Techila Web Interface
-
Navigate to
Admin→Uploadsand clickBrowseto open the file dialog window.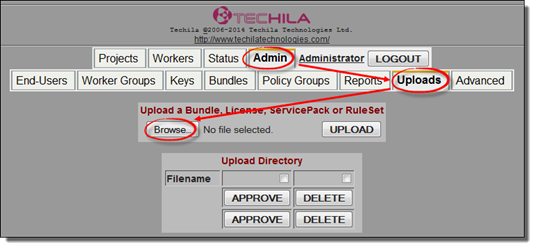 Figure 34. The
Uploadspage is used to upload Service Packs to the Techila Server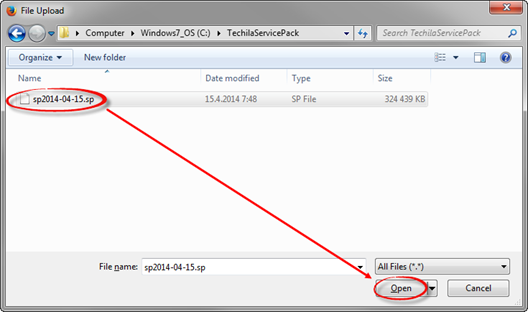 Figure 35. Select the Service Pack you wish to upload to the Techila Server. All Service Packs can be recognized from the
.spsuffix. -
After selecting the file, click the
UPLOADbutton to upload the Service Pack.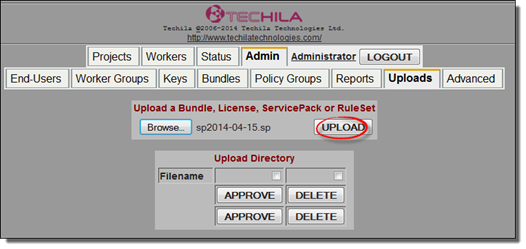 Figure 36. Clicking
UPLOADwill transfer the Service Pack to the Techila Server.After uploading the Service Pack, the new Service Pack will be listed in the
Upload Directorytable.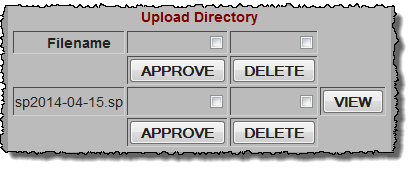 Figure 37. The name of the Service Pack will be displayed in the
Upload Directorytable. -
Tick the checkbox next to the Service Pack that was uploaded and click
APPROVE.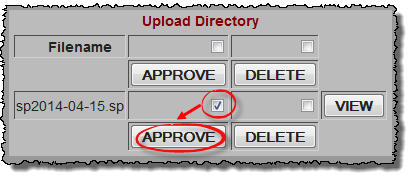 Figure 38. Approving the Service Pack will apply the updates in the Service Pack to the Techila Server.
The filename of the Service Pack will be given the suffix
.readyto indicate the Service Pack has been successfully approved. Updates included in the Service Pack will be automatically taken in to use.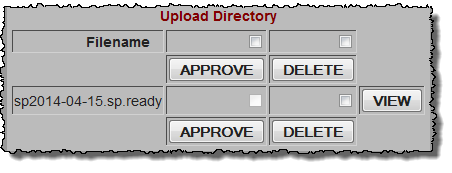 Figure 39. Approved Service Packs are added the suffix
.readyand will remain visible in theUpload Directorytable for a brief period.After the Service Pack has been approved, the Techila Server Core Bundles will be automatically updated. This may take several minutes. After the Techila Server update process is complete, the Techila Server will automatically distribute updated Bundles to the Techila Workers.
4.5. Updating the Techila License
Techila Licenses can be updated by uploading the Techila License file to the Techila Server. Uploading a new Techila License will not override your existing Techila License.
The CPU Core Limits and CPU Hour Limits of different Techila Licenses are automatically combined by summing the values specified in the Techila Licenses.
Note! Certain Techila License types require access to Internet based Techila License Server TCP port 80/443 (HTTP/HTTPS). The port and protocal are defined in the Techila License file. The license server address will be delivered together with the license file. If no connection can be established, the Techila Server will stop assigning new Jobs to Techila Workers after a certain time period (24 hours). Techila License files that require a connection have the following XML element:
<statsurl>...</statsurl>
Note! Do not change the contents of the Techila License File. Alteration may corrupt the License File, making it unusable.
-
Login to the Techila Web Interface as an administrator.
-
Click on
Admin. -
Click
UploadsThe
Uploadspage opens: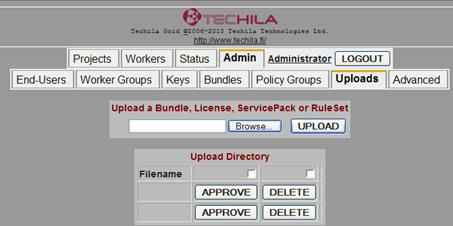 Figure 40. The
Uploadspage. -
Click
Browseand select the Techila License File you wish to transfer to the Techila Server. The Techila License file can be recognized from the.licencesuffix.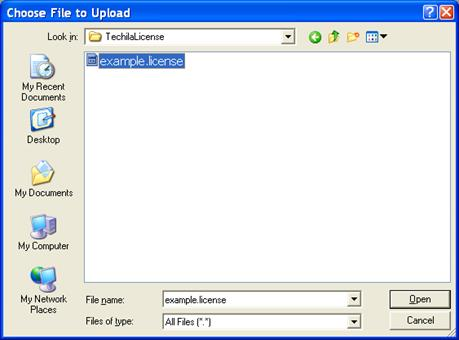 Figure 41. Select the Techila License File. The file can be identified from the .licence suffix.
 -
Click the
Uploadbutton to upload the Techila License File to the Techila Server.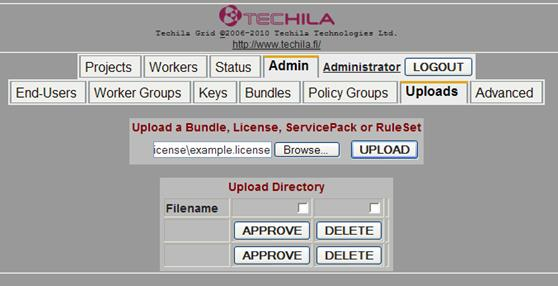 Figure 42. Clicking the
Uploadbutton will transfer the Techila License File to the Techila Server. -
The Techila License File will be listed in the
Upload Directorytable. Tick the checkbox on the row containing the Techila License File and clickAPPROVE.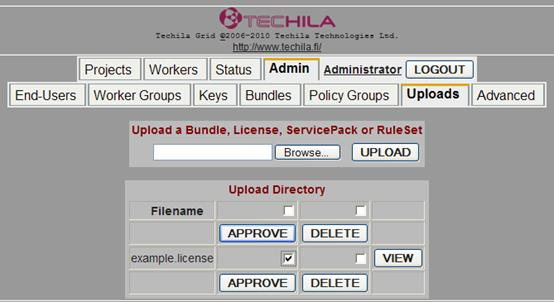 Figure 43. Approving the License File is required in order for the new Techila License take effect.
After clicking
APPROVE, the Techila License will be automatically taken into use. The Validity Period of the new Techila License will be displayed on theStatuspage.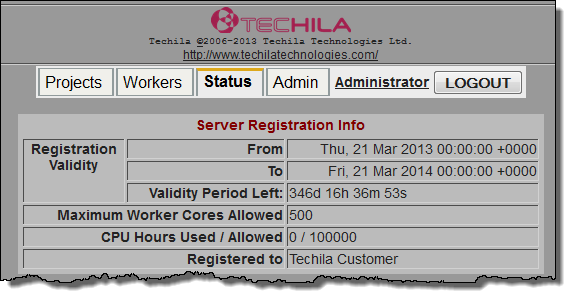 Figure 44. The Validity Period of the Techila License is displayed on the Status page. In this figure, the Techila License is valid for 346 days and allows 500 Techila Worker Cores.
4.6. Creating Runtime Bundles
Language-specific Runtime Bundles (a subset of Library Bundles) are required to perform computations on Techila Workers with different programming languages. Runtime Bundles will be required if End-Users in your TDCE environment use the following programming languages:
-
MATLAB
-
R
-
Python
Information on how to create Runtime Bundles can be found in Bundle Guide.
4.7. Enabling Interconnect
Techila interconnect is an advanced feature, which allows solving parallel workloads in a TDCE environment. In interconnect Projects, Techila interconnect functions can be used to send interconnect data packages from one Job to other Jobs in the same Project.
Using the Techila interconnect feature requires that each Techila Worker that is participating in a Project is able to send interconnect data packages to other Techila Workers in the same Project.
There are two ways on how to configure your TDCE environment to support interconnect Projects.
4.7.1. Automatic Configuration with the Techila Admin CLI
This Chapter contains instructions for adding an End-User to the TDCE system using the Techila Admin CLI.
Note! In order to use the Techila CLI admin commands, you will need to have the Techila SDK available and configured properly. Instructions for configuring and testing the Techila SDK can be found in Techila Command Line Interface for Administrators.
Note! Interconnect network connections between Techila Workers will be established by selecting a random, available port between 1024-65535. If firewalls in your IT environment only allow using a specific port / port range, then you will need to create a suitable Policy Group and Policy Rules to limit the port range on the Techila Workers. Instructions for creating Policy Rules for limiting the port range can be found in Manual Configuration by using the Techila Web Interface. In addition to creating the Policy Rules, you will need to create a Policy Group consisting of these Policy Rules and assign the Policy Group to the desired Techila Workers. These configurations will need to be done before running the Techila CLI admin configureic command.
For more information about other Techila CLI admin commands, please see Techila Command Line Interface for Administrators.
Prerequisites
-
Java installed on the computer you are using
-
Techila SDK configured to use Techila Admin CLI commands
-
Launch a command prompt/terminal and navigate to
<full path>\techila\lib.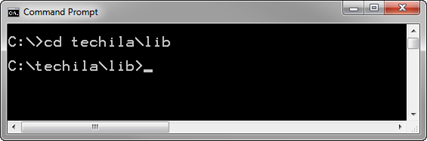 Figure 45. A command prompt window.
 -
Configure the interconnect Techila Worker Groups with the following command:
java -jar techila.jar admin configureic
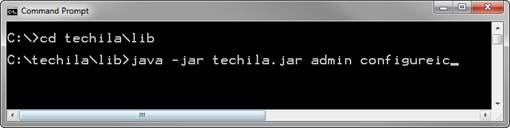 Figure 46. Executing the
configureiccommand. -
After executing the command, the interconnect Techila Worker Groups will be automatically be created and tested. If interconnect Techila Worker Groups were successfully created, the output should resemble the one shown in the screenshot below.
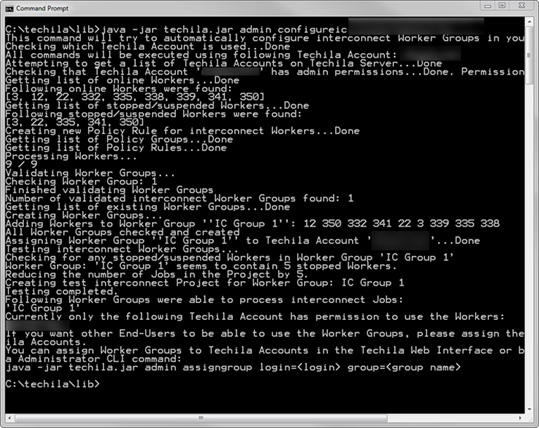 Figure 47. Output generated by the
configureiccommand. -
After executing the command, the interconnect Techila Worker Groups that were created will be assigned to the Techila Web Interface account you used when executing the
configureiccommand.In order for other End-User’s to use these Techila Worker Groups, you will need to assign the Techila Worker Groups to their Techila Web Interface accounts.
You can assign Techila Worker Groups to Techila Web Interface accounts by using one of the methods mentioned below:
-
Assign Techila Worker Groups using the Techila Web Interface. Instructions for this can be found in Assigning Techila Worker Groups to an End-User
-
Assign Techila Worker Groups using the Techila Admin CLI. Instructions for this can be found in Techila Command Line Interface for Administrators.
-
-
Test the functionality of the Techila Worker Group by running one of the interconnect examples that are included in the Techila SDK. Interconnect example material for various programming languages can be found in the following Techila SDK directory:
techila/examples/<programming language>/Interconnect
-
4.7.2. Manual Configuration by using the Techila Web Interface
This Chapter contains instructions on how to create a Techila Worker Group that can be used in interconnect Projects.
-
Login to the Techila Web Interface as a user with administrator permissions.
-
Navigate to
Admin→Worker Groups. Create a Techila Worker Group for the interconnect Techila Workers by filling theGroup NameandDescriptionfields. ClickAddto add the Techila Worker Group.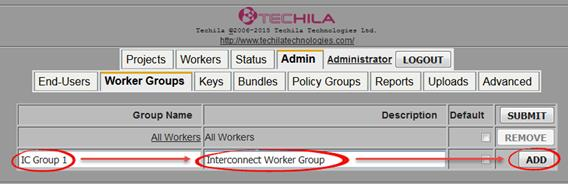 Figure 48. Creating the group.
 -
Click on the name of Techila Worker Group.
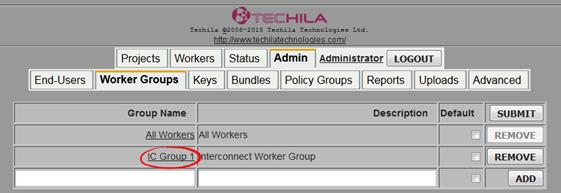 Figure 49. Click on the group.
Note! During interconnect Projects, a network connection will be established between each Techila Worker in the Techila Worker Group. This means that you should only add Techila Workers that can establish a network connection with other Techila Workers in the Techila Worker Group.
The network connection will be established by selecting a random, available port between
1024-65535. If firewalls in your IT environment only allow using a specific port / port range, then there will be an additional configuration step later during the procedure.If no ports are accessible, please choose a suitable port and re-configure your firewall to allow connections to the port before continuing.
-
Scroll down on the page and tick the checkboxes of the Techila Workers you wish to add to the Techila Worker Group. Click
Addto add the Techila Workers. Figure 50. Select and add.
 -
After clicking
Add, the Techila Workers will be visible in theAssigned Workerstable as illustrated below. Figure 51. View after adding.
 -
Click
Admin→Advanced→Policy Rules. Scroll down until you see an emptyDescriptionandCommandsfields.These empty fields can be used to create a new Policy Rule, which will be used to define a list of Techila Worker IDs that will attempt to transfer interconnect packages. Please note that if there is a firewall/other network configuration that is blocking the connection, the Techila Workers will generate errors when they try to process interconnect Jobs.
-
Fill in the
DescriptionandCommandsfields as described below.The value of the
Descriptionfield can be chosen freely. Using a descriptive description is recommended, such as for exampleInterconnection Policy for IC Group 1.The value of the Command field will need to be defined using the following syntax.
framework call fi.techila.grid.comm.oma.client.CommunicationServiceOma setNeighbors <comma separated list of Techila Worker IDs in the Techila Worker Group>
The notation
<comma separated list of Techila Worker IDs in the Techila Worker Group>will need to be replaced with the Techila Worker IDs you added to the Techila Worker Group in the previous step. In the example used in this document, Techila Workers with Techila Worker IDs1and2were added, meaning the following value should be entered to the command field:framework call fi.techila.grid.comm.oma.client.CommunicationServiceOma setNeighbors 1,2
-
After entering the values for the
DescriptionandCommandfields, click theADDbutton to create the Policy Rule.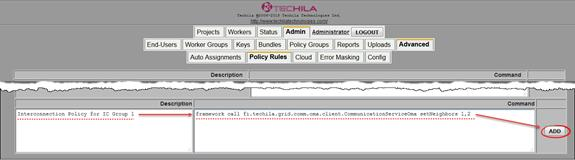 Figure 52. Define the
DescriptionandCommandaccording to the Techila Worker IDs you assigned to the Techila Worker Group. -
Click
Admin→Policy Groups. Create a new Policy Group by entering theGroup Name,DescriptionandPriority.The
Group NameandDescriptioncan be chosen freely. Choosing a descriptive values is recommended. Example values below:Group Name: Policy Rules for IC Group 1
Description: Interconnect policy rules for Worker Group IC Group 1
The Priority value defines the order in which Policy Group Rules are enforced. Larger priority values are given precedent over smaller priority values. In this example, the Priority value 2 can be used.
-
Click
ADDto add the Policy Group.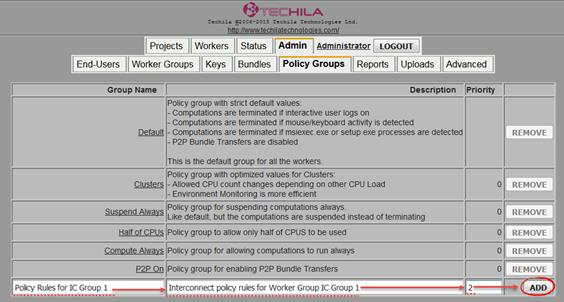 Figure 53. Fill in the details of the Policy Group.
 -
Click on the name of the Policy Group that was created.
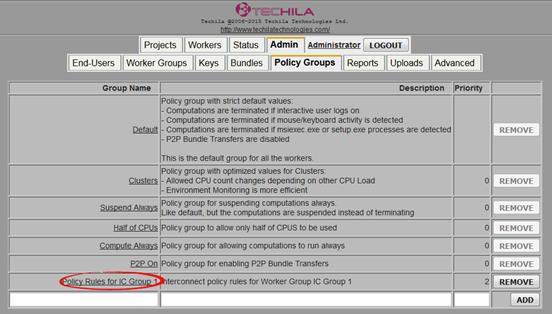 Figure 54. Open the Policy Group settings by clicking on the name.
 -
Click the
Show Rules (Advanced)link to display Policy Rules.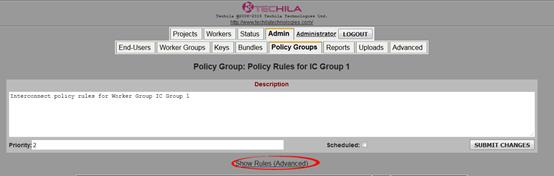 Figure 55. Display the rules by clicking on the link.
 -
Locate the Policy Rule you created earlier and tick the checkbox next to the rule. Click the arrow button to add the Policy Rule to the Policy Group.
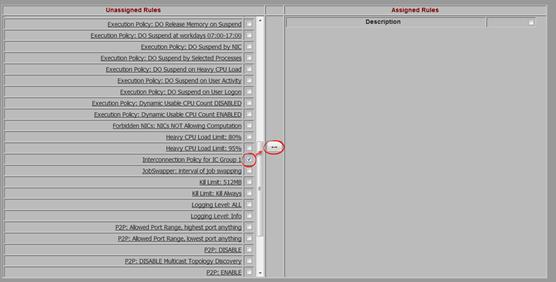 Figure 56. Click the highlighted button to assign the Policy Rule.
 -
After clicking the button, the Policy Rule should be displayed in the
Assigned Rulestable.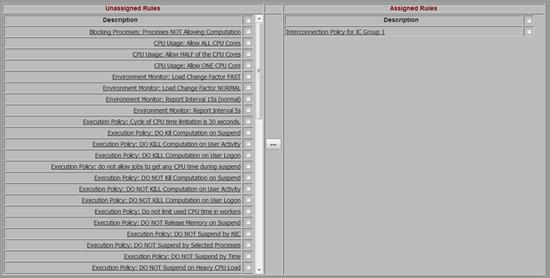 Figure 57. Rules that are active are listed in the Assigned Rules table.
 -
Scroll down until you see a list of Techila Worker Groups. Tick the checkbox next to the Techila Worker Group you created earlier and click the arrow button to assign the Techila Worker Group to the Policy Rule.
 Figure 58. Assign the Techila Worker Group.
 -
After clicking the button, the view should resemble the one shown below.
 Figure 59. The Techila Worker Group should be visible in the
Assigned Worker Groupstable. -
Click
Admin→Worker Groups. Click on the name of the Techila Worker Group you created earlier.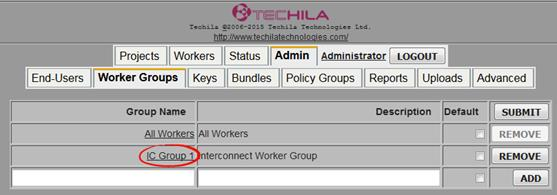 Figure 60. Click on the name of the group.
 -
Click
Admin→Policy Groups. Click the highlighted button to update the Policies to the Techila Workers. Figure 61. Click the highlighted button to update policies to the Techila Workers.
 -
The Techila interconnect feature has now been enabled for the Techila Worker Group you created.
In order for End-Users to use the Techila Worker Group, you will need to assign the Techila Worker Group to their Techila Web Interface account.
You can assign Techila Worker Groups to Techila Web Interface accounts by using the following method mentioned below:
Assign Techila Worker Groups using the Techila Web Interface. Instructions for this can be found in Assigning Techila Worker Groups to an End-User.
It is also recommended that you test the functionality of the Techila Worker Group by running one of the interconnect examples that are included in the Techila SDK.
Note! This step and several of the following steps are only required if firewall configurations in your IT environment are blocking ports between
1024-65535. If all ports between 1024-65535 can be connected to (i.e. they are not blocked by a firewall), please continue from Step 20.Click Admin → Advanced → Policy Rules. Scroll down until you see an empty
DescriptionandCommandsfields. -
Create the following two new policy Rules, which will define the lower and upper bound for the port range.
Policy Rule 1:
The value of the Description field can be chosen freely. Using a descriptive description is recommended, for example
Interconnect Port Range, Lowest Port.The Command field will be used to define the lowest allowed port in the range. The syntax for the command is:
framework call fi.techila.grid.config.handler.common.ConfigurationServiceHandler addConfiguration fi.techila.grid.interconnection.client fi.techila.grid.interconnection.client.portrangelow <Lowest allowed port> int
The <Lowest allowed port> should be replaced with the lowest port you want to use for interconnect. For example, if you wish to use port range 9000-10000 for interconnect, the following command would be defined
framework call fi.techila.grid.config.handler.common.ConfigurationServiceHandler addConfiguration fi.techila.grid.interconnection.client fi.techila.grid.interconnection.client.portrangelow 9000 int
Click the ADD button to create the rule.
Policy Rule 2:
The value of the Description field can be chosen freely. Using a descriptive description is recommended, for example
Interconnect Port Range, Highest Port.The Command field will be used to define the highest allowed port in the range. The syntax for the command is:
framework call fi.techila.grid.config.handler.common.ConfigurationServiceHandler addConfiguration fi.techila.grid.interconnection.client fi.techila.grid.interconnection.client.portrangehigh <Highest allowed port> int
The <Highest allowed port> should be replaced with the highest port you want to use for interconnect. For example, if you wish to use port range 9000-10000 for interconnect, the following command would be defined:
framework call fi.techila.grid.config.handler.common.ConfigurationServiceHandler addConfiguration fi.techila.grid.interconnection.client fi.techila.grid.interconnection.client.portrangehigh 10000 int
-
Click the
ADDbutton to create the rule.After creating the rules, you should be able to seem them in the list as illustrated below.
 Figure 62. Policy Rules defining a range for interconnect ports.
 -
Click
Admin→Policy Groups. Click on the name of the Policy Group that was created earlier.
Figure 63. Click on the name of the Policy Group. -
Click the
Show Ruleslink to display Policy Rules.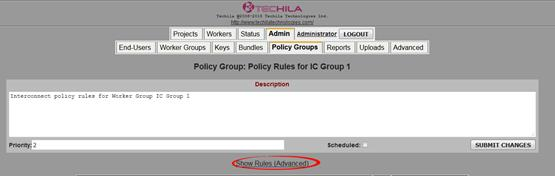 Figure 64. Click the highlighted link.
 -
Tick the checkboxes for the interconnect rules you created and click the arrow button to add the rules.
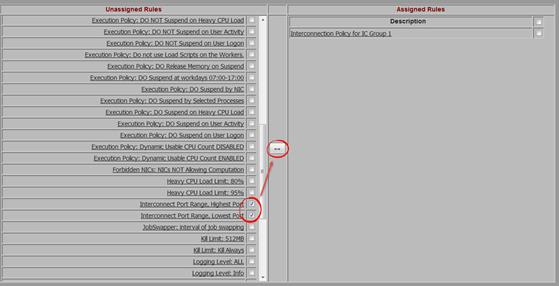 Figure 65. Assign the Policy Rules to the Policy Group.
 -
After clicking the button, the rules should be visible in the
Assigned Rulestable as illustrated below.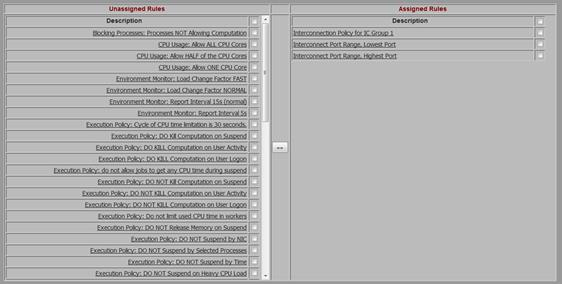 Figure 66. Assigned Policy Rules will be visible in the Assigned Rules table.
 -
Click
Admin→Policy Groups. Click the highlighted button to update the Policies to the Techila Workers.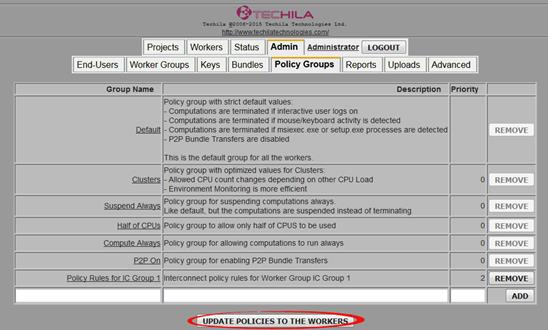 Figure 67. Click the highlighted button to update policies to the Techila Workers.
 -
The Techila interconnect feature has now been enabled for the Techila Worker Group you created. The Techila Worker Group is also configured to use the reduced port range that was defined using the additional Policy Rules.
Test the interconnect functionality of the Techila Worker Group by running one of the interconnect examples that are included in the Techila SDK. Interconnect example material for several programming languages can be found in the following Techila SDK directory:
techila/examples/<programming language>/Interconnect
4.8. Global Semaphores
Semaphores can be used to limit the number of simultaneous operations e.g. when accessing shared data resources. Global semaphores can only be created by Techila Administrators and can be used to create a limit, which will apply to all Projects in the TDCE environment. This is different from Project-specific semaphores, which are created by End-Users and will only apply to a specific Project. Project-specific semaphores will only be visible for the duration of the Project. After the Project has been completed, the Project-specific semaphore will be automatically removed.
The screenshot below illustrates a situation, where two global semaphores have been created. The semaphore dbprod can only be reserved for a maximum of 3600 seconds before it will be automatically released. A maximum number of five dbprod tokens can be reserved at any given time.
The semaphore dbtest never expires, meaning it can be reserved for an indefinite amount of time. Only one dbtest token can be reserved at any given time.
Please see the following Chapters for instructions how to create, modify and remove global semaphores:
More general information about semaphores can be found in Introduction to Techila Distributed Computing Engine.

Semaphores tab.4.9. Active Directory Configuration
This Chapter contains instructions on how to create an Active Directory (AD) account for the Techila Worker Processes. Creating an AD account for the Techila Workers processes is required if you wish to use AD impersonation to run applications under the End-User`s own AD user account on the Techila Worker.
Please note that the screenshots in this Chapter are from Windows Server 2012. If you are using a different version, the described configuration steps and appearance of screens might differ.
4.9.1. Creating an Active Directory Account for the Techila Worker
This Chapter contains instructions on how to create an AD account for the Techila Worker software. This will allow you to use the AD account to run the Techila Worker processes.
The following settings will need to be configured for the AD account:
-
Deny log on locally
-
Log on as service
-
Password never expires
-
User cannot change password
Additionally, depending on your user account management practices, the following optional settings can be configured to impose more strict limits for the account:
-
Deny log on through Remote Desktop Services
-
Deny access to this computer from the network
In order to use the AD account to run the Techila Worker software, you will need to define the name of the AD account and domain when installing the Techila Worker software. Instructions for specifying which user account should be used to run the Techila Worker processes can be found in Techila Worker Installation Guide Windows.
Steps for creating the AD account:
-
Log in to your AD domain server as a user with administrator privileges
-
Launch the
Active Directory Users and ComputersMicrosoft Management Console (MMC). -
Click <Your Domain> →
Users. Create a new user by clicking on the highlighted icon.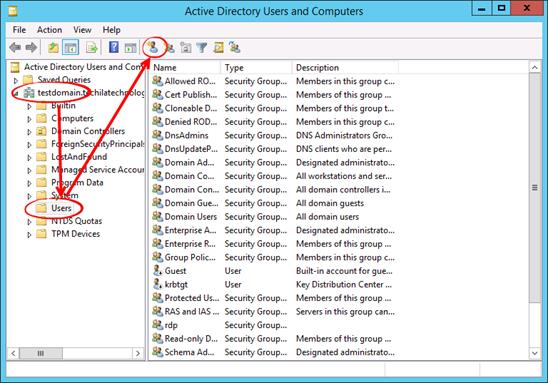 Figure 69. Start creating a new user.
 -
Define a suitable name to the Techila Worker AD account by filling in the details. Click
Nextto continue.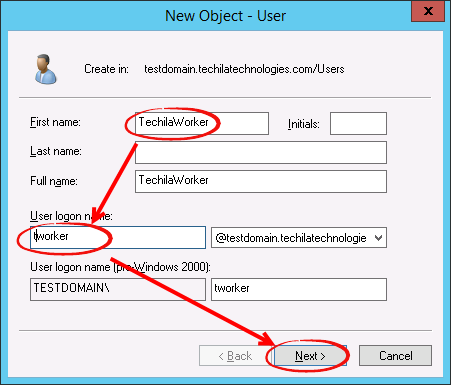 Figure 70. Define the naming properties of the Techila Worker software account.
 -
Define a password. Tick the following checkboxes:
-
User cannot change password
-
Password never expires
 Figure 71. After defining a password, remember to tick the highlighted checkboxes to prevent password expiration issues.
-
-
Click
Finishto create the user.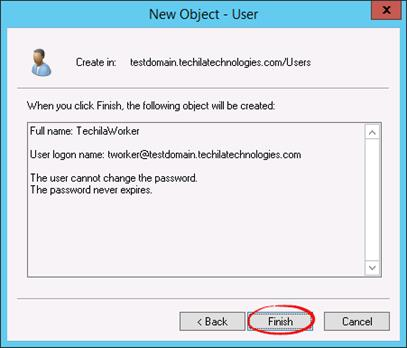 Figure 72. Finalize the settings.
 -
Close the current MMC.
-
Open the
Group Policy Management MMC. -
Navigate to
Domains→<Your domain>. Right click onDefault Domain Policyand clickEdit….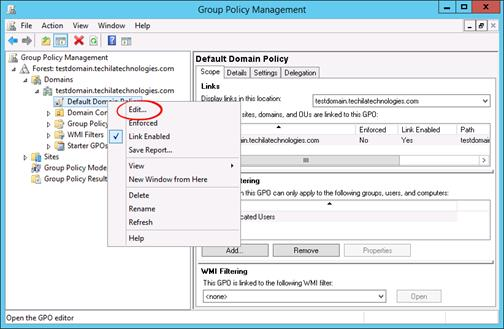 Figure 73. Choose Edit.. to display the Group Policy Management Editor.
 -
Navigate to
Computer Configuration→Policies→Windows Settings→Security Settings→Local Policies→User Rights Assignment. Right-click onLog on as a serviceand selectProperties.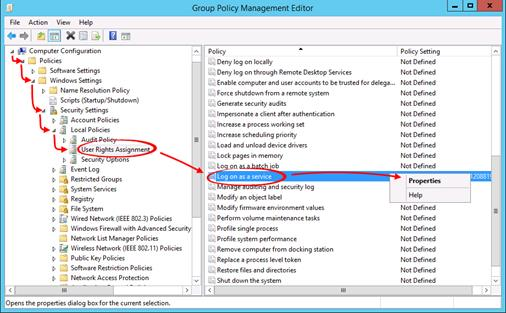 Figure 74. The Techila Worker user account needs permission to log on as a service.
 -
Click the
Add User or Groupbutton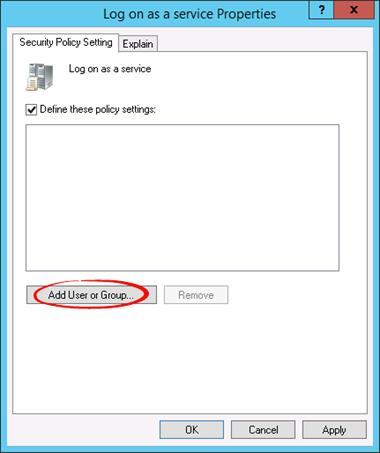 Figure 75. Adding a user account to the list.
 -
Define the user that you created earlier during this procedure and click the
OKbutton.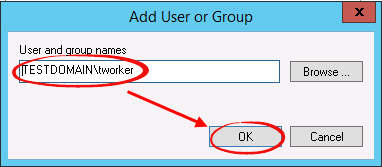 Figure 76. Replace the domain\name with values applicable to your AD environment.
 -
Click
Apply.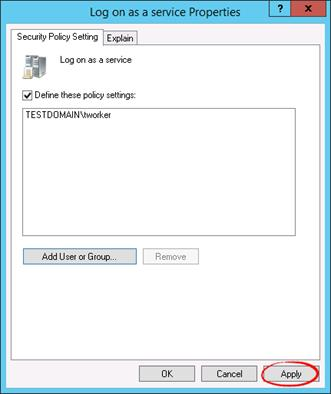 Figure 77. Apply the new settings.
 -
Click
OK. Figure 78. Click OK to close the window.
 -
Right click on
Deny log on locallyand selectProperties….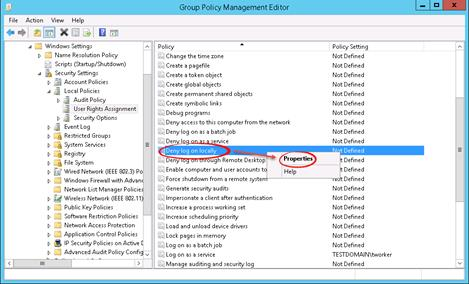 Figure 79. The Techila Worker user account should not have permission to log on locally.
 -
Tick the
Define these policy settingscheckbox and click theAdd User or Group…button.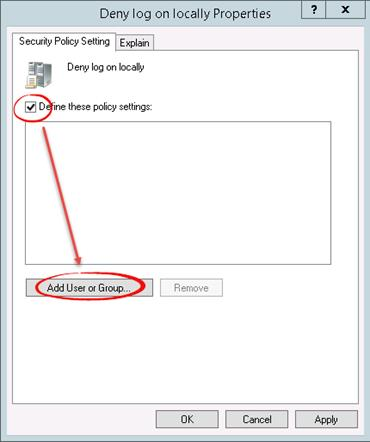 Figure 80. Add the Techila Worker user account to the list.
 -
Enter the name of AD user you created and click
OK.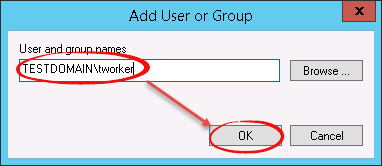 Figure 81. Replace the highlighted domain\user values with values applicable to your AD environment.
 -
Click
Apply.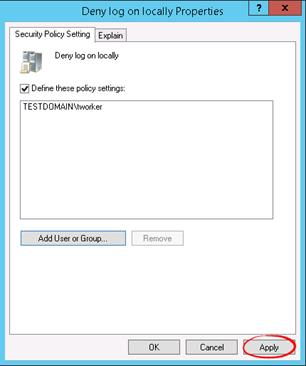 Figure 82. Apply the changes.
 -
Click
OK.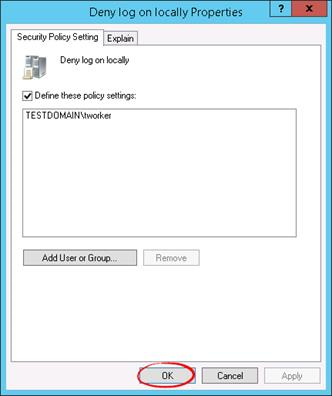 Figure 83. Close the window by clicking OK.
 -
Optional: Configure the following additional settings:
-
Deny log on through Remote Desktop Services
-
Deny access to this computer from the network
-
-
Close the MMC.
The AD account for the Techila Worker software has now been created.
4.9.2. Enabling Active Directory Impersonation
Active Directory (AD) impersonation allows the Techila Worker process to have similar access permissions as the End-User’s own AD account. In order for AD impersonation to be used, the following conditions will need to be fulfilled:
-
Techila Worker processes must be running under an AD account with necessary configurations
-
The End-User must define a Project parameter to enable AD impersonation
This Chapter contains instructions on how to configure an AD account so that it supports AD impersonation.
If you have not created an AD account for the Techila Worker, please see instructions in Creating an Active Directory Account for the Techila Worker before continuing.
-
Log in to your AD domain server as a user with administrator privileges
-
Launch the
Active Directory Users and ComputersMicrosoft Management Console (MMC). -
Open the
Viewdropdown menu and click onAdvanced Features.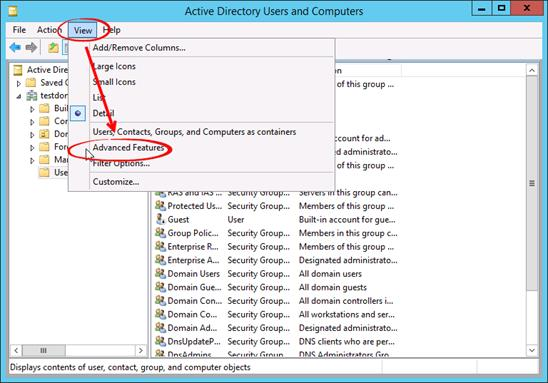 Figure 84. Display advanced features by selecting it from the dropdown menu.
 -
Right click on the user and select
Properties. Figure 85. Display the properties of the Techila Worker user account.
 -
Select the Attribute Editor tab, select servicePrincipalName and click the Edit button.
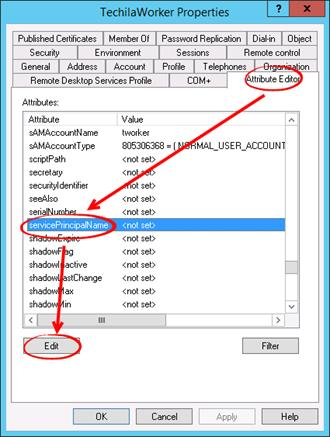 Figure 86. Define a
servicePrincipalNamefor the user account. -
Enter value TW\techila in the
Value to addtext field and click the Add button.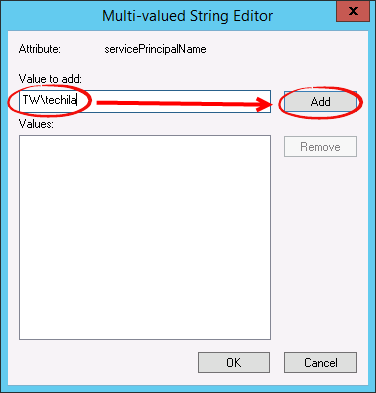 Figure 87. Define and add the value
TW\techilato the list. -
The value should now be visible in the
Valuefield. Click theOKbutton to continue.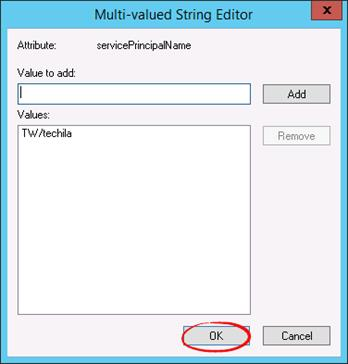 Figure 88. Click OK to close the window.
 -
Click Apply.
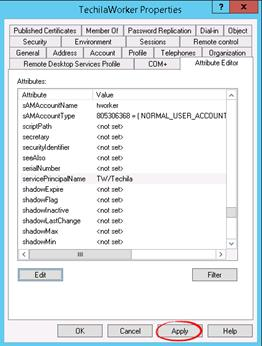 Figure 89. Apply the changes.
 -
Next, click
OKto close the window. This is needed to ensure that theDelegationtab will displayed correctly.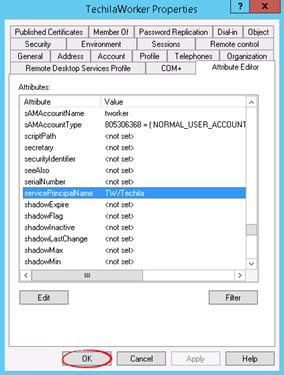 Figure 90. At this point, the Delegation tab might not be visible. Click OK to close the window.
 -
Using the right-click menu, choose
Propertiesto re-open thePropertiespage. Figure 91. Re-open the Properties view.
 -
Select the
Delegationtab (which should now be visible), selectTrust this user for delegation to any service (Kerberos only)and click theApplybutton.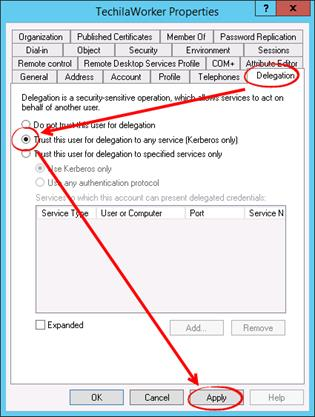 Figure 92. Enable delegation for the Techila Worker user account.
 -
Click the
OKbutton.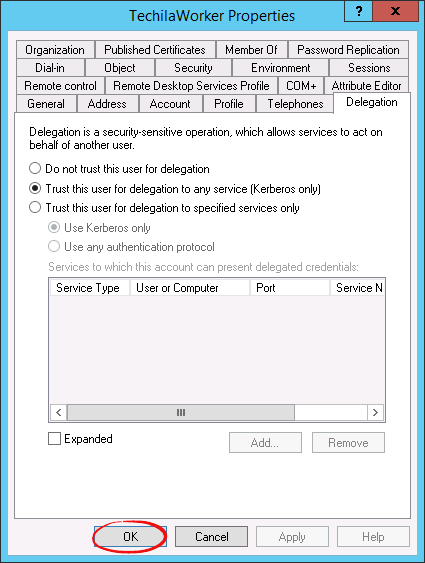 Figure 93. Click OK to close the window.
 -
Close the MMC.
The AD account for the Techila Worker software has now been configured. AD impersonation can now be used on Techila Workers that are using the AD account to run the Techila Worker processes.
5. Techila Web Interface
This Chapter contains an introduction to the Techila Web Interface concepts and navigation and provides more detailed information about the pages available in the Techila Web Interface.
More information about the administrator section can be found in Admin.
5.1. Menu Bar and Navigation
Techila Web Interface has a Menu Bar, which can be used for navigation between Techila Web Interface pages. The Menu Bar can be found on the top of all Techila Web Interface pages. After logging in to the Techila Web Interface as an administrator, you will see the Menu Bar on the top of the page as illustrated in figure below.
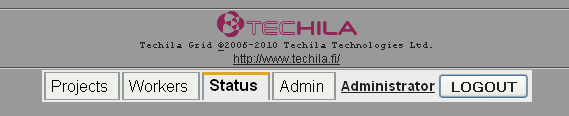
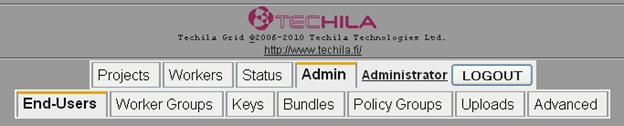
The Menu Bar contains the following menu items:
-
Projects - Contains detailed lists of Projects.
-
Workers - Shows lists of active and inactive Techila Workers.
-
Status - Shows overall system status and the load graph.
-
Admin - Displays the Administrator section of the Techila Web Interface
-
User Name - Opens a new page that can be used to change Techila settings for your account
Some of these menu items are further divided into sub-menus as illustrated in the figure below.
5.2. Links
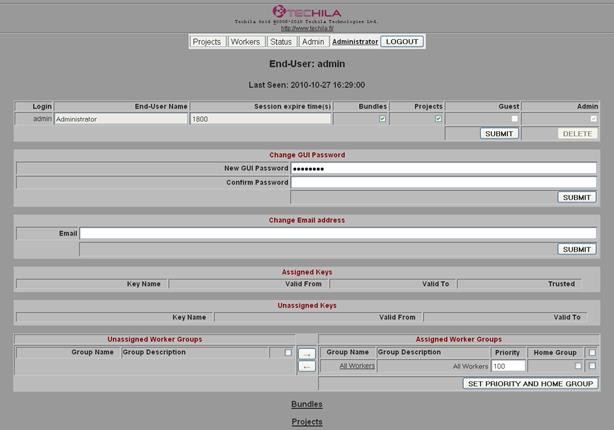
Each underlined item in the Web Interface is a link. For example, clicking on your End-User name in the Menu Bar will display your settings as shown in the figure below. Note that the appearance of the page can vary, depending on your settings.
5.3. Tables
Several pages in the Techila Web Interface contain different tables. The tables can be sorted by clicking any of the column headings. Clicking once sorts the data in descending order, and clicking again sorts the data in ascending order.
The image below illustrates a table that is sorted in a descending order according to Project ID (PID).

5.4. Automatic Refresh
On Project-related pages, the page is automatically refreshed at intervals. If you wish to turn off the automatic refresh on these pages, click the STOP REFRESH button.

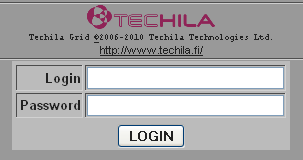
5.5. Login Page
The Login page authenticates the End-User. In order to have administrative access, you need to login as an administrator. The default administrator account is created during the installation; additional administrator accounts can be created via the End-Users page.
Login page.After a successful login, the view is changed to the Status page. If the URL address given to the browser is not the root URL or the URL of the Status page, the view is redirected to the corresponding address.
In the case of erroneous login (wrong username or password), or if any communication problems occur, a corresponding error message is shown above the input fields.
5.6. Status Page
By default, the Status page is the first page you see after a successful login. The Menu Bar in the top of the page can be used to navigate to the other available pages.
The Status page shows you the basic information about the Techila Server and the TDCE environment. It shows the total number of the Techila Workers, and number of online active, suspended or offline Techila Workers. The page also shows a graphical representation of the system load.
The Server Registration Info table contains information Techila Licence. The Validity Period Left informs how long the license is valid. During the validity period, the full amount of cores in the licence can be used. After the license expires, the TDCE system will default to zero (0) or five (5) cores (depending on the Techila Server version you are using) until the Techila Licence is renewed.
The Maximum Worker Cores Allowed entry determines how the maximum number of Techila Worker cores that can be assigned Jobs when computing a computational Projects. This number is determined by your Techila Licence. If the number of Techila Worker Cores in your TDCE environment exceeds the Maximum Worker Cores Allowed value, the fastest available Techila Worker Cores will be automatically used. This means that the Techila Worker software can be installed on new Techila Workers, even if the amount of Maximum Worker Cores Allowed is exceeded.
The CPU Hours Used / Allowed entry displays information how many CPU hours are still available in your Techila License. If the Techila License used in your environment does not have a CPU Hour limit, the value Infinite will be displayed.
The Worker Keys table contains information on how many Techila Worker Keys are currently in TDCE system. When adding new Techila Workers to the TDCE system, the Techila Worker Keys of the newly added Techila Workers will be listed in the Untrusted column. The heading of the Techila Worker Keys table is also a link, which can be used to access the Worker Keys page, where the state of the Techila Worker Keys can be modified.
The Server Statistics table contains information on the uptime and disk space usage of the Techila Server. The Disk Space on Bundle Drive entry shows the amount of total and free hard disk space on the hard disk used to store the Bundles. The Disk Usage entry shows how much disk space is consumed by Bundles and Projects.
The Project Statistics - Computed Projects table displays information how much CPU time has been used in computational Jobs. The column labelled Useful displays the amount of CPU time used in computational Jobs that have been completed successfully. The column labelled Total displays the total amount of CPU time used in the TDCE environment. This includes CPU time used in Jobs that were restarted on another Techila Worker and Jobs that failed to complete successfully due to an error in the computational code.
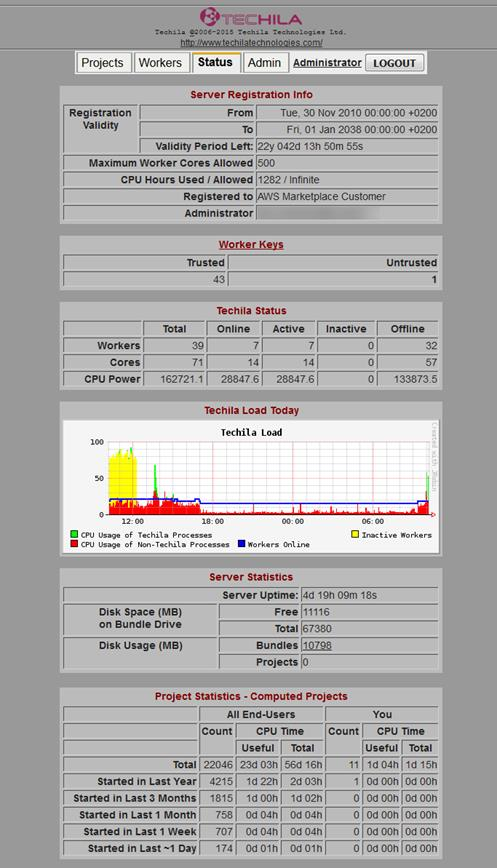
Status page of the Techila Web InterfaceThe Techila Load Today, as shown in the figure above, gives you information on:
-
Percentage of Techila Workers online (the blue line).
-
Percentage of the CPU power used for the TDCE computations (green area)
-
Percentage of the CPU power used for other purposes, i.e. normal daily use of the Techila Worker computers (red area)
-
Percentage of Techila Workers suspended (yellow area)
5.7. Project Pages
The Projects menu item is divided into the following items:
-
Active
-
Finished
When clicking on the Projects menu item, you will be automatically forwarded to the Active Projects page. The Finished menu item is further divided into following pages:
-
CompletedProjects page shows Projects that have been completed, but the results have not been downloaded. -
DownloadedProjects page shows Projects that have been completed and the results downloaded. -
RemovedProjects page show Projects that have been removed
All these pages allow turning off the automatic refresh of the page, by clicking STOP REFRESH button.
Tasks related to the Project pages include:
5.7.1. Active Projects Page
The Active Projects page shows Projects that have been created, but have not yet been finished.
The Active Projects table will display the real time used for the computations in the Time Used column. The accumulated CPU time will be displayed in the CPU Time Used column. After sufficient statistical information has been accumulated to provide a reliable estimate, the ETA column will display the estimated time of arrival of the Project.
Tasks related to the Active Projects page:
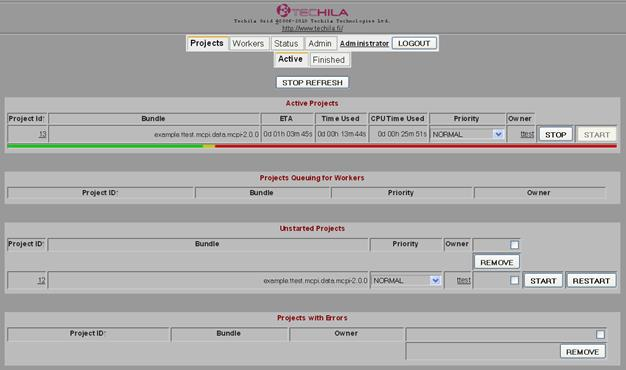
Active Projects page. This page displays information about currently active Project. Projects not being computed are listed in the corresponding table.This page also contains information on Projects that have been created, but are not currently being computed. Typical reasons that might prevent Jobs from being assigned to Techila Workers include:
-
No suitable Techila Workers are currently available. These Projects are listed in Projects Queuing for Workers Table
-
Project has been created, but has not been started. These Projects are listed in Unstarted Projects table
-
The Project contains too many errors. Projects that have been cancelled are listed in Projects with Errors table.
5.7.2. Completed Projects Page
The Completed Projects page contains a list of computational Projects that were completed successfully, but the results weren’t downloaded. Project Results can be downloaded by clicking the DOWNLOAD link in the Download column as illustrated in the figure below. After clicking on a link, you will be prompted to save or open a ZIP file containing the results.
Tasks related to the Completed Projects page include:
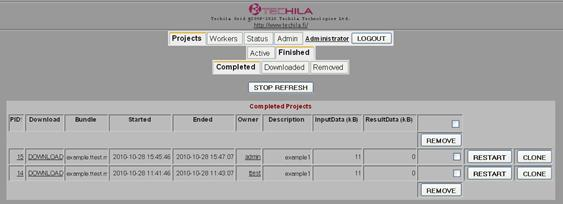
Completed Projects page. Projects which have been completed, but the results were not downloaded can be found here. These Projects have not been removed, meaning they can be restarted or cloned. Project results can also be downloaded by clicking on the DOWNLOAD link in the Download column on the row containing the correct Project ID (PID) number.5.7.3. Downloaded Projects Page
The Downloaded Projects page contains a list of computational Projects that have been completed successfully and results have been downloaded. This page enables you to clone a Project, download results or to remove a Project. Removing a Project will place them in Removed Projects.
The procedures for the tasks related to this page can be found in the following Chapters:
The Active Workers and Inactive Workers tables also contain the following information on the Techila Workers:
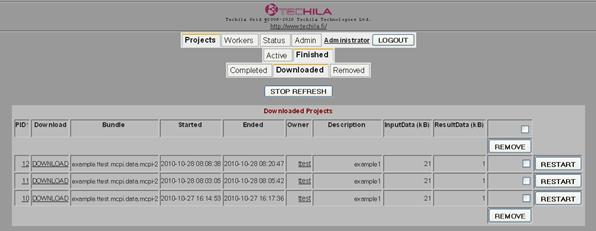
5.7.4. Removed Projects Page
The Removed Projects page contains a list of computational Projects that have been removed. Removed Projects cannot be restarted.
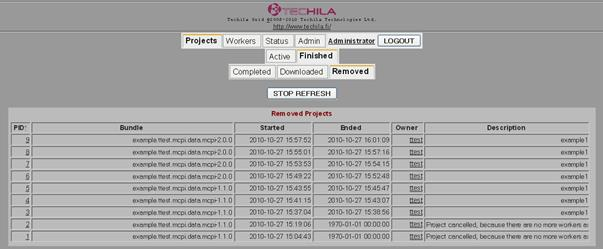
5.7.5. Project ID Page
By clicking the Project ID number on any of the Projects pages, you will get access to more detailed information on the Project. The Project ID page shows more detailed information on the Jobs of the Project and information about the Techila Workers that participate in the computations. After the Project is completed, this page can also be used to download the Project results by clicking on the DOWNLOAD button, which will be displayed under the Project ID number after the Project has been completed.
This page can also be used to stop, start, restart or clone the Project.
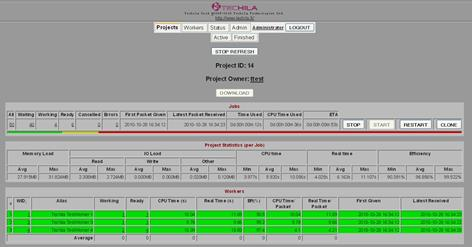
Project ID page. The upper part of this page displays more detailed Project related information and statistics.The following table describes the columns of the Jobs table shown in the above figure.
| Column | Description |
|---|---|
All |
Number of Jobs in the Project |
Waiting |
Number of Jobs not yet executed. Links to a list of waiting Jobs. |
Working |
Number of Jobs currently being computed on Techila Workers. Links to a list of Jobs being computed. |
Ready |
Number of Jobs completed. Links to a list of ready Jobs. |
Cancelled |
Number of Jobs cancelled. Links to a list of cancelled Jobs. |
Errors |
Number of errors that have occurred during the Project. Links to a list of erroneous Jobs. |
First Packet Given |
Timestamp of the first Job deployed to the execution |
Latest Packet Received |
Timestamp of the latest result received from the Techila Workers |
Time Used |
During the Project execution this displays the wall clock time from the deployment of the first packet to the current moment. After the execution, the time used for the Project is displayed. |
CPU Time Used |
Sum of the CPU time the Techila Workers have used for the Project execution |
ETA |
Estimated time to Project completion |
The following table describes the columns of the Project Statistics (per Job) table in the above figure.
| Column | Description |
|---|---|
Memory Load |
Amount of physical memory consumed by a Job. Contains the average value and the maximum amount of required memory. |
IO Load |
Amount of Input/Output activity occurring during a Job. Read - The amount of data read from the hard drive by a single Job. Write - The amount of data written to the hard drive by a single Job. Other - The amount of I/O operations that do not involve data such as control operations. |
CPU Time |
Amount of CPU time required by a single Job. Contains the minimum, average and maximum values. |
Real Time |
Amount of wall clock time required by a single Job. Contains the minimum, average and maximum values. |
Efficiency |
The efficiency of a single Job. (CPU time per Real Time). Contains the minimum, average and maximum values. |
The following table describes the columns of the Workers table in the above image.
| Column | Description |
|---|---|
WID |
Techila Worker ID |
Alias |
Alternative name of the Techila Worker. |
Working |
Number of Jobs being computed on the Techila Worker |
Ready |
Number of Jobs completed by the Techila Worker |
CPU Time |
Sum of the CPU time used for the completed Jobs |
Real Time |
Sum of the real time used for the completed Jobs |
Eff% |
Efficiency of the Techila Worker (CPU Time per Real Time) |
CPU Time / packet |
Average CPU time used for each of the Jobs |
Real Time / packet |
Average real time used for each of the Jobs |
First Given |
Timestamp when the Job was allocated to the Techila Worker |
Latest Received |
Timestamp of the latest result received from the Techila Worker |
The Project Description table shows the Description of the Project. The Project Description can be modified by entering a new Description and clicking the SUBMIT button below the table. The Project Parameters table will contain a list of input parameters for the executable code as well as parameters that control the distribution process of the Project.
The Bundle Description table displays the Description of the first Bundle that is transferred to the Techila Workers. When a Project is created with the peach-function, the Bundle Description table will display the Description of the parameter Bundle. When the peach-function is not used, the Description of the data Bundle will be displayed. The Bundle Parameters table will display information of the bundle parameters.
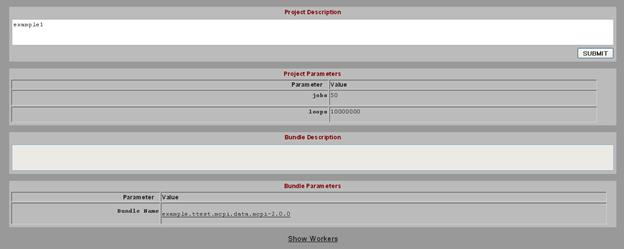
Project ID page display information on Project and Bundle Descriptions as well as applicable parameters.Clicking on the Show Workers link located at the bottom of the Project ID page will display information on Techila Workers participating in the Project. After clicking on the link, two tables will be displayed as illustrated below in the figure below. Activated Workers table lists Techila Workers that can be assigned Jobs belonging to the Project. The Inactivated Workers respectively displays Techila Workers that will not be assigned Jobs. Techila Workers can be added and removed from a Project by using the Add and Remove buttons in the Activated Workers and Inactivated Workers tables.
Project ID page will list Workers that can be assigned Jobs belonging to the Project. Inactivated Workers table includes a list of Workers that have been excluded from the Project. A Worker can be excluded e.g. because of an error that occurred during computations.The following table describes the columns of the Activated/Inactivated Workers table.
| Column | Description |
|---|---|
WID |
Techila Worker ID |
Alias |
Optional name for the Techila Worker |
OS |
Operating system of the Techila Worker |
MEM |
Amount of physical memory in the Techila Worker |
BM |
Benchmark result of the Techila Worker |
Last seen |
Timestamp when the Techila Worker was seen in the TDCE environment |
5.7.6. Job List Page
The Job List page can be accessed by clicking on the links in the All, Waiting, Working, Ready, Cancelled columns in the Jobs table in the Project ID page. Job Lists are generated based on status of the Jobs. The states include All, Waiting, Working, Ready, Cancelled. Clicking on the number in the Errors column will display all Jobs that contain errors. This page can also be used to restart individual Jobs by ticking the checkbox and clicking the RESTART button.
The Job List page can also be used to get more detailed information about a Job by clicking on the Job ID number of the Job you wish to examine.
The following table describes the columns on this page:
| Column | Description |
|---|---|
Job Id |
The Job Id number of the Job. Each Job in the computational Project will have a unique number. |
Status |
Status of the Job |
Errors |
The number of the errors that have occurred during the execution of the Job. Each error will result in the Job being restarted on a new Techila Worker. |
Retries |
Times the Job has been resubmitted to a new Techila Worker. |
Worker ID |
Techila Worker ID number of the Techila Worker computing the Job |
Alias |
Optional name of the Techila Worker |
CPU Time |
CPU time in seconds used to compute the Job |
Real Time |
Real time in seconds used to compute the Job |
Efficiency% |
Efficiency of the computation of the Job (CPU Time per Real Time) |
Given |
Timestamp when the Job was given to the Techila Worker |
Ended |
Timestamp when the result was received from the Techila Worker |
5.7.7. Job Information Page
The Job Information page displays detailed information regarding a Job. This page can be accessed by clicking on the Job ID number of a Job in any of the applicable pages.
This page also contains information of snapshots created during the Job. Snapshots are files that contain intermediate results of the computations. These files are uploaded to the Techila Server at regular intervals. The time figures enclosed in parentheses show information on how much CPU and Real Time had been used when the Snapshot was generated. The times in the Snapshot column indicate when the latest Snapshot was transferred to the Techila Server from the Techila Worker.
The Input Data table contains information of the input parameters of the Job. Note that only input parameters that are defined as Project parameters will be displayed here, parameters transferred using a Parameter Bundle will not be displayed.
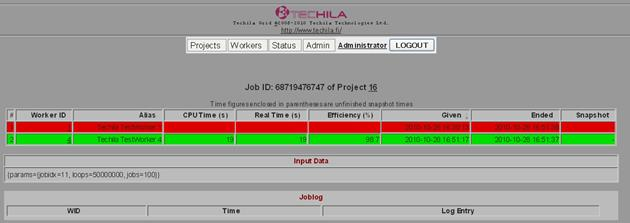
The Joblog table will be displayed if errors were generated during the Job. The Log Entry column in the Joblog table will contain error messages that were generated during the Job. The Time column will contain the time stamp of the error message.
5.7.8. Worker Pages
The pages under the Workers menu item list the Techila Workers in the TDCE environment. By clicking on Active or Inactive menu items, the list can be limited to display either Active or Inactive Workers.
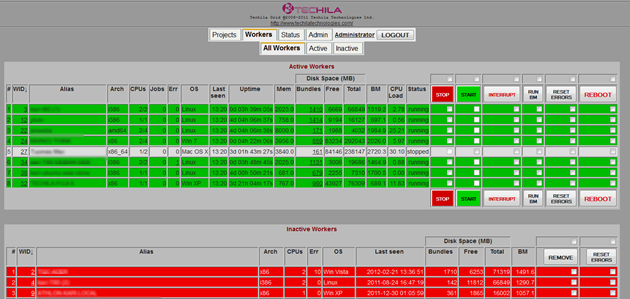
In the All Workers page, you can perform the following activities:
-
Stop Techila Workers by clicking the Stop button. This prevents the Techila Workers from accepting new computational Jobs.
-
Start Techila Workers by clicking the Start button. This action will cause Techila Workers to resume computations on a stopped Techila Worker.
-
Interrupt Techila Workers by clicking the Interrupt button. This action will interrupt all active computational Jobs and stops the Techila Worker.
-
Benchmark selected Techila Workers by clicking the Run BM button. This action will perform a Benchmark test on the Techila Worker. If the result of the new Benchmark test is higher than any previous Benchmarks, the new Benchmark result will be assigned to the Techila Worker.
-
Reset error counter for selected Techila Workers by clicking the Reset Errors button.
-
Reboot the Techila Worker process by clicking the Reboot button. Does not reboot the operating system.
-
Remove an inactive Techila Worker with the Remove button. Removing a Techila Worker will remove it from the Inactive Techila Workers list.
Tasks related to the Workers page include:
The Active Workers and Inactive Workers tables also contain the following information on the Techila Workers:
| Column | Description |
|---|---|
WID |
The Techila Worker ID |
Alias |
The alternative name of the Techila Worker |
Arch |
The CPU Architecture of the Techila Worker |
CPUs |
The number of the CPU cores in the Techila Worker |
Jobs |
The number of the Jobs currently under execution |
Err |
The number of erroneous Jobs occurred |
OS |
The name of the operating system |
Last Seen |
The timestamp when the Techila Worker has last time seen in the TDCE network |
Uptime |
The time the Techila Worker has been in the TDCE network without over 5 minutes offline time |
Mem |
The amount of physical memory of the Techila Worker |
Bundles |
The amount of hard disk space used by bundles. |
Free |
Amount of available hard disk space on the Techila Worker (in Megabytes) |
Total |
Total amount of hard disk space in the installation partition (in Megabytes) |
BM |
The benchmark result of the Techila Worker. |
CPULoad |
The current load (excluding the load of the TDCE computation) of the Techila Worker |
Status |
The status of the Techila Worker (running/stopped/suspended) |
5.7.9. Worker Details Page
You can get a more detailed view of a Techila Worker by clicking the Worker ID number in the WID column. The detailed view enables the changing of the Techila Worker Alias and shows history of the Techila Worker’s CPU load and memory usage. The control buttons at the top of the page can be used to stop, pause, start, or interrupt this individual Techila Worker.
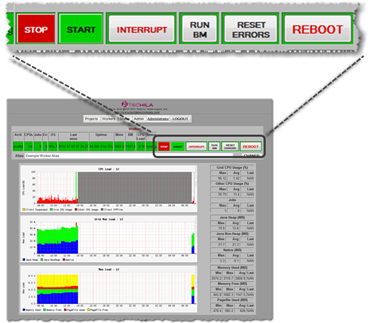
This page also contains tables displaying which Techila Worker Groups and Policy Groups the Techila Worker is currently assigned to. Techila Workers can also be assigned (and removed) to groups by using the buttons shown in the figure below.
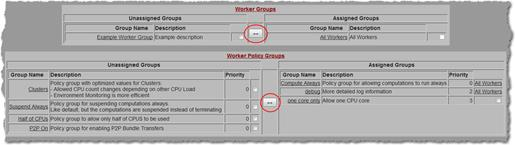
Log information that has been generated by the Techila Worker can be viewed by clicking on the Worker Logs link located at the bottom of the page.
The full view of the page displaying Techila Worker details is shown below for reference.

6. Admin
This Chapter contains a description of the pages found under the Admin menu item:
6.1. End-Users
The End-Users view contains a collection of pages that can be used to manage Techila Distributed Computing Engine End-Users, allowing you to specify End-User quotas, delete End-User accounts and to control which Worker Groups are accessible to each End-User.
6.1.1. End-User List
The End-Users List page shows the basic information of End-Users. The End-Users table lists all End-Users of the Techila Web Interface. The Permissions columns display permissions associated with each individual End-User.
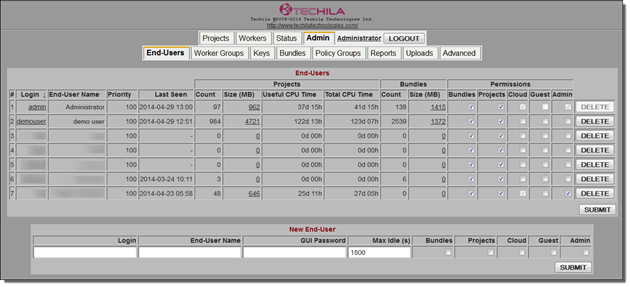
Tasks related to this page:
The following table describes the columns of the End-Users table.
| Column | Description |
|---|---|
Login |
The login name of the End-User. |
End-User Name |
The name of the End-User |
Priority |
End-Users priority value. Small values mean important users; higher values mean less important users. Minimum recommended value to be used is 0. User priority values have a small effect on which End-User’s Projects will be given computing power by the TDCE scheduler. Value can be modified in the |
Last Seen |
Time when the End-User was last seen in the Techila Web Interface |
Count |
The number of computed Projects created by the End-User |
Size |
Amount of disk space consumed by the End-Users Projects on the Techila Server |
CPU Time |
Amount of CPU time used in the End-Users Projects. |
Count |
The number of Bundles created by the End-User |
Size(MB) |
Amount of disk space used by the End-Users Bundles |
Bundles |
Gives permission to upload Bundles. |
Projects |
Gives permission to create Projects |
Cloud |
Gives permission to deploy Techila Workers in Amazon EC2 and Google Compute Engine |
Guest |
Gives the End-User Guest status. |
Admin |
Gives the End-User Administrator status |
6.1.2. End-User Settings Page
The End-User Settings page can be viewed by clicking the login of the End-User in the Login column. The End-User settings page (see figure below) can be used to modify settings for the End-User. Operations performed on this page include:
-
Modifying the permissions of the End-User (described in Changing End-User Permissions)
-
Assigning Techila Worker Groups to the End-User (described in Assigning Techila Worker Groups to an End-User)
-
Changing the Techila Web Interface password of the End-User
-
Changing End-User Priority
Information of the Bundles and Projects created by the End-User can be accessed by clicking the Bundles and Projects links at the end of the page.
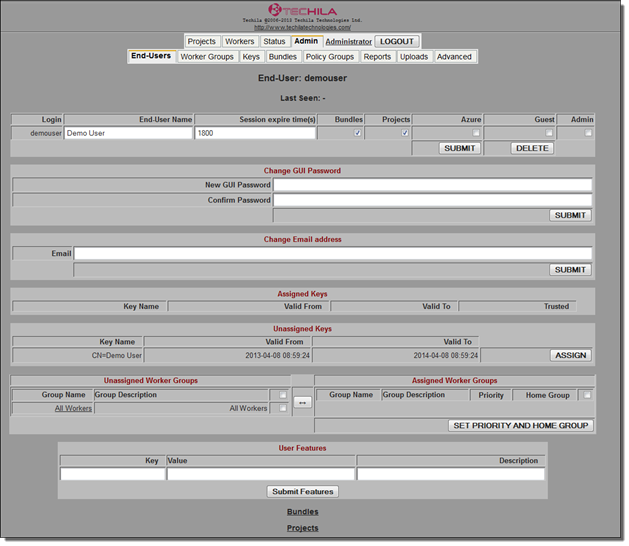
End-User Settings page can be used to modify End-User’s settings and configure the End-Users access to Techila Worker Groups. This page is also used to assign an End-User Key to the End-User.6.1.3. End-User Keys
This page contains a list of End-User Keys that have been transferred to the Techila Server. The information displayed on this page is the same as in the page Admin → Keys → End-User Keys.
Please see End-User Keys Page for more information.
6.1.4. End-User Quota
This page can be used to define End-User specific CPU time quotas. Separate quotas can be defined for the following time windows:
-
Daily quota
-
Weekly quota
-
Monthly quota
-
Total quota
If an End-User exceeds their quota, their information will be highlighted in red and the TDCE system will stop assigning Jobs from their Projects.
If the Interrupt Jobs checkbox is ticked, any Jobs that are running when the quota is exceeded will be terminated. If the Interrupt Jobs checkbox is not ticked, Jobs will be allowed to be completed and the used CPU time will be deducted from their future quota.
Please see following Chapters on how to create and remove quotas:
The following table contains information on the columns in the End-User Quota table.
| Column | Description |
|---|---|
Login |
The End-User’s login to the Techila Web Interface |
End-User Name |
The name of the End-User |
Daily (hours) |
How many hours of CPU time the End-User is allowed to use each day. |
Weekly (hours) |
How many hours of CPU time the End-User is allowed to use each week. |
Monthly (hours) |
How many hours of CPU time the End-User is allowed to use each month. |
Total (hours) |
How many hours of CPU time the End-User is allowed to use in total. |
Remaining |
Displays how many CPU hours are remaining in the End-User’s |
Interrupt Jobs |
When checked, End-User’s Jobs will be interrupted when the quota is exceeded. |
Active |
Defined for each quota separately. Used to enable/disable the quota. Needs to be checked when submitting a new quota. |
6.2. Worker Groups
The Worker Groups page lists existing Worker Groups. This page can also be used to:
-
Create new Worker Groups
-
Remove existing Worker Groups
-
Mark a Worker Group as the default Worker Group that will be automatically assigned to new End-Users. More detailed instructions for this can be found in the following Chapter: Automatically Assigning a Techila Worker Group to New End-Users
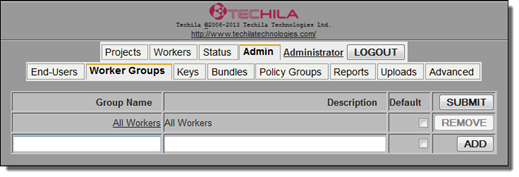
Detailed information on a Techila Worker Group can be accessed by clicking on the name of the Techila Worker Group in the Group Name column. This will open a new page, which can be used to grant access for End-Users to that specific Techila Worker Group.
6.3. Keys
The Keys page can be used to manage End-User Keys and Worker Keys. These pages can be used to manage which Techila Workers are trusted to by the Techila Distributed Computing Engine system and to manage which End-User Keys are allowed to access the Techila Distributed Computing Engine environment when using the Techila SDK.
6.3.1. Worker Keys Page
Clicking on the Keys menu item will redirect your browser to the Worker Keys page. The Worker Keys page contains information on all Techila Worker Keys. These Keys include trusted and untrusted Techila Worker Keys. Trusted Keys belong to Techila Workers that are allowed to participate in computations. Untrusted Keys belong to Techila Workers, which are cannot participate in computations.
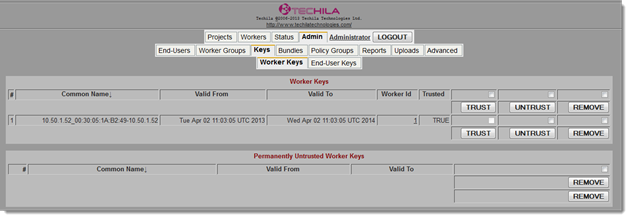
Tasks related to the Worker Keys page:
The following table contains information on the columns in the Techila Worker Keys table.
| Column | Description |
|---|---|
Common Name |
The name of the Techila Worker Key |
Valid From |
The beginning of the validity period of the Techila Worker Key |
Valid To |
The end of the validity period of the Techila Worker Key |
Worker ID |
The Techila Worker ID of the Techila Worker |
Trusted |
Lists if the Techila Worker Key is trusted by the Techila Server |
6.3.2. End-User Keys Page
The End-User Keys page contains information about End-User Keys that have been transferred to the Techila Server. Each End-User Key will typically be assigned to one Techila Web Interface account as illustrated in the screenshot below.
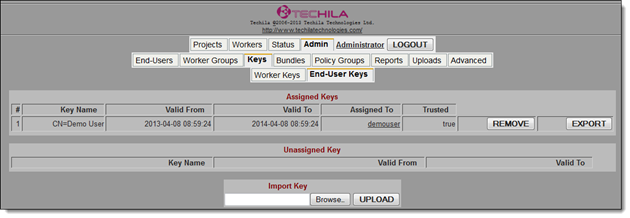
Tasks related to this page:
The following table contains information on the columns in the End-User Keys table.
| Column | Description |
|---|---|
Key Name |
Key subject name. |
Valid From |
The beginning of the validity period of the End-User Key |
Valid To |
The end of the validity period of the End-User Key |
Assigned To |
The login name of the End-User the Key is assigned to |
Trusted |
Lists if the Key is trusted by the Techila Server. True indicates the Key is trusted, false indicates that the Key is not trusted. |
6.4. Bundles
The Bundles page can be used to manage Bundles in the Techila Distributed Computing Engine system, allowing you view what Bundles are available on the Techila Server and if necessary, to delete unneeded Bundles.
6.4.1. DB Bundles Page
The DB (database) Bundles page displays all Bundles on the Techila Server. These include Core Bundles and Bundles created by End-Users.
This page can also be used to remove Bundles from the Techila Server and the Techila Workers. To remove Bundles, tick the checkboxes next to the Bundle you wish to remove and click the REMOVE button. Ticking the checkbox in the column labelled Remove from Server will remove the Bundle only from the Techila Server. Ticking the checkbox in the column labelled Remove from Workers will remove the Bundle from the Techila Workers. Ticking both checkboxes can be used to remove the Bundle from the Techila Server and Techila Workers.
After clicking the REMOVE button, the Bundles will be removed from the list and will be deleted from the disk by a background process after a preconfigured interval.
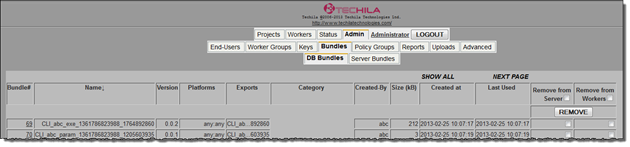
The table below describes the columns in the tables in the DB Bundles page.
| Column | Description |
|---|---|
Bundle# |
The Techila Server’s internal ID of the Bundle |
Name |
The name of the Bundle |
Version |
The version number of the Bundle |
Platforms |
Platforms the Bundle is available for. |
Exports |
Bundle exports |
Category |
The category of the Bundle |
Created-By |
The Login name of the End-User that uploaded the Bundle. |
Size |
The size of the Bundle (in kilobytes) |
Created At |
The timestamp of the Bundle signature |
Last Used |
Last time the Bundle was used |
6.4.2. Server Bundles Page
The Server Bundles page shows the list of the Server Bundles, including currently installed Core Bundles. The names of Core Bundles always start with the word Techila, meaning Core Bundles can be identified from the Bundle names visible in the Name column.
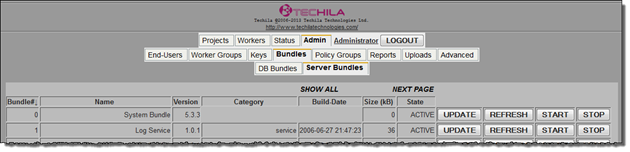
This page can also be used to stop and start the Bundles if required. Stopping Bundles is not recommended if not necessary, because this may result in system instability. The UPDATE button forces the Techila Server to update the Bundle if any newer are found in the database. The REFRESH button should be clicked after updating a Bundle to ensure that the changes are accepted. Typically updating Bundles manually is not required, because Bundles are automatically updated after they have been uploaded to the Techila Server.
The table below describes the columns in the tables in the Server Bundles page.
| Column | Description |
|---|---|
Bundle# |
The Techila Server’s internal ID of the Bundle |
Name |
The name of the Bundle |
Version |
The version number of the Bundle |
Build-Date |
The compilation timestamp of the Bundle |
Size |
The size of the Bundle (in kilobytes) |
State |
The status of the bundle ( ACTIVE = running normally) |
6.5. Uploads
The Uploads page can be used to upload new Bundles, Techila Licenses, Service Packs or Rule Sets.
Bundles and Service Packs that have been uploaded will be displayed in the Upload Directory table. In order for Bundles and Service Packs to be taken into use, the uploaded files need to be approved (by clicking the APPROVE button). This approves the file and renames the files with the postfix .ready. The approval process checks that all the requisites of the new bundles are fulfilled and the new bundles are signed. When the process is completed, the files disappear from the list. Please note that only signed bundles can be approved.
If any errors occur during the approval process, the erroneous files are renamed with the postfix .ERROR and file with postfix .desc is generated. This Description file contains the corresponding error message and it can be viewed by clicking the VIEW button.
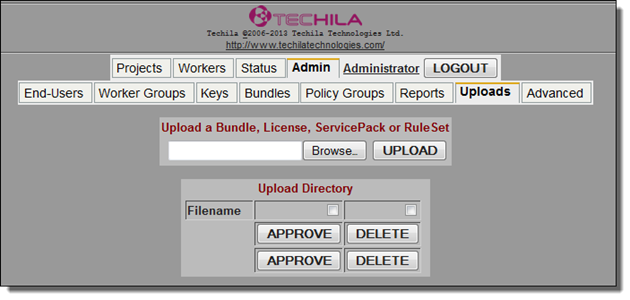
Upload Directory table.6.6. Policy Groups
The Policy Groups page lists available Policy Groups that can be assigned to Techila Worker Groups. This page can also be used to update policies to Techila Workers. The Priority values determine the order in which Policies are enforced. If there are any conflicting rules, rules belonging to the Policy Group with the largest Priority value will remain in effect. More information on Policy Groups can be found in Policy Groups.
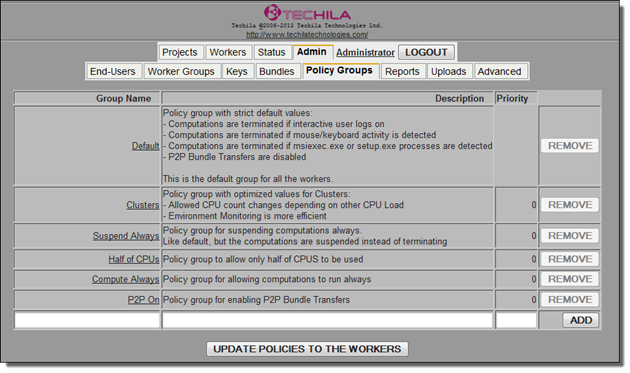
6.7. Reports
The Reports page can be used to generate usage reports from the TDCE environment. Reporting data is extracted from the Techila Server database using report specific SQL queries. New reports can be added by using the Add New Report button. When no reports are available, the view will resemble the one shown below.
Reports page when no reports have been added.Please see Techila Distributed Computing Engine Reporting Guide for more information on how to add new reports. The document also contains several example reports that can be used to extract CPU usage data from your TDCE environment.
6.8. Advanced
The Advanced menu item is used to access more advanced features available in TDCE.
6.8.1. Policy Rules
The Policy Rules page displays all currently configured Policy Rules. This page can also be used to add new Policy Rules or remove existing Rules. The Description column contains a Description of the Policy Rule. Respectively, the Command column displays the commands that are executed with the Policy Rule.
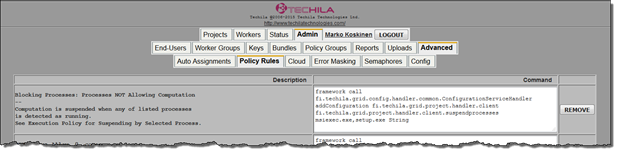
6.8.2. Semaphores
The Semaphores page displays all currently created semaphores. This includes global and Project-specific semaphores. This page can also be used to create new global semaphores or to edit the properties of existing semaphores.
The following table describes the parameters in the Semaphores table.
| Column | Description |
|---|---|
Name |
The name of the semaphore. Semaphore tokens are reserved by specifying the name of the semaphore. |
Project Id |
Displays either the string |
Expiration (s) |
Defines how many seconds a semaphore token can be reserved before it will be released and returned to the Techila Server. |
Size |
Defines the maximum number of tokens for the semaphore. This defines the maximum number of tokens that can be reserved at any given time. |
Reserved |
Displays information how many tokens are currently reserved. |
Queue |
Displays how many operations are currently waiting for a semaphore token to become available. |
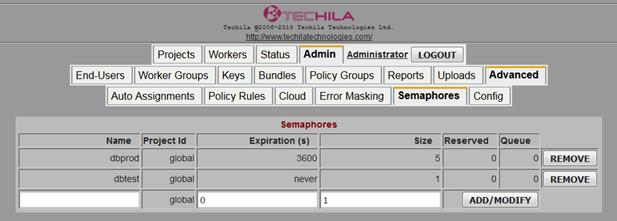
6.8.3. Config Page
The tables in the Config page contain several parameters that affect different aspects of the TDCE system functionality. Typically modifying these parameters is not required unless there is a need to change the functionality of the TDCE system. Please do not modify these values unless you are absolutely sure on how the changes will affect the TDCE system.
The Configuration Group dropdown menu can be used to select and display only the desired Bundle configuration table.
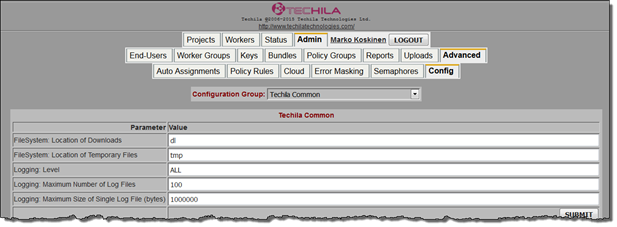
The following table describes the parameters in the Techila Common table.
| Column | Description |
|---|---|
FileSystem: Location of Downloads |
Location where forced uploads from Techila Workers are stored. |
FileSystem: Location of Temporary Files |
Place where temporary files are stored. More critical on Techila Worker side where this location is where the computation is run. On the Techila Server, this location is used to e.g. store temporary files generated during Service Pack updates. |
Logging: Level |
Determines how much log information is stored in the Log files. A list of available Logging Levels can be found in Getting Started. |
Logging: Maximum Number of Log Files |
Maximum number of Log Files allowed. |
Logging: Maximum Size of Single Log File (bytes) |
The maximum size of one Log File in bytes. |
The Techila Common Utils Cron table contains parameters that control, which commands are executed when the Cron service is restarted.
| Column | Description |
|---|---|
Cron: initial CRON Jobs |
Framework commands that are executed when the Cron service is started, e.g. when the Techila Server is restarted. |
The Techila Server Bundle Handler table contains parameters that control Bundle management on the Techila Server.
| Column | Description |
|---|---|
Bundles: Aliases for OS Architectures |
Can be used to define aliases for OS Architectures |
Bundles: Aliases for OS Names |
Can be used to define aliases for OS Names |
Cleaning: Bundle Archive Location |
Location where Bundles marked for archiving will be stored. |
Cleaning: Delay of Archiving Bundles After Last Used (days) |
Number of days a Bundle can remain unused before it is marked to be archived. |
Cleaning: Interval for Cleaning Expired Bundles (ms) |
Interval how often expired bundles are deleted from the Bundle Repository. |
FileSystem: Bundle Repository Location |
Location where Bundles are stored on the Techila Server |
Security: Allow Expiration of Signed Bundles |
Determines if Signed Bundles can expire. This check is only applied to new Bundles transferred to the Techila Server. Bundles already located on the Techila Server will not expire. |
The Techila Server Cloud Amazon EC2 table contains parameters that control Amazon EC2 settings.
| Column | Description |
|---|---|
AWS: External IP/Hostname of the Techila Server |
IP Address/Hostname that Techila Workers will connect to after being deployed in Amazon EC2. |
AWS: Fixed Benchmark Result for Workers |
Not used. Each instance type in the Amazon EC2 will have a different, instance-specific benchmark value defined by the Techila Server. |
AWS: prefix for instances |
Can be used to specify a string that will be prefixed on all names in Amazon EC2. If operating multiple Techila Servers, unique prefix must be used for each Techila Server. |
The Techila Server Cloud Google Compute Engine table contains parameters that control GCE settings.
| Column | Description |
|---|---|
GCE: External IP/Hostname of non-GCE Techila Server |
IP Address/Hostname that Techila Workers will connect to after being deployed in GCE. |
GCE: Fixed Benchmark Result for Workers |
Can be used to specify a fixed benchmark value for new Techila Workers that will be deployed in Google Compute Engine. The following value can be used to disable fixed benchmarks: -1.0 |
The Techila Server Communication Oma table contains parameters that controls communication settings.
| Column | Description |
|---|---|
Command Channel: Maximum Concurrent Operations |
The maximum number of concurrent Command Channels that can be open on the Techila Server. |
Command Channel: Port |
The port used by the Command Channel. |
Data Channel: Base URL |
The Base URL of the Data Channel. |
Data Channel: Limit of Concurrent Large Bundle Transfers |
The maximum number of concurrent Large Bundle Transfers. A Bundle is classified Large if the size exceeds the value defined in parameter |
Data Channel: Limit of Concurrent Large Result Transfers from Workers |
The maximum number of concurrent Large Result Transfers. A Result is classified large if the size exceeds the value defined in parameter |
Data Channel: Limit of Concurrent Non-Result Transfers from Workers |
The maximum number of concurrent Non-Result Transfers. |
Data Channel: Limit of Concurrent Small Bundle Transfers |
The maximum number of concurrent Small Bundle Transfers. A Bundle is classified Small if the size is less than value defined in parameter |
Data Channel: Limit of Concurrent Small Result Transfers from Workers |
The maximum number of concurrent Small Result Transfers. |
Data Channel: Limit of Large Bundles (bytes) |
The Limit which is used to classify Bundles as Large. |
Data Channel: Port |
The port used by the Data Channel. |
Data Channel: Speed Limit for Data from Server (kB/s) |
The speed limits for network transfers from that originate from the Techila Server. Value 0 indicates that the transfer speed should not be limited. |
Data Channel: Speed Limit for Data to Server (kB/s) |
The speed limits for network transfers to the Techila Server. Value 0 indicates that the transfer speed should not be limited. |
Data Channel: Timeout of a Connection without any Traffic |
Specifies the Data Channel timeout in milliseconds. |
The name of the database table will depend on your Techila Server configuration and will be either Techila Server Database PostgreSQL or Techila Server Database SQLServer. These tables contain parameters that control the database management.
| Column | Description |
|---|---|
Caching: Cache Job Reservations |
Enables Job reservations to be cached. |
Caching: Cache Results |
Enables results to be cached. |
Caching: Size of Result Cache in bytes |
Size of the result cache. |
Database: Allow Writing Default values to Tables |
Enables default values to be written to tables. |
FileSystem: Use File System for Data Tables |
Enables data tables to be stored on the file system |
GUI: Show Project Owners for Other Users |
Enables End-Users to see the owners of all Projects. |
Logging: Log Database Method Calls in Debug Mode |
Allows method calls to be logged in debug mode. |
Project Archiving: Archive Directory |
Defines the archive directory |
Project Archiving: Archive Filename Format |
Defines the filename format of the Projects |
Project Archiving: Delay (days) of Archiving Removed Projects |
Delay in days before a removed Project is archived. |
Project Cleaning: Automatically Remove Cancelled Projects |
Enables Cancelled Projects to be removed automatically |
Project Cleaning: Automatically Remove Non-Downloaded Completed Projects |
Enables Non-Downloaded Projects to be removed automatically |
Project Cleaning: Automatically Remove Stopped Un-Finished Projects |
Enables Stopped Un-Finished Projects to be removed automatically |
Project Cleaning: Delay (days) of Automatic Removal of Projects |
Delay in days before Project is removed from the Techila Server. |
Project Cleaning: Delay (days) of Removing Tables after Project Remove |
Delay in days before Project results are removed from the Techila Server. |
Project Execution: Job Swapper |
Enables the Job Swapper. |
The table Techila Server Expirer Basic contains parameters that control the management of expired Jobs.
| Column | Description |
|---|---|
Error Detection: Allow Stopping Workers and Projects with High Error Levels |
Determines if Techila Workers and Projects are stopped in situations where too many errors are generated. |
Error Detection: Execute in Every nth Expiration Loop |
Executes the error detection routine every nth Expiration Loop |
Expiration: Interval (ms) |
Determines how often the Expiration Loop is executed |
Expiration: Maximum Number of Expirations by Used Time |
Determines the maximum number of Job expirations. |
The tables Techila Server Mail AutoMailer and Techila Server Mail Handler contain parameters that control the email notifications sent by the AutoMailer.
Two different types of notification messages can be generated:
-
Admin Reports
-
End-User Key Expiration Warnings
Admin Reports are sent to the email address defined in the Mailer: Default Recipient Address parameter.
End-User Key Expiration Warnings are sent directly to End-Users in the email-addresses defined in the End-User Settings page. End-User Key Expiration Warnings are enabled with the parameter End-User Key Expiration Warning.
Admin Reports are enabled with the parameter Admin Report in the Techila Server Mail AutoMailer table.
Note! Before taking the email functionality into use, the following parameters in the Techila Server Mail Handler table will need to be configured:
-
Mailer: Default Recipient Address
-
Mailer: Sender Address
-
Mailer: SMTP Host Address
The structure of the Admin Report email notification is shown below:
-
Subject
-
Header
-
Content
-
Footer
The content of the Admin Report will be replaced with applicable fields defined in the Techila Server Mail AutoMailer table.
Admin Reports can be generated in the following situations:
-
A Techila Worker has generated too many errors and has been stopped
-
An End-User Key has expired
-
An End-User Key is untrusted
-
A Techila Worker Key has expired
-
A Techila Worker Key is untrusted
-
Low disk space on Techila Workers
-
Low disk space on the Techila Server
For example, when an Admin Report contains information on error messages generated on Techila Workers, the contents of the Admin Report will consist of the Admin Report: Erroneous Worker Message and Admin Report: Erroneous Worker Details fields. A separate Details field will be included for each Techila Worker. The structure of the message will resemble the structure illustrated below:
Techila: Administrator report

Report of Techila notifications

Following workers have generated critical

number of errors and have been stopped:

Techila Testworker (1) has 100 errors

End of report
The table below contains some of the most commonly used macros and their applicable fields in the table Techila Server Mail AutoMailer.
| Applicable fields | macro | Description |
|---|---|---|
Erroneous Worker Details |
{alias} |
Alternative name of the Techila Worker {clientid} |
The Techila Worker ID number of the Techila Worker errors} |
The number of errors generated |
Expired End-User Key Details, Untrusted End-User Key Details |
{dn} |
Name of the End-User Key {validfrom} |
Start of the validity period {validto} |
End of the validity period |
Expired Worker Key Details, Untrusted Worker Key Details |
{cn} |
Name of the Techila Worker Key {validfrom} |
Start of the validity period {validto} |
End of the validity period |
Low Disk Space on Workers Details |
{alias} |
Alternative name of the Techila Worker {clientid} |
The Techila Worker ID number of the Techila Worker {freespace} |
Amount of free disk space on the Techila Worker {totalspace} |
Total amount of disk space on the Techila Worker |
Erroneous Worker Message |
{erroneousworkers} |
List of Techila Workers that have generated a critical number of errors during computational Projects. Critical number = 100. |
Expired End-User Key Message |
{expiredusercerts} |
List of all End-User Keys on the Techila Server that have expired and are no longer valid. |
Expired Worker Key Message |
{expiredworkercerts} |
List of all Techila Worker Keys that have expired and are no longer valid. |
Low Disk Space on Server Message |
{freespace} |
Amount of free disk space on the Techila Server. {totalspace} |
Total amount of disk space on the Techila Server. |
Low Disk Space on Workers Message |
{diskspaceworkers} |
List of Techila Workers where the amount of free disk space is lower than the configured threshold (Parameter: Admin Report: Limit of Low Disk Space on Workers) |
Untrusted End-User Key Message |
{untrustedusercerts} |
List of End-User Keys that are untrusted. |
Untrusted Worker Key Message |
{untrustedworkercerts} |
The Techila Server Mail Handler table contains parameters that control the content of notifications that are sent to End-Users when Projects are completed. Note that these notification messages will only be sent if the End-User defined the following Project parameter when creating the Project:
| Project parameter | value |
|---|---|
techila_mail_on_completion |
true |
The table below describes the parameters of the Techila Server Mail Handler table:
| Parameter | Description |
|---|---|
Address Confirmation Mail: Content |
Content of the email confirmation message. Available macros are {serverurl}, {confirmkey} |
Address Confirmation Mail: Subject |
Subject of the email confirmation message |
Mailer: Default Recipient Address |
Recipient of the Admin Report messages |
Mailer: Sender Address |
Sender address displayed in all outgoing messages |
Mailer: SMTP Host Address |
SPTP Host Address of the outgoing mail server |
Project Cancelled Mail: Content |
Content of the Project Cancelled Mail. |
Project Cancelled Mail: Subject |
Subject of the Project Cancelled Mail. |
Project Completed Mail: Content |
Content of the Project Completed Mail. |
Project Completed Mail: Subject |
Subject of the Project Subject Mail. |
The table Techila Server Management Oma contains parameters that configure the service that communicates with the Techila Workers:
| Parameter | Description |
|---|---|
Management: Limit of Concurrent Operations |
Maximum number of threads that listen to data requests. |
Management: Port |
The port that listens to commands. Used for communication between the Techila Server and End-User. |
The table Techila Server Optimizer Active contains parameters that affect the optimization of Job distribution. Several of the parameters are weighing factors that affect the optimizer algorithm.
| Parameter | Description |
|---|---|
Project Priority: Alternative (Worker based) Prioritization Mode |
Enables the Alternative Techila Worker Based Prioritization mode. The Alternative Mode is explained in Chapter 3.2.2 |
Project Priority: Maximum Factor caused by used CPU-Time |
Weighing factor of the optimizer algorithm |
Project Priority: Maximum Factor caused by used Time |
Weighing factor of the optimizer algorithm |
Project Priority: Multiplier for Priority Randomization Loop Count |
Weighing factor of the optimizer algorithm |
Project Priority: Priority Multiplier for Active Workers Benchmark |
Weighing factor of the optimizer algorithm |
Project Priority: Priority Multiplier for End-User Priority |
Weighing factor of the optimizer algorithm |
Project Priority: Priority Multiplier for Project Priority Set by End-User |
Weighing factor of the optimizer algorithm |
Project Priority: Priority Multiplier for Project Start Order |
Weighing factor of the optimizer algorithm |
Project Priority: Priority Multiplier for used CPU-Time |
Weighing factor of the optimizer algorithm |
Project Priority: Priority Multiplier for used Time |
Weighing factor of the optimizer algorithm |
Scheduling: Allow Parallel Scheduling of Multiple Projects from the Same End-User |
Enables Jobs from several Projects to be scheduled simultaneously. |
Scheduling: Default Scheduling Mode |
The default distribution mode for Jobs: 0: Jobs are distributed to Techila Workers in the order of the Techila Worker efficiency, and all Techila Worker cores are utilized at once. 1: First distribute Jobs to a single core in each Techila Worker. When all Techila Workers have been utilized, start from beginning and distribute Jobs to the second core, and so on. 2: Specialized cased of 1, where Techila Workers are sorted according to the capacity category of the Techila Worker using maxpowerdifference parameter’s value. For example, at the value of 10, first all the 10% category Techila Workers will be given Jobs on their 1st core and then another on the second core when all Techila Workers in the category have Jobs. When all cores are full in the 10% category, the next category will be utilized. The 10% category means that the category contains all the Techila Workers in a bracket where the first Techila Worker and the last Techila Worker have a 10% difference in their capacity. 3: A multi-threading configuration where one Job is assigned per Techila Worker and no other Projects are allowed to be run on the same Techila Workers. If the Techila Worker already has a mode 3 assignment, no other assignments are given to the Techila Worker, but a mode 3 assignment can be given to a Techila Worker that already has other Jobs. 4: One core per Techila Worker per Project. The same as mode 3, but the Techila Worker can have other Projects running on different cores. |
Scheduling: Maximum Power Difference before Returning to Faster Workers in FASTEST_ONE_CORE_FIRST mode |
See the explanation of mode 2 in the above row. |
Scheduling: Reorder Projects by the Factors |
- |
Scheduling: Limit Jobswapper with Filter |
Can be used to specify a filter. When a filter is specified, jobswapper is only enabled for Projects matching the filter. |
Scheduling: Randomize Project Order when not using Factors |
Defines that Jobs will be distributed in a random order instead of priority values. Requires that |
Scheduling: Worker Information Update Interval (ms) |
Optimizer updates its Techila Worker data always when a Techila Worker’s state (computing/idle) changes. Because the Techila Workers' relative efficiency can change with the Techila Worker load, their rank needs to be optimized also when the situation is stable. The value is the interval (in milliseconds) when the Techila Workers' loads are checked and rearranged. |
The Techila Server P2P table contains parameters used to manage the peer-to-peer transfer settings.
| Parameter | Description |
|---|---|
P2P Server: Allowed |
Enables P2P transfers to be used. |
P2P Server: Maximum Size of Generated Slice (MB) |
The maximum size of one peer to peer transfer packet |
P2P Server: Minimum Bundle Size (MB) to Use P2P |
Determines the minimum size of a Bundle that will be transferred using peer-to-peer transfers |
P2P Worker: Limit of Concurrent Uploads from Worker |
Maximum number of concurrent uploads from a Techila Worker. |
P2P Worker: Maximum Allowed Distance of Workers |
The maximum allowed distance between Techila Workers in network hops. |
The Techila Server Results Handler table contains parameters used to define where result data is stored in the file system.
| Parameter | Description |
|---|---|
FileSystem: Location of Data |
Defines where the Project result data is stored on the Techila Server. |
The Techila Server Security X509DB table contains security related parameters:
| Parameter | Description |
|---|---|
Allow Keys to be Replaced |
Allows new Keys to replace existing Keys with an identical name. |
End-Users: Add Permission to create Bundles for Auto-Created End-Users |
Automatically add permissions to create Bundles for automatically created End-Users |
End-Users: Add Permission to create Projects for Auto-Created End-Users |
Automatically add permissions to create Projects for automatically created End-Users |
End-Users: Automatically Create End-Users for new Auto-Trusted End-User Keys |
Creates a new End-User for automatically trusted End-User Keys. Note that the Techila Web Password of the End-User will need to be changed manually before use. |
End-Users: Mark Auto-Created End-Users as Guests |
Give Auto-Created End-Users as Guest permissions. |
End-Users: Trust Keys Automatically |
Allows new End-User Keys to be trusted automatically |
Workers: Trust Keys Automatically |
Enables Techila Worker Keys to be automatically trusted by the Techila Server |
The Techila Server UI WebXmlRpc table contains settings for the server-side Web Interface component.
| Parameter | Description |
|---|---|
GUI: Maximum Simultaneous Operations |
Maximum number of simultaneous XML-RPC commands. |
GUI: Port |
Port used for XML-RPC commands. |
The Techila Server Updater Directory table contains settings related to uploading components to the Techila Server.
| Parameter | Description |
|---|---|
FileSystem: Directory for Updates |
Directory where uploads are stored on the Techila Server. |
Update: Interval for Polling Update Directory (ms) |
Interval how often the upload directory is checked for new files. |
6.8.4. Auto Assignments
The pages under the Auto Assignments menu item contain Auto Assignment rules that are used to automatically assign new Techila Workers to Techila Worker Groups or Policy Groups. Existing Auto Assignment rules can be managed by clicking on the link in the Rule column on the applicable row. This will open a new page, which can be used to configure the Techila Worker and Policy Groups new Techila Worker will be assigned to.
The procedures for automatically assigning new Techila Workers to Techila Worker Groups and Policy Groups can be found in the following Chapters:
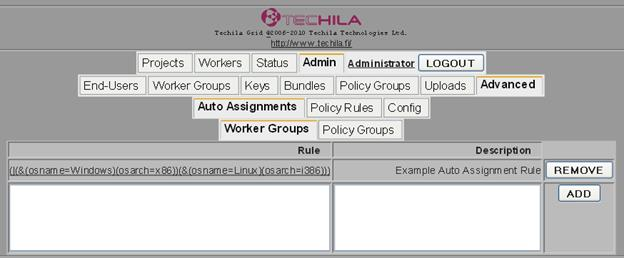
Auto Assignments Worker Groups page.6.8.5. Error Masking
The Error Masking page can be used to create filters for error messages that occur during computational Projects. These filters can be used to modify the error message that will be displayed to the End-Users.
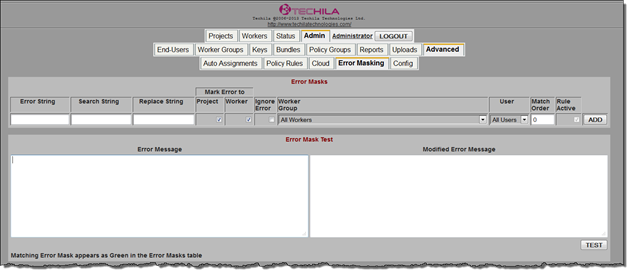
The fields in the Error Mask and Error Mask Test tables are explained below.
| Parameter | Description |
|---|---|
Error String |
Used to define which string will activate the filter. For example, value |
Search String |
Used to define which part of the error message will be replaced. |
Replace String |
Defines the string that will be displayed to the End-User (instead of the string defined in |
Mark Error to Project |
If ticked, errors will be added to the Project error counter. If the Project error counter is too large, the Project will be stopped. |
Mark Error to Worker |
If ticked, error will be added for the Techila Worker error counter. This will also cause the Techila Worker to be removed from the Project. |
Ignore Error |
If ticked, errors matching the filter will be ignored and will not be displayed to the End-User. |
Worker Group |
Can be used to select Techila Worker Groups the filter is active. The default value |
User |
Can be used to select a specific End-User for whom the filter will be active. |
Match Order |
Can be used to specify the order in which filters are activated. Filters are activated in ascending order, ie. 0,1,2,3,4,.. Note, only the first matching filter will be applied. |
Rule Active |
Can be used to either disable to enable the filter. |
Error Message |
This field can be used to enter an error message for testing purposes. This message will be filtered with currently active filters when the TEST button is clicked. |
Modified Error Message |
Displays the modified error message when the TEST button is clicked. |
6.8.6. Cloud - Amazon EC2
The Amazon EC2 page can be used to deploy Techila Workers in Amazon EC2. Techila Worker deployments are always linked to the Techila Web Interface user account that is selected from the Select User drop-down menu.
If the selected user has admin rights in the Techila Web Interface, Techila Workers will be assigned to the All Workers Techila Worker Group. This means that all End-Users that have access to this Techila Worker Group will also be able to access the computing capacity.
If the selected user is a regular user with no admin rights, Techila Workers will be assigned to a Techila Worker Group that is only assigned for the specific user. For example, if user Alice is selected, all new Techila Workers that are deployed will be assigned to a separate Techila Worker Group which is by default only assigned to user Alice.
Before deploying Techila Workers, the following fields must be configured for the user that has been selected:
-
Access Key
-
Secret Access Key
The Access Key and Secret Access Key are user-specific access credentials that can be retrieved from the AWS Management Console.
The screenshot below illustrates a situation where no EC2 keys have been added.
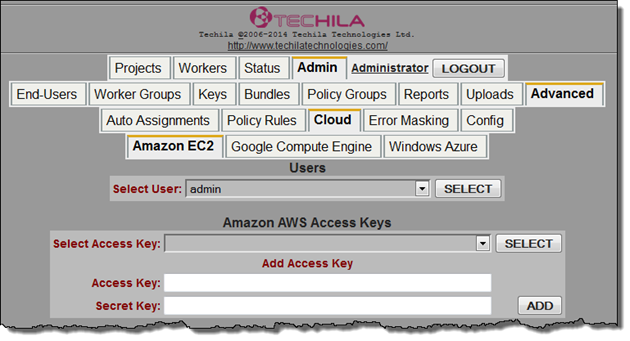
Amazon EC2 page will be different depending on the number of Amazon AWS Access Keys that have been added. In this example, no access keys have been added to the user admin.More information on managing the Amazon EC2 settings in the Techila Web Interface can be found in Chapter:
6.8.7. Cloud - Google Compute Engine
The Google Compute Engine page can be used to deploy Techila Workers in GCE. Techila Worker deployments are always linked to the Techila Web Interface user account that is selected from the Select User drop-down menu.
If the selected user has admin rights in the Techila Web Interface, Techila Workers will be assigned to the All Workers Worker Group. This means that all End-Users that have access to this Worker Group will also be able to access the computing capacity.
If the selected user is a regular user with no admin rights, Techila Workers will be assigned to a Worker Group that is only assigned for the specific user. For example, if user Alice is selected, all new Techila Workers that are deployed will be assigned to a separate Techila Worker Group which is by default only assigned to user Alice.
Before deploying Techila Workers, the following information needs to be configured for the user:
-
Google Compute Engine
Project Id
In addition, the following access credentials will need to be transferred to the Techila Server and linked to the user:
-
Project Service Key
The Project Id and Project Service Access can be retrieved from the Google Developers Console.
The screenshot below illustrates a situation where no Google Compute Engine projects have been added.
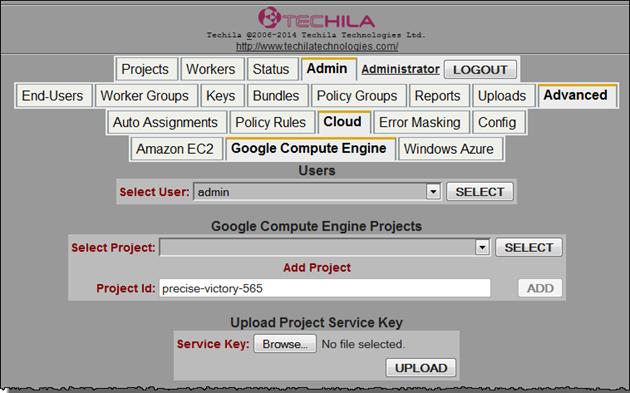
Google Compute Engine page will be different depending on the number of Projects that have been addedMore information on managing the Google Compute Engine settings in the Techila Web Interface can be found in Chapter:
7. Managing Projects
This Chapter describes the following procedures related to managing Projects:
7.1. Stopping an Active Project
This section describes how to stop an active project.
-
Click on Projects
-
The Active Projects page opens
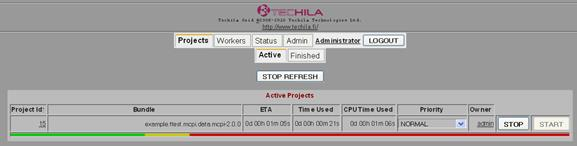 Figure 133. Projects that are being computed are visible in the Active Projects table.
 -
Click the STOP button next to the Project you want to stop.
The Project will be stopped and placed in the Unstarted Projects table
7.2. Removing an Erroneous Project
This section describes how to remove an erroneous Project.
-
Click on Projects to open the Active Projects page.
-
Scroll down to the Projects with Errors table
 Figure 134. Projects that generated too many errors are listed in the Projects with Errors table.
 -
Tick the checkbox on the row of the Project you wish to remove. Click the REMOVE button.
The Project is removed. The removed Project will be listed in in the Removed Projects page
7.3. Removing a Completed Project
This procedure describes how to remove a Project that has been completed.
-
Click on Projects.
-
Click Finished
-
Click Completed or Downloaded depending on where your Project is stored.
-
Tick the checkbox on the row of the Project you want to remove and click the REMOVE button.
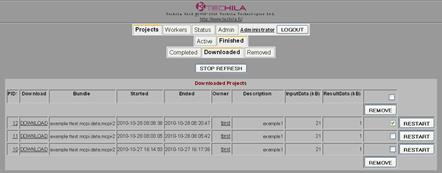 Figure 135. Downloaded and Completed Projects can be removed.
The Project is removed and will be listed in the Removed Projects page
7.4. Managing an Unstarted Project
This procedure describes how to change the priority, start, remove or restart an unstarted Project.
-
Click on Projects and browse down to the Unstarted Projects table.
 Figure 136. Unstarted Projects can be started, restarted and removed by clicking the applicable buttons. Priority can be changed by using the pull down menu.
 -
Choose the appropriate action for the Project.
7.5. Restarting a Completed Project
This procedure describes how to restart a Project that has been completed.
-
Click on Projects.
-
Click on Completed or Downloaded.
-
Click the RESTART button on the row of the Project you wish to restart.
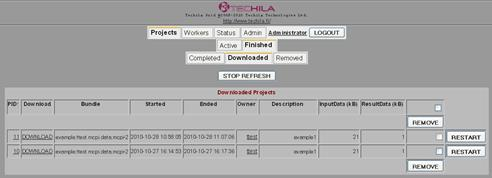 Figure 137. Restarting a Project will restart the Project using the same Project ID number.
7.6. Cloning a Completed Project
This section describes how to clone a Project that has been completed.
-
Click on Projects.
-
Click Completed.
-
Click the CLONE button on the row of the Project you want to clone. The Project will be restarted and assigned a new Project ID number.
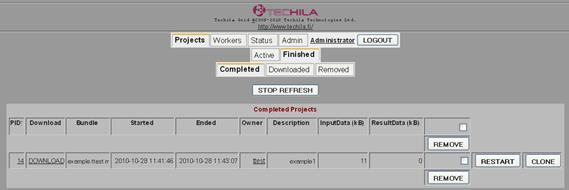 Figure 138. Cloning a Project will restart the Project with a new Project ID number.
7.7. Changing the Priority of a Project
This section describes how to change the priority of a Project.
Note! The Project needs to be listed in Active Projects, Projects queuing for Techila Workers or Unstarted Projects in the Projects page in order to change the priority.
Procedure
-
Click on
Projects. -
Select the priority of a Project from the pull down menu in the
Prioritycolumn: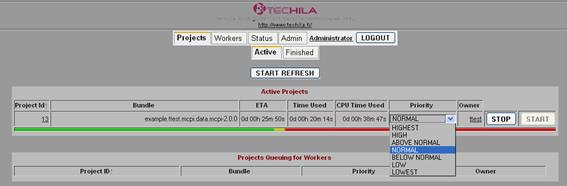 Figure 139. When applicable, the pull down menu can be used to change the Priority of a Project.
7.8. Downloading Project Results
This procedure describes how to download Project results in a zip-file from the Techila Web Interface.
Prerequisites
-
The Project has been completed.
-
The Project has not been removed
Procedure
-
Click on
Projects -
Click
CompletedorDownloaded, depending where your Project is located in.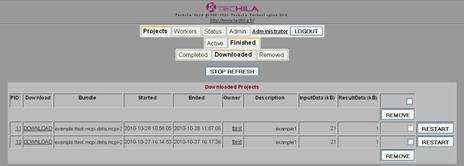 Figure 140. Results of Completed or Downloaded Projects can be downloaded by clicking the
DOWNLOADlinks in the Download column. -
Click the
DOWNLOADlink on the line of the Project. A new page will open displaying information that the download request was received. -
Click the
RETRYbutton to download the Project results. Figure 141. When the DOWNLOAD link is clicked, a ZIP file containing the results will be created. Time required to create the ZIP file will vary, depending on the size of the results.
 -
A save dialog opens. Choose a location where you wish to save the ZIP file containing the results.
8. Managing Techila Workers
This section describes the following procedures related to Techila Worker management:
8.1. Starting Techila Workers
This procedure describes how to start stopped Techila Workers.
-
Click on
Workersto open theAll Workerspage.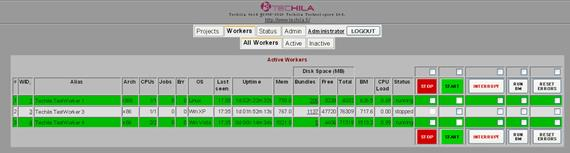 Figure 142. The
All Workerspage. The status of Techila Workers is indicated by the highlight colour and the value in theStatuscolumn. In this figure, the second Techila Worker (WID 2) is stopped and can be started. -
Tick the checkbox on the
STARTcolumn for all the Techila Workers you want to start. -
Click the
Startbutton to start the Techila Workers → The selected Techila Workers are started and will turn green in the active Workers list. The status of the Techila Worker will change torunning.
8.2. Stopping Techila Workers
This procedure describes how to stop active Techila Workers.
-
Click on
Workersto open theAll Workerspage.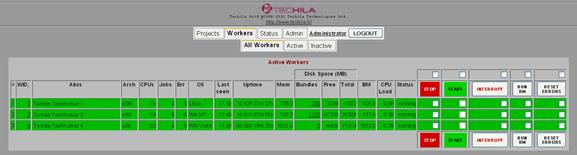 Figure 143. Highlight colours can be used to quickly discern the status of Techila Workers. In this figure, the status of all Techila Workers is
Running. -
Tick the checkbox on the
STOPcolumn for all the Techila Workers you want to stop. -
Click the
Stopbutton to stop the Techila Workers → The selected Techila Workers are stopped and grayed out on theActive Workerslist. To start the Techila Worker again, follow the procedure in Starting Techila Workers.
8.3. Interrupting Techila Workers
This procedure describes how to interrupt Techila Workers.
-
Click on
Workersto open theAll Workerspage. Figure 144. Highlight colours can be used to quickly discern the status of Techila Workers. In this figure, the status of all Techila Workers is
Running. -
Tick the checkbox in the
INTERRUPTcolumn for all the Techila Workers you want to interrupt. -
Click the
Interruptbutton to interrupt the Techila Workers → The selected Techila Workers are interrupted.
8.4. Benchmarking Techila Workers
This procedure describes how to benchmark Techila Workers.
-
Click on
Workersto open theAll Workerspage.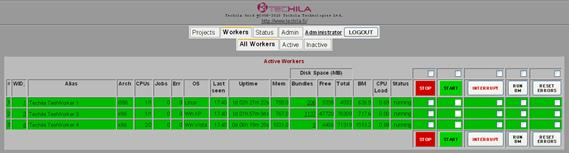 Figure 145. The BM column lists the fastest Benchmark for each Techila Worker.
 -
Tick the checkbox on the
RUN BMcolumn for all the Techila Workers you want to benchmark. -
Click the
Run BMbutton to benchmark the Techila Workers.→The selected Techila Workers are benchmarked.
8.5. Resetting Error Counter for Techila Workers
This procedure describes how to reset the error counter for Techila Workers.
-
Click on Workers to open the All Workers page.
Figure 146. TheErrcolumn displays the error count for each Techila Worker. -
Tick the checkbox on the
RESET ERRORScolumn for all the Techila Workers for which you want to reset the error counter. -
Click the
Reset Errorsbutton to reset the error counters → The error counter for the selected Techila Workers is reset.
8.6. Rebooting the Techila Worker Processes
This procedure describes how to reboot the Techila Worker processes on a Techila Worker.
Note! Does not reboot the operating system.
-
Click on
Workersto open theAll Workerspage.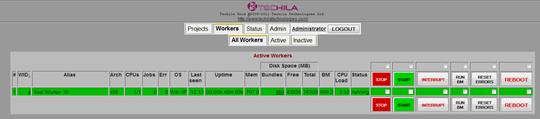 Figure 147. The
REBOOTbutton on can be used to reboot the Techila Worker processes -
Tick the checkbox in the
REBOOTcolumn of the Techila Worker you wish to reboot. -
Click the
REBOOTbutton.
The Techila Worker processes on the Techila Worker will be restarted.
8.7. Changing Techila Worker Alias
This procedure describes how to change an existing Techila Worker’s alias. Alias is a name that you can give to specific Techila Workers, which can be useful when managing large amounts of Techila Workers.
-
Click on
Workersto open theAll Workerspage.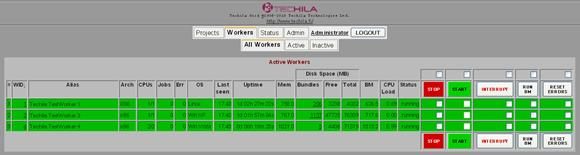 Figure 148. The
Aliascolumn in the All Workers page displays the alternative names of the Techila Workers. -
Click on the Worker ID number in the
WIDcolumn of the Techila Worker you wish to give a new alias to open theTechila Worker Detailspage: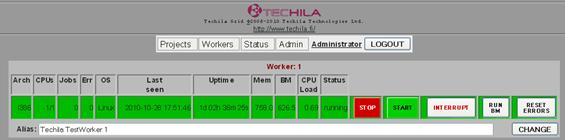 Figure 149. The new Alias can be entered in the
Aliasfield. -
Type in the new alias in the
Aliasfield, and click CHANGE.→The Techila Worker’s alias is changed.
8.8. Automatically Trusting Techila Worker Keys
This Chapter contains instructions on how to configure your Techila Server to automatically trust new Techila Worker Keys.
Procedure
-
Navigate to
Admin→Advanced→Config -
Using the
Configuration Groupdropdown menu, selectTechila Server Security X509DB. Set the value ofWorkers: Trust Keys Automaticallytotrueand click theSUBMITbutton.
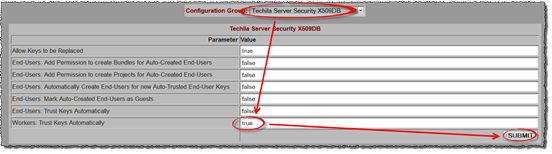
8.9. Setting Techila Worker Features
This Chapter contains instructions on how to configure Techila Worker features. Techila Worker features can be useful, for example, when extracting reporting data with a suitable query and/or when End-User’s want to limit participating Techila Workers based on which features the Techila Workers have.
Procedure
-
Navigate to
Workers. -
Click on the Worker ID of the Techila Worker you want to configure.
-
Using the
KeyandValuefields, enter the Techila Worker you want to set for the Techila Worker. Create the feature by clicking theSubmit Featuresbutton.

9. Managing End-Users
This section describes the following procedures related to managing End-Users:
9.1. Adding a New End-User to the Techila Web Interface
This procedure describes how to add a new End-User account to the Techila Web Interface.
Notes
Note that this process only gives the End-User access to the Techila Web Interface. The procedure for adding a new End-User to the Techila Distributed Computing Engine system with rights to perform computations is described in Adding a New End-User.
Procedure
-
Click on
Adminto open theEnd-Userspage. Figure 152. The
New End-Userstable is used to enter the details of the End-User. -
Enter the following information:
-
Login
-
User Name
-
GUI Password
-
-
Select
BundlesandProjects. -
If the End-User is an administrator, also tick the
admincheckbox. -
Click
SUBMIT. New End-User is created and is shown on the End-Users table.
Tips
-
You can also set the session expire time (in seconds) for each End-User.
9.2. Deleting a Techila Web Interface End-User
This procedure describes how to delete a Techila Web Interface End-User.
Procedure
-
Click on
Adminto openEnd-Userspage.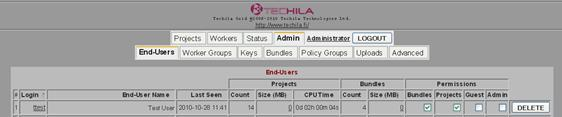 Figure 153. The
DELETEbutton in theEnd-Userstable can be used to remove End-Users. -
Find the End-User you want to delete and click
DELETEnext to the End-User name. The End-User no longer has access to the Techila Web Interface.
9.3. Changing End-User Permissions
This procedure describes how to change an existing End-User’s permissions in the Techila Web Interface. Note that End-User permissions can also be changed in the End-User settings page.
-
Click on
Adminto open theEnd-Userspage.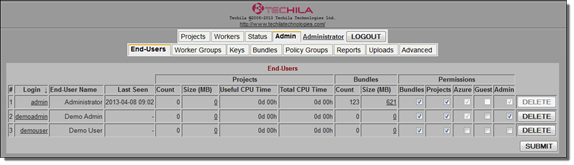 Figure 154. Permission can be granted to an End-User by ticking the applicable checkboxes and clicking
SUBMIT. Respectively, permissions can be removed by removing the checkbox ticks. -
Find the End-User whose access rights need to be modified and tick the appropriate checkboxes.
-
Click
SUBMITto change the End-User’s access rights.
9.4. Changing End-User Priority
This procedure describes how to change the End-User priority value. Modifications to the priority value will have a small effect on the amount of computing power given to the End-User’s Projects. Decreasing the priority value will give slightly more computing capacity; increasing the priority value will decrease the amount of computing power given.
-
Click on
Adminto open theEnd-Userspage. -
Click on the End-User’s
Loginthat you wish to modify.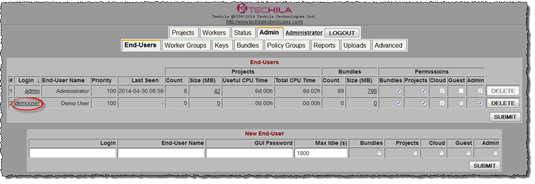 Figure 155. Click on the login.
 -
In the
End-User Settingspage, define the new priority value and click theSUBMITbutton. Smallest recommended value is 0. If required, confirm the action in the pop-up window.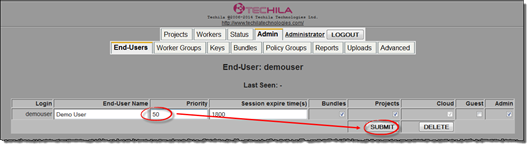 Figure 156. Changing the priority value.
The new priority value will now be visible in the End-User`s
Prioritycolumn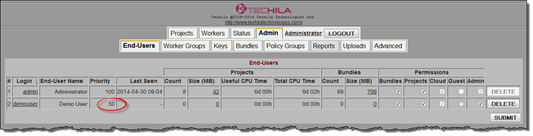 Figure 157. View after changing the priority value.
9.5. Changing End-User Settings
This procedure describes how to change an existing End-User’s settings such as:
-
End-User Name
-
End-User E-mail address
-
Techila Web Interface password
-
Assigned End-user Keys
-
Assigned Techila Worker Groups
-
Bundles
-
Click on
Adminto open theEnd-Userspage: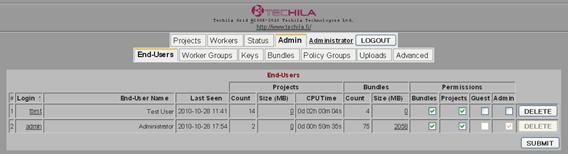 Figure 158. The
End-Userspage can be used to access the End-User settings page of each End-User. -
Click the
Loginof the End-User to open the End-User settings page: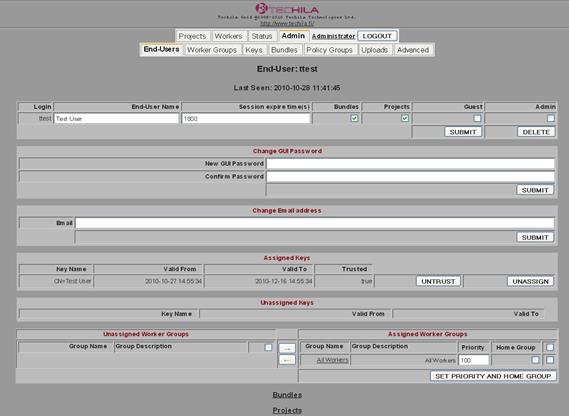 Figure 159. The End-User settings page can be used to modify the End-User Name, permissions, Techila Web Interface password or email address. This page can be used to assign or remove Techila Worker Groups from the End-User.
 -
Select the settings you wish to modify and click
SUBMITorASSIGNto update the settings.
-
9.6. Automatically Assigning a Techila Worker Group to New End-Users
This procedure describes how to automatically assign a Techila Worker Group to new End-Users
Procedure
-
Click on
Admin -
Click
Worker Groupsto open theWorker Groupspage.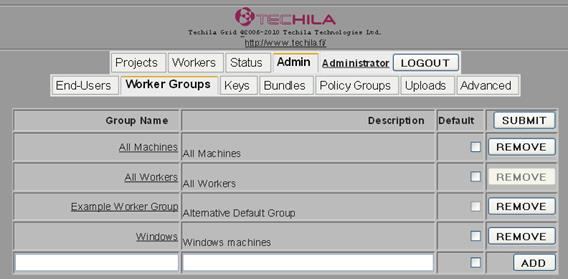 Figure 160. The Worker Groups page contains a list of existing Techila Worker Groups. The
Defaultcolumn indicates which Techila Worker Group, if any, will be automatically assigned to End-Users. In this figure, no Techila Worker Groups are designated as the default Techila Worker Group. -
Tick the checkbox next to the Techila Worker Group you wish to automatically assign to all new End-Users
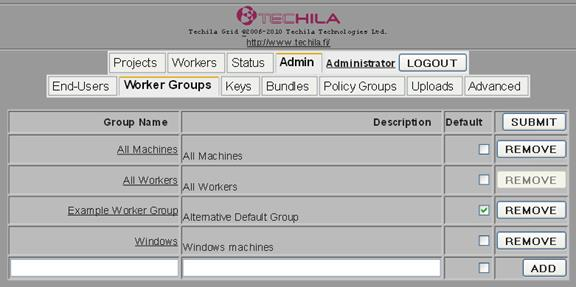 Figure 161. Tick the checkbox of the Techila Worker Group you wish to automatically assign to new End-Users. In this figure, the Techila Worker Group called
Example Worker Grouphas been selected. -
Click the
SUBMITbutton. The selected Techila Worker Group will now be automatically assigned to new End-Users.
9.7. Creating End-User Quotas
This procedure describes how to create End-User quotas.
Procedure
-
Navigate to
Admin→End-Users→End-User Quota -
Tick the checkboxes for each quota you wish to activate (
Daily,Weekly,MonthlyorTotal) -
For each quota you activated, specify the number of hours that should be included in the quota.
-
If you want that Jobs should be interrupted when the quota is exceeded, tick the
Interrupt Jobscheckbox. -
Click the
SUBMITbutton to create the quotas.The example screenshot illustrates how to define quotas for the
demouserEnd-User. In this example, the checkboxes forDailyandTotalquotas have been ticked, and the quotas of 100 hours and 10000 hours have been defined. This means that the End-User can use a maximum of 100 CPU hours each day and the total cumulative usage cannot exceed 10000 CPU hours.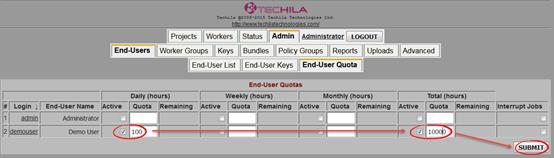 Figure 162. Defining
DailyandTotalCPU hour quotas. -
After clicking the
SUBMITbutton, check that the quotas were updated successfully.In the example screenshot below, the quotas have been updated according to the settings defined in the previous step.
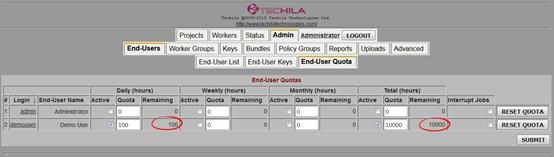 Figure 163. The
Remainingcolumns display how many CPU hours are still available in the quota.
9.8. Modifying End-User Quotas
This Chapter contains instructions on how to modify existing End-User quotas.
Note! If you wish to reset the CPU time quota of an End-User, this can be done by clicking the RESET QUOTA button. Resetting a quota will set the number of used hours in each quota to 0.
Procedure
-
Navigate to
Admin→End-Users→End-User Quota -
Tick the checkboxes for each quota you wish to activate/deactivate (daily, weekly, monthly, total)
-
For each quota you activated (ticked checkboxes), specify the number of hours that should be set as the new quota.
-
If you want that Jobs should be interrupted when the quota is exceeded, tick the
Interrupt Jobscheckbox. -
Click the
SUBMITbutton to apply the new values.In the example screenshot below, the
Dailycheckbox has been unticked and the value 20000 has been entered in theTotalcolumn. These settings could be used to remove the daily quota limit and increase the total quota limit to 20000 CPU hours. Figure 164. Apply changes by clicking the SUBMIT button.
 -
After clicking the SUBMIT button, check that the quota was updated correctly.
The example screenshot below displays the quota for
demouserafter applying the changes described in the previous step. TheDailyquota has been deactivated, as indicated by the unticked checkbox, meaning the daily quota will not be enforced. TheTotalquota has been increased from 10000 CPU hours to 20000 CPU hours as indicated by the value in the remaining field.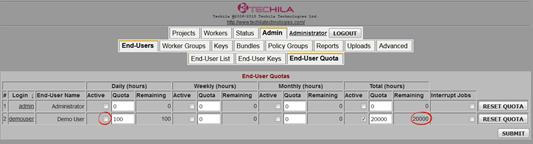 Figure 165. Changes will be reflected as new values in the
Remainingcolumns and as unticked/tickedActivecheckboxes.
9.9. Removing End-User Quotas
This Chapter contains instructions for removing End-User quotas.
Procedure
-
Navigate to
Admin→End-Users→End-User Quota -
Untick the checkbox for each quota for the Techila Web Interface account.
-
Click the
SUBMITbutton.The quotas are no longer active for the End-User.
10. Managing Techila Worker Groups
This section describes the following procedures related to managing Techila Worker Groups:
10.1. Adding Techila Worker Groups
This procedure describes how to create Techila Worker Groups.
Procedure
-
Navigate to
Admin→Worker Groups.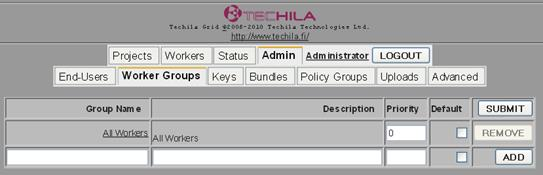 Figure 166. The
Worker Groupspage lists existing Techila Worker Groups. New groups can be created by filling in the applicable fields and clicking theADDbutton. -
Add the following details:
-
Group name
-
Description
-
Priority
-
-
Click the
ADDbutton to create the Techila Worker Group is created.
10.2. Assigning Techila Worker Groups to an End-User
This procedure describes how to assign Techila Worker Groups to an End-User. An End-User must have at least one Techila Worker Group assigned in order for Projects to be computed.
Procedure
-
Navigate to
Admin→End-Users. -
Click on the
Loginof the End-User you wish to assign Techila Worker Groups to -
The
End-User Settingspage opens displaying theUnassigned Worker GroupsandAssigned Worker Groupstables: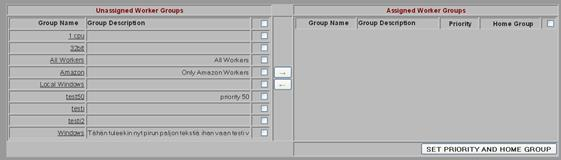 Figure 167. Techila Worker Groups that are accessible to the End-User are displayed in the
Assigned Workerstable. -
Tick the checkboxes of the Techila Worker Groups you wish give the End-User access to. Click the arrow button to assign the Techila Worker Groups to the End-User
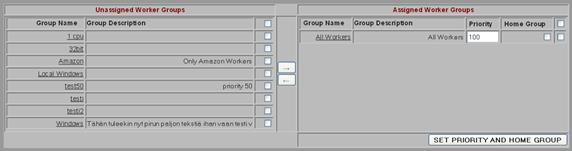 Figure 168. Techila Worker Groups can be assigned, and unassigned, by ticking the applicable checkboxes and clicking the arrow buttons located between the tables.
The End-User now has access to the Techila Worker Groups listed in the Assigned Worker Groups table.
10.3. Auto Assigning Techila Workers to Techila Worker Groups
This procedure describes how to use Auto Assignment to automatically assign new Techila Workers to Techila Worker Groups.
Note! The Techila Worker being auto assigned must be new. Auto Assignment is not run on existing Techila Workers.
-
Navigate to
Admin→Advanced→Auto Assignmentsto open theAuto Assignments Worker Grouppage: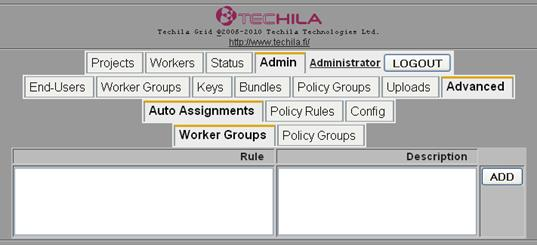 Figure 169. When applicable, this page will display information on existing Auto Assignment Rules for Techila Worker Groups. In this figure, no existing Auto Assignment Rules exist.
 -
Enter the LDAP filter in the
Rulefield and a Description in theDescriptionfield.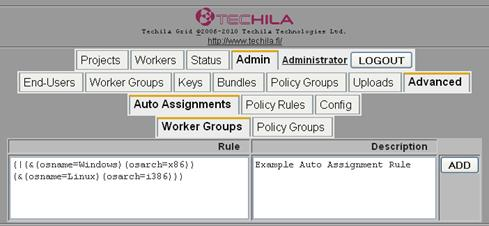 Figure 170. New Auto Assignment Rules can be created by entering an LDAP filter in the
Rulefield. -
Click
ADDto create the Auto Assignment Rule.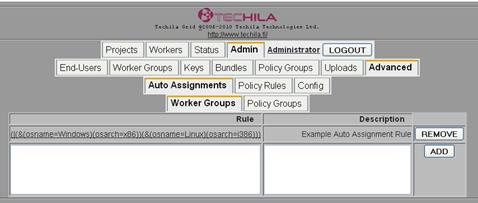 Figure 171. The Auto Assignment Rule will now be displayed on the page.
 -
Click on the Auto Assignment Rule
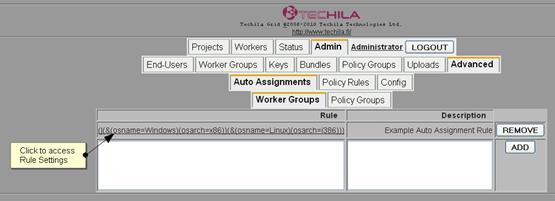 Figure 172. After creating the Auto Assignment Rule, the new rule will be displayed on the page. Clicking on the
Auto Assignment Rulecan be used to access theRule Settingspage. -
The
Rule Settingspage will open. Tick the checkbox next to the Techila Worker Group Name you want new Techila Workers matching the Auto Assignment Rule to be assigned to.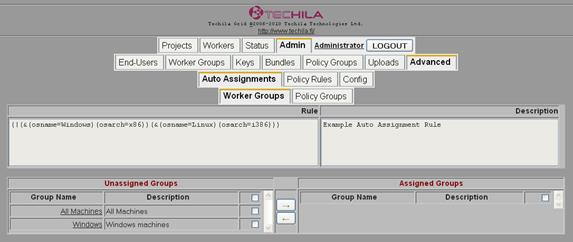 Figure 173. The Rule Settings page can be used to assign or remove Techila Worker Groups to the Auto Assignment rule. New Techila Workers meeting the filter criteria are automatically assigned to the Techila Worker Groups that are visible in the Assigned Groups table.
 -
Click the arrow button to assign the Techila Worker Group(s) to the Auto Assignment Rule.
New Techila Workers matching the LDAP filter will be automatically assigned to the Techila Worker Group(s) listed in the Assigned Groups table.
10.4. Manually Assigning Techila Workers to Techila Worker Groups
This procedure describes how to manually assign Techila Workers to Techila Worker Groups.
Procedure
-
Click on
Admin -
Click on
Worker Groups -
Click on the name of the Techila Worker Group you wish to assign Techila Workers to
-
Select the Techila Worker(s) you wish to add to by ticking the applicable checkboxes.
 Figure 174. Several Techila Workers can be selected by ticking multiple checkboxes.
 -
Click the
ADDbutton to add the Techila Workers. The Techila Worker will be assigned to the Techila Worker Group and will be visible in the Assigned Workers table.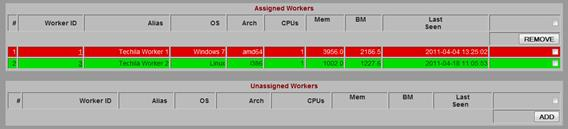 Figure 175. Techila Workers belonging to the Techila Worker Group are listed in the Assigned Workers table.
10.5. Assigning Child Groups to Parent Group
This procedure describes how to assign child groups to a parent group.
Procedure
-
Click on
Admin -
Click on
Worker Groups -
Click on the name of the Techila Worker Group you want to set as the parent group. For example, if you want to set a Techila Worker Group named "Demo Group" as the parent group, click on "Demo Group".
 Figure 176. Click on the Techila Worker Group you want to set as the parent group.
 -
Scroll down and tick the check boxes next to the Worker Groups you want to set child groups. Click the arrow button to assign them.
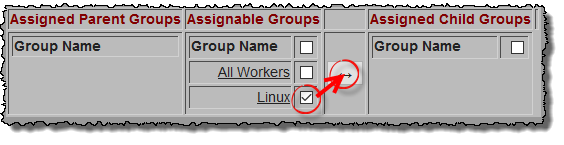 Figure 177. Select and assign the groups.
The Techila Worker Groups should now be listed in the "Assigned Child Groups" table
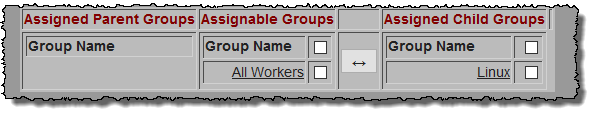 Figure 178. Assigned child group.
11. Managing Keys
This section describes the following procedures related to Key management:
11.1. Changing a Techila Worker Key Status to Trusted or Untrusted
This procedure describes how to change a Techila Worker Key status to either trusted or untrusted. The status of a Techila Worker Key must be trusted in order for the Techila Worker to participate in computations.
-
Navigate to
Admin→Keys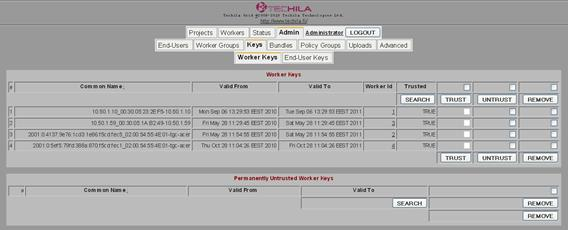 Figure 179. The Worker Keys page. The Trusted column in the Worker Keys table indicates whether the Key is trusted or not trusted.
 -
Tick the checkbox next to the Techila Worker Key you want to set trusted or untrusted, and click
TRUSTorUNTRUST→ The key is set as trusted or untrusted, depending on which button you clicked.
11.2. Removing Techila Worker Keys
This procedure describes how to remove Techila Worker Keys.
-
Click
Admin -
Click
Keys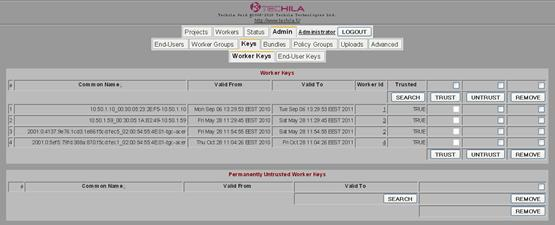 Figure 180. The
Worker Keystable contains a list of Techila Worker Keys. Several Techila Worker Keys can be selected by checking the corresponding checkboxes. -
Tick the checkbox next to the Techila Worker Keys you want remove and click
REMOVE→ The key is moved to thePermanently Untrusted Worker Keystable
11.3. Removing End-User Keys
This procedure describes how to remove End-User Keys.
-
Click
Admin -
Click
Keys -
Click
End-User Keys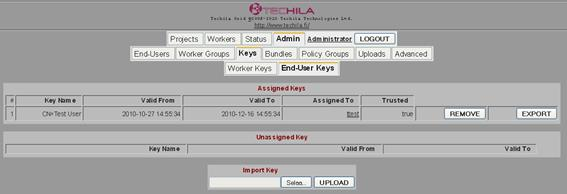 Figure 181. The
End-User Keyspage displays information on the End-User Keys registered with the Techila Distributed Computing Engine system. -
Click the
REMOVEbutton next to the End-User Key you want to remove. -
A pop-up box will ask your verification. Click
OK. The End-User Key is removed.
11.4. Assigning an End-User Key to a Techila Web Interface Account
This procedure describes how assign an End-User Key to a Techila Web Interface account
Prerequisites
-
An End-User Key that has been transferred to the Techila Server
-
An End-User Techila Web Interface account
Procedure
-
Click
Admin -
Click
End-Users -
Click on the
Loginof the End-User that you wish to assign the End-User Key to Figure 182. Open the
End-User Settingspage by clicking on theLoginof the End-User -
The
End-User Settingspage open. Locate theEnd-User Keyyou wish to assign in theUnassigned Keystable. Click theASSIGNbutton to assign the Key. Figure 183. Keys that can be assigned will be listed in the
Unassigned Keystable. -
After assignment, the Key will be listed in the
Assigned Keystable. If theTrustedcolumn states that the key is untrusted (valuefalse), click theTRUSTbutton to trust the Key. Figure 184. Set the status of the key to trusted.
The End-User Key is now assigned to the End-User.
12. Managing Bundles
This section describes the following procedures related to bundle management:
12.1. Uploading a Signed Bundle
This procedure describes how to upload a signed Bundle.
Procedure
-
Click
Admin -
Click
Uploads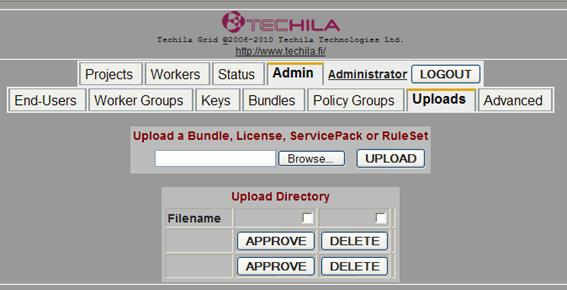 Figure 185. The
Uploadspage. -
Click
Browse, browse to the location of the Bundle and select the Bundle. -
Click
UPLOAD -
The Bundle is uploaded and will be listed in the
Upload Directory.Select the Bundle in the
Upload Directorylist, and clickAPPROVE(orDELETEif you wish to delete an uploaded bundle).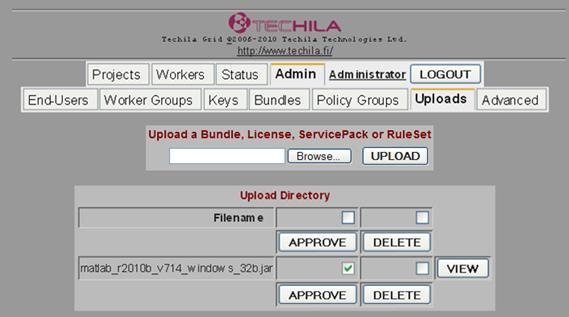 Figure 186. Bundles that have been uploaded will be displayed in the
Upload Directorytable. Bundles can be selected for approval by ticking the checkbox next to the corresponding Bundles.After clicking
APPROVE, the file will be given the suffix.ready. Figure 187. Bundles that have been approved are given the suffix
.ready. Approved Bundles will remain visible in theUpload Directoryfor a short time period. In this figure, theUpload Directorycontains one bundle that has been approved, as indicated by the.readysuffix.
12.2. Updating, Refreshing, Starting, or Stopping Server Bundles
This procedure describes how you can update, refresh, start, or stop bundles in the Server Bundles page.
Procedure
-
Click
Admin -
Click
Bundlesto open theServer Bundlespage. Figure 188. This page lists Server Bundles and can also be used to manage them.
 -
Locate the Bundle you want to manage from the Bundle list.
-
Click either
UPDATE,REFRESH,START, or `STOP `depending on which action needs to be performed.
12.3. Removing Database Bundles
This procedure describes how you can remove database Bundles. Note that removing database Bundles means that the Bundles cannot be in future Projects.
Procedure
-
Click
Admin -
Click
Bundles -
Click
DB Bundlesto open theDB bundlespage. Figure 189. The
DB Bundlespage lists all Bundles on the Techila Server. TheCreated ByandLast Usedcolumns display information on who created the Bundle and the last time the Bundle was used. -
Tick the applicable checkboxes next to the Bundle you want to remove. Ticking both checkboxes can be used to remove the Bundle from the Techila Server and Techila Workers.
-
Click
REMOVE→ A pop-up box will ask your verification. Figure 190. Pop-up box.
 -
Click
OKto confirm the deletion.
13. Managing Policies
This section describes the following procedures related to managing Policies.
Policies are automatically updated to the Techila Workers at one hour intervals. When performing modifications to Policy Groups or Policy Rules, it is recommended that you update the Policies to the Techila Workers by clicking the UPDATE POLICIES TO THE WORKERS button on the Policy Groups page to enforce the new Policies immediately.
13.1. Adding Policy Groups
This procedure describes how you can add Policy Groups.
Procedure
-
Click
Admin -
Click
Policy Groups Figure 191. The
Policy Groupspage displays existing Policy Groups. New Policy Groups can be created by filling the applicable fields and clicking theADDbutton. -
Fill in the following details:
-
Group Name
-
Description
-
Priority
-
-
Click
ADDto create a new Policy Group.
13.2. Editing Existing Policy Groups
This procedure describes how you can edit existing Policy Groups.
-
Click
Admin -
Click
Policy Groups Figure 192. The
Policy Groupspage lists existing Policy Groups. This screenshot illustrates an example Policy Group calledExample Groupthat has been created for demonstrative purposes. -
Click on the
Group Nameof an existing Policy Group to open thePolicy Group Detailspage.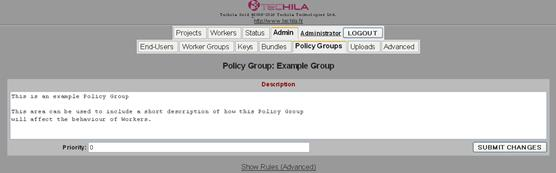 Figure 193. The
Policy Group Detailspage can be used to access more detailed information on the Policy Rules associated with the Policy Group. -
Click
Show Rules (Advanced) -
Tables will be displayed, containing Unassigned and Assigned Rules.
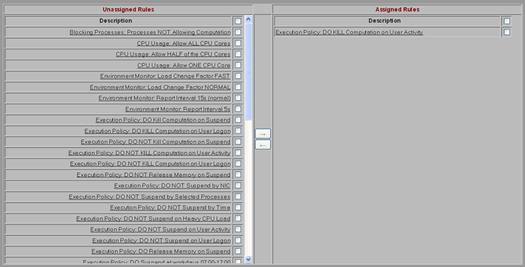 Figure 194. After clicking the
Show Ruleslink, more detailed information on the Policy Rules of the Policy Group will be displayed. In this figure, the illustrated Policy Group has one assigned Policy Rule. -
To remove a Rule from the Group, tick the checkbox next to the Rule and the button with the arrow pointing left.
To add a new rule to this group, tick the checkbox next to the rule and click the button with the arrow pointing right.
13.3. Removing Policy Groups
This procedure describes how you can remove Policy Groups.
Procedure
-
Click
Admin -
Click
Policy Groups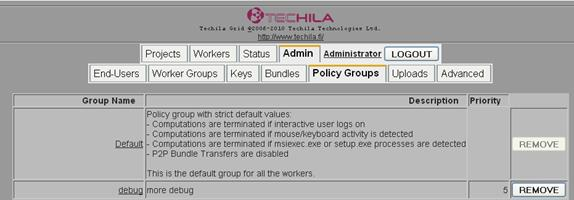 Figure 195. The
Policy Groupspage displays existing Policy groups. Policy Groups can be removed by clicking the REMOVE button. -
Find the Policy Group you wish to remove and click
REMOVEon the row containing the Policy Group. A pop-up box will ask your verification: Figure 196. Pop-up box.
 -
Click
OK→ The Policy Group is removed.
13.4. Adding Policy Rules
This procedure describes how you can add Policy Rules.
Procedure
-
Click
Admin -
Click
Advanced -
Click
Policy Rules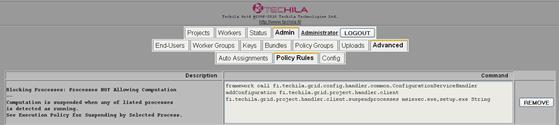 Figure 197. The
Policy Rulespage can be used to create new Policy Rules. -
Scroll down and fill in the following details:
-
Description
-
Command
-
Click OK.
A new Policy Rule is created.
-
13.5. Editing Existing Policy Rules
This procedure describes how you can edit existing policy rules.
-
Click
Admin -
Click
Advanced -
Click
Policy Rules Figure 198. Existing Policy Rules are displayed in the
Policy Rulespage. -
Click on the
Descriptionof the Policy Rule you want to edit. Figure 199. Rules can be edited by clicking the
Descriptionfield of the applicable Policy Rule. -
Make the required changes in the
Commandfield. -
Click
CHANGE→ the Policy Rule is changed.
13.6. Removing Policy Rules
This procedure describes how you can remove Policy Rules.
Procedure
-
Click
Admin -
Click
Policies -
Click
Policy Rules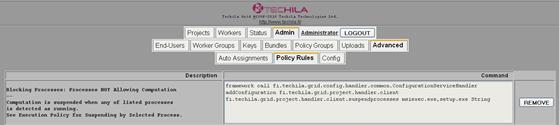 Figure 200. Existing Policy Rules can be removed by clicking the
REMOVEbutton. -
Find the policy rule you want to remove and click
REMOVE→ A pop-up box will ask your verification: Figure 201. Pop-up box.
 -
Click
OKThe Policy Rule is removed.
13.7. Auto Assigning Techila Workers to Policy Groups
This procedure describes how to use Auto Assignment to automatically assign new Techila Workers to Policy Groups.
Note! The Techila Worker being auto assigned must be new. Auto Assignment is not run on existing Techila Workers.
-
Click
Admin -
Click
Advanced -
Click
Auto Assignments -
Click
Policy Groups. TheAuto Assignments Policy Groupspage opens.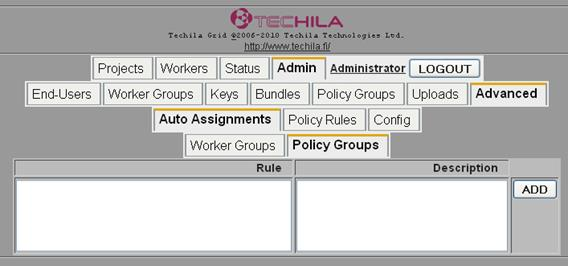 Figure 202. When applicable, this page will display information on existing Auto Assignment Rules for Policy Groups. In this figure, no existing Auto Assignment Rules for Policy Groups exist.
 -
Enter the LDAP filter in the Rule field and a Description in the Description field.
 Figure 203. New Auto Assignment Rules can be created by entering an LDAP filter in the Rule field
 -
Click
ADD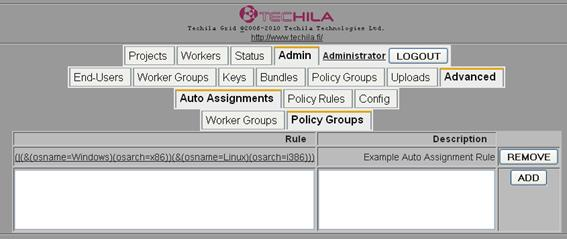 Figure 204. The Auto Assignment Rule will now be displayed on the page.
The Auto Assignment Rule is created.
-
Click on the
Auto Assignment Rule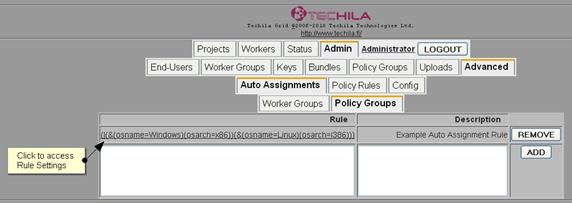 Figure 205. After creating the Auto Assignment rule, the new rule will be displayed on the page. Clicking on the Auto Assignment Rule can be used to access the Rule Settings page.
 -
The
Rule Settingspage will open. Tick the checkbox next to the Policy Group Name you want new Techila Workers matching the Auto Assignment Rule to be assigned to.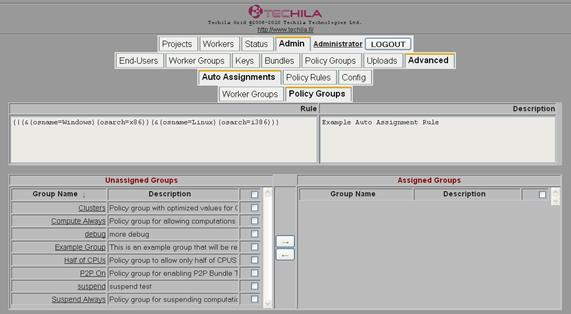 Figure 206. The Rule Settings page can be used to assign (or remove) Policy Groups to (from) the Auto Assignment rule. New Techila Workers meeting the filter criteria are automatically assigned to the Policy Groups that are visible in the Assigned Groups table.
 -
Click the arrow button to assign the Policy Group(s) to the Auto Assignment Rule.
New Techila Workers matching the LDAP filter will be automatically assigned to the Policy Group(s) listed in the Assigned Groups table.
13.8. Manually Assigning Techila Workers to Policy Groups
This procedure describes how to manually assign Techila Workers to Policy Groups.
Procedure
-
Click
Admin -
Click
Policy Groups -
Click on the name of the Policy Group you wish to assign Techila Workers to
-
Select the Techila Worker(s) you wish to add to by ticking the applicable checkboxes.
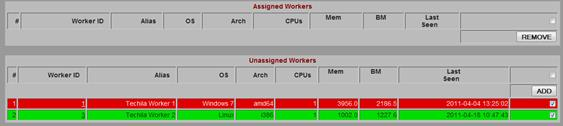 Figure 207. Several Techila Workers can be selected by ticking multiple checkboxes.
 -
Click the
ADDbutton to add the Techila Workers. The Techila Worker will be assigned to the Policy Group and will be visible in the Assigned Workers table. Figure 208. Techila Workers belonging to the Policy Group are listed in the Assigned Workers table.
14. Managing Advanced Settings
14.1. Creating Global Semaphores
This procedure describes how to create a new global semaphore, which can be used to limit the number of simultaneous processes.
Please see Introduction to Techila Distributed Computing Engine for more information about semaphores.
Procedure
-
Navigate to
Admin→Advanced→Semaphores -
Fill in the details for the new semaphore.
Field Value Name
Specify the name for the semaphore. For example, if you wish to create a semaphore called
dbprod, enter the stringdbprod.Expiration (s)
Define the expiration time in seconds for the semaphore. If you wish that the semaphore never expires, enter the value
neveror-1.Size
Define the new size for the semaphore. This defines how many tokens can be reserved at any given time.
The example screenshot below illustrates how a semaphore called
dbprodcan be created so that the number of tokens is set to 10. The expiration will be set to 3600 seconds. Figure 209. Creating a new semaphore.
 -
Check that the global semaphore was successfully created.
The example screenshot below displays the
dbprodsemaphore after it has been created with the properties described in the previous step. Figure 210. After creating the semaphore, it will be displayed on the page.
14.2. Modifying Existing Global Semaphores
This procedure describes how to edit an existing global semaphore.
Procedure
-
Navigate to
Admin→Advanced→Semaphores. -
Fill in the following values in the text fields.
Field Value Name
Specify which semaphore you want to edit. For example, if you wish to edit the properties of a semaphore named
dbprod, enter the stringdbprod.Expiration (s)
Define the new expiration time in seconds for the semaphore. If you wish that the semaphore never expires, enter the value
neveror-1.Size
Define the new size for the semaphore. This defines how many tokens can be reserved at any given time.
The example screenshot below illustrates how a semaphore called
dbprodcan be modified so that the number of tokens is increased to 10 (from 5) and that the tokens will never expire (previous configuration states that tokens expire after 3600 seconds). Figure 211. Specify which semaphore you wish to edit and enter the desired new values in the
ExpirationandSizefields. -
After clicking the
ADD/Modifybutton, check that the values for the semaphore were successfully modified.The screenshot below displays the properties of the
dbprodsemaphore after applying the changes described in the previous step. Figure 212. New semaphore properties will be displayed after applying the changes.
14.3. Removing Global Semaphores
This procedure describes how to remove an existing global semaphore.
Procedure
-
Navigate to
Admin→Advanced→Semaphores. -
Click the `REMOVE `button next to the global semaphore you wish to remove.
In the example screenshot below, semaphore
dbtestwill be removed when the highlighted button will be clicked. Figure 213. Removing a global semaphore.
 -
After clicking the REMOVE button, check that the semaphore was removed.
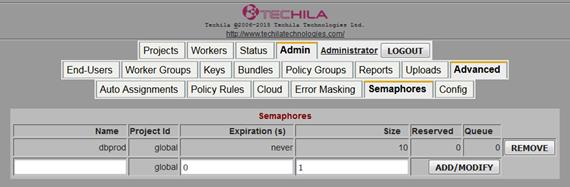 Figure 214. After removing the semaphore, it will no longer be visible.
14.4. Managing the Techila Auto Mail Handler
This procedure describes how to use configure the Techila Auto Mail Handler to send email notifications. Note, in order to enable Admin Reports the corresponding checkboxes must be ticked in the Techila Server Mail AutoMailer table.
Procedure
-
Click
Admin -
Click
Advanced -
Scroll down to the Techila Server Mail Handler table and fill in the following details:
-
Mailer: Default Recipient Address
-
Mailer: Sender Address
-
Mailer: SMTP Host Address
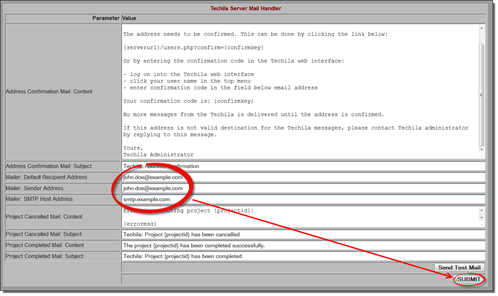 Figure 215. Configuring the applicable fields in the Techila Server Mail Handler table is required before email notifications can be sent.
-
-
Click the
SUBMITbutton to apply the changes. -
Optional: Click the Send Test Mail button to send a test mail with the configured settings.
14.5. Enabling P2P Transfers
This procedure describes how to enable P2P transfers in a TDCE environment.
-
Click
Admin -
Click
Advanced -
Scroll down to the
Techila Server P2Ptable. Figure 216. The
Techila Server P2Ptable is used to enable P2P transfers. The table can also be used to fine tune the performance of the P2P transfer mechanism. -
Tick the checkbox of the
P2P Server: Allowedparameter. Click the SUBMIT button to apply the changes. The effect of other parameters in the table is explained in Config Page. -
Click
Policy Groups.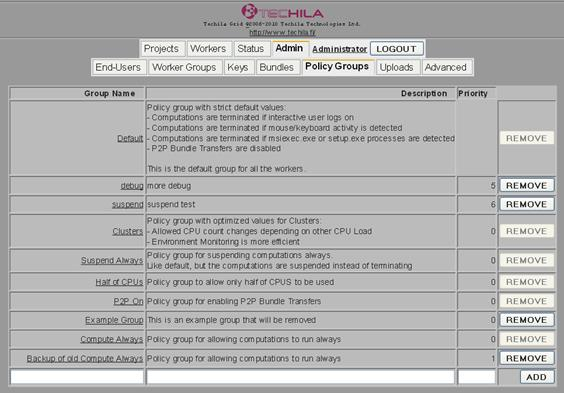 Figure 217. The
Policy Groupspage displays existing Policy Groups. The Policy Group namedP2P Oncontains the necessary Policy Rules required for enabling P2P transfers. -
Click on the
P2P Onlink in theGroup Namecolumn. ThePolicy Group Detailspage will open.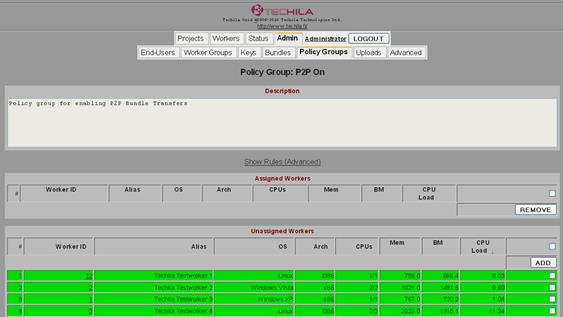 Figure 218. After clicking on the
P2P OnPolicy Group, thePolicy Group Detailspage will open. This page can be used to assign Techila Workers to the P2P On Policy Group. -
Tick the checkboxes next to the Techila Workers for which you want to enable P2P transfers.
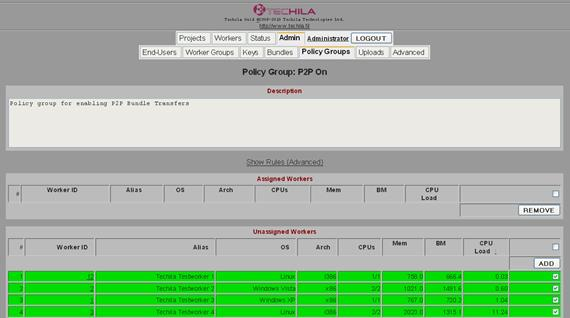 Figure 219. Checkboxes of several Techila Workers can be ticked, making it possible to assign multiple Techila Workers simultaneously.
 -
Click
ADDto add the Techila Workers to the Policy Group.The added Techila Workers will be listed in the Assigned Workers table.
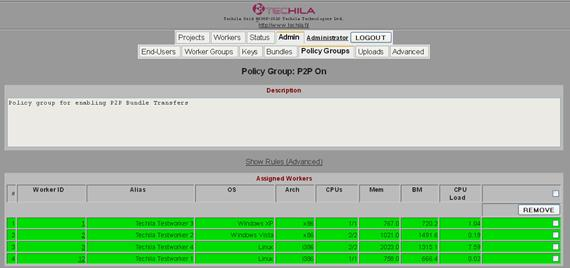 Figure 220. Techila Workers assigned to the
P2P OnPolicy Group will be displayed in the Assigned Workers table. -
Click on the Techila Worker ID number of any Techila Worker in the
Worker IDcolumn in theAssigned Workerstable. TheWorker Detailspage will open. -
Scroll down and click on the
Commanderlink.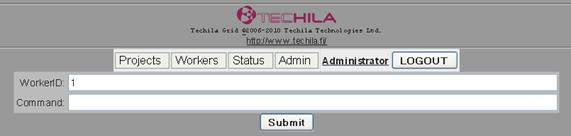 Figure 221. The Commander page can be used to execute the commands required to start the multicasting service, which is required for P2P transfers.
 -
Enter the following values to the WorkerID and Command fields:
Field Value WorkerID
0
Command
framework call fi.techila.grid.comm.oma.Worker.CommunicationServiceOma startMulticast
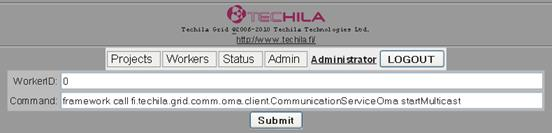 Figure 222. Entering the value
0in theWorkerIDfield will execute commands on all Techila Workers. -
Click the
Submitbutton to start the multicast service.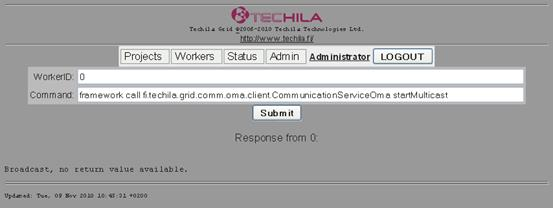 Figure 223. A notification message (
Broadcast no return…) will be displayed after clicking the Submit button.The multicast service is started on the specified Techila Workers and the Techila Workers belonging
P2P transfers are now enabled for the specified Techila Workers.
Hint! You can verify which Techila Workers are eligible to participate in P2P transfers with specific Techila Worker with the following command:
Field Value Command
framework call fi.techila.grid.comm.oma.Worker.CommunicationServiceOma getNeighbors
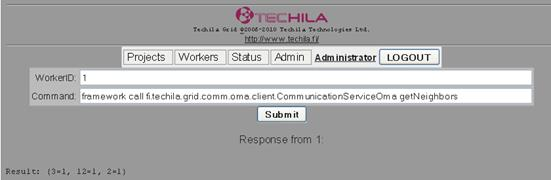 Figure 224. Eligible Techila Workers are displayed after executing the command. In this example, Techila Worker (WID 1) can perform P2P transfers with the following Techila Workers: Techila Worker with WID 3, 12 and 2.
15. Managing Cloud Settings
This Chapter contain instructions for configuring the Techila Server to support deploying Techila Workers in public cloud environments. Instructions are provided for the following processes:
Note! Some of the steps are only applicable for some public cloud environments. Applicable public cloud environments are listed at the start of each Chapter.
Note! If the Techila Server is not configured to automatically trust new Techila Worker Keys, the Keys will need to be trusted manually before the Techila Workers are allowed to participate in computational Projects. Instructions for configuring Techila Worker Keys to be trusted automatically can be found in the following Chapter:
16. Glossary
The following table gives definitions for Techila Distributed Computing Engine terminology
| Column | Description |
|---|---|
Benchmark |
An internal metric that is used to compare the CPU performance of Techila Workers when assigning Jobs. When the Techila Server is assigning Jobs to Techila Workers, Techila Workers with the highest benchmark result will be assigned Jobs first. |
Bundle |
Common data that is required on every Techila Worker. For example, libraries, binaries, and the manifest compressed in a JAR archive. Split into data bundle (shared input data), Executor Bundle (shared computational code), and library bundle (shared common prerequisites, libraries, command interpreters, etc.) |
Executor Bundle |
Bundle containing the binary files (executables) of the computation code. This may also instead contain interpretable computation code which is interpreted by a library bundle. |
Techila Worker |
The TDCE component handling the computation of the Jobs on the workstations. |
Data bundle |
Data bundle contains the common input data used in a computation Project or several Projects. The same input data is shared by all the Techila Workers computing the Project. Any non-common data which is different for each of the Techila Workers should be deployed as Project parameters (parameterized). |
Handle |
A handle is an object for storing related information about a Project and binding the TDCE operations together to control the specific Project. With multiple handles it is possible to run several Projects simultaneously within one instance of the management library. Normally the library user only sees the integer index of the handle (returned by open() method). |
Job |
Smallest unit in a computational Project. Contains a single computational package that includes partial input data (Project parameters). Jobs are executed by Techila Workers and partial results are forwarded to the server. |
Key |
Each user of the interface needs a private and a public key pair that together form the End-User’s Techila Key. These can be created with the Techila Keytool. The Techila Administrator needs to sign the End-User Key before it can be used for code signing. The End-User Key is also used for authenticating to the TDCE system. |
Library bundle |
Bundle containing common binary prerequisites used by several Projects. For example, MATLAB runtime libraries, language interpreters or mathematical libraries. |
Manifest |
A text file collected into the bundle that contains metadata of the bundle content, including the packet name, version number, and information on dependencies related to other bundles, and possibly also running instructions. The manifest states, for example, the dependency on MATLAB runtime libraries. |
Parameters |
Project parameters contain changeable arguments which are smaller than the information delivered in the data bundles. They are like the coordinates, the direction and the speed while the data bundle would be like the map of the area. In the case when the default splitter is used, the Project parameters should contain parameter "Jobs" telling the maximum number of Jobs to be created. |
Project |
A complete computational problem. This is split into Jobs by the Splitter. |
Result |
Job result that is forwarded to the server. The Job results are collected by the ResultHandler and delivered to the user program. |
ResultHandler |
Collects Job results sent by Techila Workers on the server. The default result handler collects the partial results as independent files into a ZIP archive which is delivered to the user. This archive is automatically extracted by unzip() method. |
Server |
The TDCE component communicating with the user program and the Techila Workers. Handles the splitting of the Projects to the Jobs, assigning the Jobs to the Techila Workers, handling the results, and delivering the result package back to the user program. |
Signed bundle |
The bundle which is signed with an End-User Key. All the bundles have to be signed to make them allowed in the TDCE environment. |
Splitter |
Splits the computational problem (Project) into individual Jobs on the Techila Server. Default splitter creates Jobs which in addition to Project parameters contain an index of the Job as parameter "Jobidx". |