1. Introduction
This document is intended for Techila Administrators who wish to manage their Techila Distributed Computing Engine (TDCE) environment using a command line interface.
The Techila Administrator CLI is accessible from command line interpreters for operating systems that support Java, including but not limited to:
-
Command Prompt for Windows-based operating systems
-
Shells for Unix-like systems
This document contains descriptions of the available commands in the Techila Administrator CLI and provides examples of how to use the commands. If you are still getting familiar with the terminology or theory used in this document, please refer to the documents Introduction to Techila Distributed Computing Engine and Techila Distributed Computing Engine Administration Guide for more information.
The structure of this document is as follows:
Introduction contains information about the general prerequisites for accessing the Techila Administrator CLI and instructions for making the usage of the Techila Administrator CLI more user-friendly by using environment variables.
Commands contains descriptions of available Techila CLI administrator commands. These include commands for adding a new End-User to the TDCE environment and executing reports on the Techila Server. Simple examples are included for each command.
1.1. Checking Java Availability
To use the Techila Administrator CLI, Java needs to be installed on the computer you are using.
Please ensure that you have Java installed on your computer. Java Platform, Standard Edition 6 (or newer) Java Development Kit (JDK) or Java Runtime Environment (JRE) are supported.
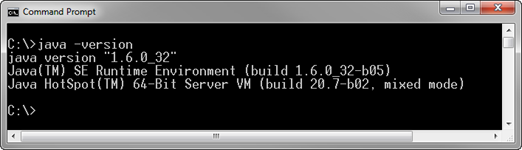
When Java is installed and available from the command line, Java version can be verified with the following command. Please note that executing the command requires that the Java installation path is listed in the PATH environment variable.
java -version
1.2. Available Commands
The Techila Administrator CLI enables the administrator to interact with the Techila Server by executing commands using the command line interpreter of their operating system. The Techila Administrator CLI can be used to execute commands that enable you to perform the following tasks:
-
adduser- Creates a Techila Account and an End-User Key -
removeuser- Removes a Techila Account -
createuser- Creates a Techila Account -
setpassword- Sets the Techila Account password -
addkey- Transfers an End-User Key to the Techila Server -
setkeytrust- Sets End-User Key trust value -
assignkey- Assign an End-User Key to a Techila Account -
unassignkey- Unassigns an End-User Key from a Techila Account -
assigngroup- Assigns a Techila Worker Group to a Techila Account -
unassigngroup- Unassigns a Techila Worker Group from a Techila Account -
listgroupusers- Lists Techila Accounts having access to specified Worker Group -
listusergroups- Lists Techila Worker Groups assigned to a Techila Account -
listusers- Displays a list of Techila Accounts -
listuserkeys- Lists End-User Keys on the Techila Server -
listworkers- Lists all Techila Workers -
listworkergroups- Lists Techila Worker Groups -
listgroupworkers- Lists Techila Workers in a Techila Worker Group -
startworker- Starts a Techila Worker -
stopworker- Stops a Techila Worker -
listreports- Lists available reports -
report- Executes a report on the Techila Server -
addreport- Adds a new report -
setreport- Modifies existing report -
removereport- Removes a report -
configureic- Configures the interconnect Techila Worker Groups -
listsemaphores- Lists semaphores on the Techila Server -
addsemaphore- Creates a new global semaphore -
removesemaphore- Removes a semaphore
The Techila Administrator CLI can be accessed using the file techila.jar, which is included in the Techila SDK and located in the techila/lib folder.
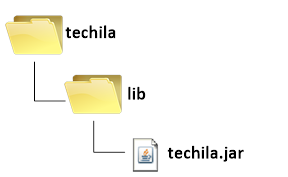
lib directory in the Techila SDK.1.3. Accessing the Techila Administrator CLI
The Techila CLI administrator commands can be accessed by changing your current working directory to the techila/lib directory in the Techila SDK and executing the following command:
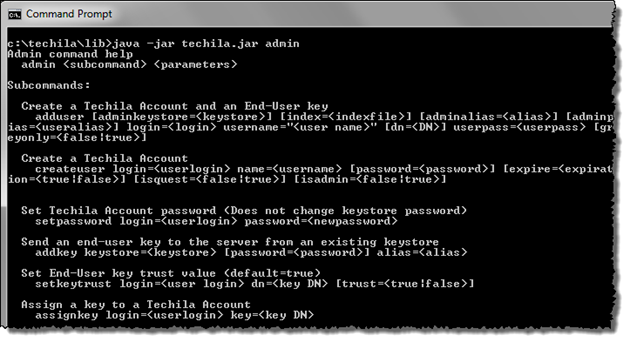
java -jar techila.jar admin
The above command will display the internal help, listing available Techila CLI administrator commands. This is illustrated in the image below.
If you do not wish to set your current working directory to techila/lib, the path to the techila.jar file must be defined when executing the commands. For example, if the full path to the techila.jar file is C:\techila\lib\techila.jar, internal help can be displayed with the command:
java -jar C:\techila\lib\techila.jar admin
Executing Techila CLI administrator commands is done by defining the name of the administrator command and any possible parameters for the command. This general syntax is shown below:
java -jar techila.jar admin <command> <parameters>
The <command> notation will be replaced with the Techila CLI administrator command that will be executed and the <parameters> notation with applicable parameters (if any) for the command.
Again, if the current working directory does not contain the techila.jar file, the path to the application needs to be defined. For example, if the full path to the directory that contains the techila.jar application is C:\techila\lib, Techila CLI administrator commands could be executed with the following command:
java -jar C:\techila\lib\techila.jar admin <command> <parameters>
1.4. Location of the techila_settings.ini configuration file
To use the Techila Administrator CLI, a properly configured techila_settings.ini file must be available.
The techila_settings.ini file will be automatically used if it exists in any of the locations listed below:
-
The file specified in environment variable TECHILA_SETTINGS_FILE
-
The current working directory
-
The following files from the users home directory
-
.techilarc
-
techila_settings.ini
-
-
The path specified with the environment variable TECHILA_SDKROOT
-
The parent folder of the
techila.jarfile -
The directory containing the
techila.jarfile
The locations are searched in the order they are listed above. The search process will stop, when the techila_settins.ini file is found.
If the techila_settings.ini file is not found in any of the locations listed above, the location of the file can be defined by using the -c switch. The general syntax for defining the location by using the -c switch is illustrated below:
java -jar techila.jar -c <path_to>\techila_settings.ini admin <command>
The <path_to> notation needs to be replaced with the path leading to the techila_settings.ini file.
For example, the following syntax uses the techila_settings.ini file located in C:\my_files\ when executing Techila CLI administrator commands.
java -jar techila.jar -c C:\my_files\techila_settings.ini admin <command>
1.5. Accessing the Techila Administrator CLI by Using Environment Variables
Environment variables can be used to access the Techila Administrator CLI and to define any other static parameters, such as the location of the techila_settings.ini file and the techila.jar file. This will reduce repetition and provide a convenient way to execute Techila CLI administrator commands.
To create an environment variable in a Windows environment to access the Techila Administrator CLI, execute the command below in the Windows Command Prompt. Note that the <path_to> notation should be replaced with the path leading to the techila.jar file:
set techila=java -jar <path_to>\techila.jar admin
You can also create the environment variable using the Windows Control Panel functionality. Using the Windows Control Panel to create the environment variable will make the environment variable accessible in all Command Prompt sessions.
To create an environment variable in a Linux environment to access the Techila Administrator CLI, use the command below. Again, replace the <path_to> notation in the command with the path leading to the techila.jar file on your computer:
techila="java -jar <path_to>/techila.jar admin"
You can also create an alias that accesses the Techila Administrator CLI by using the user configuration files (e.g., .bashrc) executed when logging in. This will make the Techila Administrator CLI accessible by using the alias and removing the need to set the environment variable manually.
After creating an environment variable, it can be used to execute Techila CLI administrator commands.
For example, in a Windows environment, a Techila CLI administrator command could be executed with the following syntax:
%techila% <command>
In a Linux environment, a Techila CLI administrator command could be executed using the syntax shown below:
$techila <command>
2. Commands
This Chapter contains a description of Techila CLI administrator commands.
Please note that the example syntaxes used in the following Chapters assume that the current working directory is techila/lib in the Techila SDK.
If you use a different current working directory, please modify the commands accordingly.
2.1. ListUsers
ListUsers - Display a list of Techila Accounts.
2.1.1. Syntax
listusers [showdeleted=<false|true>] [columns="<columns>..."]
2.1.2. Description
The ListUsers command displays a list of Techila Accounts. By default, the list will display the login, username, and lastseen columns for each Techila Account.
Additional (or fewer) columns can be returned by defining a comma-separated list of desired column names as input for the command.
2.1.3. Parameters
| Parameter | Default value | Description |
|---|---|---|
showdeleted |
false |
Defines whether or not removed Techila Accounts will be displayed. Value false: Do not display removed Techila Accounts. Value true: Also displays removed Techila Accounts. |
columns |
login, username, lastseen |
Comma-separated list of columns that will be returned in the list. Please see the Table below for a list of available column names. |
The table below contains a list of column names that can be given to the columns parameter when executing the command. Any columns defined when executing the command will be returned in the output.
| Column | Return Value | Description |
|---|---|---|
userid |
<int> |
The user identification number. Each Techila Account will have a unique user ID. |
username |
<string> |
The Techila Account owner name |
isadmin |
<boolean> |
Does the Techila Account have administrative permissions in the Techila Web Interface? Return value 1: Administrative permissions Return value 0: No administrative permissions |
lastseen |
<timestamp> |
Timestamp of the last activity of the End-User. This timestamp is updated by Techila Web Interface activity and each time a session is created using the management interface (typically during Project creation). If the End-User has not logged in to the Techila Web Interface or created management interface sessions, a minus sign (-) will be displayed. |
cloudpermission |
<boolean> |
Does the Techila Account have permission to deploy Techila Workers. Return value 1: Permission to deploy Techila Workers Return value 0: No permissions |
login |
<string> |
The |
projectpermission |
<boolean> |
Does the Techila Account have permission to create computational Projects? Return value 1: Permission to create Projects Return value 0: No permissions |
<string> |
The email address associated with the Techila Account. |
|
expire |
<int> |
The session expiration time for the Techila Account. If the Techila Account remains inactive for a longer time period than defined here, they will need to re-enter their login credentials to the Techila Web Interface. |
priority |
<int> |
The Techila Account priority. The Techila Server scheduling algorithm will use this priority value and will have a small effect when determining which Projects are given computational capacity. By default, all Techila Accounts have the same priority. |
isdeleted |
<boolean> |
Has the Techila Account been removed? Return value 1: Techila Account is removed Return value 0: Existing Techila Account |
bundlepermission |
<boolean> |
Does the Techila Account have permission to approve Bundles on the Techila Server? Return value 1: Permission to approve Bundles Return value 0: No permission |
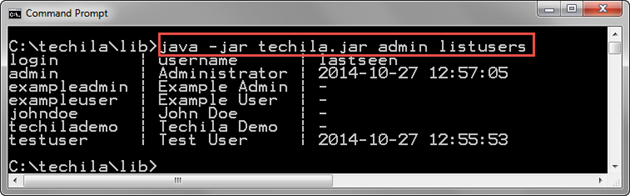
2.1.4. Example 1: Display List of Techila Accounts with Default Columns
The example command below gets a list of Techila Accounts with the default columns.
java -jar techila.jar admin listusers
The screenshot below shows the output of the ListUsers command when executed without additional parameters. This will display the columns login, username, and lastseen for each Techila Account on the Techila Server.
2.1.5. Example 2: Display List of Techila Accounts with Specified Columns
The example command below gets a list of Techila Accounts with all default columns and the isadmin column, which displays information whether or not the Techila Account has administrative permissions in the Techila Web Interface.
java -jar techila.jar admin listusers columns=login,username,lastseen,isadmin
The screenshot below shows the output of the ListUsers command when executed using the columns parameter to define a list of desired columns. The column isadmin contains information about the Techila Account’s permission status in the Techila Web Interface.

ListUsers command. In this example, Techila Accounts with login admin and exampleadmin have administrative permissions in the Techila Web Interface, as indicated by the value 1 in the isadmin column.2.2. ListWorkers
ListWorkers - Lists all Techila Workers.
2.2.1. Syntax
listworkers [columns="<columns>..."]
2.2.2. Description
The ListWorkers command retrieves a list of all Techila Workers. By default, the Techila Worker ID, status, alias, and uptime for each Techila Worker is displayed.
Additional (or fewer) columns can be returned by defining a comma-separated list of desired column names as input for the command.
2.2.3. Parameters
| Parameter | Default value | Description |
|---|---|---|
columns |
workerid,status,alias,uptime |
Comma-separated list of columns that will be displayed in the list. Please see the Table below for a list of available column names. |
The table below contains a list of column names that can be used as values for the columns parameters. All specified columns will be included in the list returned by the command.
| Column | Return Value | Description |
|---|---|---|
jobs |
<int> |
Number of Jobs on the Techila Worker, including Jobs that have been expired. This value is also shown in the Techila Web Interface. |
benchmark |
<float> |
Benchmark result of the Techila Worker. Benchmark units are an internal metric for sorting the Techila Workers based on CPU performance. |
totaldiskspace |
<int> |
Total amount of disk space on the partition the Techila Worker software is installed on. Value in bytes. |
totalmem |
<int> |
The total amount of RAM memory on the computer the Techila Worker is installed on. Value in bytes. |
lastseen |
<timestamp> |
Time stamp of the last network connection established to the Techila Server from the Techila Worker. |
activejobs |
<int> |
Number of Jobs on the Techila Worker, which have not expired. |
errors |
<int> |
Number of errors generated in Jobs on the Techila Worker since the last Job that was successfully completed. |
cpufree |
<float> |
Amount of free CPU power on the Techila Worker. |
osarch |
<string> |
Processor architecture of the Techila Worker. |
osname |
<string> |
Operating system of the Techila Worker. |
alias |
<string> |
The alias of the Techila Worker. The alias is generated automatically when the Techila Worker software is installed. The alias can also be changed in the Techila Web Interface. |
status |
<int> |
The status of the Techila Worker. Status values are shown below:
|
uptime |
<string> |
The uptime of the Techila Worker processes. If a Techila Worker is offline, a minus sign (-) will be displayed as the value. The value is displayed in seconds. |
processors |
<int> |
Total number of CPU cores on the Techila Worker. |
usablecpus |
<int> |
Number of CPU cores that can be used to assign computational Jobs. By default, one Job will be assigned to one CPU core. |
workerid |
<int> |
The Techila Worker ID number. Each Techila Worker in the Techila environment will have a unique Techila Worker ID. |
freediskspace |
<int> |
Amount of free disk space on the Techila Worker. |
bundlesize |
<int> |
Amount of disk space used by Bundles on the Techila Worker. Value in bytes. |
2.2.4. Example 1: Getting a List of Techila Workers
The example command below gets a list of Techila Workers.
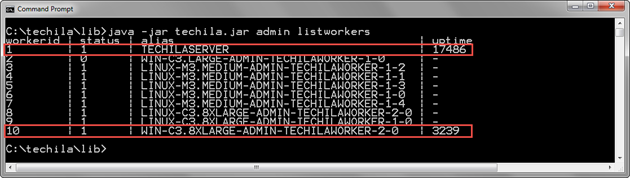
java -jar techila.jar admin listworkers
The above command will display the following information:
-
Techila Worker ID of each Techila Worker
-
Status of the Techila Worker
-
Alias of the Techila Worker
-
Uptime of the Techila Worker processes in seconds
The below screenshot contains an example output of this command. In the list of Techila Workers, two Techila Workers are currently online, as indicated by the values in the uptime column. The remaining eight Techila Workers are offline, as indicated by the minus signs in the uptime column. Both Techila Workers online are in the Running state, as indicated by the value 1 in the status column.
uptime column.2.2.5. Example 2: Getting a List of Jobs on Techila Workers
The example command below gets a list of Jobs assigned to Techila Workers.
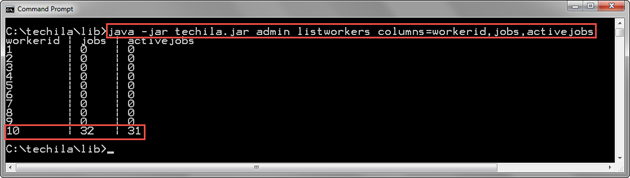
java -jar techila.jar admin listworkers columns=workerid,jobs,activejobs
The below screenshot shows an example output when the command is executed. Each line in the output will display the Techila Worker ID of a Techila Worker and the number of Jobs currently assigned to the Techila Worker. The jobs column shows how many Jobs (including expired Jobs) are assigned to the Techila Worker in total, and the activejobs column displays the number of non-expired Jobs.
In this example, Techila Worker with Techila Worker ID 10 is currently processing 32 Jobs, as shown by the value in the jobs column. One of these Jobs has expired, as indicated by the value 31 in the activejobs column.
2.3. ListGroupUsers
ListGroupUsers - Lists Techila Accounts with access to specified Techila Worker Group.
2.3.1. Syntax
listgroupusers group=<group name> [columns="<columns>..."]
2.3.2. Description
The ListGroupUsers command displays a list of Techila Accounts with access to the specified Techila Worker Group.
For End-Users to successfully use the TDCE environment for computational purposes, their Techila Account will need to have access to at least one Techila Worker Group, which has suitable Techila Workers for their purposes.
2.3.3. Parameters
| Parameter | Default value | Description |
|---|---|---|
group |
No default value. Mandatory parameter |
Name of the Techila Worker Group for which the Techila Accounts will be listed. Note! The command will only return the column headers if no Techila Accounts are assigned to the Techila Worker Group. Note! If you attempt to get a list of Techila Accounts assigned to a non-existing Techila Worker Group, the command will only return the column headers. |
columns |
login,name |
Comma-separated list of columns will be displayed. Please see the Table below for a list of available column names. |
The table below contains a list of column names that can be used as values for the columns parameter. All specified columns will be included in the list returned by the command.
| Column | Return Value | Description |
|---|---|---|
login |
<string> |
The login of the Techila Account. |
name |
<string> |
The name of the Techila Account owner. |
2.3.4. Example 1: Getting a List of Techila Accounts Assigned to a Techila Worker Group
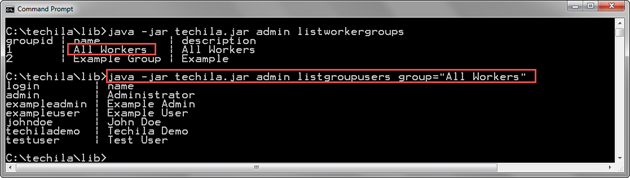
The example command below gets a list of Techila Accounts assigned to the Techila Worker Group named "All Workers".
java -jar techila.jar admin listgroupusers group="All Workers"
2.4. ListUserGroups
ListUserGroups - Lists Techila Worker Groups assigned to specified Techila Account.
2.4.1. Syntax
listusergroups login=<login> [columns="<columns>..."]
2.4.2. Description
The ListUserGroups command can be used to get a list of Techila Worker Groups assigned to a Techila Account.
2.4.3. Parameters
| Parameter | Default value | Description |
|---|---|---|
login |
No default value. Mandatory parameter |
The Techila Account for which Techila Worker Groups will be listed. Note! The command will only return the column headers if no Techila Accounts are assigned to the Techila Worker Group. |
columns |
name,cpriority |
Comma-separated list of columns will be displayed. Please see the Table below for available column names and descriptions. |
The Table below contains a list of column names that can be used as values for the columns parameter. All specified columns will be included in the list returned by the command.
| Column | Return Value | Description |
|---|---|---|
name |
<string> |
The name of the Techila Worker Group. |
priority |
<string> |
The Techila Worker Group priority. |
2.4.4. Example 1: Getting a List of Techila Worker Groups Assigned to a Techila Account
The example command below gets a list of Techila Worker Groups assigned to the Techila Account with login exampleuser.
java -jar techila.jar admin listusergroups login=exampleuser
The screenshot below contains an example output of the command. The command returns three lines of output, the first line containing the column headers and the remaining two lines containing the Techila Worker Groups assigned to the exampleuser Techila Account. In this example, Techila Worker Groups "All Workers" and "Example Group" are assigned to the Techila Account. This means that the owner of the Techila Account can use Techila Workers belonging to either Techila Worker Group in their computational Projects.

exampleuser.2.5. ListUserKeys
ListUserKeys - Lists End-User Keys on the Techila Server.
2.5.1. Syntax
listuserkeys [login=<login>] [columns="<columns>..."]
2.5.2. Description
The ListUserKeys command retrieves a list of End-User Keys on the Techila Server.
If an End-User Key is not assigned to any Techila Account, the userid column returned by this command will have the value 0, and the login column will be empty.
This command can also be used to retrieve a list of End-User Keys that are assigned to a specific Techila Account. This is done by defining the login of the Techila Account when executing the command (see Example 2).
2.5.3. Parameters
| Parameter | Default value | Description |
|---|---|---|
login |
All logins. By default, it will display a list of all End-User Keys on the Techila Server. |
The Techila Account for which End-User Keys will be listed. |
columns |
userid,login,trusted,dn |
Comma-separated list of columns that will be displayed in the list. Please see the Table below for available column names and descriptions. |
The Table below contains a list of column names that can be used as values for the columns parameter. All specified columns will be included in the list returned by the command.
| Column | Return Value | Description |
|---|---|---|
trusted |
<boolean> |
The status of the End-User Key’s trust value. Return value Return value The Key’s trusted status can be changed with the |
dn |
<string> |
The distinguished name of the End-User Key. Each End-User Key will have a unique distinguished name. |
login |
<string> |
The login of the Techila Account the key is assigned to. This column will be empty if the key is not assigned to any Techila Account. |
validfrom |
<timestamp> |
Start of the End-User Key validity period. |
validto |
<timestamp> |
End of the End-User Key validity period. |
userid |
<int> |
The user ID of the Techila Account to the End-User Key is assigned to. If the End-User Key is not assigned to any Techila Account, the value |
2.5.4. Example 1: Getting a List of All End-User Keys on the Techila Server
The command shown below displays a list of all End-User Keys on the Techila Server.
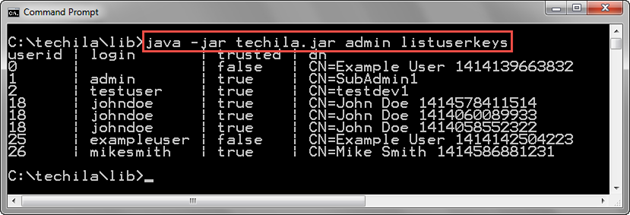
java -jar techila.jar admin listuserkeys
The screenshot below shows an example output of the command. The first line of the output displays the column headers, and the following lines display a list of End-User Keys on the Techila Server. The End-User Key on the first line is unassigned, as indicated by the value 0 in the userid column and the empty login column.
2.5.5. Example 2: Getting a List of Assigned Keys to a Techila Account
The command below gets a list of keys assigned to the Techila Account with the login name exampleuser.
java -jar techila.jar admin listuserkeys login=exampleuser
The screenshot below contains an example output of the command. The first line contains the column headers, and the following two lines have information about the keys assigned to the Techila Account exampleuser. There are two lines in this example, meaning two keys are assigned to the Techila Account.
The value of the trusted column for the key on the second line is false, meaning the key cannot be used to establish a session with the Techila Server. This means that this key cannot be used when creating computational Projects.
The value of the trusted column for the key on the third line is true, meaning that the key could be used to establish a session with the Techila Server. This means that this key can be used to create computational Projects.
Note! You can use the SetKeyTrust command to toggle the status of the key’s trusted value if required.

2.6. ListWorkerGroups
ListWorkerGroup - Lists Techila Worker Groups.
2.6.1. Syntax
listworkergroups [columns="<columns>"]
2.6.2. Description
The ListWorkerGroups command retrieves a list of existing Techila Worker Groups.
Note! After retrieving a list of Techila Worker Groups with this command, you can use the AssignGroup command to assign any Techila Worker Groups to a Techila Account. This will allow the owner of the Techila Account to use Techila Workers in the Techila Worker Group in their computational Projects.
2.6.3. Parameters
| Parameter | Default value | Description |
|---|---|---|
columns |
groupid,name,description |
Comma-separated list of columns that will be displayed in the list. Please see the Table below for available column names and descriptions. |
The Table below contains a list of column names that can be used as values for the columns parameter. All specified columns will be included in the list returned by the command.
| Column | Return Value | Description |
|---|---|---|
groupid |
<int> |
The Techila Worker Group identification number. Each Techila Worker Group will have a unique identification number. Note! If a Techila Worker Group is deleted, the identification number of the Techila Worker Group will not be re-used when creating new Techila Worker Groups. |
name |
<string> |
The name of the Techila Worker Group |
description |
<string> |
The description of the Techila Worker Group |
isdefault |
<boolean> |
Will this Techila Worker Group be automatically assigned to new Techila Accounts? Return value Return value The |
2.6.4. Example 1: Displaying a List of Techila Worker Groups
The example command below displays a list of existing Techila Worker Groups.
java -jar techila.jar admin listworkergroups
The below screenshot contains an example output of the command. The first line contains the column headers, and the following three lines display all existing Techila Worker Groups. One Techila Worker Group is displayed on each line. The groupid column has the values 1, 2 and 5, while values 3 and 4 are missing. This indicates that two Techila Worker Groups (with groupids 3 and 4) have been deleted at some point before executing the command.

2.6.5. Example 2: Displaying Automatically Assigned Techila Worker Groups
The below command displays which Techila Worker Groups will be automatically assigned to new Techila Accounts. This is done by listing isdefault as one of the column names that will be returned (columns parameter).
java -jar techila.jar admin listworkergroups columns=name,isdefault
The screenshot below displays an example output of the command. In the example, the value of the isdefault column is t (true) for Techila Worker Group "All Workers" and f (false) for other Techila Worker Groups. This means that only the Techila Worker Group "All Workers" will be assigned to new Techila Accounts.
Note! If required, the isdefault status of Techila Worker Groups can be defined in the Techila Web Interface, on the "Worker Groups" page.

2.7. ListGroupWorkers
ListGroupWorkers - Displays a list of Techila Workers in the specified Techila Worker Group.
2.7.1. Syntax
listgroupworkers group=<group> [columns="<columns>"]
2.7.2. Description
The ListGroupWorkers command displays a list of Techila Workers in the specified Techila Worker Group.
If no Techila Workers are assigned in the Techila Worker Group, the command will only return the column headers.
2.7.3. Parameters
| Parameter | Default value | Description |
|---|---|---|
group |
No default value. Mandatory parameter. |
The name of the Techila Worker Group for which you want to display assigned Techila Workers. Note! If the Techila Worker Group name contains a whitespace, the name must be enclosed in quotation marks ("). |
columns |
workerid,alias |
Comma separated list of columns that will be displayed in the list. Please see the Table below for available column names and descriptions. |
The Table below contains a list of column names that can be used as values for the columns parameter. All specified columns will be included in the list returned by the command.
| Column | Return Value | Description |
|---|---|---|
osname |
<string> |
The operating system of the Techila Worker. |
hostname |
<string> |
The hostname (on Linux) or computername (on Windows) of the Techila Worker. |
alias |
<string> |
The alias of the Techila Worker. The alias of a Techila Worker can be defined in the Techila Web Interface. |
osarch |
<string> |
Processor architecture |
lastseen |
<timestamp> |
Timestamp of the last active network connection |
workerid |
<int> |
The Techila Worker identification number. |
usablecpus |
<int> |
Number of CPU cores that can be used when assigning computational Jobs. |
2.7.4. Example 1: Listing Techila Workers in a Techila Worker Group
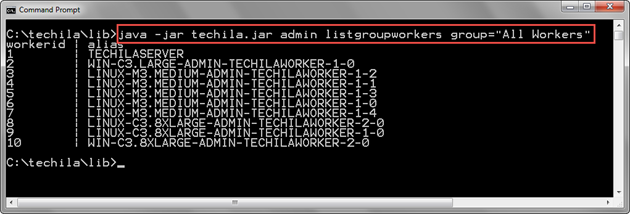
The example command below displays a list of Techila Workers assigned to the "All Workers" Techila Worker Group (group parameter).
java -jar techila.jar admin listgroupworkers group="All Workers"
The screenshot below contains an example output generated by the command. The first line of the output contains the default column headers, and the following lines contain a list of Techila Workers assigned to the "All Workers" Techila Worker Group. One line of output is generated per Techila Worker. In this example, there are 10 Techila Workers assigned in the Techila Worker Group, which means there are also 10 lines of output.
2.8. ListReports
ListReports - Lists available reports.
2.8.1. Syntax
listreports
2.8.2. Description
The ListReports command lists available reports created on the Techila Server.
2.8.3. Parameters
This command takes no input parameters.
The Table below describes the output columns generated by the command.
| Parameter | Description |
|---|---|
id |
The Report ID number. Each report has a unique identifier. |
description |
The description of the report. |
query |
Displays the SQL query that will be executed when running the report |
2.8.4. Example 1: Getting a List of Reports
The example command below gets a list of Techila Accounts with the default columns.
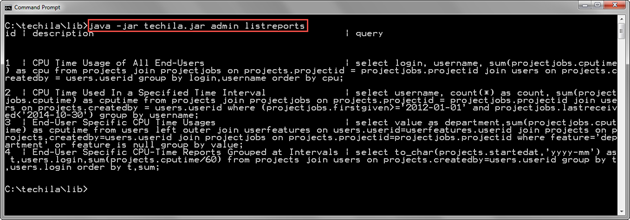
java -jar techila.jar admin listreports
In this example, there are four reports on the Techila Server.
2.9. AddUser
AddUser - Adds a new End-User to the TDCE environment by creating a new Techila Account and a new End-User Key.
2.9.1. Syntax
adduser [adminkeystore=<keystore>] [index=<indexfile>] [adminalias=<alias>] [adminpass=<password>] [userkeystore=<keystore.jks>] [useralias=<useralias>] login=<login> username="<user name>" [dn=<DN>] userpass=<userpass> [group="<worker group>"] [validity=<validity period>] [keyonly=<false|true>]
2.9.2. Description
This command creates a new Techila Account and a keystore containing the End-User Key. The End-User Key will also be automatically transferred to the Techila Server and assigned to the Techila Account.
This command can also be used to create the keystore file only. This is useful when the Techila Account has already been created, and the End-User Key has expired. In this situation, the End-User Key will be assigned to the specified existing Techila Account.
Note! You can only create Techila Accounts, which have login values that have not been previously used. This applies even if you have removed the earlier Techila Account.
2.9.3. Parameters
| Parameter | Default value | Description |
|---|---|---|
adminkeystore |
/home/techila-admin/admin/admin.jks |
Location of the keystore that contains the administrator key |
index |
Path defined in parameter |
The index file used to store key data, including serial number, distinguished name, and validity period. Information from the index file is typically only needed when revoking keys. By default, the index.xml will be read from the same directory as defined in |
adminalias |
Alias of the first key in the admin keystore. |
The alias of the administrator key in the administrator keystore. Typically, this parameter does not need to be defined. Note! If your keystore contains multiple keys, this parameter must be used to define the alias. |
adminpass |
adminpass |
The password of the administrator keystore file. |
userkeystore |
<login>.jks |
The name of the keystore file that will be created and used to store the End-User Key By default, the keystore name will be defined by using the value of the |
useralias |
<login> |
The alias of the End-User Key that will be created. By default, the alias will be the same as defined in the parameter |
login |
No default value. Mandatory parameter. |
The Techila Account login, used to log in to the Techila Web Interface. This parameter is always required. |
username |
No default value. Mandatory parameter. |
The name of the Techila Account owner |
dn |
CN=<username> <system timestamp in milliseconds> |
The distinguished name of the End-User Key. The value will be set by default based on the |
userpass |
No default value. Mandatory parameter. |
The password to the End-User keystore file that will be created. The same password will be set for the Techila Web Interface Techila Account. |
group |
All Workers |
Techila Worker Groups that will be assigned to the End-User. The "All Workers" Techila Worker Group will be assigned by default. Note! If there are any Techila Worker Groups that have the |
validity |
365 |
The validity of the End-User Key in days. By default, the validity period is 365 days. |
keyonly |
false |
Toggles Techila Account creation on/off. |
2.9.4. Example 1: Adding a New End-User
The command below will add a new End-User to the Techila system by creating a Techila Account and a keystore containing the End-User Key.
java -jar techila.jar admin adduser adminkeystore=C:\AWSDeployment\subadmin1.jks adminpass=adminpass login=johndoe userpass=userpass123 username="John Doe" userkeystore=C:\techila\johndoe.jks validity=730
The first two parameters (adminkeystore, adminpass) in the example are used to define which administrator key is accessed. The command accesses the administrator key in the C:\AWSDeployment\subadmin1.jks keystore file. The password used to access the keystore is adminpass.
The following parameters (login, username, userpass) in the example define the properties of the Techila Account that will be created for the End-User. The command will create a Techila Web Interface account with the login johndoe (login parameter) and password userpass123 (userpass parameter). The name John Doe (username parameter) will be displayed when the user is logged in to the Techila Web Interface.
The following parameters (userkeystore, userpass, validity) in the example define the properties of the keystore containing the End-User Key that will be created. The command will create a keystore file in C:\techila\johndoe.jks (userkeystore parameter). The alias of this keystore will be set to johndoe (default value of alias parameter), and the keystore will be protected with the password userpass123 (userpass parameter). The validity period of the End-User Key will be 730, which means 730 days.
The Techila Worker Group named "All Workers" (default value for the group parameter) will be automatically assigned to the End-User.
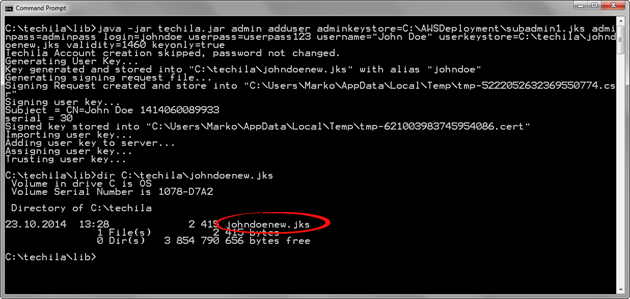
Below is a screenshot of the Windows Command Prompt after executing the command. In this example, the keystore file johndoe.jks has been generated and stored in C:\techila\johndoe.jks.
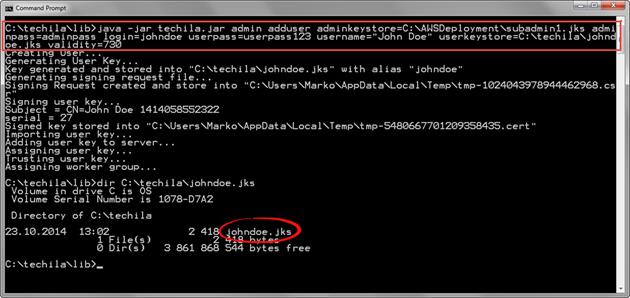
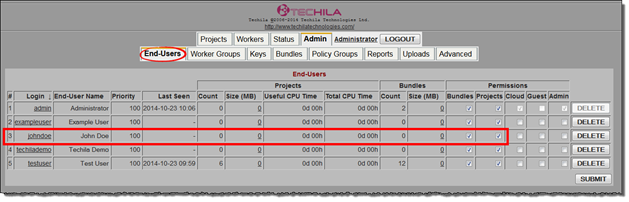
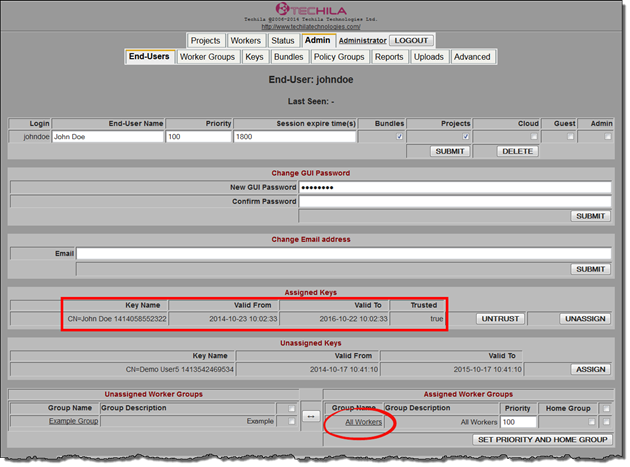
adduser command creates the keystore file in the directory you defined in the userkeystore parameter.Below is a screenshot of the Techila Web Interface, displaying the new Techila Account. The "Bundles" and "Projects" checkboxes have been automatically ticked for the Techila Account, meaning the End-User automatically has the necessary permissions to create computational Projects.
Below is another screenshot from the Techila Web Interface, which displays the Techila Account settings. The "Assigned Keys" table displays the properties of the End-User’s Key (2-year validity period), and the "Assigned Worker Groups" table shows that the Techila Worker Group "All Workers" is assigned to the Techila Account.
2.9.5. Example 2: Create a New End-User Key and Assign it to an Existing Techila Account
The command below creates a keystore containing an End-User Key. This End-User Key will be assigned to an existing Techila Account.
java -jar techila.jar admin adduser adminkeystore=C:\AWSDeployment\subadmin1.jks adminpass=adminpass login=johndoe userpass=userpass123 username="John Doe" userkeystore=C:\techila\johndoenew.jks validity=1460 keyonly=true
The parameters of the command are identical to those in Example 1 in this Chapter, except for parameters userkeystore, validity, and keyonly.
The new keystore will be saved into C:\techila\johndoenew.jks (userkeystore parameter), and the validity of the new End-User Key will be set to 1460 days (validity parameter). The new End-User Key will be assigned to an existing Techila Account, meaning no new Techila Accounts will be created (login and keyonly parameters).
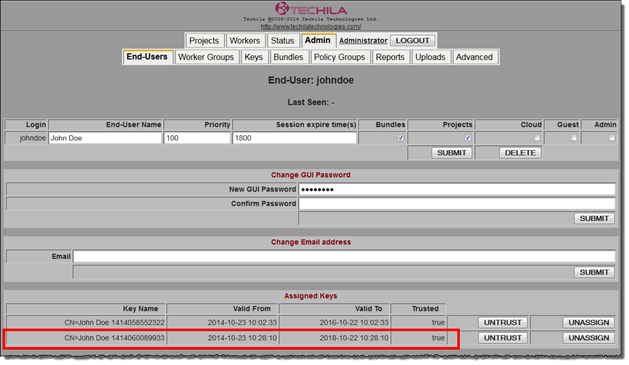
userkeystore parameter. In this example, the keystore file johndoenew.jks has been created in the directory C:\techila.The End-User Key will be assigned to the existing johndoe Techila Account, and it will be visible in the Techila Web Interface, as illustrated in the screenshot below.
2.10. RemoveUser
RemoveUser - Removes a Techila Account.
2.10.1. Syntax
removeuser login=<userlogin>
2.10.2. Description
The RemoveUser command removes the Techila Account.
After the Techila Account has been removed, any End-User Keys assigned to the Techila Account cannot initiate a new management session with the Techila Server, meaning the End-User Keys cannot be used for computational purposes.
Note! When a Techila Account is removed using the RemoveUser command, no new Techila Accounts with the same login value can be created. The removed Techila Account will still be stored in the Techila Server database and used for accounting purposes.
2.10.3. Parameters
| Parameter | Default value | Description |
|---|---|---|
login |
No default value. Mandatory parameter. |
The login of the Techila Account that will be removed. |
2.10.4. Example 1: Removing a Techila Account
The example command below will remove a Techila Account., which has the login exampleuser (login parameter).
java -jar techila.jar admin removeuser login=exampleuser
In the screenshot below, the Techila CLI administrator command listusers has been used to display a list of Techila Accounts, which includes an account for exampleuser. The Techila Account was then removed with the removeuser command. After removing the Techila Account, the Techila Account will no longer be visible when a list of Techila Accounts is retrieved with another listusers command.
Note! If you wish to view removed Techila Accounts, add the showdeleted=true parameter to the listusers command.
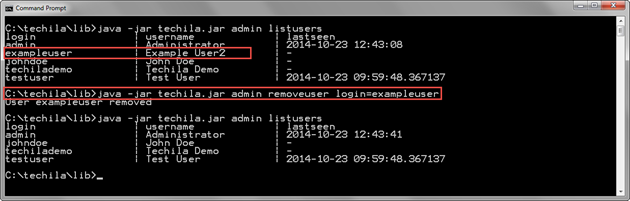
exampleuser Techila Account, it will no longer be visible in the list of Techila Accounts.2.11. CreateUser
CreateUser - Creates a Techila Account.
2.11.1. Syntax
createuser login=<login> name=<username> password=<password> [expire=<expiration>] [bundlepermission=<true|false>] [projectpermission=<true|false>] [isquest=<false|true>] [isadmin=<false|true>]
2.11.2. Description
The CreateUser command creates a new Techila Account. The End-User can then access the Techila Web Interface using the Techila Account login and password.
Note! This command will not create a keystore file containing an End-User Key. If you wish to add a new End-User to your TDCE environment who can also create computational Projects, please use the AddUser command described in AddUser.
2.11.3. Parameters
| Parameter | Default value | Description |
|---|---|---|
login |
No default value. Mandatory parameter. |
The login of the Techila Account that will be created. |
name |
No default value. Mandatory parameter |
The name of the Techila Account owner. It will be displayed in the Techila Web Interface when the End-User is logged in. |
password |
No default value. Mandatory parameter |
The Techila Account password. The End-User can log in to the Techila Web Interface with the password defined here. |
expire |
1800 |
The Techila Web Interface session expiration period. Suppose the End-User remains inactive in the Techila Web Interface for a longer time period than defined with this parameter. In that case, they will be prompted to re-enter their login credentials. Value in seconds. |
bundlepermission |
true |
Gives the Techila Account permission to approve Bundles. |
projectpermission |
true |
Gives the Techila Account permission to create Projects. |
isquest |
false |
Legacy feature. It can be used to give the Techila Account access to the administrator pages in the Techila Web Interface without giving control over the features on these pages. |
isadmin |
false |
Can be used to give the Techila Account access to the administrator pages in the Techila Web Interface and full control of these pages. |
2.11.4. Example 1: Creating a Regular Techila Account
The example command below will create a regular Techila Account (no isadmin parameter, default false value will apply) with login exampleuser4 (login parameter) and password exPass123 (password parameter). The timeout for the Techila Account will be set to 1 hour (expire parameter)
java -jar techila.jar admin createuser login=exampleuser4 name="Example User" password=exPass123 expire=3600
The screenshot below illustrates how the new Techila Account will be visible in the list of Techila Accounts.
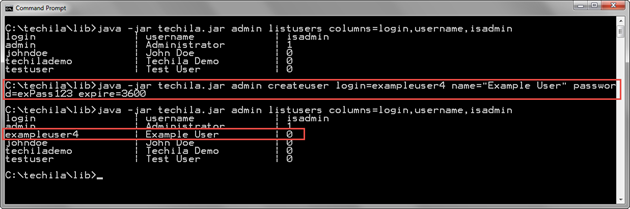
isadmin column is 0, meaning the Techila Account does not have administrative permissions in the Techila Web Interface.2.11.5. Example 2: Creating Techila Account with Administrator Permissions
The command below creates a Techila Account with administrator permissions.
java -jar techila.jar admin createuser login=exampleadmin name="Example Admin" password=exPass123 expire=3600 isadmin=true
This command would create a Techila Account with login exampleadmin (login parameter) and password exPass123 (password parameter). This Techila Account will have administrative permissions in the Techila Web Interface (isadmin parameter).
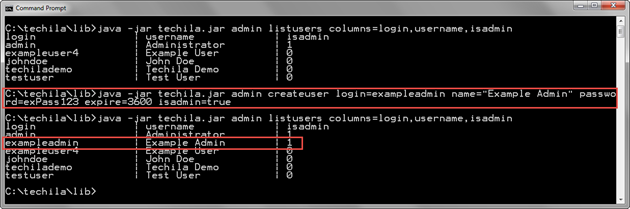
isadmin column is 1, meaning the Techila Account has administrative permissions in the Techila Web Interface.2.12. SetPassword
SetPassword - Resets the password of a Techila Account to the Techila Web Interface.
2.12.1. Syntax
setpassword login=<userlogin> password=<newpassword>
2.12.2. Description
The SetPassword command resets a Techila Account password.
Note! This command only resets the Techila Account password to the Techila Web Interface. The password for the keystore file containing the End-User Key will not be changed. Instructions for changing the keystore password can be found in the "Introduction to Techila Distributed Computing Engine" document.
2.12.3. Parameters
| Parameter | Default value | Description |
|---|---|---|
login |
No default value. Mandatory parameter. |
The login of the Techila Account for which the password will be changed. |
password |
No default value. Mandatory parameter. |
The new password for the Techila Account. |
2.12.4. Example 1: Changing Techila Account Password
The example command below will change the password for a Techila Account with login exampleuser (login parameter). The new password for the Techila account will be set to examplepass (password parameter).
java -jar techila.jar admin setpassword login=exampleuser password=examplepass
After changing the password for the Techila Account, exampleuser would be able to login to the Techila Web Interface using the password examplepass.
2.13. AddKey
AddKey - Transfers an End-User Key from an existing keystore file to the Techila Server.
2.13.1. Syntax
addkey keystore=<keystore> password=<password> [alias=<alias>]
2.13.2. Description
The AddKey command transfers an End-User Key from an existing keystore file to the Techila Server.
Note! The transferred End-User Key will not be assigned to any Techila Account. Please use the command AssignKey to assign the End-User Key to a Techila Account.
2.13.3. Parameters
| Parameter | Default value | Description |
|---|---|---|
keystore |
No default value. Mandatory parameter. |
The path and name of the keystore file that contains the End-User Key that you wish to transfer to the Techila Server. |
password |
No default value. Mandatory parameter. |
The existing keystore password. This password will be used to access the keystore file. |
useralias |
Alias of the first key in the keystore. |
The alias of the End-User Key in the keystore. Typically, this parameter does not need to be defined. Note! If your keystore contains multiple keys, this parameter must be used to define the alias. |
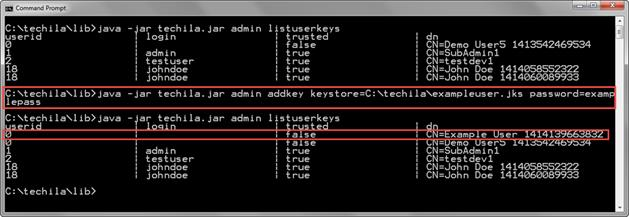
2.13.4. Example 1: Transferring an End-User Key to the Techila Server
The example command below accesses the keystore located in C:\techila\exampleuser.jks (keystore parameter), which is protected with the password examplepass (password parameter). The useralias parameter does not need to be defined because the keystore file only contains one key.
java -jar techila.jar admin addkey keystore=C:\techila\exampleuser.jks password=examplepass
The screenshot below displays a list of End-User Keys on the Techila Server before and after executing the AddKey command. After executing the AddKey command, the new End-User Key will be visible in the list of End-User Keys. The userid column displays the value 0, and the login column is empty, meaning the End-User Key is not assigned to any Techila Account.
2.14. SetKeyTrust
SetKeyTrust - Sets End-User Key trust value to true or false, depending on the parameters used.
2.14.1. Syntax
setkeytrust login=<login> dn=<key DN> [trust=<true|false>]
2.14.2. Description
The SetKeyTrust command sets the End-User Key trust value to trusted or untrusted, based on the value of the trust parameter.
In order for the End-User Key to be used for creating computational Projects, the End-User Key trust value needs to be set to trusted.
The SetKeyTrust command can also be used to set the trust value of an End-User Key to untrusted, which will prevent the End-User Key from being used to create computational Projects.
2.14.3. Parameters
| Parameter | Default value | Description |
|---|---|---|
login |
No default value. Mandatory parameter. |
The login of the Techila Account to which the End-User Key is assigned. |
dn |
No default value. Mandatory parameter |
The distinguished name of the End-User Key for which the |
trust |
true |
Defines whether the End-User Key will be trusted or untrusted. Key status can be set to untrusted using the value |
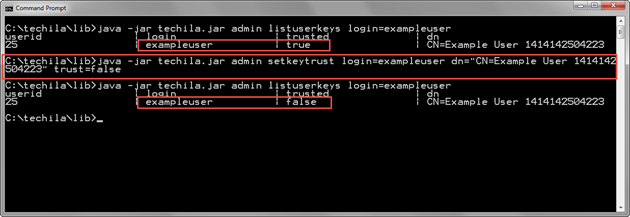
2.14.4. Example 1: Setting an Assigned End-User Key to Untrusted
The example command below modifies the trust status of the End-User Key with the distinguished name "CN=Example User 1414142504223" (dn parameter) assigned to the Techila Account with login exampleuser (login parameter). The trusted status of the End-User Key will be set to untrusted (trust parameter).
java -jar techila.jar admin setkeytrust login=exampleuser dn="CN=Example User 1414142504223" trust=false
The screenshot below displays the trust status of the End-User Key assigned to the Techila Account with login example user before and after executing the SetKeyTrust command. After executing the SetKeyTrust command, the trust status of the End-User Key’s trust value will be false as highlighted.
2.15. AssignKey
AssignKey - Assigns an End-User Key to a Techila Account.
2.15.1. Syntax
assignkey login=<login> dn=<key DN>
2.15.2. Description
The AssignKey command can be used to assign an End-User Key to a Techila Account.
End-User Keys can only be assigned if they are available on the Techila Server. End-User Keys cannot be assigned directly from keystore files. Please use the command AddKey to transfer an End-User Key to the Techila Account if needed.
This command can also be used to re-assign an assigned End-User Key to a different Techila Account. Reassigning the End-User Key will automatically remove it from the original Techila Account.
2.15.3. Parameters
| Parameter | Default value | Description |
|---|---|---|
login |
No default value. Mandatory parameter. |
The login of the Techila Account to which the End-User Key will be assigned. |
dn |
No default value. Mandatory parameter |
The distinguished name of the End-User Key that will be assigned. |
2.15.4. Example 1: Assigning an Unassigned End-User Key to a Techila Account
The example command below assigns an End-User Key with the distinguished name CN=Example User 1414139663832 (dn parameter) to the Techila Account with login exampleuser (login parameter).
java -jar techila.jar admin assignkey login=exampleuser dn="CN=Example User 1414139663832"
The screenshot below displays the status of the End-User Keys assigned to Techila Accounts before and after executing the AssignKey command. Before executing the AssingKey command, the defined End-User Key is not assigned to any Techila Account. After executing the AssignKey command, the End-User Key with the specified distinguished name is assigned to the Techila Account with login exampleuser.
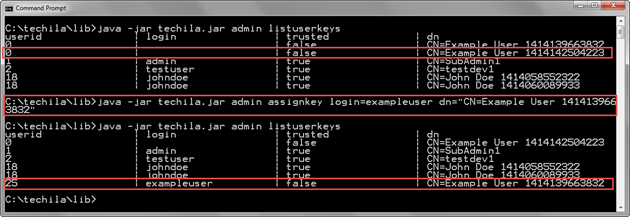
exampleuser Techila Account, the value exampleuser will be displayed in the login column for the End-User Key.2.15.5. Example 2: Reassigning End-User Key to a Different Techila Account
The example command below assigns an End-User Key with the distinguished name CN=Example User 1414139663832 (dn parameter) to the Techila Account with login testuser (login parameter).
java -jar techila.jar admin assignkey login=testuser dn="CN=Example User 1414139663832"
The screenshot below displays the status of the End-User Keys assigned to Techila Accounts before and after executing the AssignKey command. Before executing the AssingKey command, the specified End-User Key is assigned to the Techila Account with login exampleuser.
After executing the AssignKey command, the End-User Key with the specified distinguished name is reassigned to the Techila Account with login testuser. No End-User Keys are assigned to the exampleuser Techila Account.
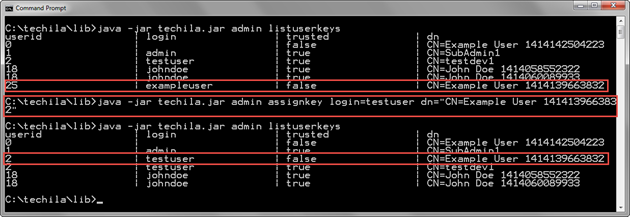
login column will display the new value.2.16. UnassignKey
UnassignKey - Removes an End-User Key from a Techila Account.
2.16.1. Syntax
unassignkey login=<login> dn=<key DN>
2.16.2. Description
The UnassignKey command can be used to remove an End-User Key from a Techila Account. After being removed, the End-User Key will not be assigned to any Techila Account.
End-User Keys not assigned to any Techila Account cannot be used to create sessions to the Techila Server or for signing Bundles, meaning the End-User Key cannot be used for computational purposes.
Unassigned End-User Keys can be assigned to Techila Accounts using the AssignKey command.
2.16.3. Parameters
| Parameter | Default value | Description |
|---|---|---|
login |
No default value. Mandatory parameter. |
The login of the Techila Account from which the End-User Key will be removed. |
dn |
No default value. Mandatory parameter |
The distinguished name of the End-User Key that will be unassigned. |
2.16.4. Example 1: Unassigning an End-User Key from a Techila Account
The example command below unassigns an End-User Key with the distinguished name CN=Example User 1414139663832 (dn parameter) from the Techila Account with login testuser (login parameter).
java -jar techila.jar admin unassignkey login=testuser dn="CN=Example User 1414139663832"
The screenshot below displays the status of the End-User Keys assigned to Techila Accounts before and after executing the UnassignKey command. Before executing the UnassignKey command, the defined End-User Key is assigned to the Techila Account with login testuser. After executing the UnassignKey command, the End-User Key with the specified distinguished name is not assigned to any Techila Account. This can be seen from the userid column, which has the value 0, and the empty login column.
The login and userid columns will reflect the change after unassigning the End-User Key. image::image047.png[]
2.17. AssignGroup
AssignGroup - Assigns a Techila Worker Group to a Techila Account.
2.17.1. Syntax
assigngroup login=<login> group=<group name>
2.17.2. Description
The AssignGroup command can be used to assign a Techila Worker Group to a Techila Account. Assigning a Techila Worker Group to an End-User’s Techila Account will give the End-User access to all Techila Workers in the Techila Worker Group.
Several Techila Worker Groups can be assigned to a Techila Account by executing this command multiple times with desired Techila Worker Group names.
2.17.3. Parameters
| Parameter | Default value | Description |
|---|---|---|
login |
No default value. Mandatory parameter. |
The login of the Techila Account to which the Techila Worker Group will be assigned. |
group |
No default value. Mandatory parameter |
The name of the Techila Worker Group that will be assigned. If the Techila Worker Group name contains whitespace, the name must be enclosed in quotation marks, e.g., "Example Group". |
2.17.4. Example 1: Assigning a Techila Worker Group to a Techila Account
The example command below assigns a Techila Worker Group named "Example Group" (group parameter) to the Techila Account with login johndoe (login parameter).
java -jar techila.jar admin assigngroup login=johndoe group="Example Group"
The screenshot below displays a list of Techila Worker Groups assigned to the Techila Account johndoe before and after executing the AssignGroup command. Before the AssignGroup is executed, only the "All Workers" Techila Worker Group is assigned to the Techila Account. After the AssignGroup has been executed, the Techila Worker Group named "Example Group" is also assigned to the Techila Account.

2.18. UnassignGroup
UnassignGroup - Removes a Techila Worker Group from a Techila Account.
2.18.1. Syntax
unassigngroup login=<login> group=<group name>
2.18.2. Description
The UnassignGroup command removes a Techila Worker Group from a Techila Account. Removing a Techila Worker Group from an End-User’s Techila Account will revoke the End-User access to all Techila Workers in the Techila Worker Group.
Several Techila Worker Groups can be removed from a Techila Account by executing this command multiple times with desired Techila Worker Group names.
2.18.3. Parameters
| Parameter | Default value | Description |
|---|---|---|
login |
No default value. Mandatory parameter. |
The login of the Techila Account from which the Techila Worker Group will be removed. |
group |
No default value. Mandatory parameter |
The name of the Techila Worker Group that will be removed from the Techila Account. If the Techila Worker Group name contains whitespace, the name must be enclosed in quotation marks, e.g., "Example Group". |
2.18.4. Example 1: Removing a Techila Worker Group from a Techila Account
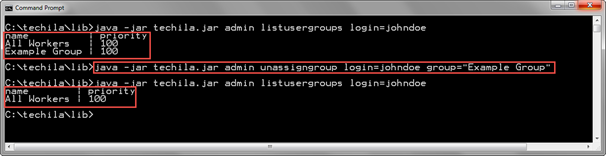
The example command below removes a Techila Worker Group named Example Group (group parameter) from the Techila Account with login johndoe (login parameter).
java -jar techila.jar admin unassigngroup login=johndoe group="Example Group"
The screenshot below displays a list of Techila Worker Groups assigned to the Techila Account johndoe before and after executing the UnassignGroup command. Before the UnassignGroup is executed, Techila Worker Groups "All Workers" and "Example Group" are assigned to the Techila Account. After executing the UnassignGroup command, only the Techila Worker Group named "All Workers" is assigned to the Techila Account.
2.19. StartWorker
StartWorker - Removes any possible Stopped statuses from Techila Workers.
2.19.1. Syntax
startworker <workerid>...
2.19.2. Description
The StartWorker command removes the Stopped status of the Techila Worker. Removing the Stopped status will allow Jobs to be assigned to the Techila Worker.
Several Techila Workers can be started using a single command by defining the Techila Worker IDs as a whitespace-separated list.
Please note that if the status of the Techila Worker is Suspended or Initializing after the Stopped status is removed, Jobs will not be assigned to the Techila Worker. In this case, Jobs will be assigned when any possible Suspended or Initializing statuses have been replaced with the Running status.
2.19.3. Parameters
| Parameter | Default value | Description |
|---|---|---|
workerid |
No default value. Mandatory parameter. |
Defines which Techila Workers will be affected. |
2.19.4. Example 1: Starting One Techila Worker
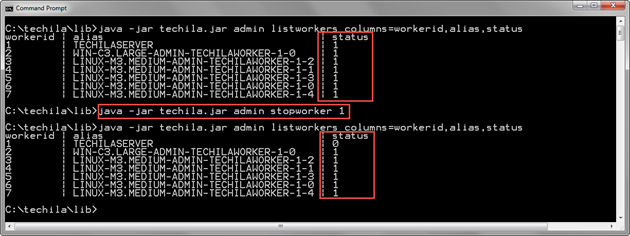
The example command below removes the Stopped status from Techila Worker with Techila Worker ID 1.
java -jar techila.jar admin startworker 1
The screenshot below displays the status of Techila Workers before and after executing the StartWorker command. Before the StartWorker command is executed, Techila Worker with Techila Worker ID 1 is stopped, as indicated by the value 0 in the status column. After executing the StartWorker command, the status of Techila Worker ID 1 is 1, indicating that the Techila Worker is no longer in the stopped state.

Stopped status of a Techila Worker.2.19.5. Example 2: Starting Several Techila Worker
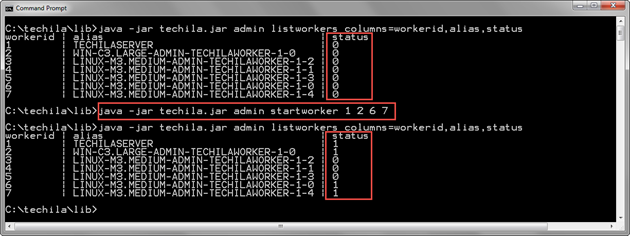
The example command below removes the Stopped status from Techila Workers with Techila Worker IDs 1, 2, 6, and 7.
java -jar techila.jar admin startworker 1 2 6 7
The screenshot below displays the status of Techila Workers before and after executing the StartWorker command. Before the StartWorker command is executed, all Techila Workers are stopped, as indicated by the value 0 in the status column. After the StartWorker command has been executed, Techila Workers with Techila Worker IDs 1, 2, 6 and 7 have been started, as indicated by the value in the status column 1.
Stopped status of several Techila Workers.2.20. StopWorker
StopWorker - Sets the status of Techila Workers to Stopped.
2.20.1. Syntax
stopworker <workerid>...
2.20.2. Description
The StopWorker command can be used to set the status of a Techila Worker to Stopped. Setting the status to Stopped will prevent new Jobs from being assigned to the Techila Worker.
Several Techila Workers can be stopped using a single command by defining the Techila Worker IDs as a whitespace-separated list.
2.20.3. Parameters
| Parameter | Default value | Description |
|---|---|---|
workerid |
No default value. Mandatory parameter. |
Defines which Techila Workers will be stopped. |
2.20.4. Example 1: Stopping One Techila Worker
The example command below stops one Techila Worker with Techila Worker ID 1.
java -jar techila.jar admin stopworker 1
The screenshot below displays the status of Techila Workers before and after executing the StopWorker command. Before executing the StopWorker command, all Techila Workers are running as indicated by the value 1 in the status column. After executing the StopWorker command, the status of Techila Worker with Techila Worker ID 1 is 0, indicating that the Techila Worker is now in the Stopped state.
2.20.5. Example 2: Stopping Several Techila Workers
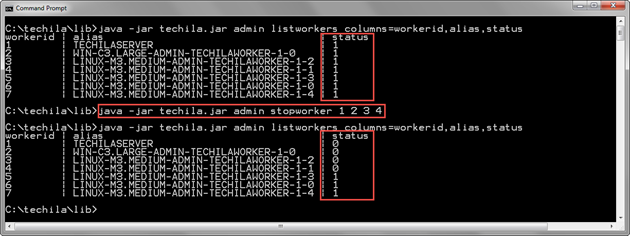
The example command below stops Techila Workers with Techila Worker IDs 1, 2, 3, and 4.
java -jar techila.jar admin stopworker 1 2 3 4
The screenshot below displays the status of Techila Workers before and after executing the StopWorker command. Before the StopWorker command is executed, all Techila Workers are in the Running state as indicated by the value 1 in the status column. After executing the StopWorker command, Techila Workers with Techila Worker IDs 1, 2, 3 and 4 have been stopped, as indicated by the value in the status column 0.
2.21. AddReport
`AddReport` - Adds a new report to the Techila Server.
2.21.1. Syntax
addreport query=<SQL query> description=<description>
2.21.2. Description
The AddReport command adds a new report to the Techila Server. After adding the report, it can be executed using the Report command.
This command requires an SQL query as an input argument. This will define what database operations are performed when this report is executed.
For more information about what SQL tables and columns can be used in reports, please see the "Techila Distributed Computing Engine Reporting Guide" document.
2.21.3. Parameters
| Parameter | Default value | Description |
|---|---|---|
query |
No default value. Mandatory parameter. |
The SQL query that will be executed when the report is executed. |
description |
No default value. Mandatory parameter. |
Description of the report. |
2.21.4. Example 1: Adding a New Report
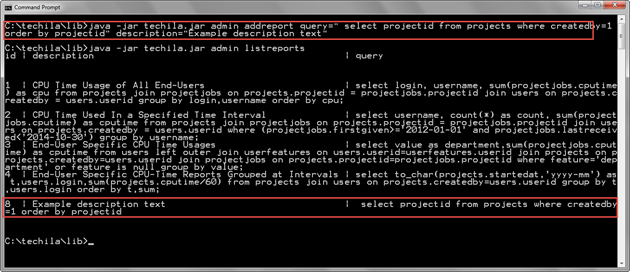
The command below adds a simple report to the Techila Server. The example report will return the Project ID numbers of Projects created by the Techila Account with userid 1.
java -jar techila.jar admin addreport query="select projectid from projects where createdby=1 order by projectid" description="Example description text"
The screenshot below contains an example output when executing the command. After executing the AddReport command, the new report will be listed when getting a list of reports with the ListReports command.
ListReports command.2.21.5. Example 2: Adding a Report Requiring Input Parameters
The example command shown below adds a query similar to the previous example. The differentiating factor is that the userid of the Techila Account will need to be passed as an input parameter each time the report is executed.
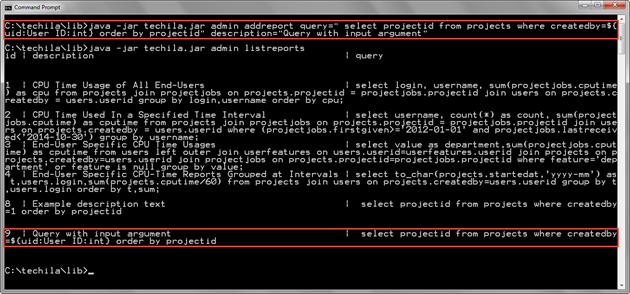
java -jar techila.jar admin addreport query="select projectid from projects where createdby=${uid:User ID:int} order by projectid" description="Query with input argument"
The below screenshot displays adding the report with the AddReport command. After the report has been added, it will be visible when a list of reports is retrieved with the ListReports command.
Please see Example 2: Executing a Report with Input Parameters for instructions on running this example report.
2.22. Report
Report - Executes a report on the Techila Server.
2.22.1. Syntax
report [headers=<true|false>] [xml=<false|true>] [<parametername=value>...] <Report ID>
2.22.2. Description
The Report command can be used to run reports that have been previously added to the Techila Server.
The following output formats are supported:
-
XML
-
Semicolon-separated values (default)
Input parameters can also be passed to the executable report. This is useful when executing the same report with different parameters (e.g., different userid).
The report output will be printed to the standard output stream. If you wish to store the output in a file, redirect the output to the desired output file as shown below:
report <id> > outputfile.txt
2.22.3. Parameters
| Parameter | Default value | Description |
|---|---|---|
headers |
true |
Toggles report headers on/off. It only affects output formatting when xml=false. Value Value |
xml |
false |
Can be used to generate output in XML format. Value Value `true: Output in XML format |
parametername |
No default value. |
Defines parameter for the report. It can be used to pass input arguments from the command line interface to the report. |
2.22.4. Example 1: Executing a Report
Please see Example 1: Adding a New Report for information on how to create the report executed in this example.
The example command shown below executes the report with Report ID 8.
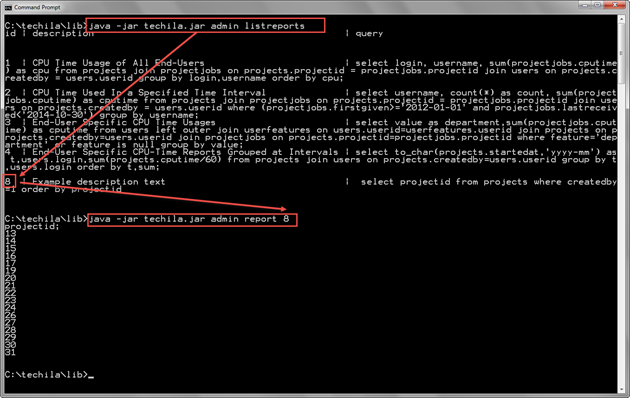
java -jar techila.jar admin report 8
In the screenshot below, the ListReports command has been used to display a list of reports on the Techila Server. After displaying the list, a report with Report ID 8 has been executed using the report command.
2.22.5. Example 2: Executing a Report with Input Parameters
Please see Example 2: Adding a Report Requiring Input Parameters for information on how to create the report executed in this example.
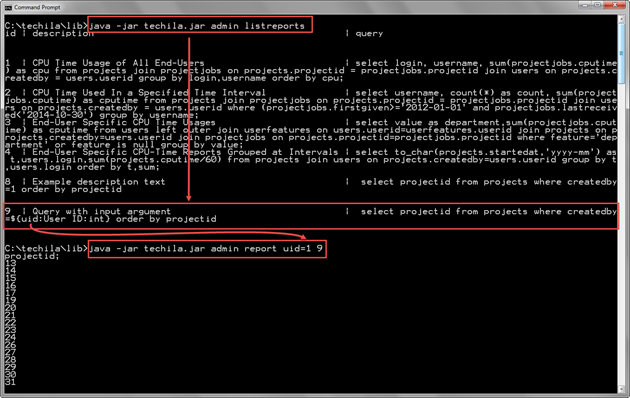
The command shown below will execute the report with Report ID 9. The value for the uid parameter is defined in the command line syntax.
java -jar techila.jar admin report uid=1 9
The value of the uid parameter will define which userid will be selected when retrieving the list of Projects with the report.
The screenshot below contains example syntax and output when executing the command. The ListReports command is used to get a list of reports. After retrieving the list of reports, the Report ID of the desired report can be selected and entered when executing the report with the Report command.
2.23. SetReport
SetReport - Replaces an existing report with an SQL query and description.
2.23.1. Syntax
setreport reportid=<Report ID> query=<SQL query> description=<description>
2.23.2. Description
The SetReport command replaces the SQL query and description of an existing report with new values.
2.23.3. Parameters
| Parameter | Default value | Description |
|---|---|---|
reportid |
No default value. Mandatory parameter. |
Defines which report will be modified. |
query |
No default value. Mandatory parameter. |
The new SQL query that will be set in the modified report. |
description |
No default value. Mandatory parameter. |
The new description of the modified report |
2.23.4. Example 1: Replace an Existing Report and Description
The example command below sets a new SQL query and description for an existing report with Report ID 8.
java -jar techila.jar admin setreport reportid=8 query="select status,projectid from projects where createdby=1 order by projectid" description="Modified example description text"
After executing the SetReport command, the report with Report ID 8 has been modified to retrieve the Project status and Project ID number of Projects created by the Techila Account with userid 1. The modified SQL query and description can be viewed with the ListReports command.

2.24. RemoveReport
RemoveReport - Removes an existing report from the Techila Server.
2.24.1. Syntax
removereport reportid=<report id>
2.24.2. Description
The RemoveReport command removes an existing report from the Techila Server.
After the report has been removed, it cannot be executed with the Report command.
2.24.3. Parameters
| Parameter | Default value | Description |
|---|---|---|
reportid |
No default value. Mandatory parameter. |
Defines which report will be removed. |
2.24.4. Example 1: Removing an Existing Report
The example command shown below will remove the report with Report ID 8.
java -jar techila.jar admin removereport reportid=8
The screenshot below shows the execution of the command. After the report has been removed with the RemoveReport command, the report will no longer be visible in the report list returned by the ListReports command.

2.25. ConfigureIC
ConfigureIC - Automatically configures interconnect Techila Worker Groups.
Note! When running the configureic command, it is strongly recommended that all Techila Workers in the Techila Distributed Computing Engine (TDCE) environment are in the Running state. If Techila Workers are in the Suspended, Stopped, or Initializing state, the interconnect test Projects will contain a reduced amount of Jobs. In this case, the result of the test Project might not be valid for the entire Techila Worker Group.
2.25.1. Syntax
configureic [forceclean=<false|true>] [keepall=<false|true>]
2.25.2. Description
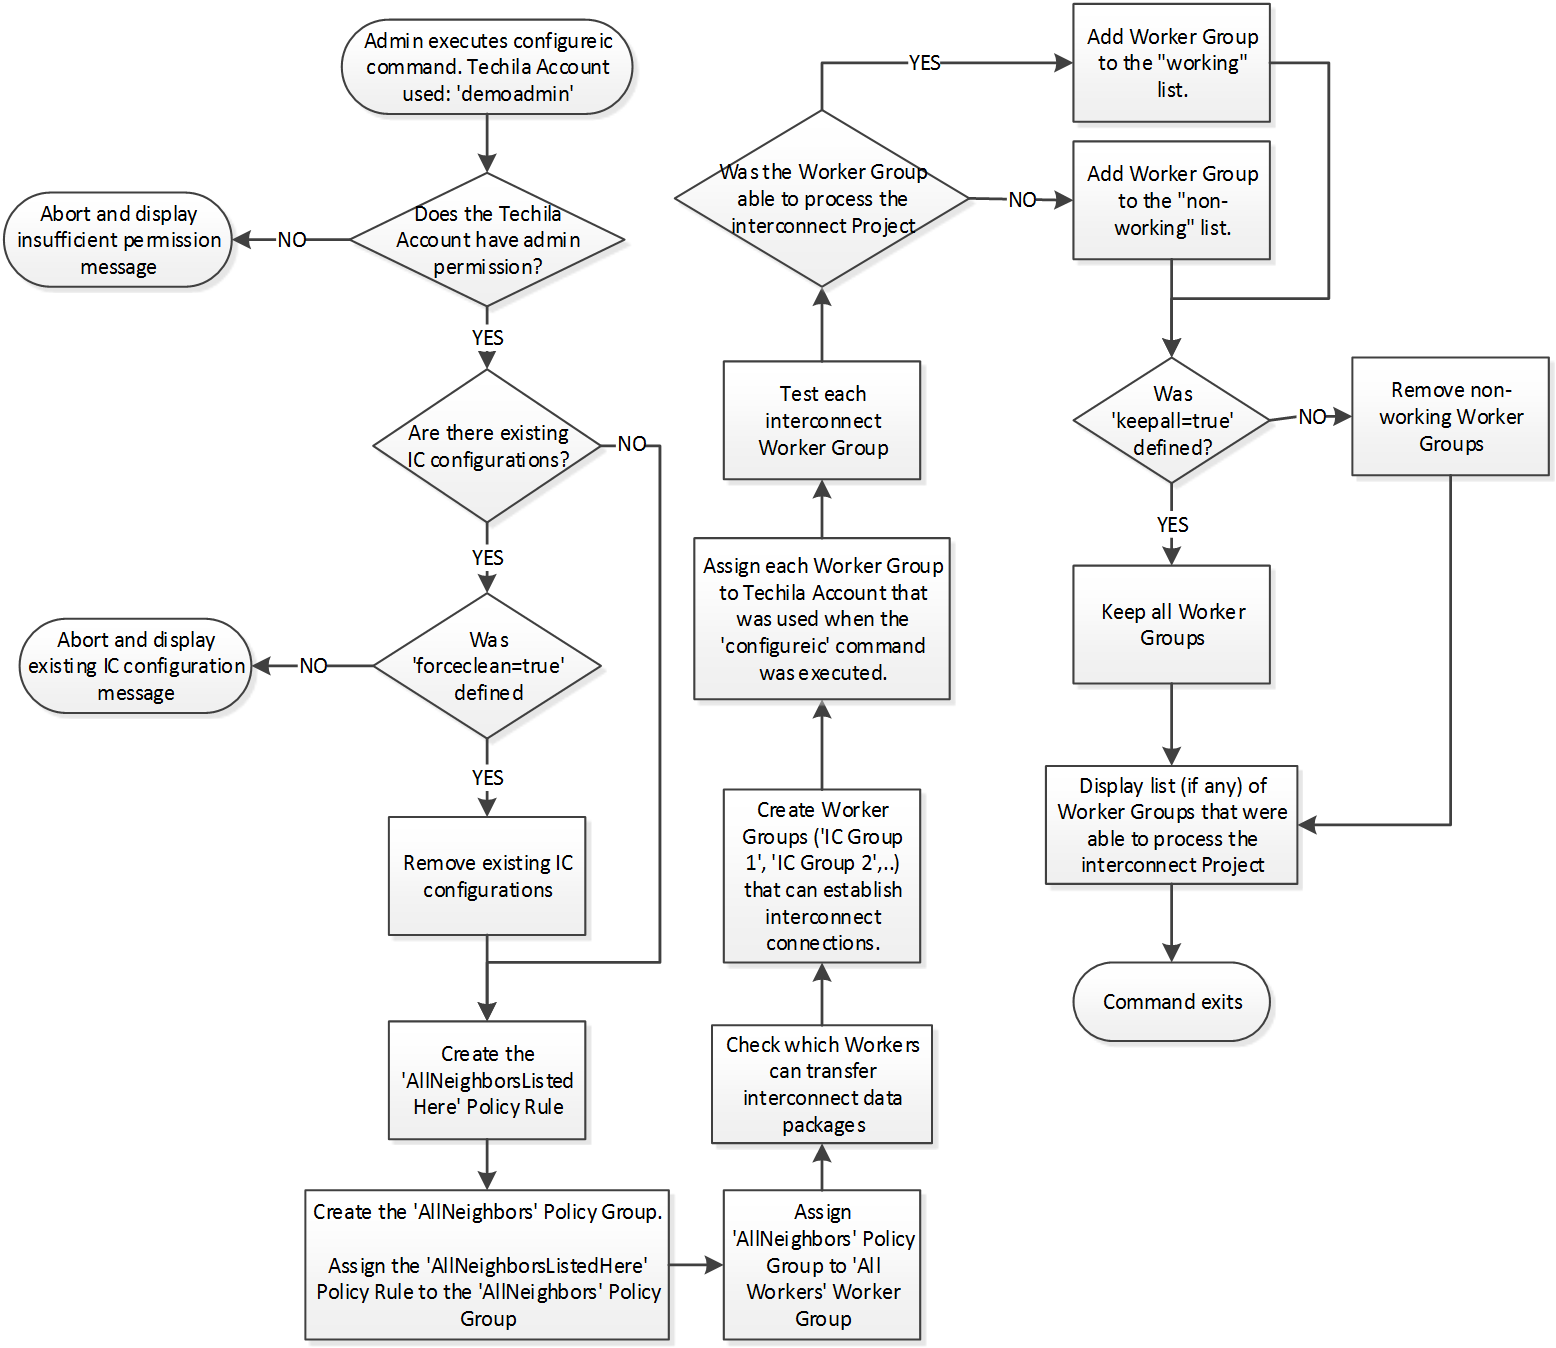
The configureic command automatically creates Techila Worker Groups, which are able to process Jobs that use the Techila interconnect functions.
The flowchart below illustrates what operations are performed when the command is executed.
The table below describes the configurations created in the Techila Web Interface when the command is executed.
| Feature | Description |
|---|---|
Worker Group(s) |
The command will create one or more Techila Worker Groups based on the network connectivity of the Techila Workers. I.e., Techila Workers are grouped so that all Techila Workers in the Techila Worker Group can transfer interconnect data packages with other Techila Workers in the Techila Worker Group. Techila Worker Groups will be named using the following convention (depending on how many unique Techila Worker Groups will be found):
Please note that if network connectivity prevents establishing interconnect networks, no Techila Worker Groups will be created. |
Policy Group |
The command will create a Policy Group, assigned to the All Workers Techila Worker Group. The name of this Policy Group will be: AllNeighbors |
Policy Rules |
The AllNeighborsListedHere |
2.25.3. Parameters
| Parameter | Default value | Description |
|---|---|---|
forceclean |
false |
Defines whether or not override existing interconnect configurations Value Value |
keepall |
false |
Defines whether or not to keep the interconnect Techila Worker Groups that failed during the testing phase. Setting this value to Value Value |
2.25.4. Example 1: Creating interconnect Techila Worker Groups
The example command shown below will create interconnect Techila Worker Groups.
java -jar techila.jar admin configureic
The screenshot below shows an example output generated by the command when run in an environment consisting of 11 Techila Workers. In this case, the command created two Techila Worker Groups, IC Group 1 (8 Techila Workers) and IC Group 2 (3 Techila Workers).

2.26. ListSemaphores
ListSemaphores - Lists semaphores on the Techila Server.
2.26.1. Syntax
listsemaphores
2.26.2. Description
The listsemaphores command retrieves a list of semaphores from the Techila Server.
2.26.3. Example 1: Listing semaphores on the Techila Server
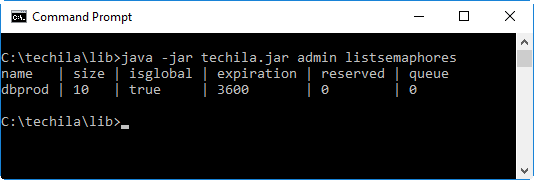
The command below retrieves a list of semaphores from the Techila Server.
java -jar techila.jar admin listsemaphores
2.27. AddSemaphore
AddSemaphore - Adds a new semaphore.
2.27.1. Syntax
addsemaphore name=<name> [size=<size>] [expiration=<expiration>]
2.27.2. Description
The AddSemaphore command can be used to either add a new global semaphore or modify the properties of an existing semaphore.
2.27.3. Parameters
| Parameter | Default value | Description |
|---|---|---|
name |
No default value. Mandatory parameter. |
Defines the name of the semaphore that will be the target of this command. If the name does not match an existing semaphore, a new one will be created. If the name matches an existing semaphore, then the size and expiration values for that semaphore will be set to match the values used when the command was executed. |
size |
1 |
Defines how many semaphore tokens the semaphore will have. By default, the semaphore will be set to contain one semaphore token. |
expiration |
never |
Defines the semaphore expiration time (in seconds). By default, the semaphore will never expire. |
2.27.4. Example 1: Adding a new semaphore
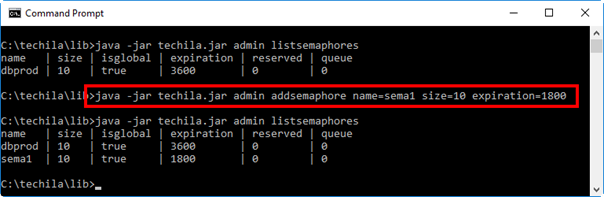
The command below creates a new semaphore named sema1 with 10 semaphore tokens, each with an expiration time of 1800 seconds (30 minutes).
java -jar techila.jar admin addsemaphore name=sema1 size=10 expiration=1800
The screenshot below shows the execution of the command and illustrates how the new semaphore can be viewed after it has been added.
2.27.5. Example 2: Modifying an existing semaphore
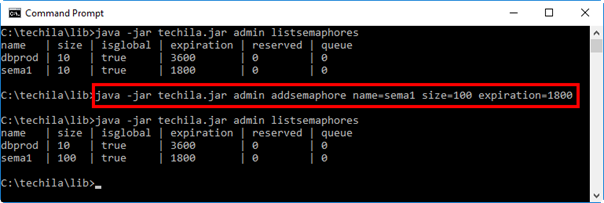
The example command shown below will modify a semaphore named sema1. When the command is executed, the number of semaphore tokens will be increased from 10 to 100.
java -jar techila.jar admin addsemaphore name=sema1 size=100 expiration=1800
The screenshot below shows the execution of the command and illustrates how the new properties of the sema1 semaphore were changed when the command was executed.
2.28. RemoveSemaphore
RemoveSemaphore - Removes an existing semaphore.
2.28.1. Syntax
removesemaphore name=<name>
2.28.2. Description
The RemoveSemaphore command can be used to remove an existing semaphore.
2.28.3. Parameters
| Parameter | Default value | Description |
|---|---|---|
name |
No default value. Mandatory parameter. |
Defines the name of the semaphore that will removed. |
2.28.4. Example 1: Removing an existing semaphore
The example command shown below will remove a semaphore named sema1.
java -jar techila.jar admin removesemaphore name=sema1
The screenshot below shows the execution of the command and illustrates how the new semaphore can be viewed after it has been added.