1. Introduction
This document is intended for End-Users and contains instructions for:
-
Downloading and configuring the Techila SDK
-
Testing the configuration settings
Note! During this document, you will see the term demouser.jks used in examples and screenshots. The demouser.jks is just an example and refers to the keystore containing your private authentication credentials. Your keystore might be named differently. The Techila SDK that is available for download via public URL does not contain a keystore file. Keystore files are created and provided by your local Techila administrator who is managing your Techila Distributed Computing Engine environment under a Techila Enterprise License. Only SDKs downloaded directly from your Techila Server installation contain a keystore file.
If you do not have a keystore file even though your organization has a Techila Enterprise License / Techila Distributed Computing Engine environment, please contact your local Techila administrator for assistance.
If you do not have access to a Techila Enterprise License / Techila Distributed Computing Engine environment, you can set up Techila Distributed Computing Engine Advanced Edition in Google Cloud Platform Marketplace by following the instructions in Techila Distributed Computing Engine in Google Cloud Platform Marketplace. After you set up Techila Distributed Computing Engine Advanced Edition in Google Cloud Platform Marketplace, you will be able to download a pre-configured Techila SDK, which contains a keystore with valid user credentials for your Techila Distributed Computing Engine environment.
This document also contains a comprehensive list of available configuration parameters in the techila_settings.ini settings file. More information on programming language specific configuration steps and example material can be found here.
The appearance of screenshots and dialogs presented in this document may vary depending on which operating system and web browser you are using.
1.1. Preparation
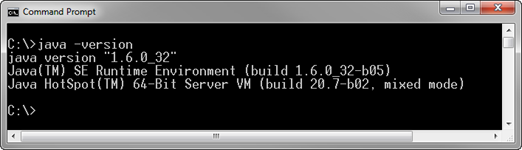
Please ensure that you have Java installed on your computer. Java Platform, Standard Edition 6 (or newer) Java Development Kit (JDK) or Java Runtime Environment (JRE) are supported.
When Java is installed and available from the command line, Java version can be verified with the following command. Please note that executing the command requires that the Java installation path is listed in the PATH environment variable.
java -version
2. Techila SDK Installation Procedure
The installation procedure is divided into three steps following steps.
Note! If you are using Techila Distributed Computing Engine Advanced Edition in Google Cloud Platform Marketplace, the configuration steps will be different. If you are using Techila Distributed Computing Engine Advanced Edition in Google Cloud Platform Marketplace please follow the instructions described here: Downloading and Configuring the Application Plugins when using Techila in Google Cloud Launcher
2.1. Downloading the Techila SDK
Please follow the instructions below to download the Techila SDK.
Download the Techila SDK from the Techila Dashboard or from an URL given by Techila support staff.
2.2. Extracting the Techila SDK on Your Computer
After downloading the TechilaSDK.zip file, extract the contents of the zip file to your local hard disk in a directory that does not require administrative permissions for file operations.
Extracting the ZIP file will create directory structure illustrated below.
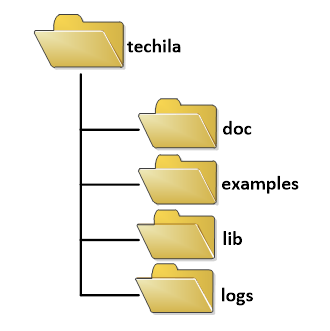
| Directory | Description of Contents |
|---|---|
doc |
.NET help file and link to online documentation. Online documentation can be found here. |
examples |
Example applications implemented in various programming languages, including MATLAB, R, Python, C and C#. Walkthroughs of the example material can be found in the programming language specific guides in the |
lib |
All functions applications relevant to the operation of the Techila SDK. Contains for example the MATLAB helper functions and the Python and R Techila packages. The contents of this folder should not be modified unless otherwise instructed. |
logs |
Will contain log information generated during past and current computational Projects |
2.3. Configuration & Testing
Before continuing, please make sure you have your keystore file (e.g. keystore.jks) available. Note that your keystore file might be named differently. The keystore file contains your private authentication credentials, which will be required when establishing a connection with the Techila Server. The Techila SDK that is available for download in the public URL does not contain a keystore file. Keystore files are created and provided by your local Techila administrator who is managing your Techila Distributed Computing Engine environment under a Techila Enterprise License.
If you do not have a keystore file even though your organization has a Techila Enterprise License / Techila Distributed Computing Engine environment, please contact your local Techila administrator for assistance.
If you do not have access to a Techila Enterprise License / Techila Distributed Computing Engine environment, you can set up Techila Distributed Computing Engine Advanced Edition in Google Cloud Platform Marketplace by following the instructions in Techila Distributed Computing Engine in Google Cloud Platform Marketplace. After you set up Techila Distributed Computing Engine Advanced Edition in Google Cloud Platform Marketplace, you will be able to download a pre-configured Techila SDK, which contains a keystore with valid user credentials for your Techila Distributed Computing Engine environment.
Always place the keystore file in a safe location. Remember that your keystore file contains your personal user credentials, and the file should not be shared with anyone in any circumstances. The keystore can be thought as a personal credit card and should be handled with equal care.
2.3.1. Configuring techila_settings.ini with a Text Editor
This Chapter contains instructions on how you can configure the techila_settings.ini settings file by using a text editor. Instructions are also provided for testing the configuration by using the command line interpreter of your operating system.
Steps for configuration and testing are listed below.
-
Navigate to the
techilafolder and locate thetechila_settings.ini.templatefile. Copy or rename this file totechila_settings.ini. This step is necessary to ensure that new versions of the Techila SDK do not overwrite your previous configuration settings. -
Open the
techila_settings.inifile with a text editor and edit the following lines according to the information you have received from your Techila Administrator:hostname=techila.example.com keystore={user.home}\{user.name}.jksThe value of the
keystoreparameter will need to point to your keystore file. Keystore files are created and provided by your local Techila administrator who is managing your Techila Distributed Computing Engine environment under a Techila Enterprise License. The Techila SDK that is available for download in the public URL does not contain a keystore file.If you do not have a keystore file even though your organization has a Techila Enterprise License / Techila Distributed Computing Engine environment, please contact your local Techila administrator for assistance.
If you do not have access to a Techila Enterprise License / Techila Distributed Computing Engine environment, you can set up Techila Distributed Computing Engine Advanced Edition in Google Cloud Platform Marketplace by following the instructions in Techila Distributed Computing Engine in Google Cloud Platform Marketplace. After you set up Techila Distributed Computing Engine Advanced Edition in Google Cloud Platform Marketplace, you will be able to download a pre-configured Techila SDK, which contains a keystore with valid user credentials for your Techila Distributed Computing Engine environment.
Note! If your Techila administrator informs you that you are not using the default port (25001), remove the comment mark from the line
#port=25001and enter the correct port.It is also recommended to edit the line defining the location of the temporary directory so it points to a folder located on a local hard disk.
tempdir={inidir}\tempIf the temporary directory is located on a network drive, the performance of your system can suffer when creating computational projects.
The following example values could be used when a keystore named
demouser.jksis located inC:\techiladirectory and the IP address of the Techila Server is10.11.12.13. Please note that these are only example values. Update your values to match your keystore name and Techila Server hostname.hostname=10.11.12.13 keystore=C:\techila\demouser.jks
Save the changes you made to the
techila_settings.inifile and close the text editor.The following steps contain instructions on how you can test your configuration.
-
Open a Command Prompt
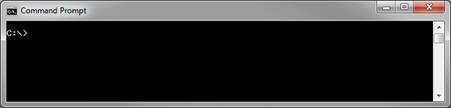 Figure 3. Command Prompt.
 -
Change your working directory to the
techilafolder. The installation path may be different on your computer than in the figure below.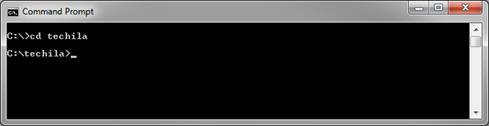 Figure 4. Changing the current working directory to the
techilafolder.Initialize a session on the Techila Server using command:
java -jar ./lib/techila.jar init
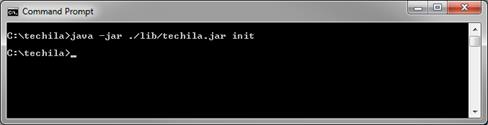 Figure 5. Initializing a session on the Techila Server with the
initcommand. -
If everything works, you should receive see the Graphical Password Dialog prompting you for your password.
 Figure 6. The Graphical Password Dialog. In this screenshot, the dialog is prompting for the keystore password.
 -
Enter your password. If everything works, the command will be executed without any output.
Optional step: If you wish to see a more verbose output, you can also execute the
testsessioncommand after executing theinitcommand. To execute the command, use the syntax shown below:java -jar ./lib/techila.jar testsession
After executing the command, you should see the following messages:
testSession returned 0
OK
-
When you have finished testing, remove the session you created using command
java -jar ./lib/techila.jar unload
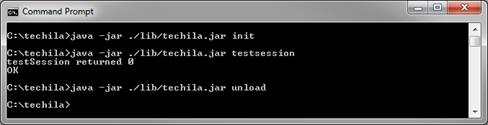 Figure 7. Removing the session with the unload command.
You have now successfully configured your
techila_settings.inifile.
Please continue by performing any applicable programming language specific configuration steps defined here. Direct links to MATLAB, R and Python configuration steps are listed below:
After you have performed all necessary configuration steps, you can continue by running example applications located in the examples folder. It is also advisable that you familiarize yourself with the Introduction to Techila Distributed Computing Engine, which provides information on how the TDCE system functions.
You can also examine the additional configuration parameters in the settings file, which are presented in Appendix 1: Description of techila_settings.ini File Parameters.
3. Appendix 1: Description of techila_settings.ini File Parameters
The techila_settings.ini file is a settings file, which contains multiple parameters controlling the functionalities of your Techila Distributed Computing Engine (TDCE) environment. Apart from the parameters described in Configuration & Testing, any modifications to the default values are not typically required. In certain situations, e.g. when analysing errors resulting from a Techila Worker Code or the Management Interface, adjusting some of the parameters can be beneficial.
This Chapter introduces the parameters available in the techila_settings.ini file and macros. A macro is a single computer instruction that results in a series of instructions. Macros can be used to refer to existing parameters in the techila_settings.ini file. The parameters will be introduced in a similar order as they appear in the techila_settings.ini file.
Macros
Macros written in curly braces (e.g. {user.home}) can be used to refer to the value of a Java property or an environment variable. Macros can also be used to refer to a parameter, which is defined in the techila_settings.ini file. Macros can be thought as a convenient way to refer to a long path name or to an existing environment variable.
In addition, two TDCE-specific macros are available:
-
{temp} refers to a temporary directory, which is the same temporary directory referred with {java.io.tmpdir}
-
{inidir} refers to the directory where the
techila_settings.inifile is located
3.1. Hostname
The hostname parameter defines the address of the Techila Server. The address can be defined either as an IP address or using the Techila Server’s (DNS) name. The address of the Techila Server is specified by the Techila Administrator.
Example:
hostname=techila.example.com
The syntax shown above defines that a Techila Server, which can be found in the address techila.example.com, will be used when performing Techila related activities, such as creating a computational Project.
3.2. Port
The port parameter defines the port on the Techila Server that should be used when connecting to the Techila Server. The port number of the Techila Server is specified by the Techila Administrator.
Example:
port=25001
The syntax shown above defines that the End-User’s computer establishes a connection to port 25001 on the Techila Server.
Port used by duplex communication mode is automatically determined by this same port definition by adding 1, making the default port 25002.
3.3. Alias
The alias parameter distinguishes, which Techila Key in the keystore file will be used when communicating with the Techila Server.
Example:
alias=johndoe
The syntax shown above defines that the Techila Key linked to alias johndoe will be used from the keystore file.
The Techila Administrator will provide the alias associated with the End-Users Techila Key at the same time when providing the keystore file.
Please note that the alias parameter can also be commented out. This is because the TDCE system will automatically use the correct key when the keystore only contains one End-User Key.
3.4. Keystore
The keystore parameter defines the location of the keystore file.
Example:
keystore=C:\techila\johndoe.jks
The syntax shown above defines that a keystore file named johndoe.jks located in the directory C:\techila\ will be used.
The keystore containing the End-User Key is protected with a password, which can be entered using three different methods. These methods are the Graphical Password Dialog, Console Password Dialog or by storing the password in the techila_settings.ini file using the password parameter.
For instructions on using either the Graphical or Console Password Dialogues, see Passworddialog. For instructions on storing the password in the techila_settings.ini file, see Password.
3.5. Passworddialog
The passworddialog parameter defines, which password dialog will be used. Techila SDK offers two alternative dialogs: the Graphical Password Dialog and the Console Password Dialog.
The Graphical Password Dialog will create a separate graphical window prompting for the End-User’s password for the specified keystore file. Following line will enable the Graphical Password Dialog:
passworddialog=fi.techila.grid.management.oma.client.GraphicalPasswordDialog
The Console Password Dialog will prompt for the End-Users password directly in the console. Following line will enable the Console Password Dialog:
passworddialog=fi.techila.grid.management.oma.client.ConsolePasswordDialog
With older versions of Java, the password might not be hidden when it is entered when using the Console Password Dialog. Upgrading to the latest version of Java will ensure that the password will not be displayed.
Note that only one password dialog can be enabled at a time.
3.6. Storepassword
The storepassword parameter enables the End-User to store the password in memory for future use. If the password is stored, it will remain stored within the same Java instance. For example in MATLAB, this means that several Projects can be created and the password will need to be entered only when creating the first Project. Re-entering the password will not be required during subsequent Projects created during the same MATLAB session.
The password will be stored as cleartext. Because of this, this option should be used carefully. Use this option only in situations, where nobody else can gain access to your computer.
To store the password in memory, use the following syntax:
storepassword=true
3.7. Password
The password parameter enables password to be stored as cleartext in the techila_settings.ini file. When a value for the password parameter is defined, the value will be automatically used when accessing the keystore file.
Example:
password=mypasswd1
The syntax shown above defines the string mypasswd1 will be used as the password when accessing the keystore file.
|
Note
|
It is HIGHLY recommended not to write the password in the techila_settings.ini file, but instead use a password dialog for entering the password!
|
3.8. Statuswindow
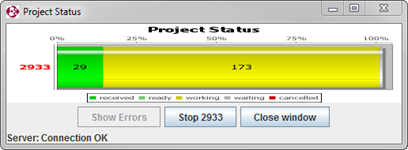
The statuswindow parameter defines whether a Graphical Status Window should be displayed when creating a Project. The Status Window is a graphical window, which displays information of Projects that are currently being processed in the TDCE environment. The Status Window can also be used to stop Projects and to access information regarding any errors occurred during a Project. A screenshot of the Status Window is presented below.
Example:
statuswindow=fi.techila.grid.management.oma.client.GraphicalStatusWindow
The above syntax displays the default Status Window. Note that displaying the Status Window requires a method for displaying graphics. If a method is not available, the Status Window will not be displayed.
If a method for displaying graphics is not available, the Status Window can be disabled by commenting the line containing the statuswindow parameter
3.9. Statuswindow.nocloseonerror
The statuswindow.nocloseonerror parameter defines whether the Status Window will be closed when errors occur in a Project. If the value of the parameter is set to false, the Status Window will close after all Projects are completed even if errors have occurred in the Projects.
To keep the Status Window open in a situation where errors occurred during a Project, use the following command:
statuswindow.nocloseonerror=true
3.10. Statuswindow.fontsize
The size of the text displayed in the Graphical Status Window can be adjusted using the statuswindow.fontsize parameter. Increasing the value of the parameter will increase the font size of the text.
Example:
statuswindow.fontsize=4
Reasonable values of the statuswindow.fontsize parameter are in the range of 0-50, where 0 corresponds to the default font size.
3.11. Tempdir
The tempdir parameter defines the location of the temporary directory, which will be used to store temporary data related to Projects. This data includes:
-
Bundles created when creating a Project. For more information on Bundles, please refer to Introduction to Techila Distributed Computing Engine.
-
Job result files downloaded from the Techila Server.
Example:
tempdir={inidir}\temp
With the syntax shown above, temporary data files will be stored in a directory called temp, which will be created in the directory containing the techila_settings.ini file.
3.12. Logdir
The logdir parameter defines the location of the directory where log files will be stored on the End-User’s computer. These log files will primarily contain messages related to communication to the Techila Server.
Example:
logdir={inidir}\logs\
With the syntax shown above, log files will be stored in a folder called logs in the path defined in the {inidir} macro. By default the syntax shown above will create the logs folder under the techila folder.
3.13. Logfile
The logfile parameter defines the names of the log files that will be created to store the log information. Names of the log files need to be unique, meaning that no two files can have the same name. Unique names can be defined using %u and %g parameters. These parameters are explained below:
-
%u = A unique number to resolve conflicts
-
%g = A generation number to distinguish rotated logs
Example:
logfile=techila_%u_%g.log
With the syntax shown above, the first log file will be named to techila_0_0.log, the second log file will be named to techila_0_1.log and so forth. The value of the %u parameter will be used to differentiate log files generated during simultaneous sessions.
For example, an End-User has two instances of MATLAB running, which are both used to create a Techila Project. Names of the log files created during these Projects will be differentiated by the %u parameter. The names of the log files containing the latest log information will be techila_0_0.log for the first MATLAB instance and techila_1_0.log for the second MATLAB instance.
3.14. Maxlogsize
Log information is appended to log files, meaning that the size of the log files increases as they are used to store more log information. The maxlogsize parameter defines the maximum size of one log file. The size of maximum allowed file size is defined in bytes.
Example:
maxlogsize=1000000
With the above syntax, the maximum allowed file size will be set to 1000000 bytes (one megabyte).
3.15. Maxlogfiles
The maxlogfiles parameter defines the maximum number of active log files that will be created per session.
Example:
maxlogfiles=10
With the syntax shown above, the maximum allowed number of log files will be set to ten per session.
3.16. Fileloglevel
Logging level is used to control, which messages will be stored in log files or printed to the console. Available logging levels are listed below in descending order:
-
SEVERE
-
WARNING
-
INFO
-
CONFIG
-
FINE
-
FINER
-
FINEST
Messages corresponding to the logging levels are listed below.
| LOGGING LEVEL | MESSAGES |
|---|---|
SEVERE |
Messages indicating a serious failure |
WARNING |
Messages indicating a potential problem |
INFO |
Informational messages |
CONFIG |
Configuration messages |
FINE |
Messages containing tracing information |
FINER |
Messages containing moderately detailed tracing Information |
FINEST |
Messages containing highly detailed tracing information |
ALL |
Indicates that all messages should be logged |
OFF |
Indicates that no messages should be logged |
Examples:
-
ALLlogs all messages -
SEVERElogs only error messages indicating a severe failure -
FINElogs error messages rated as SEVERE,WARNING,INFO,CONFIG or FINE
The fileloglevel parameter defines, what messages will be stored in the log files. It is advisable to use the ALL Logging level, as log files provide useful information when trying to locate the reason for errors that occurred during computations.
Example:
fileloglevel=ALL
With the syntax shown above, all messages will be stored in log files.
3.17. Consoleloglevel
The consoleloglevel parameter defines what messages will print to the console. Printing messages to the console means that they will be displayed in the program used for creating the Project. You can use the same log levels as listed in Fileloglevel.
For example, when a Project is created with MATLAB, messages will be printed to the MATLAB Command Window. Typically it is useful to only print the most severe error messages on the console and store detailed information in log files.
Example:
consoleloglevel=SEVERE
With the syntax shown above, only severe error messages will be printed to the console.
The image below contains a screenshot of the messages that will be printed to the command prompt when a session with the Techila Server is initialized. The consoleloglevel in this example is set to INFO.
+ .Messages printed to the console. The level of the messages printed to the console in this example is INFO. image::image031.png[]
3.18. Errorfile
The errorfile parameter defines the name and location of the file, which will be used to store error messages generated during Projects. These error messages can also be viewed from the Status Bar or by using the Techila Web Interface. For instructions on how to access the error messages from the Techila Web Interface, please refer to the document "Techila Web Interface".
Example:
errorfile={logdir}\errorfeed
With the syntax shown above, a file called errorfeed will be created (if it does not already exist) and any possible error messages generated during Projects will be appended to it.
This file is useful when trying to locate the reason for errors that during a Project. The error messages will be stored as cleartext, meaning the file can be manipulated and searched normally with a text editor.
Note that the maximum size of the file is not limited and is not cleaned up automatically. If the size of the file grows too large to be handled conveniently, consider renaming the file or deleting the error file. This will automatically cause new error messages to be appended to a new file.
3.19. Errordir
The errordir parameter defines an error directory, which will be used to store files containing error messages generated during a Project. One error file will be created for each Project containing errors. The name of the error file will be of the form project<Project ID Number>.
For example, if a Project with a Project ID number of 1234 generates errors, a file named project1234 will be created to store the error messages. The error messages are stored in cleartext, and the file can be opened using any text editor.
Example:
errordir ={logdir}\project_errors
With the syntax shown above, error files for Project errors will be created in a directory called project_errors located under directory containing the log files.
Note that the number of error files or the size of individual error files is not limited. The folder containing the error messages is not cleaned automatically, meaning that obsolete files should be manually deleted when necessary.
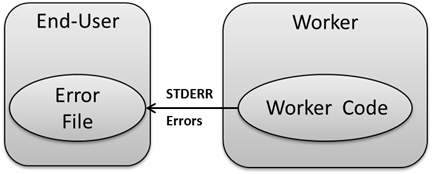
3.20. Stderr
The stderr parameter defines whether Project errors will be printed to the Standard Error (STDERR) stream. This means that, for example, if a Project is created with MATLAB, error messages would be displayed in the MATLAB Command Window.
Errors generated during a computational Project can be printed to the console with the following command:
stderr=true
3.21. Stdoutfile
The Standard Output (STDOUT) stream is an output channel between a computer program and its environment and is used to display messages. The Standard Output Config section contains parameters that control where the STDOUT streams from the Workers will be directed. Storing the STDOUT stream generated by Workers can be useful when more information regarding the current state of the computations is required.
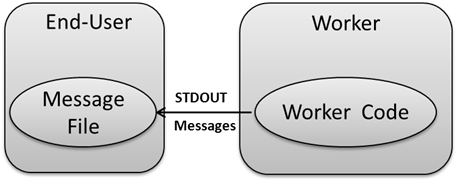
To direct the STDOUT stream generated on Workers during a Project, the following Project parameter needs to be defined in the Local Control Code. More information about the Local Control Code concept can be found in the document Introduction to Techila Distributed Computing Engine.
| Parameter | Boolean Value |
|---|---|
techila_stream_stdout |
true |
The STDOUT stream will be appended to the files every time the End-Users program polls the Techila Server for the Project status. Instructions on how to modify the polling interval can be found in Polltime.
The stdoutfile parameter defines the name and location of the file, which will be used to store the STDOUT streams. The STDOUT stream from all Workers will be appended to the file, meaning the size of the file can grow quickly in cases where large amounts of information is directed to the STDOUT stream on the Workers.
Example:
stdoutfile={logdir}\techilaout.log
The syntax shown above will direct the STDOUT stream to a file called techilaout.log, which will be stored in the location defined with the macro {logdir}.
3.22. Stdoutdir
The stdoutdir parameter defines the directory where the STDOUT streams from Workers will be stored.
Example:
stdoutdir={logdir}\workerout
The syntax shown above will direct all the STDOUT messages generated during a Project to a subdirectory located under a directory called workerout.
A separate subdirectory will be created for each Project and each subdirectory will be named according to the Project ID of the project for which it was created for.
For example, if the Project ID number of a Project is 1234, a folder named 1234 will be created under the workerout folder. The subdirectories will contain a separate log file for each Job in the Project that generated messages to STDOUT.
3.23. Stderrfile
The Standard Error stream is an output channel between a computer program and its environment and is used to display error messages. The Standard Error Config section contains parameters that control where the STDERR streams from the Workers will be directed. Storing the STDERR stream generated by Workers is useful for when the error messages need to be analysed in more detail.
To direct the STDERR stream generated on Workers during a Project, the following Project parameter needs to be defined in the Local Control Code. More information about the Local Control Code concept can be found in Introduction to Techila Distributed Computing Engine.
| Parameter | Boolean Value |
|---|---|
techila_stream_stderr |
true |
The STDERR stream will be appended to the error files every time the End-Users program polls the Techila Server for the Project status. Instructions on how to modify the polling interval can be found in Polltime.
The stderrfile parameter defines the name and location of the file, which will be used to store the STDERR streams generated on the Workers. The STDERR stream from all Workers will be appended to the file.
Example:
stderrfile={logdir}\techilaerr.log
The syntax shown above will direct the STDERR stream to a file called techilaerr.log, which will be stored in the location defined with the macro {logdir}.
3.24. Stderrdir
The stderrdir parameter defines the directory where the STDERR streams from the Workers will be stored.
stderrdir={logdir}\workererr
A separate subdirectory will be created for each Project and each subdirectory will be named according to the Project ID of the project for which it was created for.
For example, if the Project ID number of a Project is 1234, a folder named 1234 will be created under the workererr directory. The subdirectories will contain a separate log file for each Job in the Project that generated messages to STDERR.
3.25. Polltime
The polltime parameter defines how often the End-User’s computer will poll the Techila Server for the status of Projects. When the End-Users computer polls the Techila Server, the following actions will occur:
The number of waiting, working and ready Jobs in a Project will be updated to the Status Window
New error messages will be updated to the Status Window
New Job result files will be transferred to the End-User’s computer, assuming that the transfer mode has been set to Streaming. More information on the Streaming feature can be found in the document Introduction to Techila Distributed Computing Engine.
STDOUT and STDERR streams generated on Workers will be appended to files on the End-Users computer
Example:
polltime=5000
With the syntax shown above, the End-Users computer will poll the status of Projects at five second intervals.
3.26. Dlretrytime
The dlretrytime parameter defines how often download requests for Project results will be performed.
The first download request will be performed when all the Jobs in a Project have been completed. If the result package is not ready on the Techila Server, a new download request will be performed after the interval defined in the dlretrytime parameter. Download requests will be performed until the result package has been downloaded successfully or until the download request fails.
Example:
dlretrytime=10000
With the syntax shown above, download requests will be performed at ten second intervals.
3.27. Execmaxretrycount
The execmaxretrycount parameter defines the maximum number of times a command that communicates with the Techila Server will be executed. A command will only be retried in the case the command does not receive a response from the Techila Server. Commands that executed correctly will not be retried.
For example, if a connection with the Techila Server cannot be established when initializing a session during the first attempt, the initialization will be retried if the value of the execmaxretrycount parameter is set to two (2) or more. Minimum value of this parameter is one (1), which indicates that no retries will be performed. Increasing the number of retry attempts can be beneficial in situations where the network connection is not reliable.
The delay between retry attempts is defined with the execretrydelay parameter. For instructions on how to configure the delay between retry attempts, see Execretrydelay.
Example:
execmaxretrycount=5
With the above syntax, the maximum number a command will be executed will be set to five.
3.28. Execretrydelay
The execretrydelay parameter defines the interval, how often a command that communicates with the Techila Server will be retried in case the Techila Server did not respond to the command.
For example, if a connection with the Techila Server cannot be established when initializing a session, another initialization attempt will be performed after the delay specified with the execretrydelay parameter.
The number of attempts is controlled with the execmaxretrycount parameter. For instructions on how to configure the number of attempts, see Execmaxretrycount.
Example:
execretrydelay=10000
With the syntax shown above, the delay between command retries will be set to ten seconds.
3.29. Maxresultsinstream
The maxresultsinstream parameter defines the maximum number of result files that can be transferred from the Techila Server a single package when streaming results.
For example, the following syntax would set the maximum number of results per package to 100.
maxresultsinstream=100
4. Appendix 2: Changing the keystore password
The keystore password can be changed by using the keytool.jar application, which is located in the lib folder in the techila directory. To change the keystore password, please follow the steps listed below:
-
Open a command prompt and change the current working directory to the
libfolder, which is located under thetechilafolder. Figure 11. A Command Prompt with the current working directory set to the
libfolder. -
Execute the keytool.jar application with the syntax shown below:
java -jar keytool.jar passwd --keystore <keystore> --alias <alias>
Change the values of <keystore> and <alias> notations to correspond to your settings.
The image below illustrates the syntax for changing the password protecting a keystore file named
demouser.jksthat is located in theC:\techilafolder.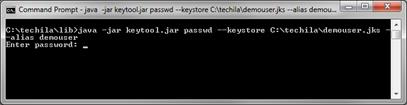 Figure 12. Executing the command used for changing the password of the keystore file. After executing the command, the application will prompt for the existing password
 -
After executing the command, you will be prompted to enter your existing password. Enter your existing password.
-
After you have entered your old password, you will be prompted to enter the new password twice. After entering the new password twice, the application will exit. The password for your keystore has now been changed.
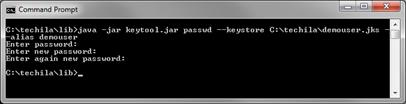 Figure 13. After successfully changing the keystore password, the keytool application will exit. If errors were encountered during the process, corresponding error messages will be displayed.
5. Glossary
| Term | Description |
|---|---|
Bundle |
Common data that is required on every Techila Worker compressed in a Java Archive. Includes input data, computational code and common prerequisites, libraries, command interpreters, etc. |
End-User |
A person who has an End-User Techila Key and End-User privileges to the TDCE environment |
Job |
Smallest unit in a computational Project. Jobs are executed on Workers and partial results are transferred back to the Techila Server. |
Project |
A computational problem. A Project is created by the End-User and it is split into Jobs on the Techila Server. |
Project ID |
The Project Identification number. Every Project is given a unique Project Identification Number when the Project is created. |
Standard Error Stream |
An output channel between a program and its environment (e.g. a text terminal or MATLAB Command Window). Typically used to display errors. |
Standard Output Stream |
An output channel between a program and its environment (e.g. a text terminal or MATLAB Command Window). Typically used to display messages. |
Techila Administrator |
A person who has a Techila Administrator key and administrative rights to the TDCE system. |
Techila Key |
An End-User is provided an End-User Techila Key, which is used to sign the code that is transferred to the distributed computing environment. Signed code can be traced back to the End-User by the Techila Administrators. |
Techila Server |
The server manages the distributed computing environment and communicates with the End-Users program and the Workers. The Techila Server also splits the Projects into Jobs, assigns the Jobs to Workers, handles the results and delivers the results back to the End-Users program. |
Techila Worker |
A Techila Worker is a computer that is connected to the Techila Server. Techila Workers provide the computational power of the distributed computing environment. By default, a single Job is assigned to a single core on the Workers CPU. |