1. Introduction
This document is intended for End-Users who wish to access the Techila Distributed Computing Engine (TDCE) environment from applications developed with Java. If you are unfamiliar with the terminology or the operating principles of the TDCE system, information on these can be found in Introduction to Techila Distributed Computing Engine.
The structure of this document is as follows:
Introduction introduces the functions that are used for distributing computations from applications developed with Java to the TDCE environment. A brief summary of the naming convention of the Java source code files is also provided.
Preparation contains information regarding the preparation steps required to use TDCE with applications developed with Java.
Tutorial Examples contains walkthroughs of simple example codes. The example material illustrates how to define input arguments for the executable program and transfer data files to Techila Workers participating in the computations. After examining the material in this Chapter you should be able convert a simple locally executable program to a TDCE-enabled version, which in turn can be used to perform the computations in the TDCE environment.
1.1. Techila Executor Service
When distributing computations from a Java application to a Techila Distributed Computing Engine environment, the recommended method is to use the Techila Executor Service.
The Techila Executor Service (TES) functions similarly as the standard Java ExecutorService, meaning both provide a mechanism for sending asyncronous workloads to be processed. The most important difference between these two is that TES will use the computing power available in your TDCE environment, instead of your local machine.
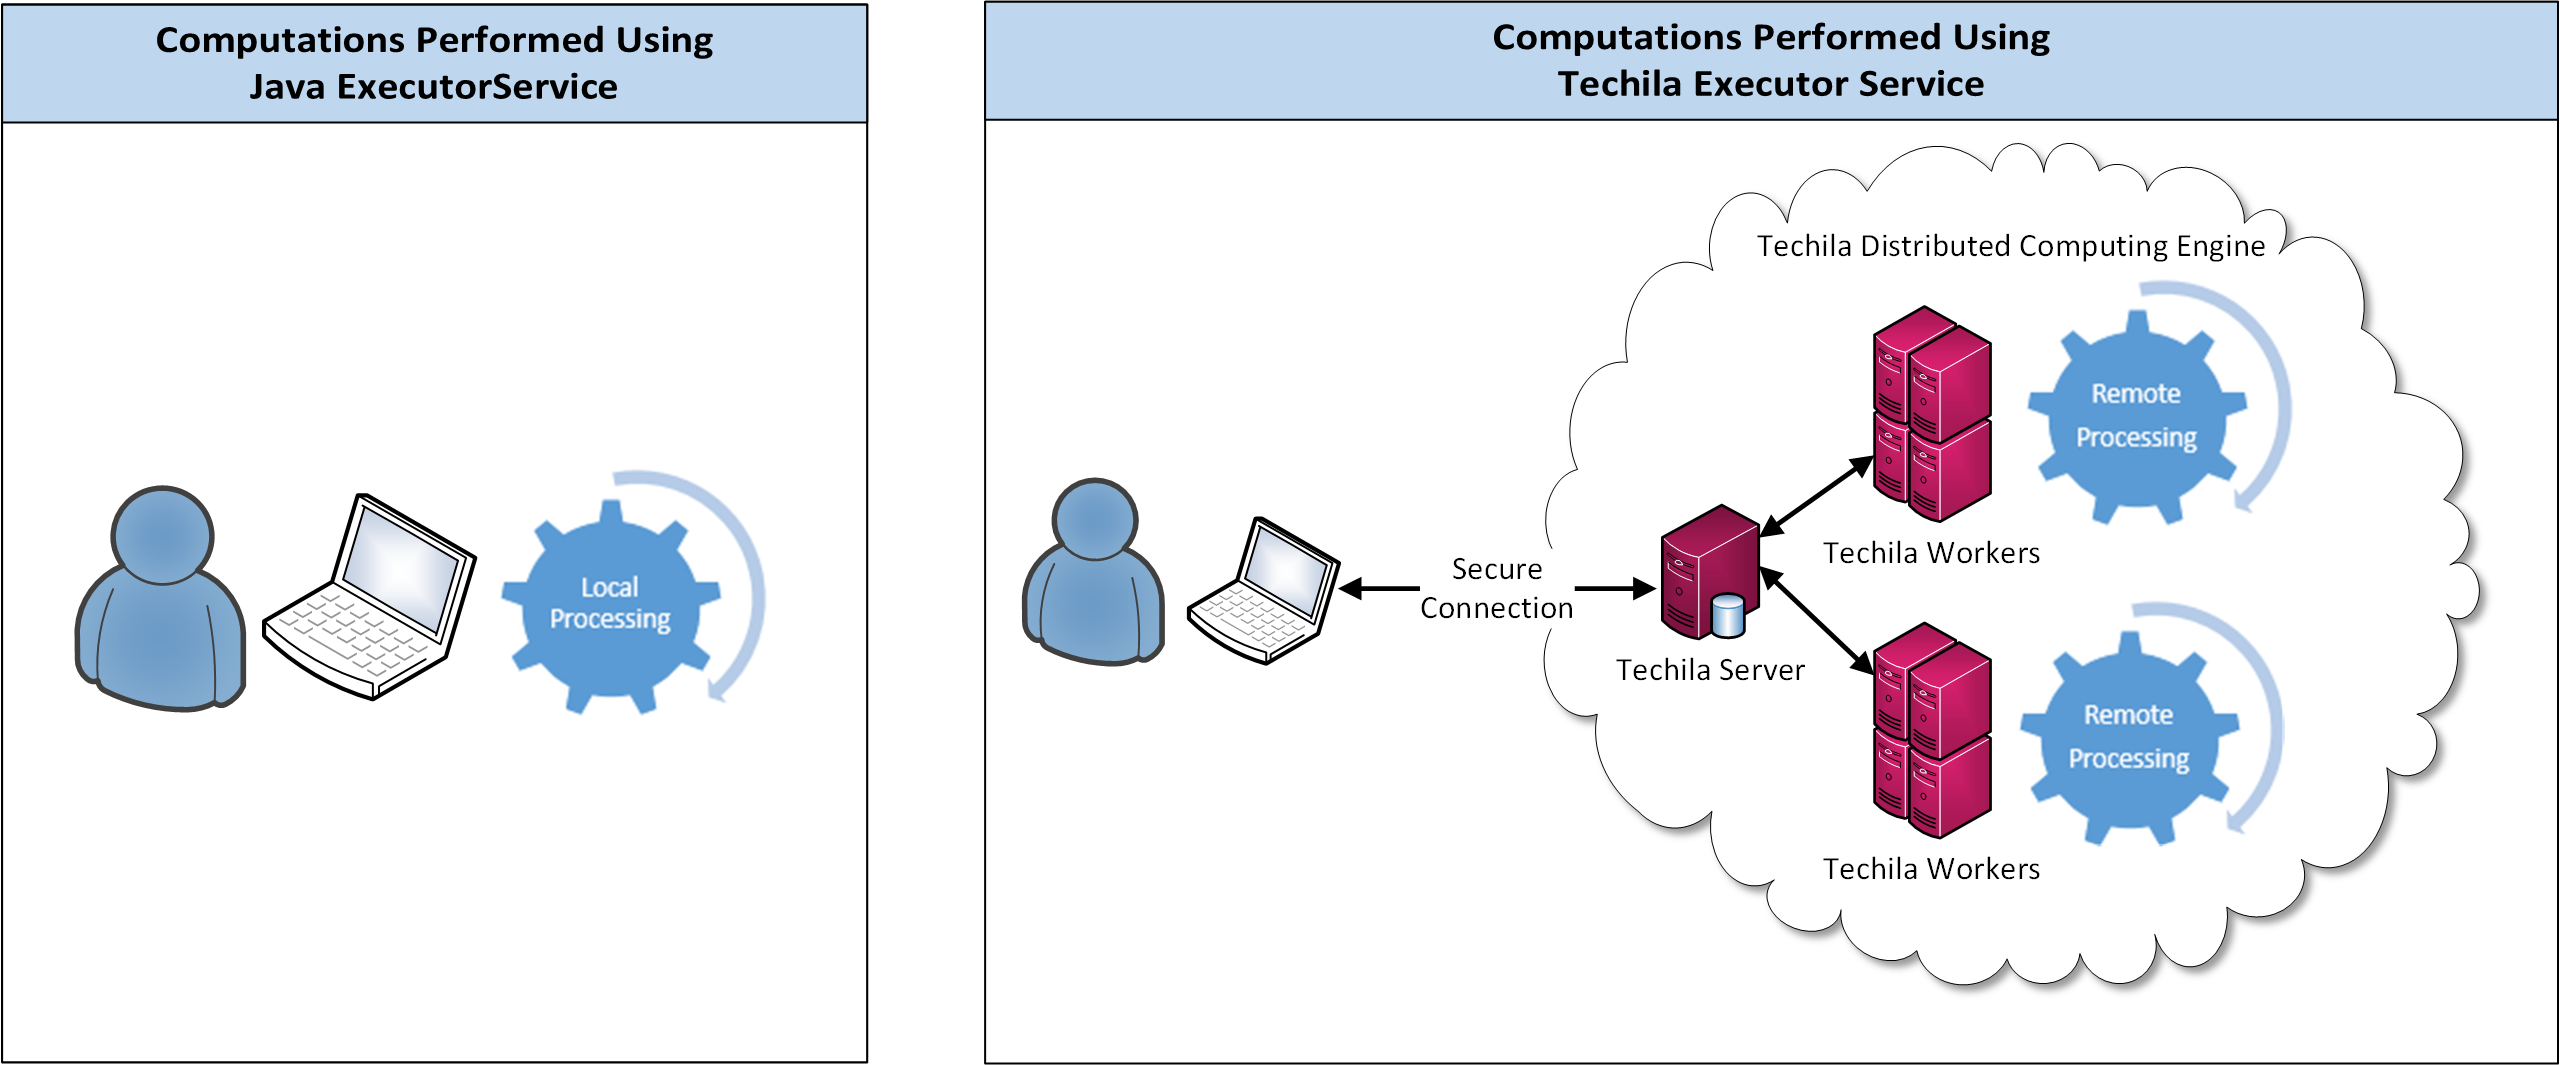
Even though the operating principle of Techila Executor Service is similar as Java’s own ExecutorService, underlying differences in architecture result in one important distinction: Tasks submitted to Techila Executor Service must be computationally intensive to see performance gains. The reason for this are the underlying overheads that are always present when dealing with distributed computing. These overheads include delays caused by data transfers between your computer and the Techila Workers and other initialization delays related to setting up the computing environment.
The code syntax for using Techila Executor Service is similar as Java’s own ExecutorService The image below highlights some of the similarities (and differences) when comparing Java’s own ExecutorService with Techila Executor Service.
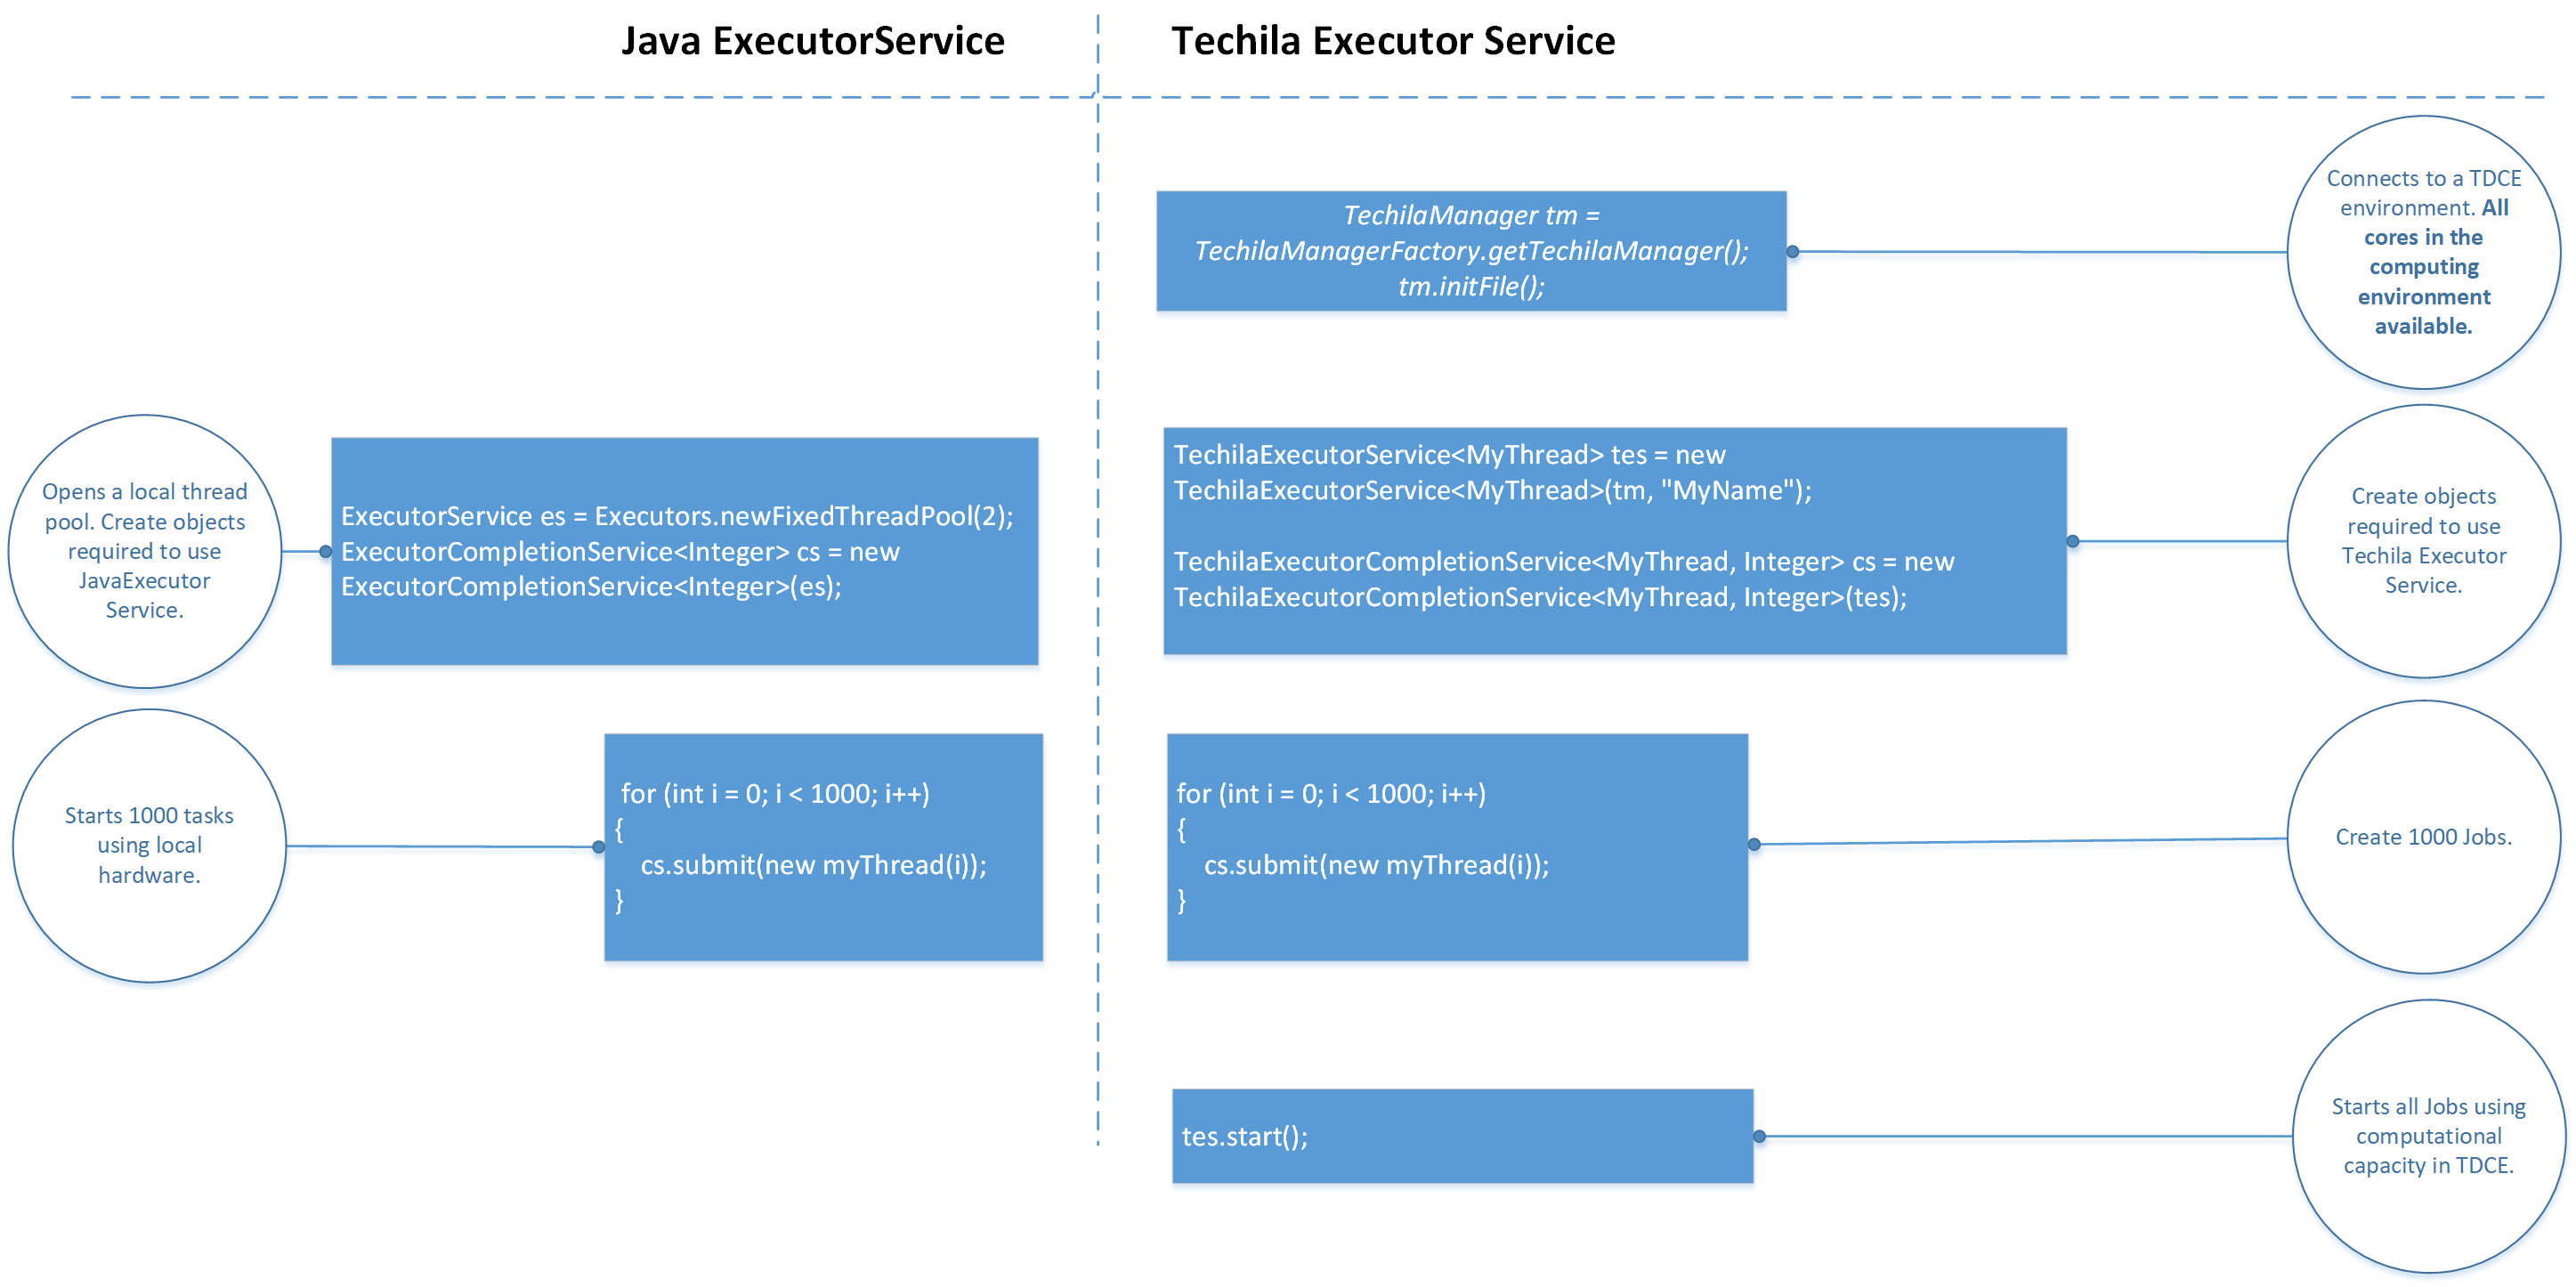
The list below lists the main differences/limitations between Java ExecutorService and Techila Executor Service.
-
The class containing the executable code must be tagged with the
Serializableattribute. -
The class must contain a
callmethod, which should contain the computationally intensive operations you want to execute on Techila Workers. -
Some of the ExecutorService methods/features (such as the Runnable method) are not supported.
-
Current version of the Techila SDK only supports submitting Callable tasks.
1.2. Java API
The Techila Distributed Computing Engine (TDCE) Java API functionality is included in the following file:
-
techila.jar (located in
techila\libin the Techila SDK)
This library provides the following classes:
| Class | Description |
|---|---|
fi.techila.user.Support |
Contains status codes, their explanations and provides functionality for extracting/controlling the log information provided by the TDCE system. |
fi.techila.user.TechilaExecutorCompletionService |
Provides methods for managing computational workloads when using Techila Executor Service. |
fi.techila.user.TechilaExecutorService |
Provides methods for starting and stopping workloads when using Techila Executor Service. |
fi.techila.user.TechilaManagerFactory |
Provides a factory for creating a TechilaManager instance (see below). |
fi.techila.user.TechilaManager |
Is the main Techila manager interface, providing methods for authentication, testing, managing workloads and cleaning up. |
More information can be found in the Java Docs.
When used together, these classes will allow you to use the Techila Executor Service to distribute computations to your TDCE environment.
Chapters Local Control Code and Techila Worker Code contain information about the most commonly used commands when accessing a TDCE environment from an application developed with Java.
1.2.1. Local Control Code
Local Control Code refers to the code that will be used for creating the computational Project.
In order to access the TDCE API from applications developed with Java, the TDCE classes will need to be imported with the import statements as shown below:
import fi.techila.user.Support;
import fi.techila.user.TechilaExecutorCompletionService;
import fi.techila.user.TechilaExecutorService;
import fi.techila.user.TechilaManagerFactory;
import fi.techila.user.TechilaManager;
In addition to these TDCE classes, you will need to import the following standard Java class to use the Techila Executor Service:
import java.util.concurrent.ExecutionException;After importing the classes, a new TechilaManager object can be created with the following command:
TechilaManager tm = TechilaManagerFactory.getTechilaManager();After creating the object, a network connection with the Techila Server can be initialized with the following command:
int status = tm.initfile();The command will only execute successfully if a properly configured configuration file (typically named techila_settings.ini) can be accessed. When tm.initfile() is executed without input arguments (as in the example above), the techila_settings.ini file will be searched from the following locations in the order they are listed here:
-
The file specified in environment variable TECHILA_SETTINGS_FILE
-
The current working directory
-
The following files from the user’s home directory
-
.techilarc
-
techila_settings.ini
-
-
The path specified with the environment variable TECHILA_SDKROOT
-
The
techilafolder in the Techila SDK
It is also possible to define the location of the configuration file when executing the command. In the example below, the file C:\techila\techila_settings.ini would be used when initializing the connection.
int status = tm.initfile("c:\\techila\\techila_settings.ini");The initFile method will return an integer value, which can be used to determine whether or not the operation was successful. Value 0 is the return code for OK, other numerical values are problem indicators. More verbose status descriptions can be displayed by using the the describeStatusCode method from the Support class.
The example code snippet below illustrates how this can be done
int status = tm.initFile();
// Let's assume everything worked, meaning status is 0
Support sp = tm.support();
String codedesc = sp.describeStatusCode(status);
System.out.println("Status: " + codedesc);
// This would print: Status: OK
After the network connection has been initialized, Techila Executor Service objects need to be created. These will be used for creating a computational Project in the TDCE environment. The objects can be created with the following commands:
TechilaExecutorService<MyCode> tes = new TechilaExecutorService<MyCode>(tm, "MyProject");
TechilaExecutorCompletionService<Integer> cs = new TechilaExecutorCompletionService<MyCode, Integer>(tes);
When creating the TechilaExecutorService object, the constructor takes two input arguments. The first argument is the instance of the TechilaManager class (which was created earlier). The second input argument is a string, which will be used to define the name of your Project ("MyProject" in the example). In addition, you will need to define the class you want use in your computations ("MyCode" in the example). This class needs to be defined in the Worker Code that will be executed on the Techila Workers during the computational Job.
When creating the TechilaExecutorCompletionService object, the constructor takes one input argument. This input argument will be the TechilaExecutorService object tes, which was created earlier. In addition, you will need to define two type parameters: the class that will be executed on Techila Workers (MyCode in the example) and the value type that the executable code will return (Integer in the example).
After creating these objects, new instances of classes that you wish to execute in the TDCE environment can be added to the list in the cs object. These classes should contain the computationally intensive code. For example, the following lines could be used to add two instances of the MyCode class with different input arguments into the list.
cs.submit(new MyCode(1));
cs.submit(new MyCode(2));
Each object in the list will correspond to one Job in the TDCE environment. This means that when using the example code shown above, the computational Project would consist of two Jobs. Each object in the list will be serialized into a separate file and transferred to the TDCE environment in a Job Input Bundle. These files will be deserialized on the Techila Workers after the files have been transferred from the Techila Server.
If you wish to create and execute a large number of objects, the cs.submit commands can be placed within a loop structure. For example, the following syntax would add 5 instances of MyCode with different input arguments:
int jobs = 5;
for (int i = 0; i < jobs; i++) {
    cs.submit(new MyCode(i));
}
After adding all objects to the list, the computational Project can be created with the following command.
tes.start();After executing the command, the computational Project will be created and all required files will be transferred to the Techila Server. Typically at least the following data will be transferred:
-
All serialized object data
-
Compiled class and Java Archive (JAR) file dependencies
-
techilaworkerutils.jar(included in the Techila SDK)
The tes.start(); call will also start a local thread, which will automatically download the results from the Techila Server as Jobs are completed. These results will be automatically imported into the local Java application and stored in a list in the cs object.
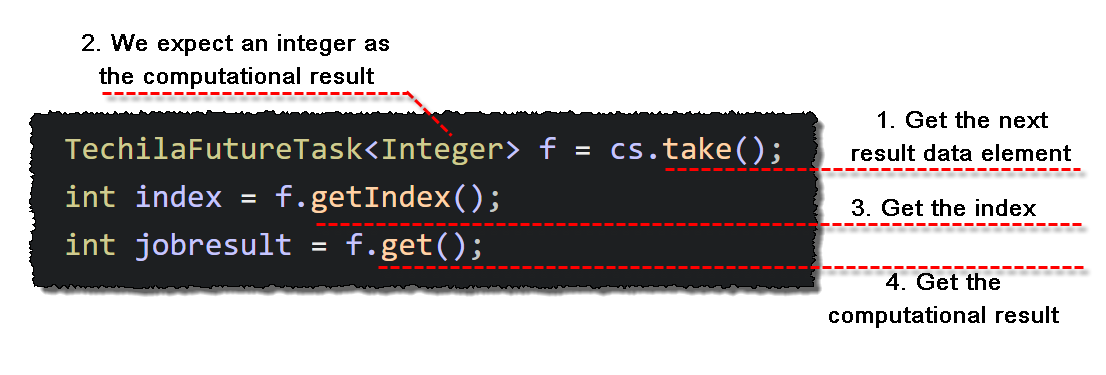
After creating the Project, the result of one Job can be displayed by executing the following commands:
TechilaFutureTask<Integer> f = cs.take();
int index = f.getIndex(); // Ranges from 0 to (number of Jobs-1). Indicates which Job generated the result.
int jobresult = f.get();  // Contains the actual result
System.out.println("Result at index " + index + ": " + jobresult);
The getIndex() method will retrieve the index of the Job, which is automatically returned from each Job. For Job 1, the index will 0, for Job 2, the index will be 1 and so on. The get() method will retrieve the actual computational result that was returned from the call method.
Please note that the code above will print the result of the first Job that was completed. There is no guarantee that this result will belong to the Job with index 0.
If your Project contains a large number of Jobs, accessing the results can be easily achieved by placing the get and getIndex operations inside a loop structure This can be done by placing the command inside a loop structure. The syntax shown below illustrates how to display results of all Jobs in a Project that contains 5 Jobs.
int jobs = 5;
for (int i = 0; i < jobs; i++) {
    try {
        TechilaFutureTask<Integer> f = cs.take();
        int index = f.getIndex();
        int jobresult = f.get();
        System.out.println("Result at index " + index + ": " + jobresult);
    } catch (ExecutionException ee) {
        System.err.println("Task failed: " + ee.getMessage());
    }
}
Example: If each job returns the same result (e.g. value 2), then the printout would look resemble the example printout below. Please note that the indexes are in a seemingly random order. This random order matches the order in which the Jobs were completed.
Result at index 4: 2
Result at index 0: 2
Result at index  1: 2
Result at index  3: 2
Result at index  2: 2
1.2.2. Techila Worker Code
Techila Worker Code refers that code that will be executed on Techila Workers in each computational Job.
As mentioned in Local Control Code, the objects that are sent to the TDCE environment and executed on the Techila Workers will need to be serialized. This can be done by marking the class with the Serializable attribute. The class also needs to marked with a Callable attribute and it needs to contain an implementation for the call method. The value returned by the call method will be the result of the Job.
For example, the following class defines an implementation for the call method, which simply sums integers 1 + 1 and returns the summation result from the Job.
import java.io.Serializable;
import java.util.concurrent.Callable;

public class MyCode implements Callable, Serializable {

    public Integer call() throws Exception {
        return 1 + 1;
    }
}
1.3. Project Process Flow
The list below contains some of the Java specific operations that are performed when the End-User uses the TDCE Java API to create a computational Project.
-
TechilaExecutorServiceobjecttesand TechilaExecutorCompletionService objectcsare created on the End-User’s computer in their Java application. When the object is created, the list in `cs`will be empty. Figure 3. A TechilaProject object with an empty list.
 -
Objects are created and added (using
cs.submit) to the list in thecsobject on the End-User’s computer. Each object will need to contain a definition for thecallmethod. Figure 4. A
csobject, which contains a list of three objects. -
The
tes.startmethod is called on the End-Users computer. This creates the computational Project.Objects in the list (in
cs) are serialized into files, which are stored in the memory of the End-User’s computer.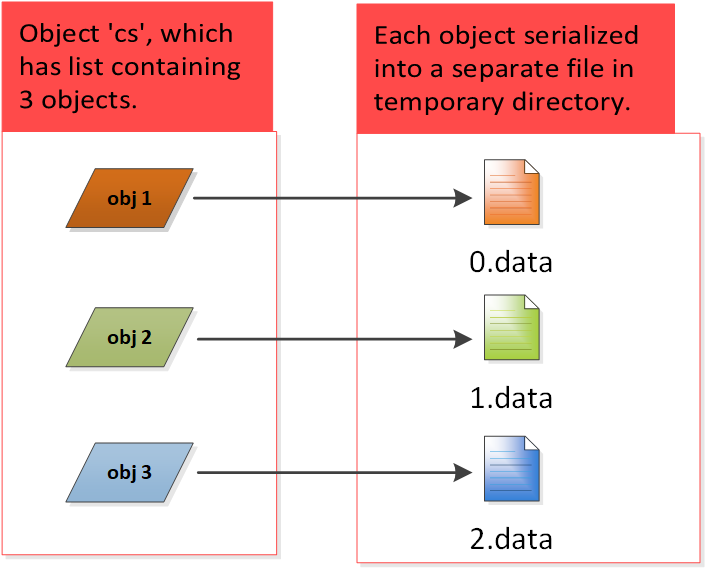 Figure 5. In this example, the
cscontains a list of three objects. Each object in the list will be serialized into a separate file, meaning three files will be created. -
Files containing the serialized class files are stored in a Job Input Bundle and transferred to the Techila Server
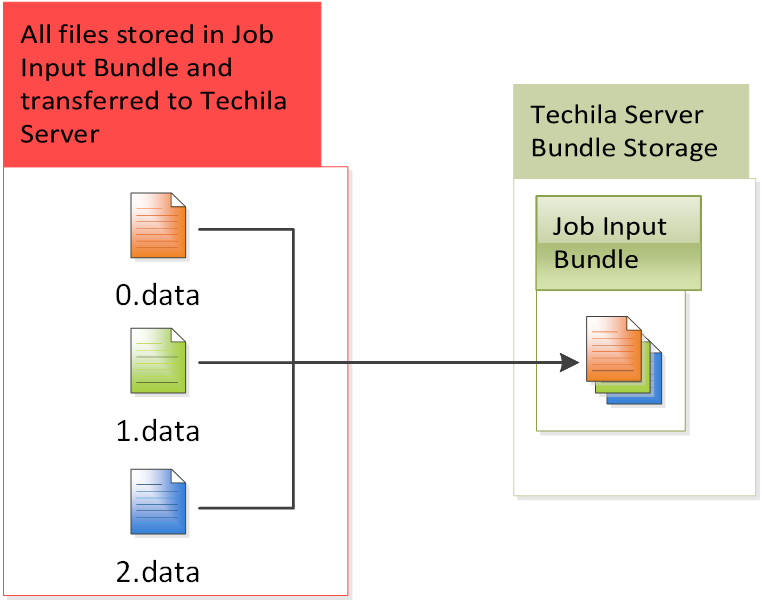 Figure 6. All serialized files will be stored in a Job Input Bundle and transferred to the Techila Server. In this example, the Job Input Bundle contains three files.
 -
The following components are stored in Bundles and transferred to the Techila Server:
-
The compiled class containing your Java application
-
File
techilaworkerutils.jar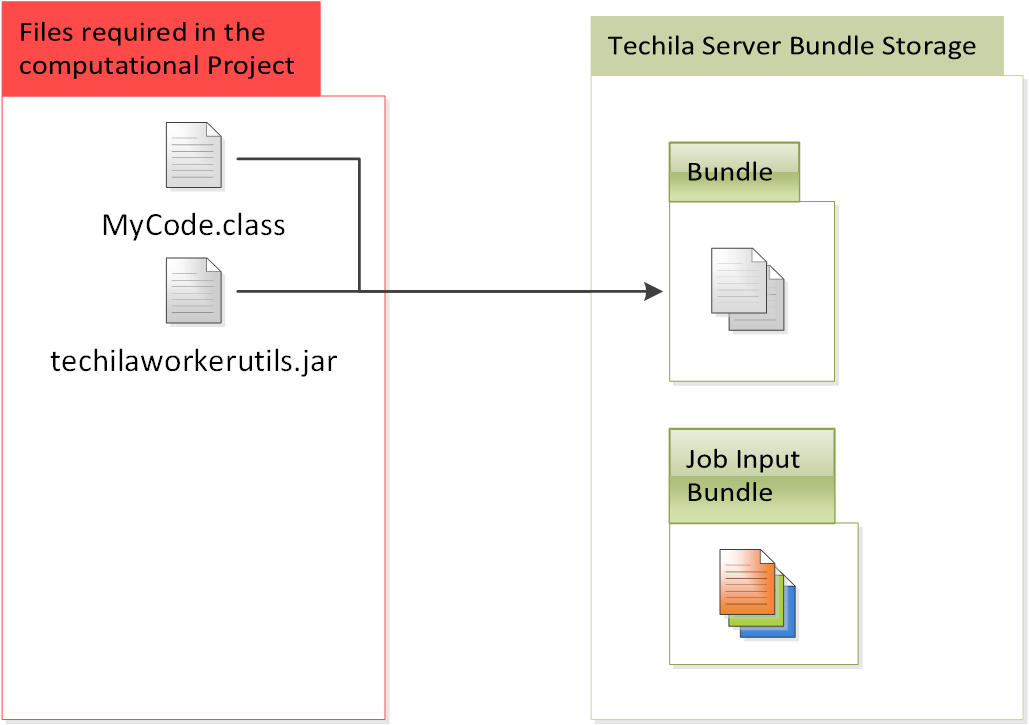 Figure 7. All files required in the computational Project will be stored into separate Bundle and transferred to the Techila Server.
-
-
Jobs are assigned to Techila Workers and all Bundles belonging to the Project are transferred to the Techila Workers (except the Job Input Bundle). Files in the Bundles will be extracted to a temporary working directory on the Techila Worker.
Each Job will also download a separate input file from the Job Input Bundle (Job 1 will download the 1st serialized file, Job 2 will download the 2nd serialized file and so on)
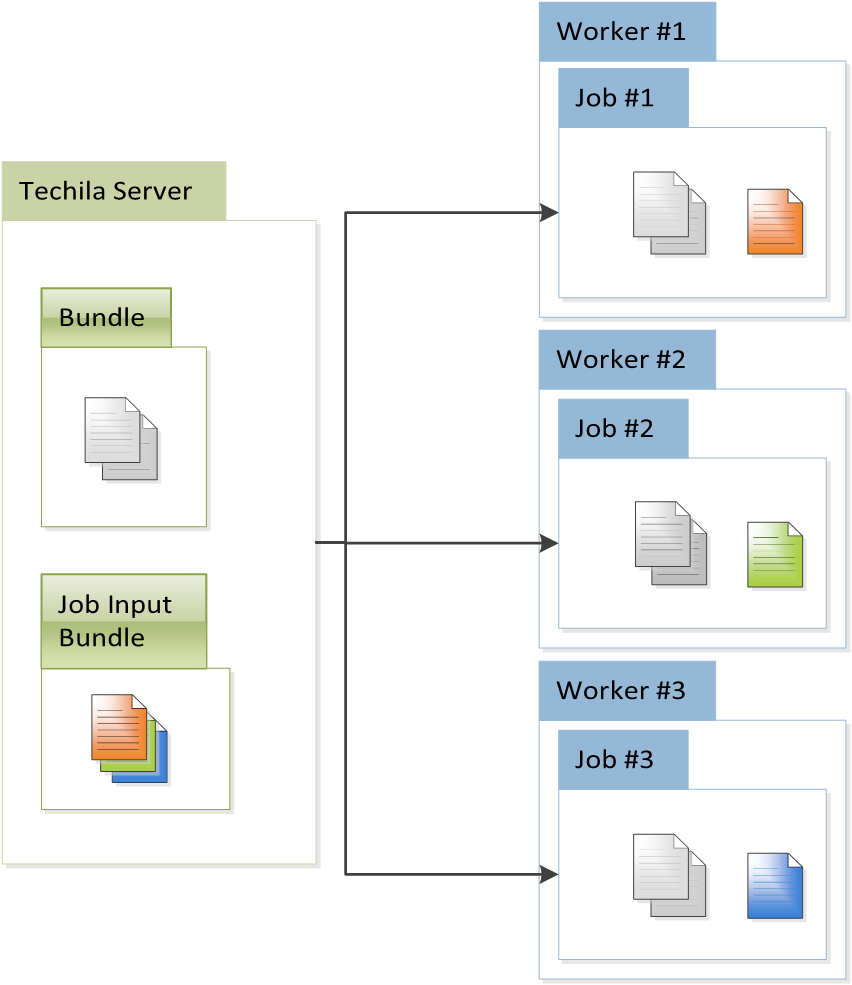 Figure 8. The number of Jobs in the Project will be equal to the number of serialized files in the Job Input Bundle. In this example, the Job Input Bundle contains three files, which means the Project contains three Jobs.
 -
The
TechilaExecutor.classis executed, which deserializes the object from the file that was transferred from the Job Input Bundle. TheTechilaExecutor.classis located in thetechilaworkerutils.jar.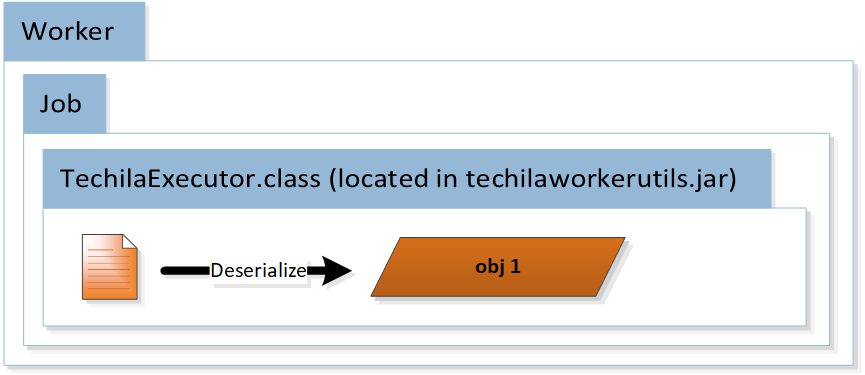 Figure 9. In each Job, the serialized file containing the object will be deserialized into an object.
 -
The
TechilaExecutor.classcalls thecallmethod defined in the End-User’s Java application.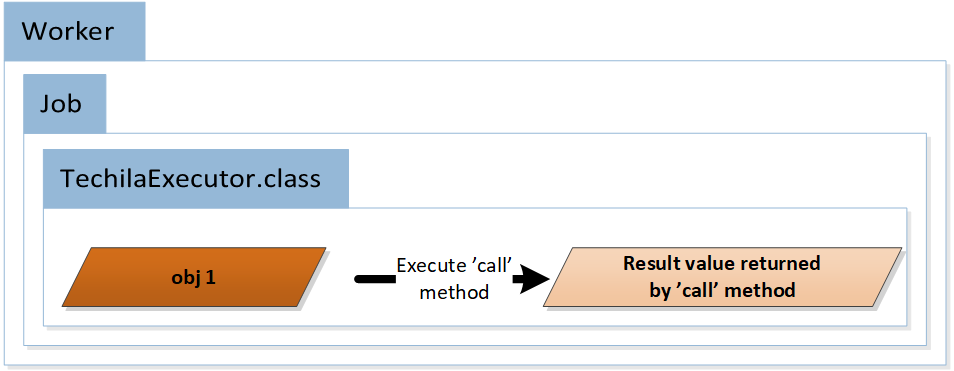 Figure 10. In each Job, the
callmethod defined in the object will be executed. -
The code in
TechilaExecutor.classserializes the result value into a result file.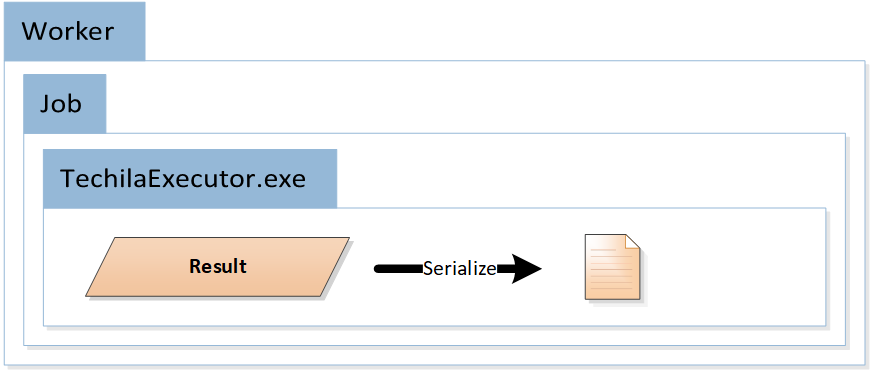 Figure 11. After the
Executemethod has been executed, the object will be serialized in to a result file. -
The result files (serialized objects) are transferred from the Techila Workers to the Techila Server and from the Techila Server to the End-User’s computer
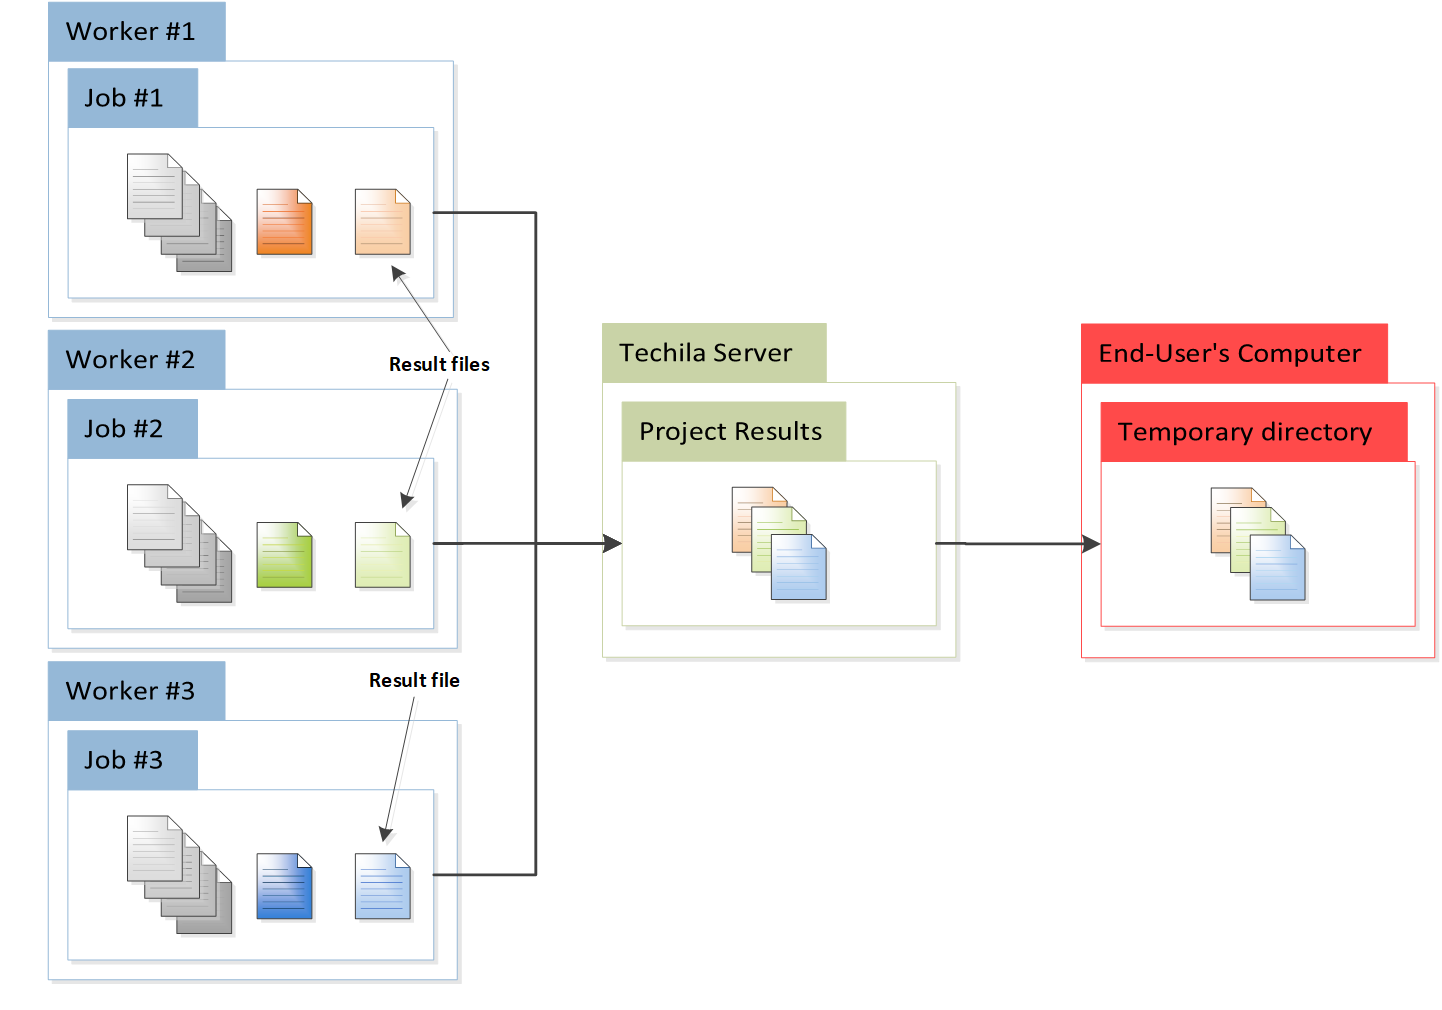 Figure 12. The result file (that contains the object) will be transferred to the End-User’s computer.
 -
On the End-User’s computer, the data structures in the result files are deserialized and stored in the list in the
csobject.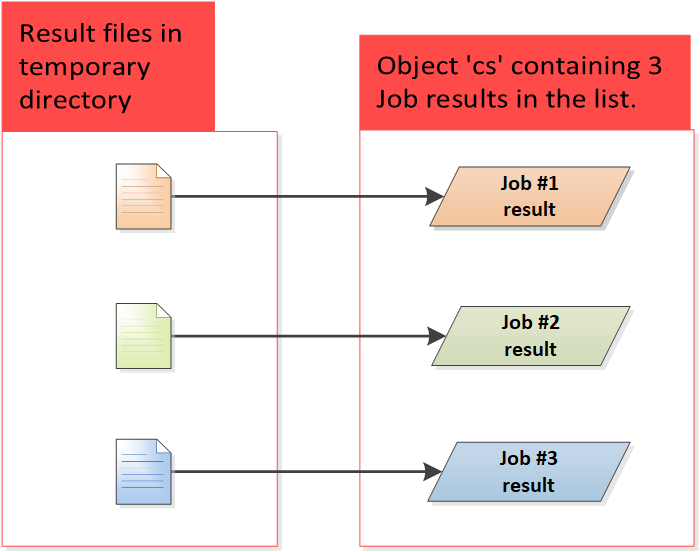 Figure 13. Result files will be deserialized into objects and stored in the list in the
csobject.Again, please note that the results are stored in the order the Jobs are completed. This means that there is no guarantee that the first result item in the list belongs to the Job 1.
 Figure 14. Results are stored in the order the Jobs are completed.
1.4. Example Material
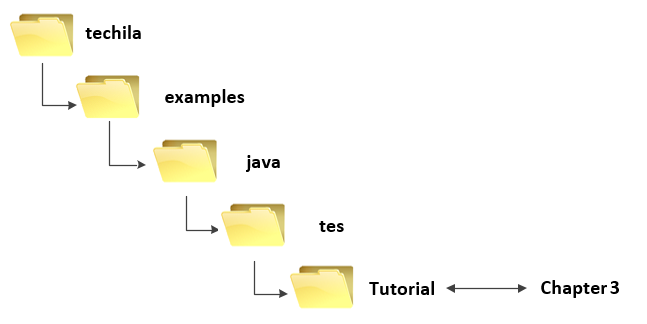
The example material discussed in this document can be found under the following folder in the Techila SDK:
-
techila\examples\java\tes\Tutorial
Examples located in the Tutorial folder are examined in Tutorial Examples.
1.4.1. Naming Convention of the Java Source Code Files
The typical naming convention of Java source code files containing the example material presented in this document is explained below:
-
Files beginning with
Runcontains the commands for creating the computational Project. You can run this file to start each example. -
Files ending in
Distcontain the computational operations that will be distributed and performed in the TDCE environment. The code in these files will be automatically sent and executed on Techila Workers.
Please note that some files and/or functions might be named differently, depending on their role in the computations.
2. Preparation
This Chapter contains a description of the steps that need to performed in order to compile and run the example material included in the Techila SDK.
2.1. Techila SDK Requirements
To access TDCE from applications developed with Java, you will need the following components:
-
Techila SDK (or just the Techila SDK Java library components)
-
Keystore file containing a signed End-User Key (typically created by your local Techila Administrator)
-
A
techila_settings.inifile that has been configured according to the instructions in Getting Started.
Note! If you are using Techila Distributed Computing Engine in Google Cloud Launcher, the Techila SDK downloaded from the Techila Configuration Wizard automatically includes a valid keystore file and configured techila_settings.ini file.
2.2. Java Requirements
Please ensure that you have Java installed on your computer. Java Platform, Standard Edition 8 (or newer) Java Development Kit (JDK) is supported.
Techila Workers have Java 8 installed. When compiling your executable Java code, please set the target to Java 8.
When Java is installed and available from the command line, Java version can be verified with the following command. Please note that executing the command requires that the Java installation path is listed in the PATH environment variable.
java -version
2.3. CLASSPATH Environment Variable
In order to compile and run the tutorial example material, your CLASSPATH environment variable must include the current working directory (.) and the techila.jar file (including the full path).
For example, if the Techila SDK is located in C:\techila and the full path to the techila.jar file is C:\techila\lib\techila.jar, then the following CLASSPATH can be used.
CLASSPATH=.;C:\techila\lib\techila.jar;
Note! If you want to run the interconnect example material, your classpath will also need to contain the techilaworkerutils.jar file, which is located in the techila\lib directory. Example below:
CLASSPATH=.;C:\techila\lib\techila.jar;C:\techila\lib\techilaworkerutils.jar
Please update your CLASSPATH environment variable before proceeding if you intend to run the example code material.
3. Tutorial Examples
This Chapter contains walkthroughs of minimalistic examples that illustrate how to implement and control the core features of the TDCE Java API. The example material discussed in this Chapter, including Java-source code files and data files can be found under the following folder in the Techila SDK:
-
techila\examples\java\tes\Tutorial
Please note that the example material in this Chapter is only intended to illustrate the core mechanics related to distributing computations from applications developed with Java. The code snippets used in the examples are computationally trivial, meaning using distributed computing will not increase performance due to overheads.
3.1. Executing the First Example
The walkthrough in this Chapter is intended to provide an introduction on distributed computing using the TDCE Java API. The purpose of this example is to demonstrate:
-
The basic syntax used for creating a computational Project with the TDCE Java API
The Java source code files used in this example are located in the following folder in the Techila SDK:
3.1.1. Distributed version
The source code of the distributed version is located in the following files in the Techila SDK:
techila\examples\java\tes\Tutorial\1_distribution\RunDistribution.java
techila\examples\java\tes\Tutorial\1_distribution\DistributionDist.java
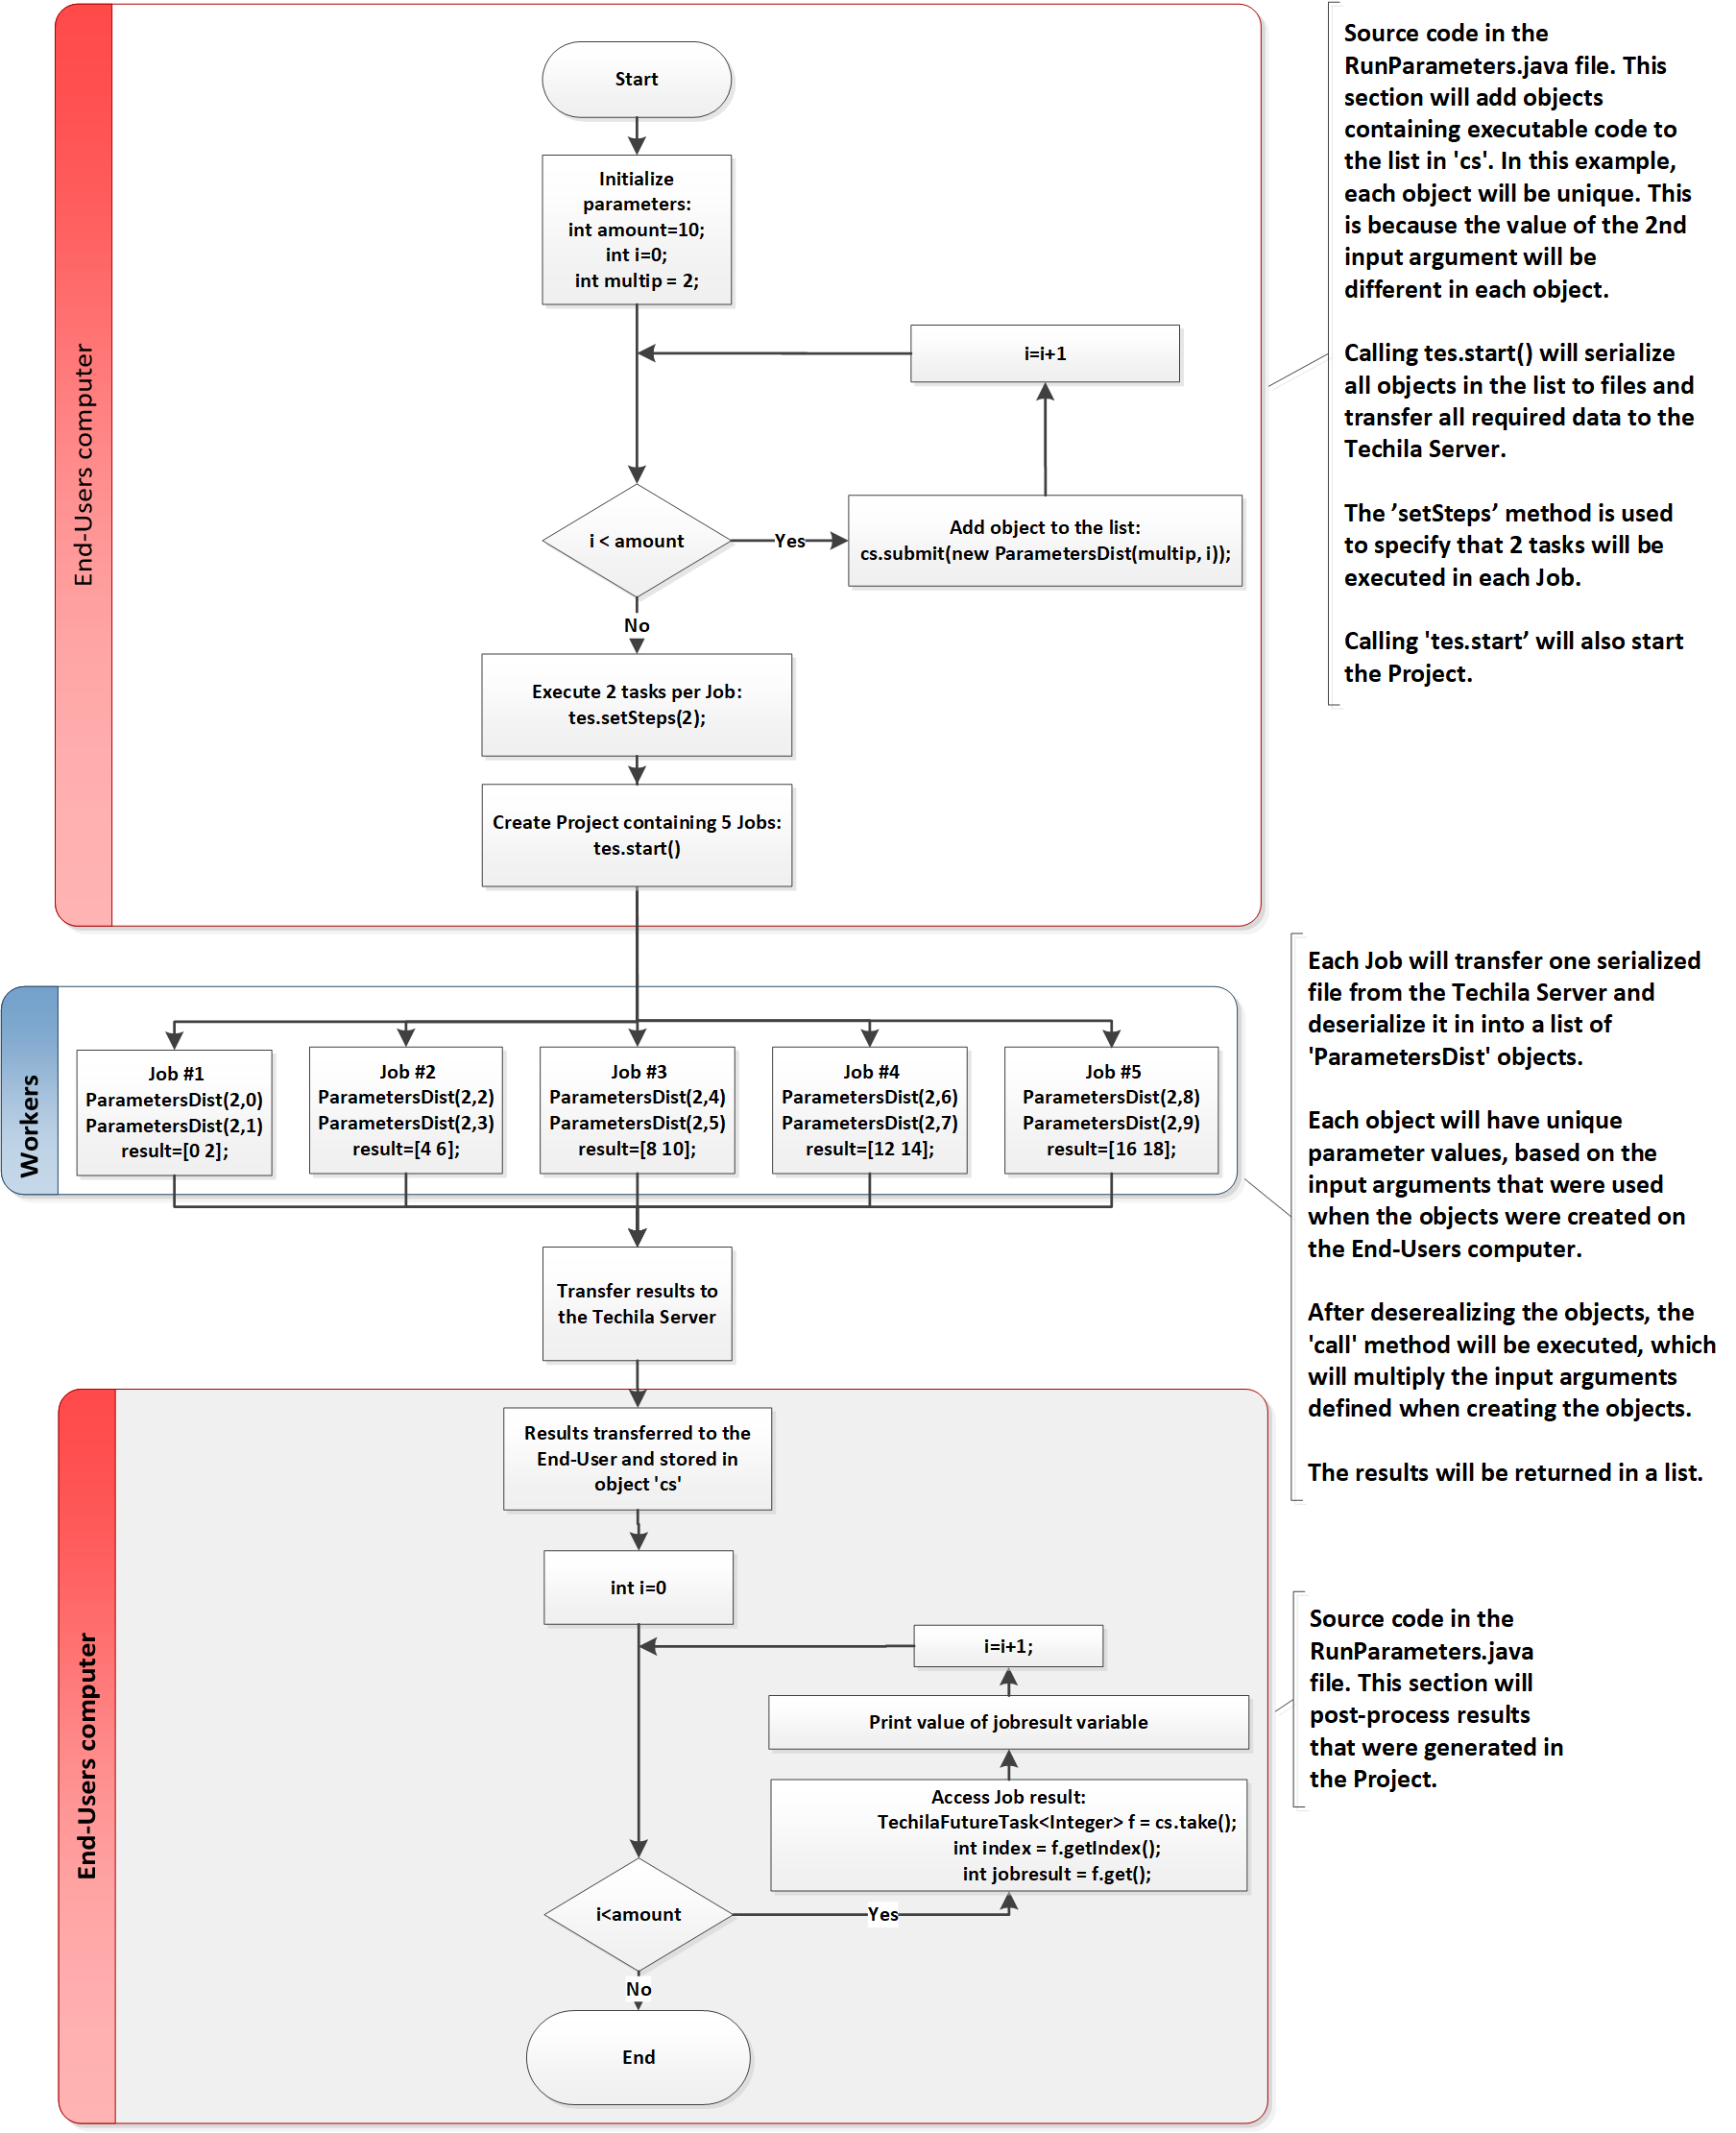
The process flow of the distributed program is shown below. Sections highlighted with red indicate parts of the program that are executed on the End-User’s computer. The section highlighted with blue indicates operations that take place on the Techila Workers.
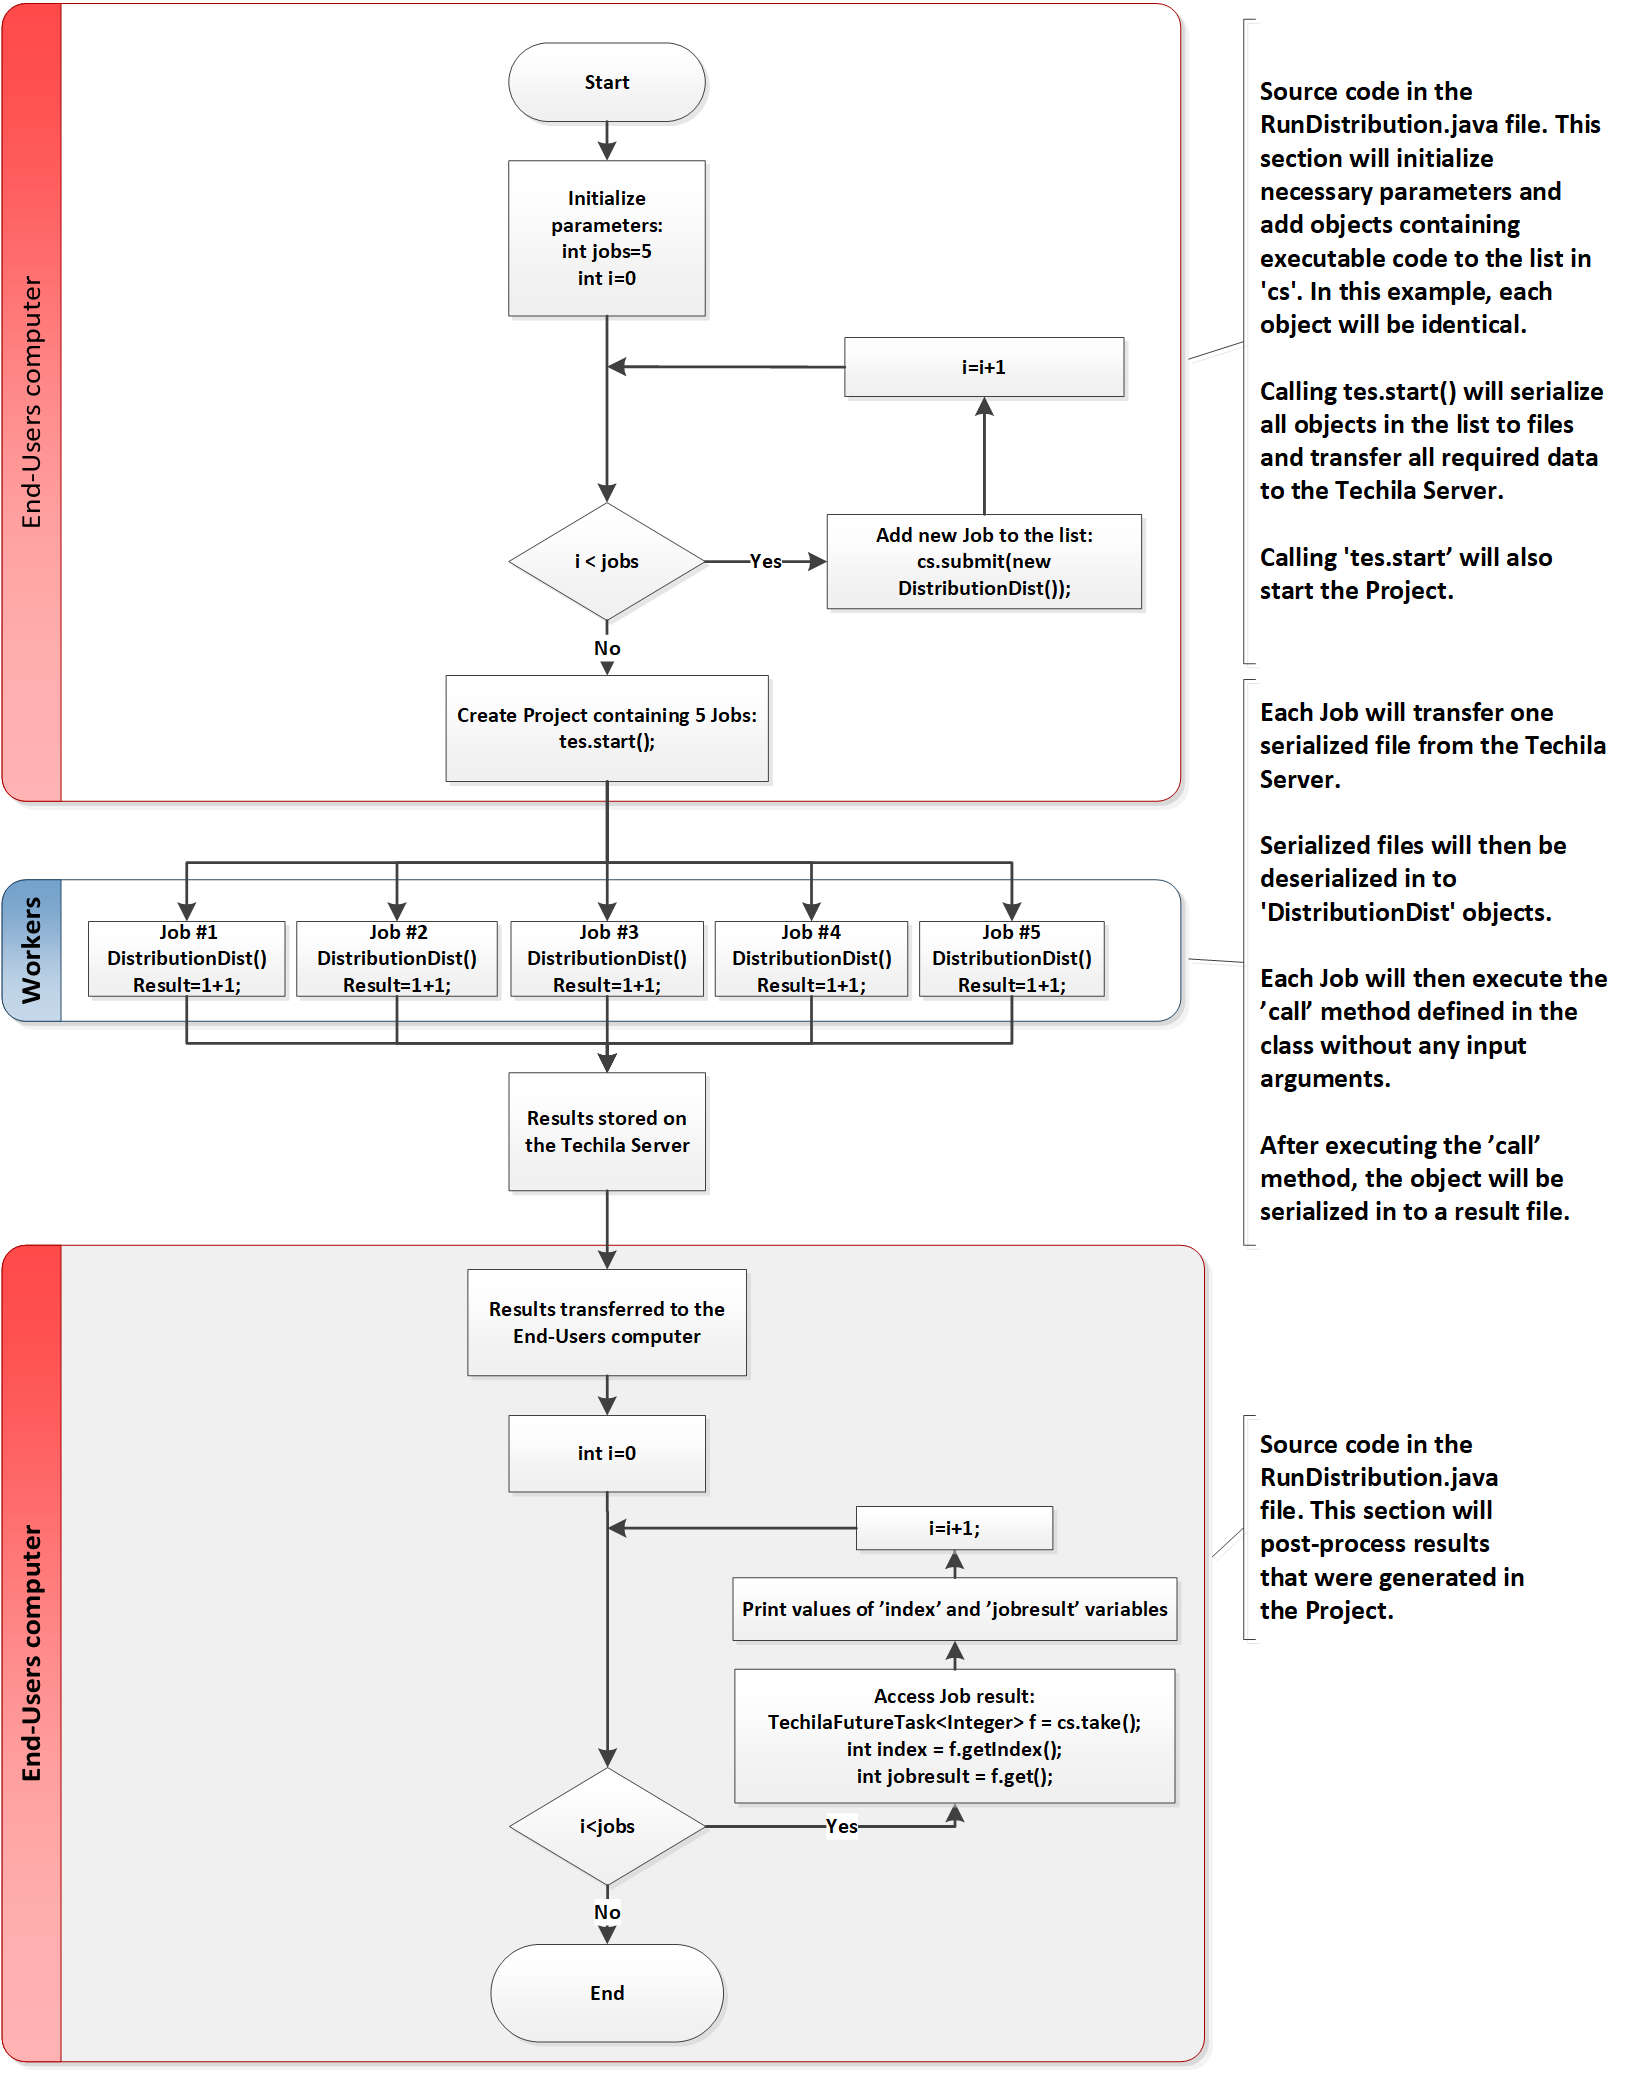
DistributionDist the objects without any input arguments.
The program starts by setting an initialization value for the variable jobs, which will be used to define the number iterations in the for-loop. Each for-loop iteration will create a new DistributionDist object, which will be added to the list in the cs object. After all objects have been added to the list, the computational Project will be created by calling the tes.start method.
After the Project has been created, Jobs will be assigned to Techila Workers. After Jobs have been assigned, each Job will retrieve one serialized file (containing a DistributionDist object) from the Techila Server.
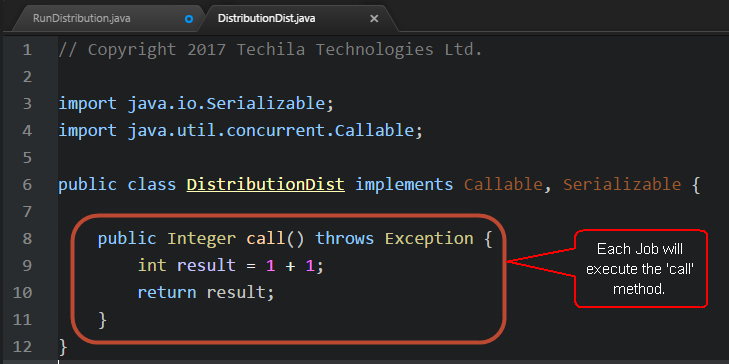
This file will then be deserialized into a DistributionDist object and the call method in the object will be called once. At the end of the call method, the result value of the summation operation will be stored in the variable result.
After a Job is completed on a Techila Worker, the result variable will be serialized to a result file, which will be transferred back to the Techila Server.
As soon as result files are available, they will be automatically transferred from the Techila Server to the End-User’s computer. After result files have been received on the End-User’s computer, the data structures in the files (i.e. the result variables) will be deserialized and stored in the cs object in a list.
Job results will be accessed in the second for-loop. Every for-loop iteration will get one result data element and print the index and value of the result in the standard output stream. If no new results are available when trying to access results, the cs.take(); command will wait/block execution until new result data is available. The syntax for accessing individual Job results is illustrated below:
3.1.2. Building and running the example
This Chapter contains instructions on how to compile and run the first Java tutorial example included in the Techila SDK.
-
Launch a Microsoft Windows Command Prompt / Linux Shell Terminal
-
Change your current working directory to the directory that contains the material for this example.
-
Compile the 'RunDistribution.java' file using command:
javac RunDistribution.java
-
Create a Project by running the compiled code using command:
java RunDistribution
-
If prompted, enter your keystore password.
-
After the Project has been completed, the result of each Job will be displayed on a separate line as shown below.
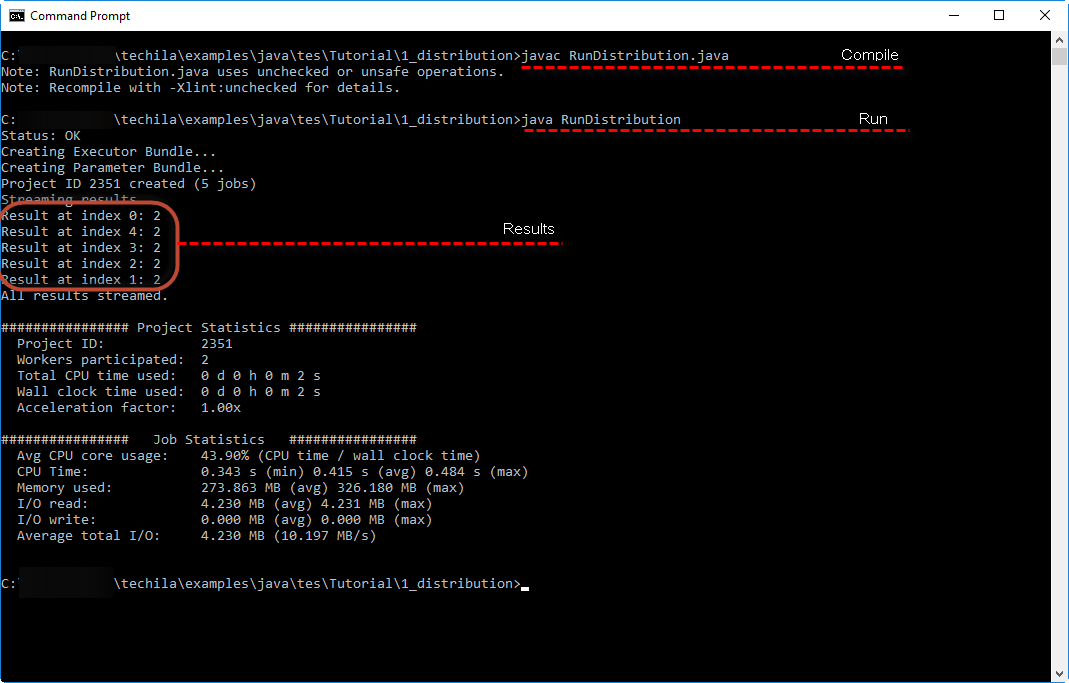 Figure 20. Executing the distributed application where computational operations are executed in the Techila Distributed Computing Engine environment.
3.2. Using Input Arguments
The walkthrough in this Chapter is intended to provide an introduction on:
-
how you can pass input arguments to the code that will be executed on Techila Workers
-
how to execute multiple tasks in a Job by using the
setStepsmethod.
The material discussed in this example is located in the following folder in the Techila SDK:
-
techila\examples\java\tes\Tutorial\2_parameters
Input arguments can be passed to executable code by defining the input arguments when creating a new instance of the serializable class. For example, the following code could be used to create two instances of class ParametersDist with different input arguments.
TechilaExecutorService<ParametersDist> tes = new TechilaExecutorService<ParametersDist>(tm, "ParametersTutorial");
TechilaExecutorCompletionService<ParametersDist, Integer> cs = new TechilaExecutorCompletionService<ParametersDist, Integer>(tes);
cs.submit(new ParametersDist(2, 0));
cs.submit(new ParametersDist(2, 1));
When using input arguments in your serializable class, you will also need to define a suitable constructor that stores the input data into private variables. This constructor will be called when creating instances of the class, meaning it must be able to process the input arguments. For example, the following constructor could be used to create objects that take two input arguments.
public class ParametersDist implements Callable, Serializable {

    private int multip;
    private int index;

    public ParametersDist(int multip, int index) {
        this.multip = multip;
        this.index = index;
    }

    public Integer call() throws Exception {
       // Executable code should go here.
    }
}
By default, each Job will execute the call method of one object submitted using cs.submit. If you want to group the calls together, this can be done by using the setSteps method in TechilaExecutorCompletionService. For example, the following code snippet would create a Project consisting of 1 Job. This Job would execute the call methods in both objects, because the number of steps has been set to 2.
TechilaExecutorService<ParametersDist> tes = new TechilaExecutorService<ParametersDist>(tm, "ParametersTutorial");
TechilaExecutorCompletionService<ParametersDist, Integer> cs = new TechilaExecutorCompletionService<ParametersDist, Integer>(tes);

// Add two objects
cs.submit(new ParametersDist(2, 0));
cs.submit(new ParametersDist(2, 1));

// Set steps to 2
tes.setSteps(2);

// This would create a Project consisting of 1 Job. This Job would execute the `call` methods in both objects.
tes.start();
3.2.1. Distributed version
The source code of the distributed version is located in the following files:
techila\examples\java\tes\Tutorial\2_parameters\RunParameters.java
techila\examples\java\tes\Tutorial\2_parameters\ParametersDist.java
The process flow of the distributed program is shown in the image below. Sections highlighted with red indicate parts of the program that are executed on the End-User’s computer. The section highlighted with blue indicates operations that take place on the Techila Workers.
The program starts by setting an initialization value for the variable amount, which will be used to define the number iterations of in the for-loop. Each for-loop iteration will create a new ParametersDist object, where the value of the second input argument will depend on the value of the loop counter (variable i). The values of the input arguments will be stored in the objects and will be used when the computations are executed on the Techila Workers
The number of steps has been set to 2 by using tes.setSteps(2);, meaning each Job will execute the call methods of two objects. This means that the total number of Jobs in the Project will be: The number of objects in the list (10) divided by the value of steps (2) = 5 Jobs.
After all of the objects have been added, the computational Project will be created by calling the tes.start method.
After the Project has been created, Jobs will be assigned to Techila Workers. In this example, each Techila Worker will transfer one serialized file, which contains two ParametersDist objects. The variable values in these objects will match the values defined as input arguments when the objects were created on the End-User’s computer.
After deserialization, the call methods will be executed. This method will multiply the values defined as input arguments when the object was created. Job 1 will multiply 2*0 and 2*1, Job 2 will multiply 2*2 and 2*3 and so on.
The result value of the multiplication operation will be stored in the variable result.
3.2.2. Running the example
This Chapter contains illustrations on how to run the example program described in this Chapter.
-
Launch a Microsoft Windows Command Prompt / Linux Shell Terminal
-
Change your current working directory to the directory that contains the material for this example.
-
Compile the
RunParameters.javafile using command:javac RunParameters.java
-
Create a Project by running the compiled code using command:
java RunParameters
-
If prompted, enter your keystore password.
-
After the Project has been completed, the result of each task will be displayed on a separate line as shown below.
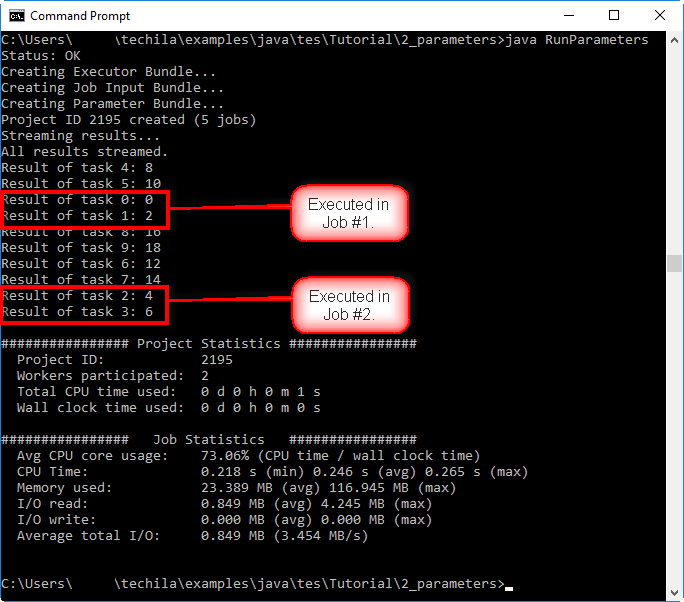 Figure 22. Executing the distributed application where computational operations are executed in the Techila Distributed Computing Engine environment.
3.3. Transferring Data Files
The walkthrough in this Chapter is intended to provide an introduction on how you can transfer additional data files to Techila Workers.
Material discussed in this example is located in the following folder in the Techila SDK:
-
techila\examples\CSharp\Tutorial\3_datafiles
Additional files can be transferred to the Techila Workers by using the methods listed below:
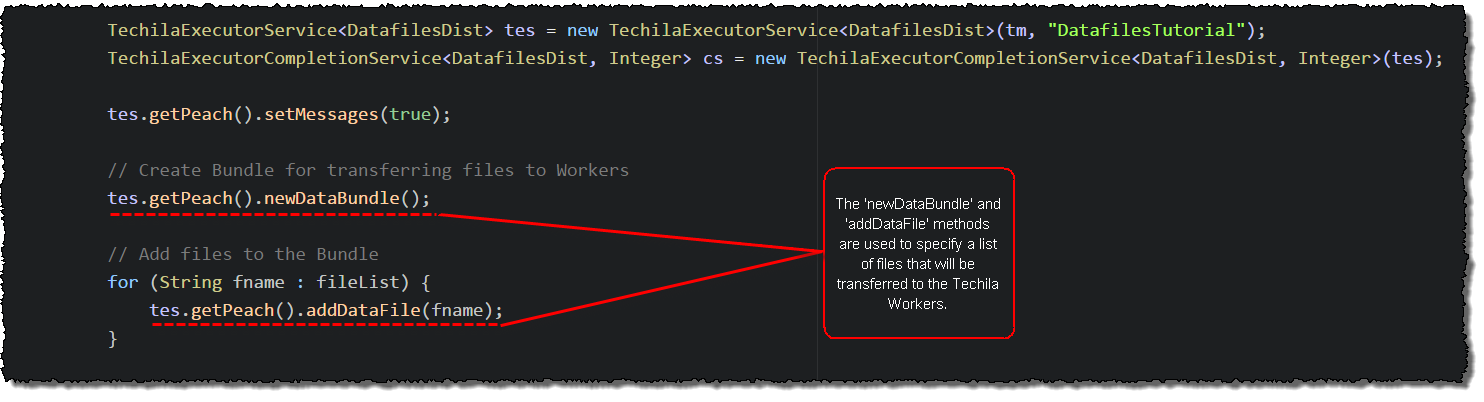
-
tes.getPeach().newDataBundle() -
tes.getPeach().addDataFile(string file) -
tes.getPeach().addDataFile(string file, string targetName) -
tes.getPeach().addDataFileWithDir(string dir, string file)
These methods are explained below.
tes.getPeach().newDataBundle() command is used state that a new Data Bundle should be created. This function must be called before files can be added to the Data Bundle.
tes.getPeach().addDataFile(string file) method can be used add files to a Data Bundle, enabling you to transfer files from your current working directory to the Techila Server and Techila Workers. The input argument (string file) will be used to define the name of the file that should be transferred. For example, the syntax shown below would transfer a file called datafile.txt from the current working directory to all Techila Workers participating to the Project.
TechilaExecutorService<DatafilesDist> tes = new TechilaExecutorService<DatafilesDist>(tm, "Example");
TechilaExecutorCompletionService<DatafilesDist, Integer> cs = new TechilaExecutorCompletionService<DatafilesDist, Integer>(tes);
tes.getPeach().newDataBundle();
tes.getPeach().addDataFile("datafile.txt");
Multiple files can be transferred by using multiple method calls. For example, the syntax shown below would transfer files datafile1.txt and datafile2.txt to all Techila Workers participating to the Project.
TechilaExecutorService<DatafilesDist> tes = new TechilaExecutorService<DatafilesDist>(tm, "Example");
TechilaExecutorCompletionService<DatafilesDist, Integer> cs = new TechilaExecutorCompletionService<DatafilesDist, Integer>(tes);
tes.getPeach().newDataBundle();
tes.getPeach().addDataFile("datafile1.txt");
tes.getPeach().addDataFile("datafile2.txt");
tes.getPeach().addDataFile(string file, string targetName) command can be used to transfer file to the Techila Worker and copy the files to a different target name on the Techila Worker. The first input argument is the name of the file on your computer. The second input argument is the name of the file after it has been transferred to the Techila Worker. For example, the syntax shown below would transfer a file called datafile.txt to the Techila Worker, where it would be renamed to workerfile.txt.
TechilaExecutorService<DatafilesDist> tes = new TechilaExecutorService<DatafilesDist>(tm, "Example");
TechilaExecutorCompletionService<DatafilesDist, Integer> cs = new TechilaExecutorCompletionService<DatafilesDist, Integer>(tes);
tes.getPeach().newDataBundle();
tes.getPeach().addDataFile("datafile.txt","workerfile.txt");
tes.getPeach().addDataFileWithDir(string dir, string file) method can be used to transfer files that are NOT located in the current working directory. The first input argument defines where the directory where the file is (null for current directory). The second input argument defines the name of the file that should be transferred. For example, the following syntax would transfer a file called datafile.txt located in the directory C:\temp to all participating Techila Workers.
TechilaExecutorService<DatafilesDist> tes = new TechilaExecutorService<DatafilesDist>(tm, "Example");
TechilaExecutorCompletionService<DatafilesDist, Integer> cs = new TechilaExecutorCompletionService<DatafilesDist, Integer>(tes);
tes.getPeach().newDataBundle();
tes.getPeach().addDataFileWithDir("C:\\temp","datafile.txt");
Please note that all files transferred using these functions will be copied to the same temporary working directory with the executable binary when the computational Job is processed on the Techila Worker. If you wish to preserve the directory structure of the transferred files, this can be achieved by creating a named data bundle by using the Techila Bundle Creator Tool (as described in the Bundle Guide) and importing the named Data Bundle to the computational Project.
Another option for preserving the directory structure is to create a zip-archive of the files/folders you want to transfer and place the zip-archive in the Bundle. After transferring the Bundle to the Techila Worker, you can extract the zip-archive, which will preserve the directory structure.
After a Data Bundle has been created, it can be automatically reused in subsequent computational Projects assuming that nothing has changed regarding following properties:
-
The number of Data Bundles created
-
Timestamps of files in the Bundles
-
Content of the files in the Bundles
If you wish to create a Bundle that can be reused in several different computational Projects, it is recommended that you use the CLI createBundle command or the Techila Bundle Creator tool for creating the Data Bundle. More information on the use of these tools can be found in Bundle Guide. The Bundle can then be imported in to a computational Project using the following function:
tes.GetPeach().AddExeImport(string importName);3.3.1. Distributed version
The source code of the distributed version is located in the following file:
techila\examples\java\tes\Tutorial\3_datafiles\RunDatafiles.java
techila\examples\java\tes\Tutorial\3_datafiles\DatafilesDist.java
The process flow of the distributed program is shown below. Sections highlighted with red indicate parts of the program that are executed on the End-User’s computer. The section highlighted with blue indicates operations that take place on the Techila Workers.
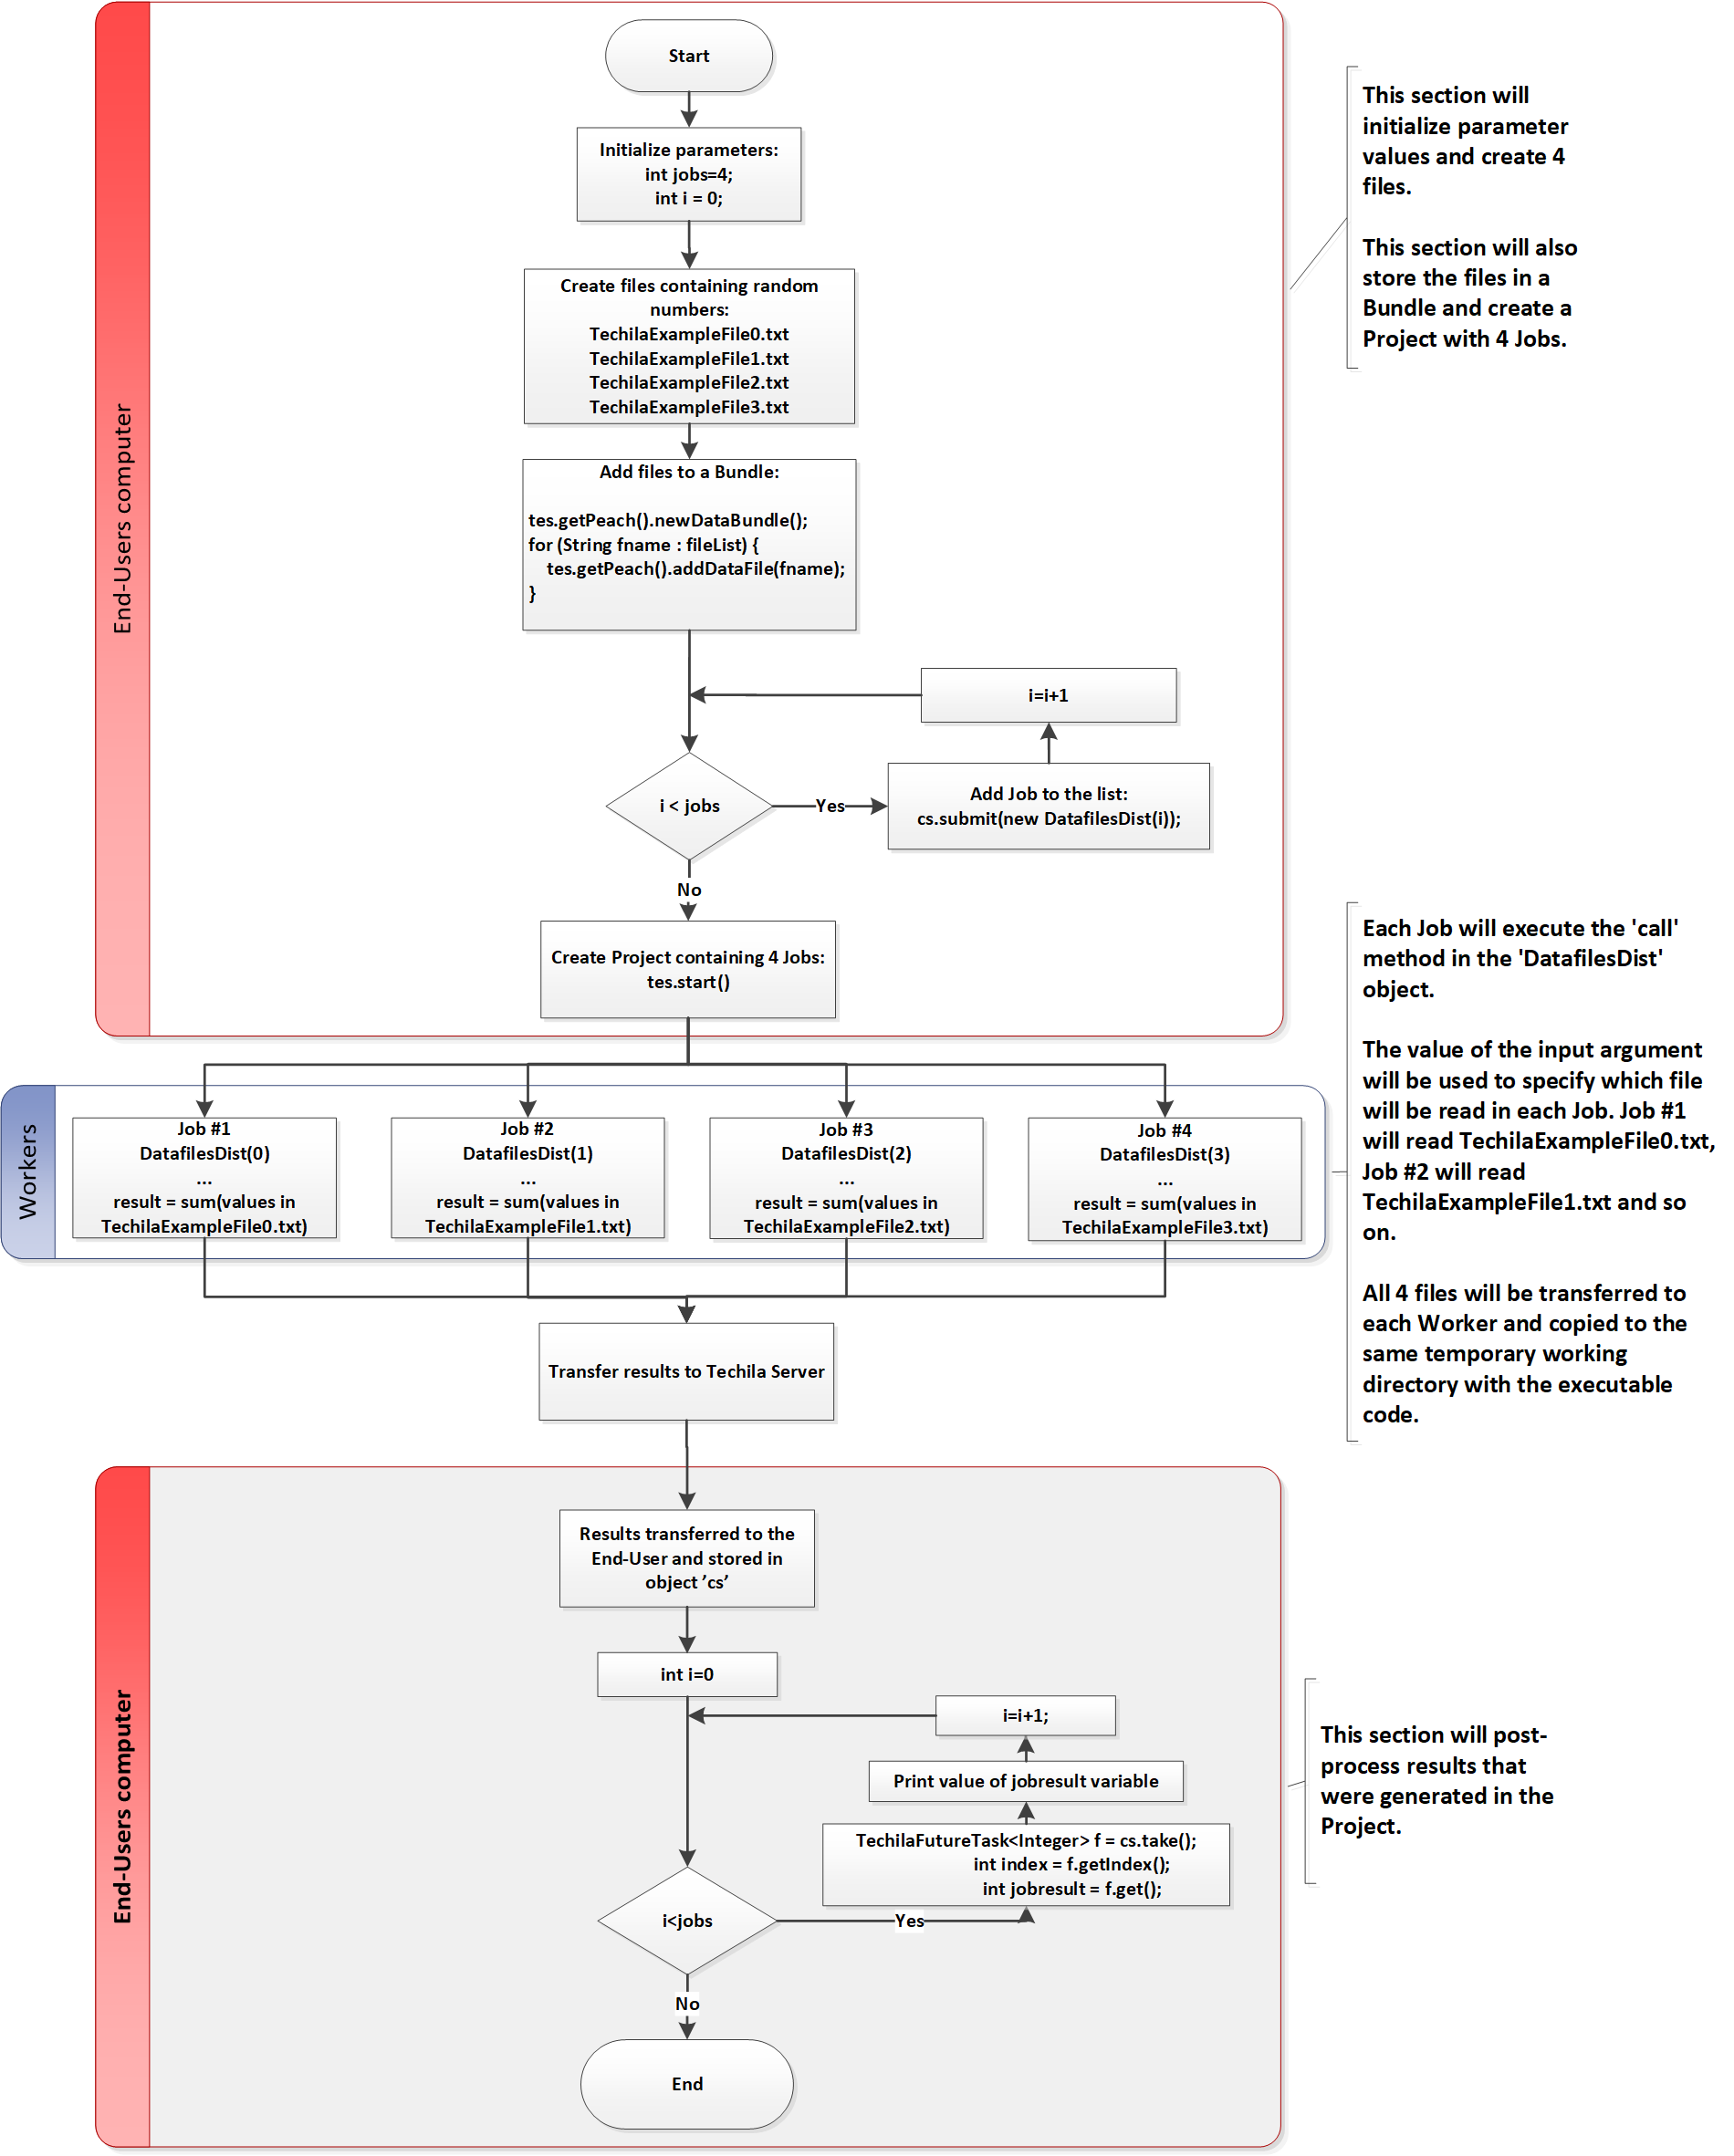
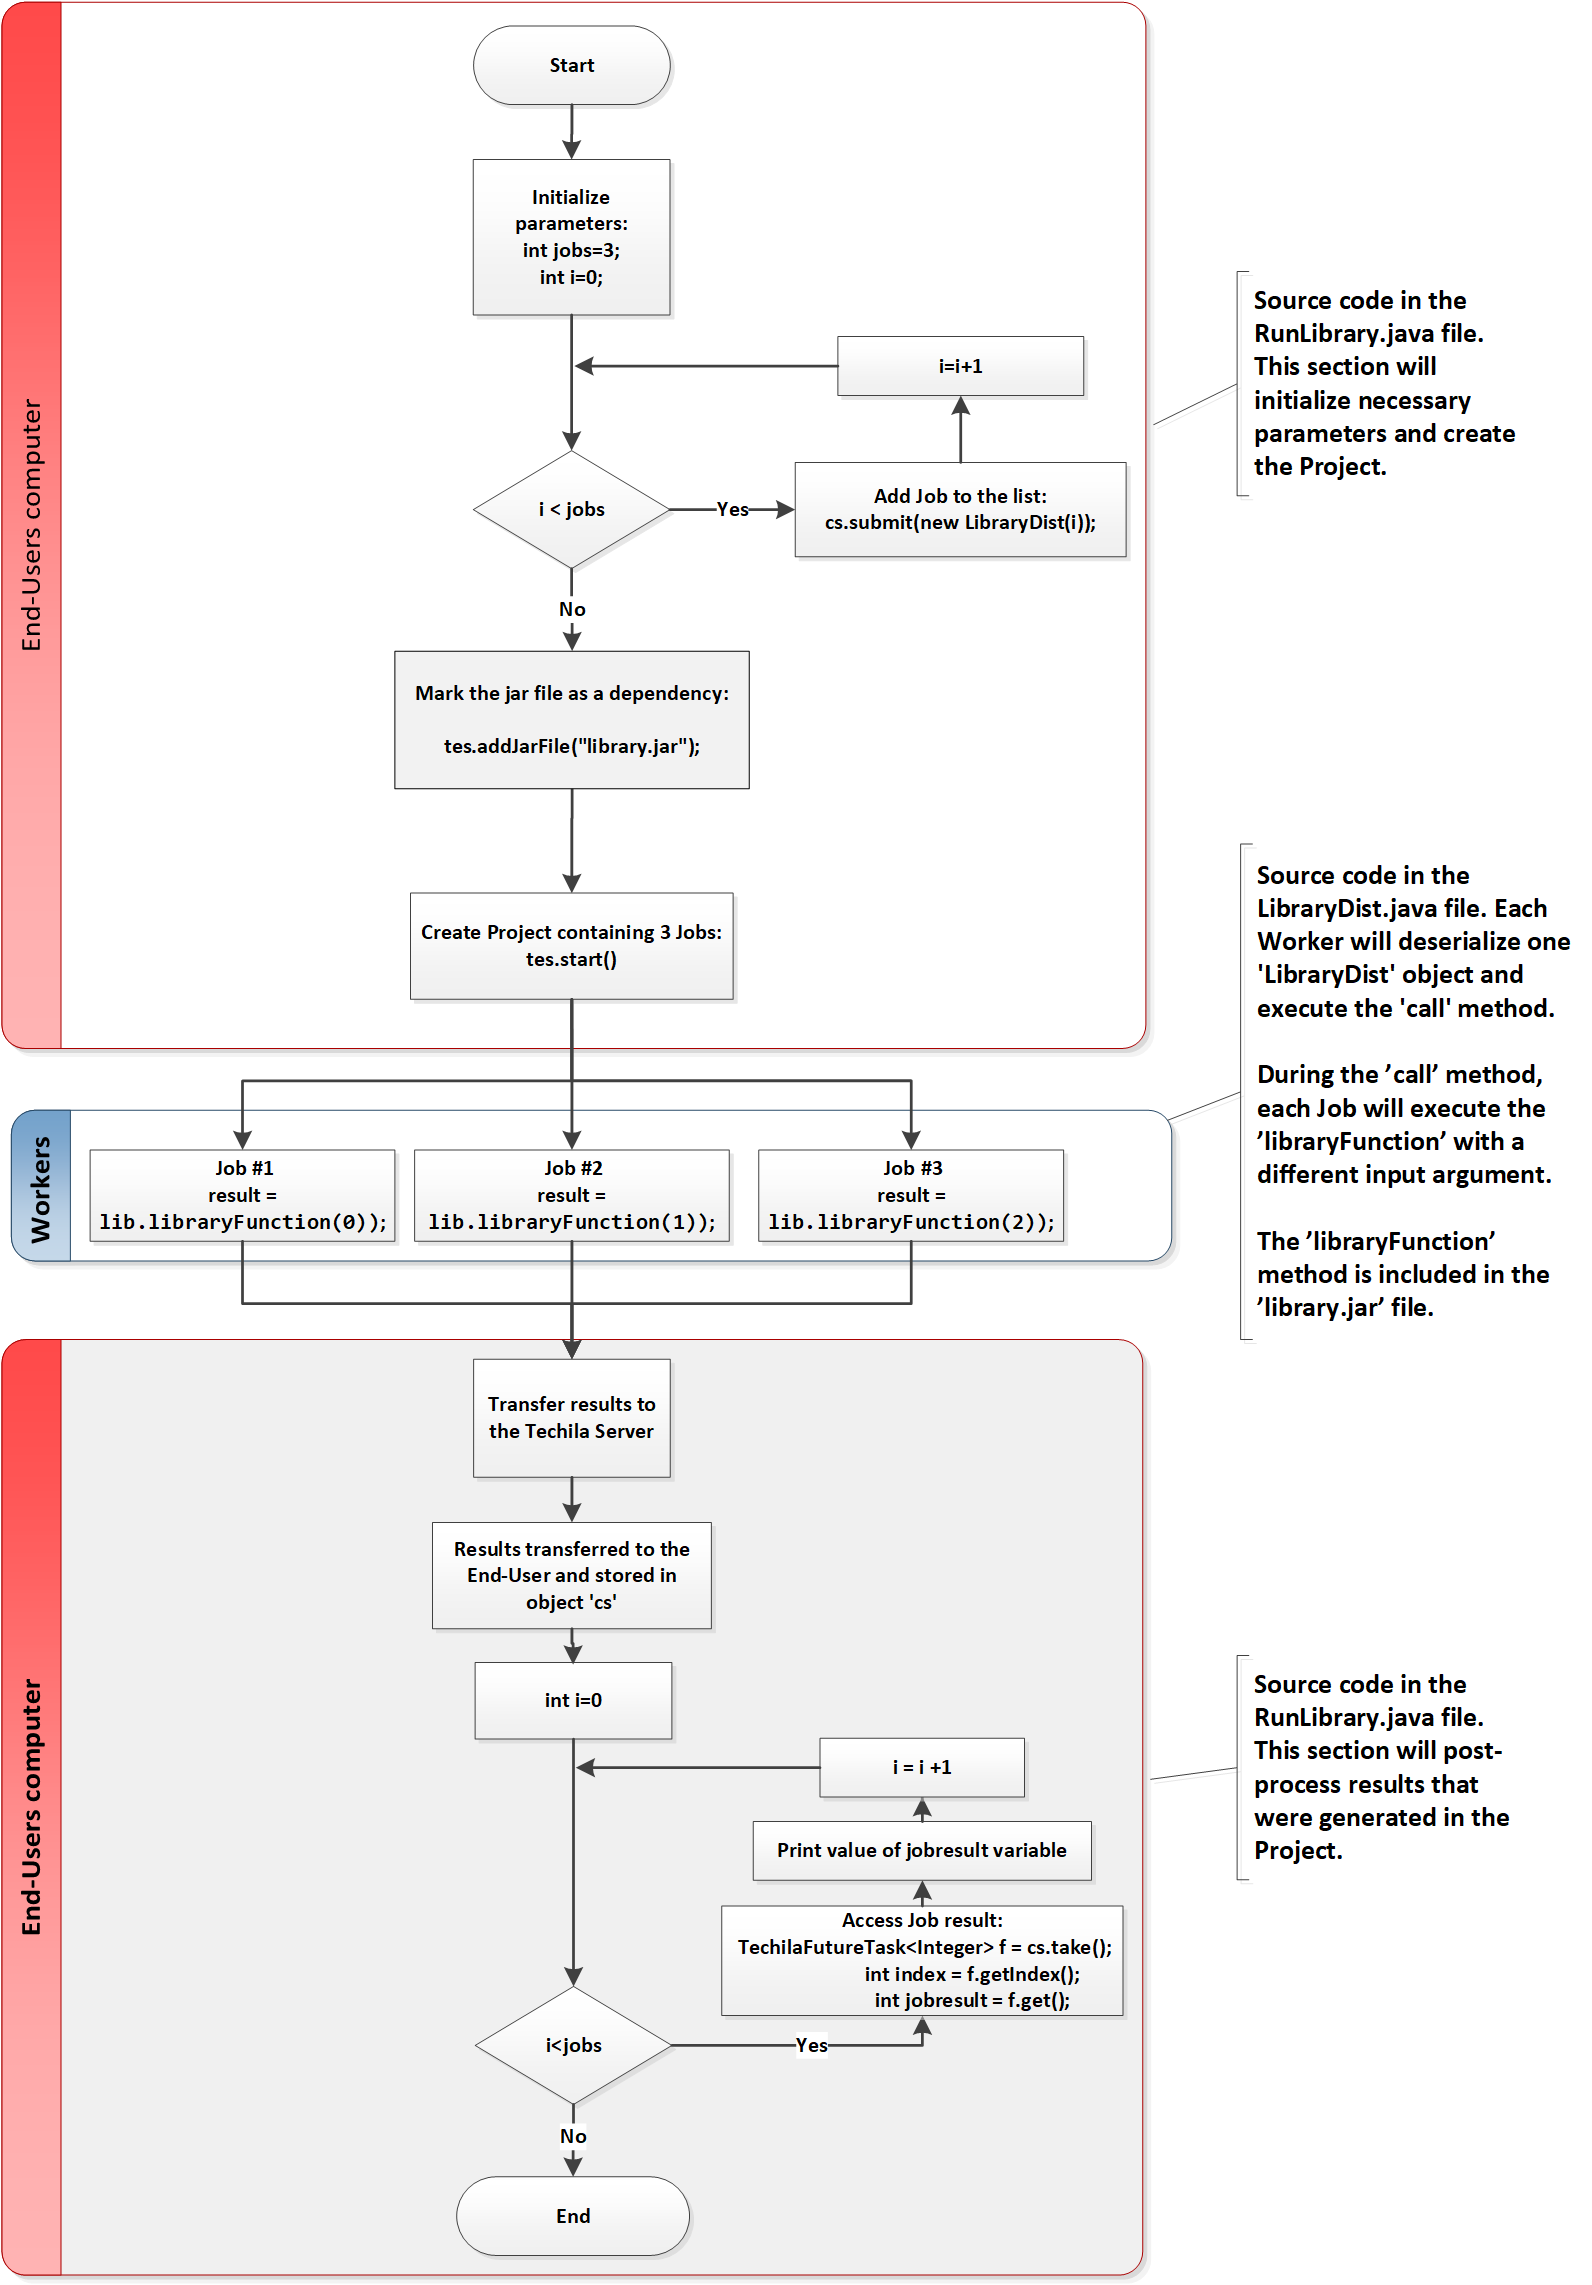
The program starts by creating text files containing random numbers. After generating the files, the program will add the files to a Bundle by using the newDataBundle and addDataFile commands. This will mark all files that were created to be transferred to the Techila Server when the tes.start() is called.
After the files have been added to the Bundle, the program will enter a for-loop. Each for-loop iteration will create a new DatafilesDist object with a different input argument. These objects will be added to the list in the cs object.
After all objects have been added to the list, the computational Project will be created by calling the tes.start method. Calling the method will also create the Bundle that contains the text files. This Bundle will then be automatically transferred to the Techila Server.
After the Project has been created, Jobs will be assigned to Techila Workers. At this point, the Bundle containing the text files will also be automatically transferred to each participating Techila Worker. After the Bundle has been transferred to the Techila Worker, the text files will be extracted from the Bundle and copied to the same temporary working directory that contains the executable code.
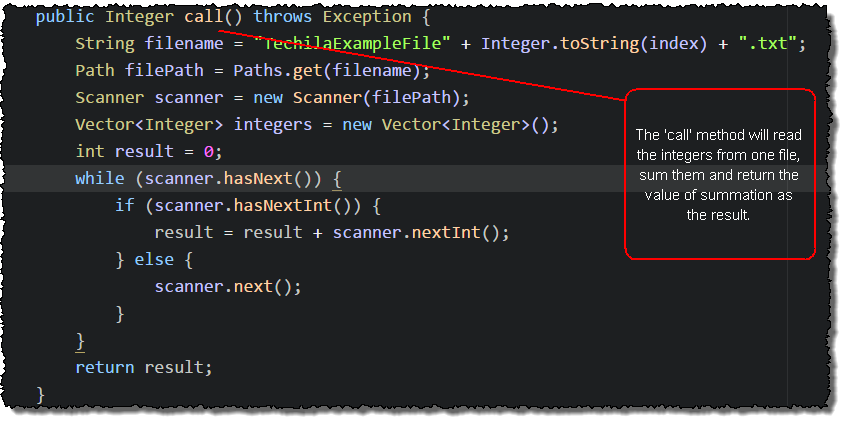
After all files required for the Job have been copied to the temporary working directory, the DatafilesDist object will be deserialized. After deserialization, the call method in the DatafilesDist class will be executed. In this example, the code will read one of the transferred text files and sum the integers found in the file. The result value of the summation operation will be stored in the variable result, which will be returned from the Job as the computational result.
3.3.2. Running the example
This Chapter contains illustrations on how to run the example program described in this Chapter.
-
Launch a Microsoft Windows Command Prompt / Linux Shell Terminal
-
Change your current working directory to the directory that contains the material for this example.
-
Compile the
RunDatafiles.javafile using command:javac RunDatafiles.java
-
Create a Project by running the compiled code using command:
java RunDatafiles
-
If prompted, enter your keystore password.
-
After the Project has been completed, the result of each Job will be displayed on a separate line as shown below.
 Figure 26. Executing the distributed application. After the Project has been completed, the program will display one line of output per Job. Each line will contain the value of the summation operation.
3.4. Using JAR Files
The walkthrough in this Chapter is intended to provide an introduction on how you can use JAR files in the code that is executed on Techila Workers.
Material discussed in this example is located in the following folder in the Techila SDK:
-
techila\examples\java\tes\Tutorial\4_libraries\
JAR files are files that can contain additional functions that can be accessed by accessing the library during runtime execution. If the program that is executed on a Techila Worker needs access to functions in a JAR file, the file containing the function definitions needs to be transferred to the Techila Workers by using the addJarFile. For example, the following command could be used to transfer a file called library.jar from the current working directory to the Techila Workers.
tes.addJarFile("library.jar");When using the above syntax to transfer JAR files, the CLASSPATH environment variable on the Techila Workers is automatically updated to include the files.
Multiple JAR files can be transferred by executing the command several times, once for each file you want to transfer. For example, the following syntax could be used to transfer JAR files library.jar and secondlibrary.jar.
tes.addJarFile("library.jar");
tes.addJarFile("secondlibrary.jar");
If the JAR file is not located in the current working directory, you can include the path in the file name. For example, the following syntax would add file library.jar from the current working directory and file secondlibrary.jar from directory C:\temp.
tes.addJarFile("library.jar");
tes.addJarFile("C:\\temp\\secondlibrary.jar");
After being transferred to the Techila Worker, all JAR files will be copied to the Job’s temporary execution directory, meaning the directory structure will be flattened.
3.4.1. Distributed version
The source code of the distributed version is located in the following files:
techila\examples\java\tes\Tutorial\4_libraries\RunLibrary.java
techila\examples\java\tes\Tutorial\4_libraries\LibraryDist.java
techila\examples\java\tes\Tutorial\4_libraries\Library.java - This contains the library method, which will be stored in a JAR file
The process flow of the distributed program is shown in the image below. Sections highlighted with red indicate parts of the program that are executed on the End-User’s computer. The section highlighted with blue indicates operations that take place on the Techila Workers.
The program starts by setting the Job count to 3 and creating one LibraryDist object for each Job. These objects will be added to the list in the cs object. The functionality in LibraryDist requires access to a library method, which can be satisfied by adding the library.jar file using the addJarFile method. This library.jar file will be created in Running the example.
After three iterations, three objects have been added to the list. The computational Project will then be created by calling the tes.start method. At this point, the following files will be transferred from your computer to the Techila Server:
-
TechilaExecutor.java (Always transferred)
-
library.jar (Transferred because it has been added using the
addJarFilemethod.) -
Librarydist.class (File containing the compiled Java application)
-
All files containing serialized
LibraryDistclass instances
After all data has been transferred to the Techila Server, Jobs will be assigned to Techila Workers. After Jobs have been assigned, all necessary data will be transferred from the Techila Server to the Techila Workers. This will include the file library.jar file, which will be copied to the same temporary working directory with other files.
Each Job will then deserialize file containing a LibraryDist object and execute the call method.
3.4.2. Running the example
This Chapter contains illustrations on how to run the example program described in this Chapter.
-
Launch a Microsoft Windows Command Prompt / Linux Shell Terminal
-
Change your current working directory to the directory that contains the material for this example.
-
Compile the
Library.javafile using command:javac Library.java
-
Store the class file to a jar file using command:
jar cvf library.jar Library.class
-
Compile the
RunDatafiles.javafile using command:javac RunLibrary.java
-
Create a Project by running the compiled code using command:
java RunLibrary
-
If prompted, enter your keystore password.
-
After the Project has been completed, the result of each Job will be displayed on a separate line as shown below.
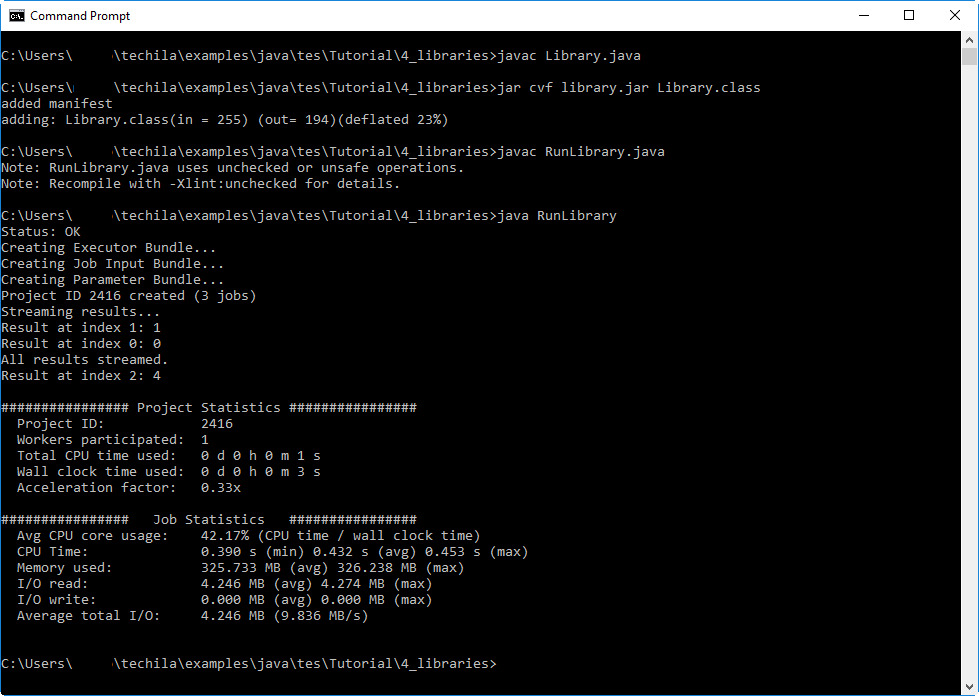 Figure 28. Executing the distributed application. After the Project has been completed, the program will display one line of output per Job. Each line will contain the value returned from the library function.
4. Features
This Chapter contains walkthroughs of the example material in the Techila SDK that illustrate how to use various features available in Techila Executor Service.
4.1. Intermediate Data
The walkthrough in this Chapter is intended to provide an introduction on how to transfer intermediate data between your computer and the Techila Workers while the Jobs are still running.
The material discussed in this example is located in the following folder in the Techila SDK:
techila\examples\java\tes\Features\intermediate_data
More general information about this feature can be found in Introduction to Techila Distributed Computing Engine.
On the End-User’s computer, intermediate data is managed by using Java functionality in the TechilaExecutorService class as shown below.
-
sendIMData(long jobid, dataToJob)- Executed on End-User’s computer. Sends data from the End-User’s computer to a Job. This method call is typically used inside an intermediate callback method (explained later in this Chapter.)
In the computational Job, intermediate data is managed by using Java methods in the TechilaConn class. The TechilaConn class is located in the techilaworkerutils.jar, which will be automatically transferred to each Job in the Project. The methods used to manage intermediate data are shown below:
-
sendIMData(object result)- Executed in the Job, on the Techila Worker. Sends data from a Job to the End-User’s computer. -
loadIMData(long timeout)- Executed in the Job, on the Techila Worker. Receives data from the End-User.
These methods and the concept of an intermediate callback function are explained in more detail below.
To manage intermediate data on the Techila Worker, the TechilaConn class needs to be imported as shown below:
import fi.techila.user.workerutils.TechilaConn;After importing the class, intermediate data can be sent from the Job to the End-User by creating a TechilaConn object and using the sendIMData method. The example syntax shown below shows how a variable called dataToTransfer could be transferred as intermediate data from the Job to the End-User’s computer.
// Following lines should be executed in code executed on Techila Workers
TechilaConn conn = new TechilaConn();
int dataToTransfer = 42;
conn.sendIMData(dataToTransfer);
Multiple variables can be easily transferred by creating a list and/or an object that contains the variables you want to transfer.
Data can be received from the End-User by executing the loadIMData method in the Job. The example code snippet below illustrates how to receive intermediate data (of type Integer) and store it in a variable called dataReceivedFromUser.
// Following lines should be executed in code executed on Techila Workers
TechilaConn conn = new TechilaConn();
Integer dataReceivedFromUser = (Integer)conn.loadIMData(30000);
When executing the loadIMData method, a timeout period will need to be defined as an input argument (in milliseconds). Using the syntax shown above, the command would wait for 30 seconds before timing out. If the command does not receive intermediate data within 30 seconds, it will return a null value after which the any remaining code in the Job will be executed normally.
Intermediate data can be managed on the End-User’s computer by implementing an 'intermediateDataReceived' method in class that has been registered as callback using registerCallback. For example, the following code snippet could be used to register the methods in MyCallback class as the callbacks.
// Register the methods in MyCallback as the callback methods.
tes.registerCallback(new MyCallback());
In order to successfully register a class as a callback, the class will need to implement the following methods:
| Method | Description |
|---|---|
public void taskCompleted(TechilaFutureTask<T> task) |
Executed once when a task is completed. |
public void projectCompleted(TechilaExecutorService<T> tes) |
Executed once if the Project is completed successfully. |
public void projectFailed(TechilaExecutorService<T> tes) |
Executed once if the Project is fails. |
public void intermediateDataReceived(TechilaExecutorService<T> tes, long jobid, Object o) |
Executed once each time when new interemediate data is received. Typically you will call the |
public boolean intermediateEnabled() |
Used to toggle whether or not |
The type <T> will need to be replaced with the class that contains the code executed on Techila Workers. The image below illustrates how to register a callback class and how to implement the classes:

Using the methods mentioned above, intermediate data can be transferred between the End-User’s computer and the Techila Workers. The image below illustrates how variable a could be transferred from the Job to the End-User’s computer and back to the Job by using the methods described above.
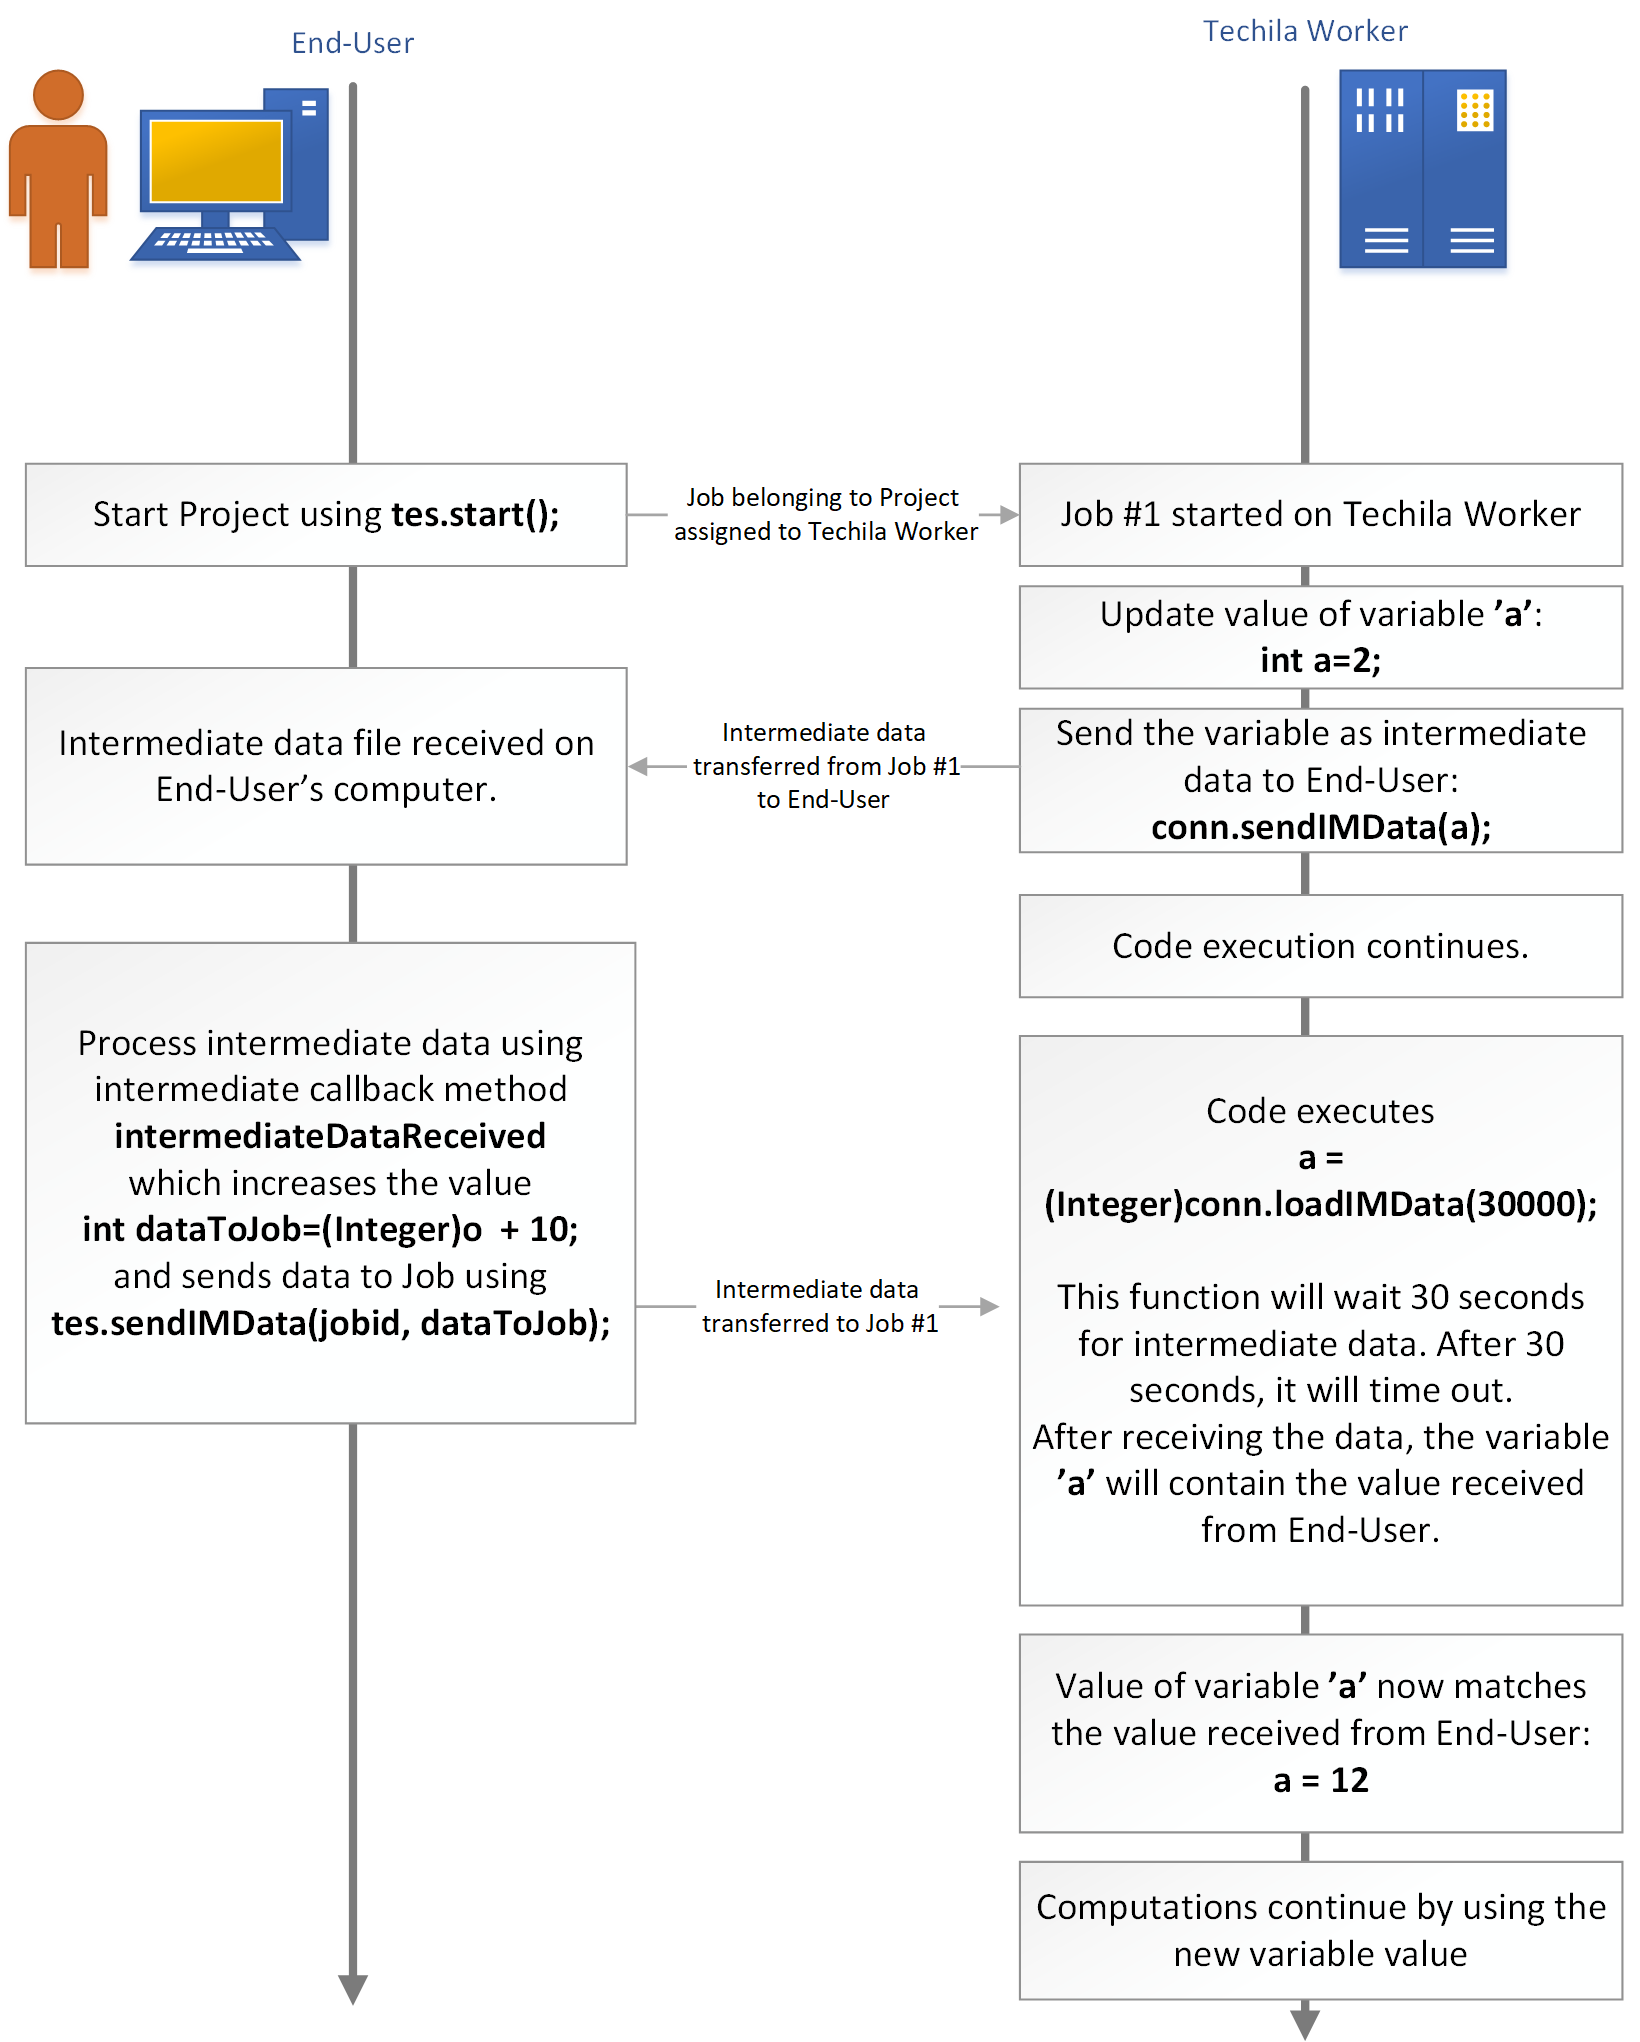
The intermediateDataReceived(TechilaExecutorService<T> tes, long jobid, Object o) method requires three input arguments.
The type in TechilaExecutorService<T> tes needs to match the type you are executing on the Techila Workers. For example, if you are executing a class called MyClass during the Jobs, you need to specify the class as follows intermediateDataReceived(TechilaExecutorService<MyClass> tes, long jobid, Object o)
Argument long jobid will contain the Jobid number, which is a 64-bit binary coded decimal. This is a unique value in a Techila Distributed Computing Engine environment and will be needed when sending data back to the Job. The first 32 bits contain the Project ID and the last 32 bits contain the Job’s index number that transferred the data. For example, if you want to get the Job’s index number, you can execute the following operation:
public void intermediateDataReceived(TechilaExecutorService<IntermediateDist> tes, long jobid, Object o) {
// Will return the Job's index number, which will range from 1 to the total number of Jobs.
long jobidx = jobid & 0xffff;
}
The Object o argument contains the actual intermediate data that has been received from the Job. You will need to cast o to match the data type that was transferred from the Job. For example, if an Integer was transferred, then you need to cast it to an Integer in order to load it on your computer.
public void intermediateDataReceived(TechilaExecutorService<IntermediateDist> tes, long jobid, Object o) {
int dataFromJob = (Integer)o;
}
The code snippet shown below shows an intermediate callback method that prints the data received from the Job, increases the value by 2 and sends the updated variable back to the same Job.
public void intermediateDataReceived(TechilaExecutorService<IntermediateDist> tes, long jobid, Object o) {
    int dataFromJob = (Integer)o;
    System.out.println(dataFromJob);
    int dataToJob = dataFromJob + 2;
    tes.sendIMData(jobid, dataToJob);
}
4.1.1. Example material walkthrough
The source code of the example discussed here can be found in the following file in the Techila SDK:
techila\examples\java\tes\Features\intermediate_data\RunIntermediate.java
techila\examples\java\tes\Features\intermediate_data\IntermediateDist.java
techila\examples\java\tes\Features\intermediate_data\Callback.java
The source code in the files is also shown below for convenience.
Contents of RunIntermediate.java.
// Copyright Techila Technologies Ltd.

import java.util.concurrent.ExecutionException;
import java.util.concurrent.TimeUnit;

import fi.techila.user.Support;
import fi.techila.user.TechilaExecutorCompletionService;
import fi.techila.user.TechilaExecutorService;
import fi.techila.user.TechilaFutureTask;
import fi.techila.user.TechilaManagerFactory;
import fi.techila.user.TechilaManager;

public class RunIntermediate {

    public void runIntermediate(int amount) {
        // Method for creating the computational Project.

        // Create a TechilaManager object, which will be used for initializing
        // the network connection / authentication
        TechilaManager tm = TechilaManagerFactory.getTechilaManager();

        try {
            // Initialize a connection to the Techila Server
            int status = tm.initFile();

            // Print the status of initialization attempt
            Support sp = tm.support();
            String codedesc = sp.describeStatusCode(status);
            System.out.println("Status: " + codedesc);

            // Create required TES objects.
            TechilaExecutorService<IntermediateDist> tes = new TechilaExecutorService<IntermediateDist>(tm, "IntermediateExample");
            TechilaExecutorCompletionService<IntermediateDist, Integer> cs = new TechilaExecutorCompletionService<IntermediateDist, Integer>(tes);

            // Enable messages.
            tes.getPeach().setMessages(true);

            // Register a callback method. The 'intermediateDataReceived' method
            // in 'Callback' class will be automatically executed
            // when new intermediate data will be received from a Job.
            tes.registerCallback(new Callback());

            // Add objects to a list. Each list object will correspond to one Job in the TDCE environment.
            int input;
            for (int i = 0; i < amount; i++) {
                input = i + 1;
                cs.submit(new IntermediateDist(input));
            }

            // Start the computational Project. Also starts a local thread that
            // will automatically download the results as soon as they are available.
            tes.start();

            // Access and print the results.
            for (int i = 0; i < amount; i++) {
                try {
                    TechilaFutureTask<Integer> f = cs.take();

                    int index = f.getIndex();
                    int jobresult = f.get();

                    System.out.println("Result of task " + index + ": " + Integer.toString(jobresult));
                } catch (ExecutionException ee) {
                    System.err.println("Task failed: " + ee.getMessage());
                }
            }

            // Allow 10 seconds for the local thread to terminate.
            tes.awaitTermination(10, TimeUnit.SECONDS);

        } catch (Throwable e) {
            System.err.println("Exception: " + e);
            e.printStackTrace();
        } finally {
            tm.unload(true, true);
        }
    }

    public void run() {
        runIntermediate(2);
    }

    public static void main(String[] args) {
        RunIntermediate rd = new RunIntermediate();
        rd.run();
    }
}
Contents of IntermediateDist.java.
// Copyright Techila Technologies Ltd.

import java.net.Socket;

import java.io.Serializable;
import java.util.List;
import java.util.concurrent.Callable;

import fi.techila.user.workerutils.TechilaConn;
//import fi.techila.user.workerutils.Func;

public class IntermediateDist implements Callable, Serializable {

    private int input;

    public IntermediateDist(int input) {
        this.input = input;
    }

    public Integer call() throws Exception {

        // Create a TechilaConn object so we can get information about the Job
        TechilaConn conn = new TechilaConn();

        // Get the Job's index, will range from 1 to the number of Jobs
        int index = conn.getJobId();

        int result = input + index;

        // Send data from the Job to the End-User's computer
        conn.sendIMData(result);

        Thread.sleep(5000);
        // Wait and receive intermediate data from the End-User's computer. If no data is received, the command will return null.
        Integer finalResult = (Integer)conn.loadIMData(30000);

        // Handle possible null return values
        if (finalResult == null) {
            // If we didnt get intermediate data, something went wrong
            return -1;
        } else {
            // Otherwise return the final result
            return finalResult;
        }
    }
}
Contents of Callback.java.
import fi.techila.user.TechilaExecutorService;
import fi.techila.user.TechilaExecutorServiceCallback;
import fi.techila.user.TechilaFutureTask;

public class Callback implements TechilaExecutorServiceCallback<IntermediateDist> {

    // Mandatory method. Executed once when a task is completed.
    public void taskCompleted(TechilaFutureTask<IntermediateDist> task) {
        System.out.println("callback: task completed");
    }
    // Mandatory method. Executed once if the Project is completed successfully.
    public void projectCompleted(TechilaExecutorService<IntermediateDist> tes) {
        System.out.println("callback: project completed");
    }

    // Mandatory method. Executed once if the Project fails.
    public void projectFailed(TechilaExecutorService<IntermediateDist> tes) {
        System.out.println("callback: project failed");
    }

    // Mandatory method. Executed when intermediate data is received from a Job.
    public void intermediateDataReceived(TechilaExecutorService<IntermediateDist> tes, long jobid, Object o) {
        // Get the Job's index number. This will range from 1 to the total number of Jobs.
        long jobidx = jobid & 0xffffffff;
        System.out.println("Received intermediate data from Job #" + jobidx);
        System.out.println("Value of received variable is: " + Integer.toString((Integer)o));
        // Cast the intermediate data that was received to an integer and
        // increase the value by 10 so we know it has been modified here.
        int dataToJob = (Integer)o  + 10;
        System.out.println("Increased value of variable to: " + dataToJob);
        System.out.println("Sending updated value of variable as intermediate data to Job #" + jobidx);
        // Send the updated value back to the same Job that sent the data.
        tes.sendIMData(jobid, dataToJob);
        System.out.println("Finished sending intermediate data to Job #" + jobidx);
    }

    // Mandatory method.
    public boolean intermediateEnabled() {
        // Return true to enable intermediate data callback method.
        // If modified to return false, the intermediate data callback function
        // would not be executed.
        return true;
    }
}
Each Job will generate a variable result and transfer the value of the variable as intermediate data back to the End-User’s computer. After the intermediate data has been received on the End-User’s computer, the data will be processed using the intermediate callback function intermediateDataReceived, which is stored in the Callback.java file.
The intermediateDataReceived method will display information about the data that was received from a Job, increase the value of the variable by 10 and send the updated value back to the same Job that sent the data by using function sendIMData. This updated value will be loaded in the Job by the loadIMData method call.
Each Job will return the updated value of the variable as the result. These results will be printed after the Project has been completed.
4.1.2. Running the example
This Chapter contains illustrations on how to run the example program described in this Chapter.
-
Launch a Microsoft Windows Command Prompt / Linux Shell Terminal
-
Change your current working directory to the directory that contains the material for this example.
-
Compile the
RunIntermediate.javafile using command:javac RunIntermediate.java
-
Create a Project by running the compiled code using command:
java RunIntermediate
-
If prompted, enter your keystore password.
-
. After the Project has been completed, the results will be displayed.
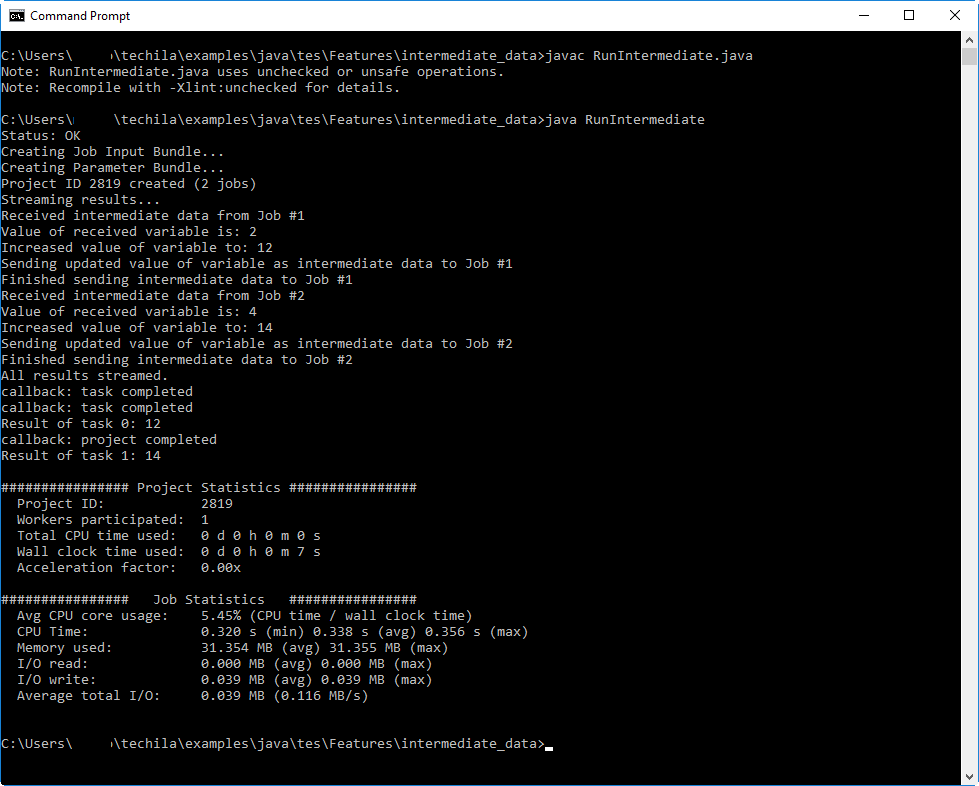 Figure 31. Executing the distributed application. After the Project has been completed, the program will the results generate during Jobs.
5. Interconnect
The Techila interconnect feature allows solving parallel workloads in a Techila environment. This means that using the Techila interconnect feature will allow you to solve computational Projects, where Jobs need to communicate with other Jobs in the Project.
More general information about this feature can be found in Techila Interconnect document.
Below are some notes about additional requirements that need to be met when using the Techila interconnect feature with Java.
General Note: All Jobs of an interconnect Project must be running at the same time
When using Techila interconnect methods in your code, all Jobs that execute these methods must be running at the same time. Additionally, all Techila Workers that are assigned Jobs from your Project must be able to transfer Techila interconnect data. This means that you must limit the number of Jobs in your Project so that all Jobs can be executed simultaneously on Techila Workers that can transfer interconnect data.
If all Techila Workers in your Techila environment are not able to transfer interconnect data, it is recommended that you assign your Projects to run on Techila Worker Groups that support interconnect data transfers. If Jobs are assigned to Techila Workers that are unable to transfer interconnect data, your Project may fail due to network connection problems. Please note that before the interconnect Techila Worker Groups can be used, they will need to be configured by your local Techila Administrator.
You can specify that only Workers belonging to specific Techila Worker Groups should be allowed to participate in the Project with the techila_worker_group Project parameter.
The example code line below illustrates how the Project could be limited to only allow Techila Workers belonging to Techila Worker Group called IC Group 1 to participate. This example assumes that administrator has configured a Techila Worker Group called IC Group 1 so it consists only of Workers that are able to transfer interconnect data with other Techila Workers in the Worker Group.
tes.getPeach().putProjectParam("techila_worker_group","IC Group 1");Please ask your local Techila Administrator for more detailed information about how to use the Techila interconnect feature in your Techila environment.
5.1. Interconnect Example
This example is intended to illustrate how to transfer data between Jobs in the Project.
There is no locally executable version of this code example. This is because the distributed versions are essentially applications, where each task must be executed at the same time.
The material used in this example is located in the following folder in the Techila SDK:
-
techila\examples\java\tes\Interconnect\1_interconnect
Please note that before you can successfully run this example, your Techila environment needs to be configured to support Techila interconnect Projects. Please ask your local Techila Administrator for more information.
Methods for transferring the interconnect data are included in the TechilaInterconnect class, which is included in the techilaworkerutils.jar file. This file is located in the techila\lib directory in the Techila SDK. This class can be imported during a computational Job with the following syntax:
import fi.techila.user.workerutils.TechilaConn;Additionally, some interconnect methods (such as the cloudOp) will require the following additional import:
import fi.techila.user.workerutils.Func;After importing the classes, the first step is to initialize the interconnect network by using the initInterconnection method. This method will need to be executed in each Job at the same time in order to initialize the interconnect network successfully. This method takes one input argument, which is used to define a timeout value for the method call (in milliseconds). If any of the Jobs is not able join the interconnect network within the timeout period, all Jobs will generate an error.
The code snippet below illustrates how to create a new TechilaConn object and use the initInterconnection method with a 30 second timeout period to initialize the interconnect network.
TechilaConn conn = new TechilaConn();
conn.initInterconnection(30000);
After initializing the network connection, data can be transferred between the Jobs by using the interconnect methods. These methods are introduced below.
Transferring Interconnect Data Between Specific Jobs
Data can be transferred between two specific jobs by using the following methods:
-
sendDataToJob(int targetjob, Object o) -
receiveDataFromJob(int sourcejob)
The sendDataToJob(int targetjob, Object o) method sends Object o a to the Job with an index number defined in argument int targetjob.
The recv_data_from_job(int sourcejob) method receives data from the Job that is specified in the int sourcejob argument. This method returns the data that was received from the sourcejob.
Any data that is sent with the sendDataToJob method, must be received with a matching receiveDataFromJob method call.
Example: The following syntax could be used to send a string Hello to Job 2.
TechilaConn conn = new TechilaConn();
conn.initInterconnection(30000);
sendDataToJob(2, "Hello")
conn.waitForOthers();
If we assume that the above code is executed in Job 1, the data could be received by executing the following command in Job 2.
TechilaConn conn = new TechilaConn();
conn.initInterconnection(30000);
String data = receiveDataFromJob(1)
conn.waitForOthers();
The output variable data will contain the data that was received. In this example, data would contain the string Hello.
After interconnect data has been transferred between Jobs, the conn.waitForOthers() method can be used to enforce a synchronization point. When this command is executed in Jobs, each Job in the Project will wait until all other Jobs in the Project have also executed the command before continuing.
Broadcasting interconnect data from one Job to all other Jobs in the Project
If you want to transfer data from a specific Job to all other Jobs in the Project, then you can use the following method:
-
cloudBc(int sourceJob, Object dataToTransfer)
The int sourceJob argument should be replaced with the index of the broadcasting Job. The Object dataToTransfer argument should be replaced with the data you want to broadcast.
For example, the following syntax could be used to transfer a string from Job 2 to all other Jobs in the Project:
TechilaConn conn = new TechilaConn();
conn.initInterconnection(30000);
String dataToTransfer = "Hello";
int sourceJob = 2;
String broadcastResult = conn.cloudBc(sourceJob, dataToTransfer);
conn.waitForOthers();
After the broadcast operation has been completed, each Job will have the same value (Hello) stored in the broadcastResult variable.
Performing cloudOp operations
The cloudOp method can be used to execute the given operation across all the Jobs and return the result to all Jobs, or the target Job. The general syntax for executing a cloudOp operation and returning the data to all Jobs is shown below:
-
cloudOp(new Method(), Object argument)
In the example above, Method needs to be a class that implements the Func interface. Inside this Method class, you can use the op method to define what operations you want to execute using cloudOp. The object argument represents the input argument given to the op method inside the Method class.
For example, the example code snippet below shows how a class called Sum containing a functionality for summing two integers could be used as the cloudOp operation. Each Job in the Project would get the result of the summation as the return value, which would be stored in cloudOpResult.
....
TechilaConn conn = new TechilaConn();
conn.initInterconnection(30000);
int cloudOpResult = conn.cloudOp(new Sum(), myjobid);
conn.waitForOthers();
....

public class Sum implements Func<Integer> {
    public Integer op(Integer num1, Integer num2) {
        return num1 + num2;
    }
}
....
If you only want to return the result in a specific Job, you can do this by giving the cloudOp method an additional input argument to define the target Job index. For example, the following code snippet would perform the same operations as the code snippet above, with the exception that the result is only returned in Job 1. All other Jobs in the Project would return a null value.
....
TechilaConn conn = new TechilaConn();
conn.initInterconnection(30000);
Integer cloudOpResult = conn.cloudOp(new Sum(), myjobid, 1);
conn.waitForOthers();
....

public class Sum implements Func<Integer> {
    public Integer op(Integer num1, Integer num2) {
        return num1 + num2;
    }
}
....
5.1.1. Example material walkthrough
The source code of the example discussed here can be found in the following file in the Techila SDK:
techila\examples\java\tes\Interconnect\1_interconnect\RunInterconnect.java
techila\examples\java\tes\Interconnect\1_interconnect\InterconnectDist.java
techila\examples\java\tes\Interconnect\1_interconnect\ReturnData.java
The code in RunInterconnect.java will create a Project that consists of two Jobs. The code executed during the Jobs is located in the InterconnectDist.java, which will perform three distinct interconnect operations.
The first interconnect operation consists of using the sendDataToJob and receiveDataFromJob method to transfer data between Jobs.
The second interconnect operation consists of a cloudBc method call, which is used to broadcast a simple message string from Job 2.
The third interconnect operation consists of a cloudOp method call, which is used to calculate the sum of the Job index values. In this example, which only contains two Jobs, the summation result will be 3. This summation result will be returned in each Job.
Finally, after all operations have been completed, the results will be stored in a ReturnData object, which will be returned from the Job as the computational result. After the results have been transferred back to the End-User’s computer, values will be extracted from the ReturnData objects and dispayed on the screen.
The source code in the files is also shown below for convenience.
Contents of RunInterconnect.java.
// Copyright Techila Technologies Ltd.

import java.util.concurrent.ExecutionException;
import java.util.concurrent.TimeUnit;

import fi.techila.user.Support;
import fi.techila.user.TechilaExecutorCompletionService;
import fi.techila.user.TechilaExecutorService;
import fi.techila.user.TechilaFutureTask;
import fi.techila.user.TechilaManagerFactory;
import fi.techila.user.TechilaManager;

public class RunInterconnect {

    public void runInterconnect(int amount) {

        // Method for creating the computational Project.

        // Create a TechilaManager object, which will be used for
        // initializing the network connection / authentication
        TechilaManager tm = TechilaManagerFactory.getTechilaManager();

        try {

            // Initialize a connection to the Techila Server
            int status = tm.initFile();

            // Print the status of initialization attempt
            Support sp = tm.support();
            String codedesc = sp.describeStatusCode(status);
            System.out.println("Status: " + codedesc);

            // Create required TES objects.
            TechilaExecutorService<InterconnectDist> tes = new TechilaExecutorService<InterconnectDist>(tm, "InterconnectTutorial");
            TechilaExecutorCompletionService<InterconnectDist, ReturnData> cs = new TechilaExecutorCompletionService<InterconnectDist, ReturnData>(tes);

            // Enable messages.
            tes.getPeach().setMessages(true);

            // Add objects to a list. Each list object will correspond
            // to one Job in the TDCE environment.
            for (int i = 0; i < amount; i++) {
                cs.submit(new InterconnectDist());
            }

            // Start the computational Project. Also starts a local
            // thread that will automatically download the results as
            // soon as they are available.
            tes.start();

            // Access and print the results.
            for (int i = 0; i < amount; i++) {
                try {
                    TechilaFutureTask<ReturnData> f = cs.take();

                    int index = f.getIndex();
                    ReturnData jobresult = f.get();

                    System.out.println("Result of task " + i + ": " + jobresult.getBroadcastResult());
                    System.out.println("Result of task " + i + ": " + Integer.toString(jobresult.getCloudOpResult()));
                    System.out.println("Result of task " + i + ": " + jobresult.getJobToJobResult());

                } catch (ExecutionException ee) {
                    System.err.println("Task failed: " + ee.getMessage());
                }
            }

            // Allow 10 seconds for the local thread to terminate.
            tes.awaitTermination(10, TimeUnit.SECONDS);

        } catch (Throwable e) {
            System.err.println("Exception: " + e);
            e.printStackTrace();
        } finally {
            tm.unload(true, true);
        }
    }

    public void run() {
        runInterconnect(2);
    }

    public static void main(String[] args) {
        RunInterconnect rd = new RunInterconnect();
        rd.run();
    }
}
Contents of InterconnectDist.java.
// Copyright Techila Technologies Ltd.

import java.net.Socket;

import java.io.Serializable;
import java.util.List;
import java.util.Vector;
import java.util.concurrent.Callable;

import fi.techila.user.workerutils.TechilaConn;
import fi.techila.user.workerutils.Func;

public class InterconnectDist implements Callable, Serializable {

    public ReturnData call() throws Exception {

        // Set up the interconnect network
        TechilaConn conn = new TechilaConn();
        conn.initInterconnection(30000);
        // Get the Job's id number
        int myjobid = conn.getJobId();

        // Send data between two Jobs in the Project
        String jobToJobResult = null;
        if (myjobid == 1) {                                 // Job #1 will execute this code block
            conn.sendDataToJob(2, "Hi from Job #1");        // Send message to Job #2
            jobToJobResult = conn.receiveDataFromJob(2);    // Receive message from Job #2
        }
        if (myjobid == 2) {                                 // Job #2 will execute this code block
            jobToJobResult = conn.receiveDataFromJob(1);    // Receive message from Job #1
            conn.sendDataToJob(1, "Hi from Job #2");        // Send message to Job #1
        }
        conn.waitForOthers();  // Syncronize


        // Perform a broadcast operation
        String dataToTransfer = "Broadcasted hello from Job " + Integer.toString(myjobid); // One Job says hello to all other Jobs
        int sourceJob = 2;
        String broadcastResult = conn.cloudBc(sourceJob, dataToTransfer); // Broadcast data from Job #2.
        conn.waitForOthers();  // Syncronize


        // Perform a cloud op operation using the 'Sum' method.
        int cloudOpResult = conn.cloudOp(new Sum(), myjobid);
        conn.waitForOthers();

        conn.waitForOthers();  // Syncronize

        // Build and return the data in an object.
        ReturnData retData = new ReturnData(broadcastResult, cloudOpResult, jobToJobResult);
        return(retData);


    }

    // Class implementing the Func interface. Will be called during the cloudOp-operation.
    public class Sum implements Func<Integer> {
        public Integer op(Integer num1, Integer num2) {
            return num1 + num2;
        }
    }


}
Contents of ReturnData.java.
// Copyright Techila Technologies Ltd.

import java.io.Serializable;

public class ReturnData implements Serializable{
    // Class used to return result data from the Job to the End-User.
    private String broadcastResult;
    private int cloudOpResult;
    private String jobToJobResult;


    public ReturnData(String broadcastResult, int cloudOpResult, String jobToJobResult) {
            this.broadcastResult = broadcastResult;
            this.cloudOpResult = cloudOpResult;
            this.jobToJobResult = jobToJobResult;
    }

    // Get methods so we can access the result data easily on the End-User's computer.
    public String getBroadcastResult(){
        return this.broadcastResult;
    }

        public int getCloudOpResult(){
        return this.cloudOpResult;
    }

        public String getJobToJobResult(){
        return this.jobToJobResult;
    }
}
5.1.2. Running the example
This Chapter contains illustrations on how to run the example program described in this Chapter. Note, before compiling the code, please make sure you have updated your CLASSPATH as mentioned in CLASSPATH Environment Variable.
-
Launch a Microsoft Windows Command Prompt / Linux Shell Terminal
-
Change your current working directory to the directory that contains the material for this example.
-
Compile the
RunInterconnect.javafile using command:javac RunInterconnect.java
-
Create a Project by running the compiled code using command:
java RunInterconnect
-
If prompted, enter your keystore password.
-
After the Project has been completed, the results will be displayed.
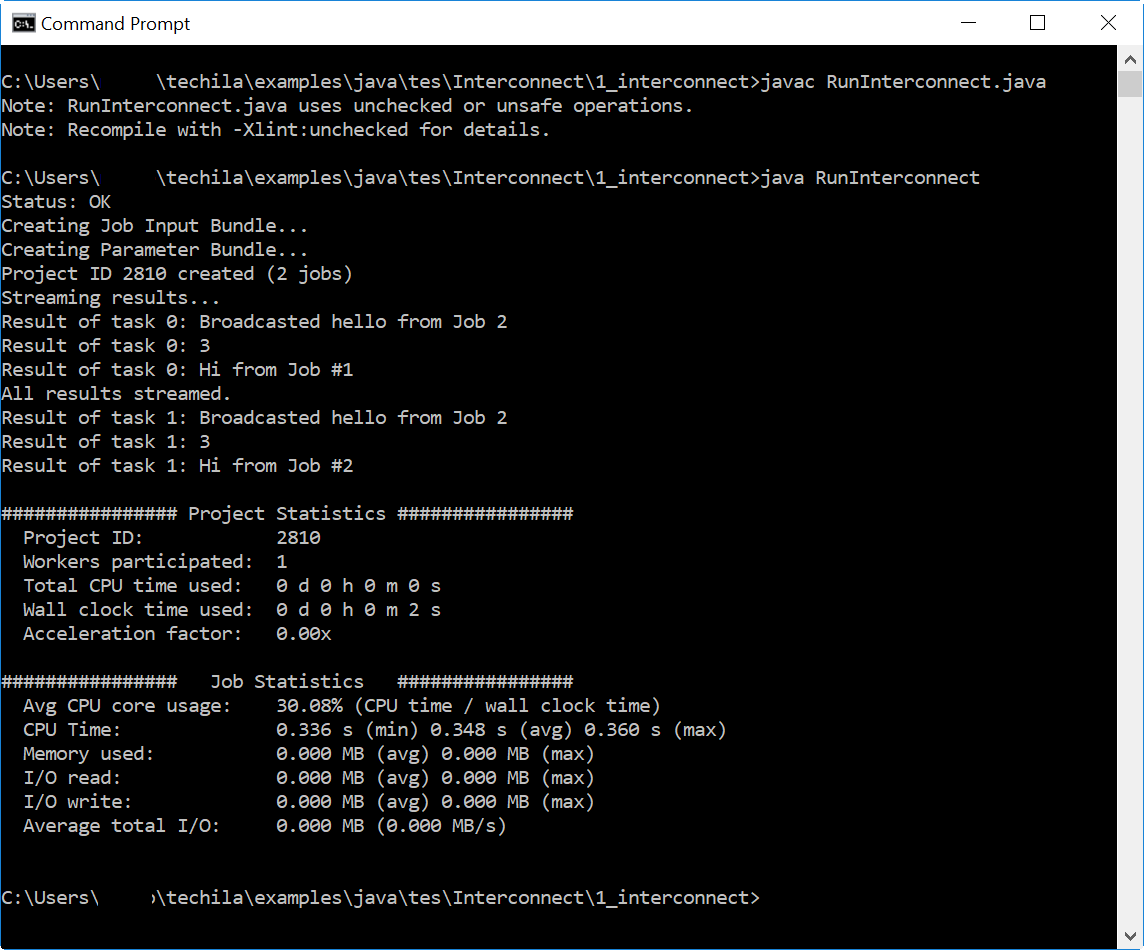 Figure 32. Executing the distributed application. After the Project has been completed, the program will the results generate during Jobs.