1. Introduction
This document introduces the Techila interconnect feature, which enables Jobs to communicate with other Jobs in the same Project. This document is intended for End-Users who wish to process computational workloads in Techila Distributed Computing Engine (TDCE) that are not embarrassingly parallel.
The structure of this document is as follows
Version Requirements contains information about the minimum required versions of the TDCE components that are needed in order to use the Techila interconnect feature.
Interconnect Overview contains a general overview of the Techila interconnect feature.
Interconnect Functionality contains a list of commands available in the Techila interconnect feature set. Also includes a more detailed description of the each command with general examples on how to utilize the features.
2. Version Requirements
In order to use the Techila interconnect functionality, your Techila Distributed Computing Engine (TDCE) environment must meet following requirements for the Techila Server, Techila Worker and Techila SDK.
If you are unsure about your Techila Server and Techila Worker versions, please contact your local Techila Administrator for support.
| Techila Distributed Computing Engine in On-Premises | ||
|---|---|---|
Component |
Required Version in On-Premises |
Required Version in Cloud |
Techila Server |
|
|
Techila Worker |
|
|
Techila SDK |
2015-02-04 09:39:39 or newer. Version information can be found in the |
Same as in On-Premises. |
3. Interconnect Overview
Techila interconnect establishes an interconnect network between each Job in the Project, which enables interconnect data packages to be transferred between Jobs. This allows Techila Distributed Computing Engine (TDCE) to be used in situations where computational Jobs must be able to communicate with other Jobs in the Project.
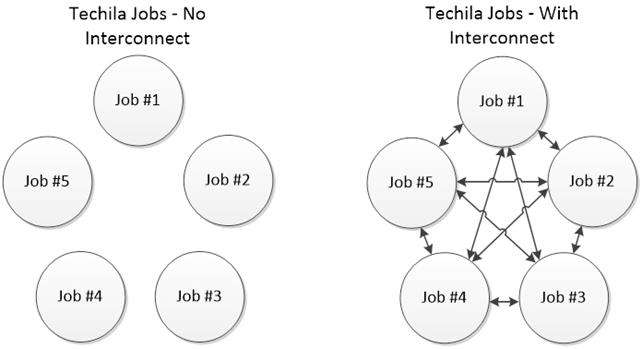
This interconnect network can be used to transfer interconnect data packages between specific Jobs, or to broadcast data from one Job to all other Jobs in the Project. More detailed information about different types of interconnect data transfers can be found in SendDataToJob and CloudBc.
Native Techila interconnect functionality is currently available for the following programming languages / frameworks:
-
MATLAB
-
Python
-
R
-
C# / .NET
Please see following programming language specific guides for more information and examples:
3.1. Techila Interconnect Network
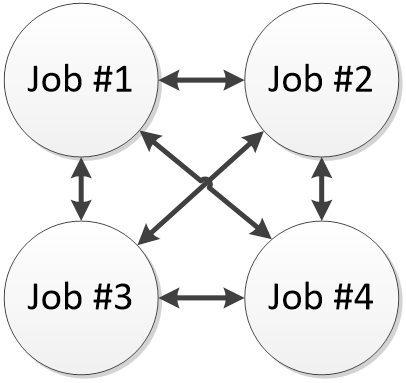
When using the Techila interconnect commands in a Project, an interconnect network is automatically created. This interconnect network will connect each Techila Worker that participates in the Project. The interconnect network will be used to transfer interconnect data between Jobs.
Jobs will have a limited amount of time to join this interconnect network, before the connection will timeout. The duration of the default timeout window depends on the method used to initialize the interconnect network:
When InitIc command is called separately to initialize the interconnect network, the default timeout window will be 30 seconds
When InitIc command is not called separately, the timeout window will be 60 seconds
If needed, these default timeout windows can be overridden by specifying the desired timeout window as an input argument to the InitIc command.
If any Job in the Project fails to connect to the interconnect network within the timeout window, the Project will be terminated. This is to ensure that each Job in the Project will be able to communicate with all other Jobs in the Project.
|
Note
|
If you specify a timeout window with a negative value (e.g. -1) when executing the InitIc command, Job execution will be allowed to continue even if they could not join the interconnect network. |
3.2. Using Suitable Techila Workers in Your Interconnect Project
By default, Jobs from a Project can be assigned to any Techila Worker that belongs to a Workers Group that is assigned to the End-User`s Techila Account. However, there is no guarantee that all of these Techila Workers can establish an interconnect network, which can cause the Project to fail.
This means that when creating a Project that uses Techila interconnect commands, Jobs from the Project must be assigned to Techila Workers that are able to establish an interconnect network. This can be achieved by specifying the name of the Techila Worker Group that contains Workers capable of establishing interconnect networks as a Project parameter.
Please note that such Techila Worker Groups must be configured by a Techila Administrator before they can be used. Please contact your Local Techila Administrator for more information about what Workers Groups in your TDCE environment can be used in Projects that use the interconnect functionality.
3.3. Minimum Required Amount of Techila Worker CPU Cores
When using the Techila interconnect commands in your code, all Jobs belonging to the Project must be able to join the interconnect network within the timeout window. This means that you must have a sufficient amount of available Techila Worker CPU cores to process all Jobs at the same time.
Please contact your local Techila Administrator for more information about how many Techila Worker CPU Cores capable of processing interconnect Jobs are available in your TDCE environment.
Below are two examples that illustrate what happens when a sufficient amount of suitable CPU cores is available and what happens when not enough CPU cores are available.
Example 1: The figure below illustrates a situation where a Project consisting of two interconnect Jobs is started in a TDCE environment. In this example, the TDCE environment has two CPU cores available. This means that each Job can be assigned to free CPU core and is able to initialize the interconnect network within the timeout window.
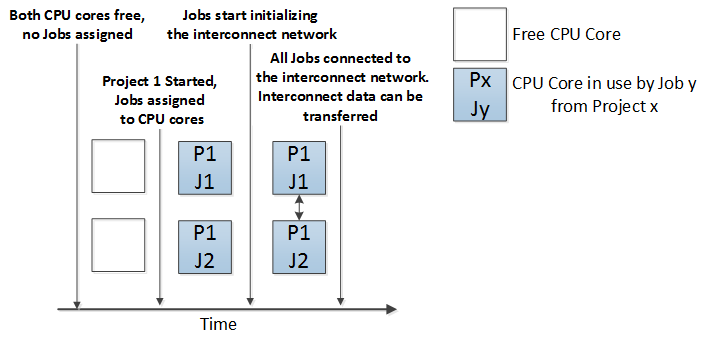
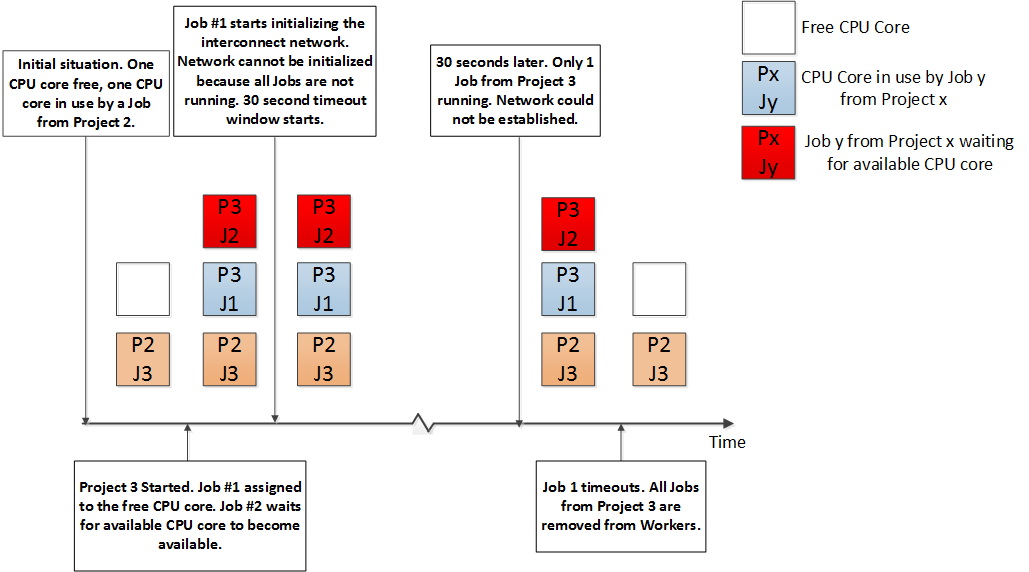
Example 2: The figure below illustrates a situation where a Job from another Project (Project 2, non-interconnect) is already running on one of the CPU cores. This means that there is only one CPU core available in the TDCE environment.
When Project 3, which consists of two Jobs, is started, only one Job can be assigned to a CPU core and started. This Job will then try to establish the interconnect network when the interconnect commands are executed in the Techila Worker Code. This will trigger the 30 second timeout window. After 30 seconds have passed, all Jobs from Project 3 will be automatically terminated because the interconnect network was not joined by all Jobs in the Project.
4. Interconnect Functionality
This Chapter contains a general description of Techila interconnect functionality that is common with all programming languages. Depending on the programming language, the described functionality is typically implemented by using a function, method or a variable. Please see the programming language specific examples for details.
Please note that depending on the programming language you are using, the naming convention and syntax of the function/method/variable might be different than the one described in this document.
4.1. InitIc
The InitIc command can be used to initialize the interconnect network. This interconnect network will connect each Job in the Project with all other Jobs and will allow Jobs to transfer interconnect data packets between other Jobs in the same Project.
|
Note
|
The InitIc command is executed automatically when calling interconnect commands (MATLAB) or when creating interconnect objects (Python). This means that you do not need to call the InitIc command separately, unless you specifically want to do so. If using R, the InitIc command must be called separately. |
Calling the InitIc command separately can be useful, for example, in situations where you are testing the Techila Distributed Computing Engine (TDCE) environment and want to verify that the interconnect network can be successfully established. If there is a problem with forming the interconnect network between Jobs, the connection will timeout after the programming language specific timeout window. If establishing the interconnect network fails, the Project will be stopped and removed.
When calling the InitIc command separately, it is possible to override the default timeout window.
4.2. SendDataToJob
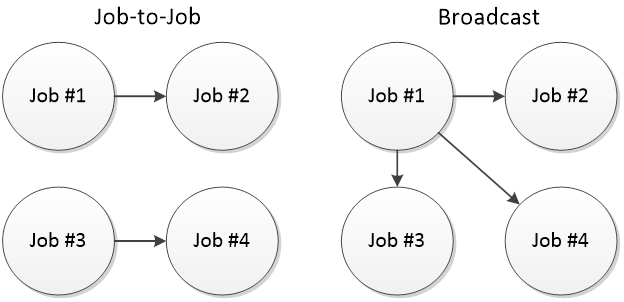
This command is used to send interconnect data from one Job to another Job. When executing this command, you will need to specify the target Job where the data packet will be sent. Any interconnect data packages sent with this command must be received in the target Job. In other words, a SendDataToJob command in the source Job must always be paired with a corresponding RecvDataFromJob command in the target Job.
Example: The figure below illustrates a situation where Job-to-Job interconnect transfers are used to transfer words Hello and Bye between Job #1 and Job #2. After both Jobs have been started, the interconnect network is established between Jobs 1 and 2.
After the interconnect network has been established, Job #1 will send the word Hello to Job #2. Job #2 will be listening for any data originating from Job #1.
After Job #2 has received the data from Job #1, Job #2 will send the word Bye to Job #1. Job #1 will be listening for any data originating from Job #2.
After the data has been received by Job #2, both Jobs continue processing and will automatically terminate the process after all remaining code in the Techila Worker Code has been executed.
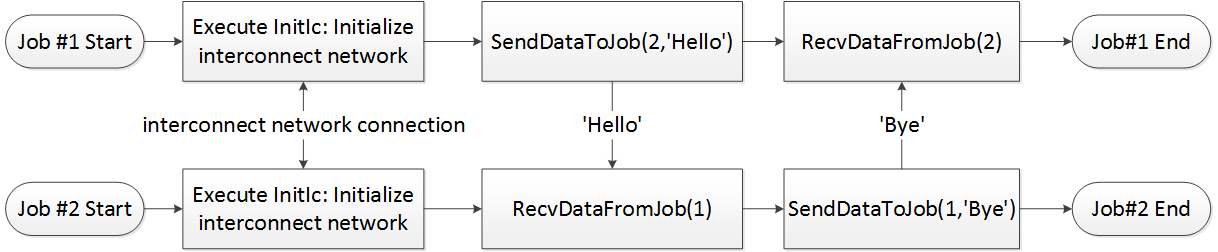
SendDataToJob command must be received with a matching RecvDataFromJob command.4.3. RecvDataFromJob
This command is used to receive data from other Jobs that has been sent with the SendDataToJob command. When executing this command, you will need to define the source Job from which data will be received.
In situations where a Job needs to receive data from multiple Jobs, each interconnect data packet (sent with the SendDataToJob) must be received with a matching RecvDataFromJob command. Data packets will be received sequentially, in the order defined by the RecvDataFromJob commands.
Example: The figure below illustrates a situation where two Jobs are sending data to one Job. Both Jobs (Job #1 and Job #3) will send the interconnect data packet at the same time to Job #2, but the interconnect data packet from Job #1 will be received first. The interconnect data packet from Job #3 will be received after the interconnect data packet from Job #1 has been received.
This order is which interconnect data packets are received is defined by input arguments given to the RecvDataFromJob command. The first command that is executed is RecvDataFromJob(1), which defines that data from Job #1 will be received. The second command that is executed is RecvDataFromJob(3), which in turn defines that data from Job #3 will be received.
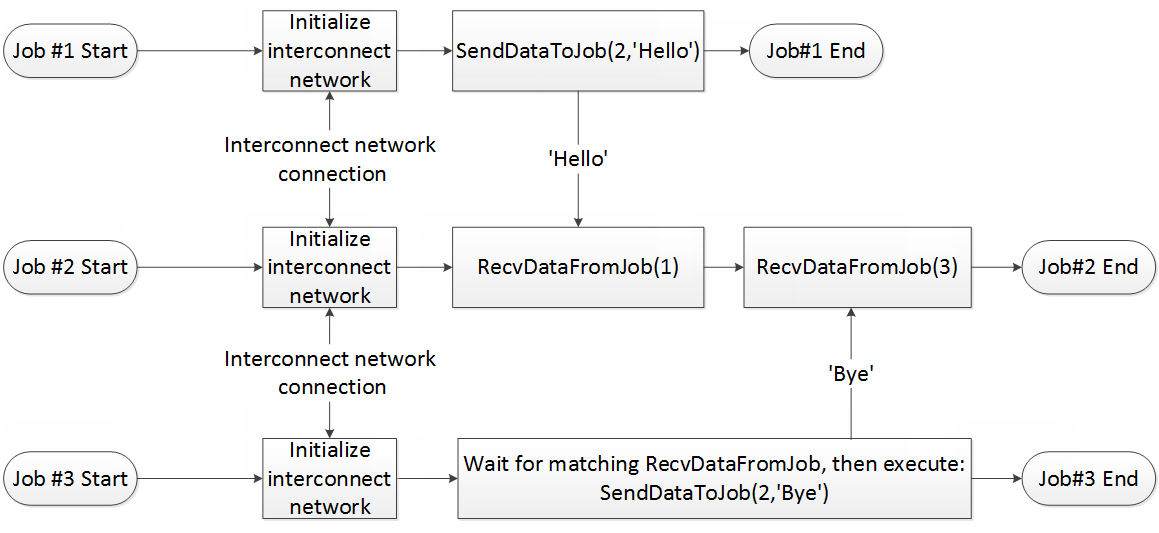
RecvDataFromJob commands.4.4. CloudOp
The CloudOp command executes defined operations in all Jobs belonging to the same Project. After the operation has been executed in all Jobs, the result of the operation will be broadcasted to all Jobs and returned as the return value of the CloudOp command.
This operation can for example be used to find the minimum or maximum value of a parameter that is defined in all Jobs. This operation can also be a reference to a function defined by an End-User, meaning the operations are not limited to basic arithmetic operations.
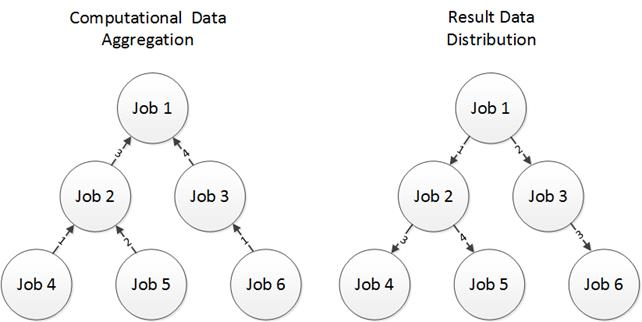
When using CloudOp, data is transferred between Jobs using a binary tree structure. The figure below illustrates how the data is transferred in an example situation where six Jobs use the CloudOp operation. The numbers in the arrows indicate the order in which the transfers are executed. Arrows labeled with 1 will happen first, followed by arrows labeled with 2 and so forth.
When a Job receives new data, the operation defined in CloudOp command will be executed in the Job. The result of the operation will then be sent according to the binary tree to the next Job, which will again perform the defined operation.
Each Job can have only one active send or receive transmission. If multiple Jobs wish to send data to the same Job, the Jobs will transfer the data sequentially.
Please note that depending on what programming language you are using, there can be differences in the order in which binary tree operations will be executed.
Below is another example illustration of what takes place in Jobs when searching for the smallest value of a variable. Each Job sets the value of variable a to be different, 10 in Job #1, 1 in Job #2 and 12 in Job #3. The CloudOp command is then used to find the smallest of these values (1), which will then be transferred to each Job and returned as the output value. This means that the value of variable a will be 1 in all Jobs after the command has been executed.
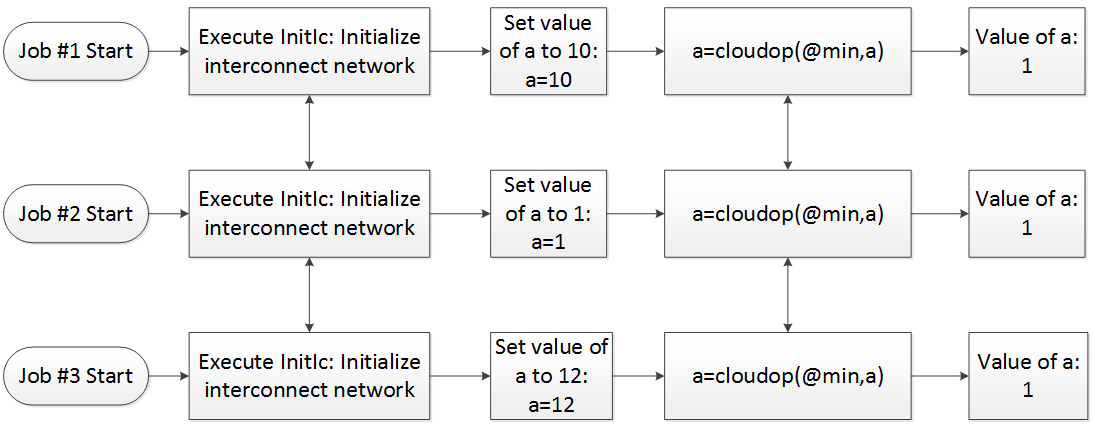
a is searched.4.5. CloudBc
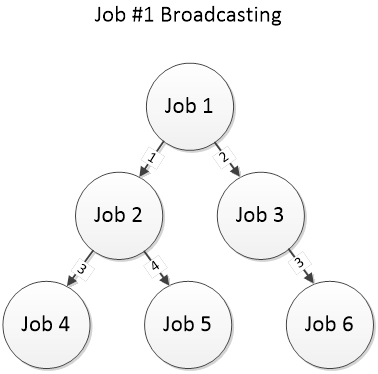
The CloudBc command broadcasts data from one Job to all the other Jobs in the same Project.
By default, the CloudBc command will broadcast the data from Job #1 to all other Jobs. The example figure below shows a situation where Job #1 broadcasts data to all other Jobs.
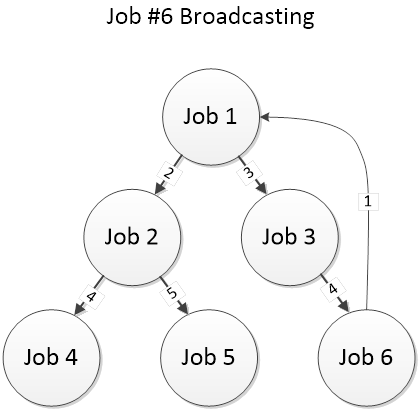
If you do not want Job #1 to broadcast the data, you can define a different Job when calling the CloudBc command. If another Job is defined to broadcast the data, the specified Job will start by sending the data to Job #1, which will then broadcast the data to all other Jobs using the binary tree structure. The example figure below shows a situation where Job #6 broadcasts data to all other Jobs.
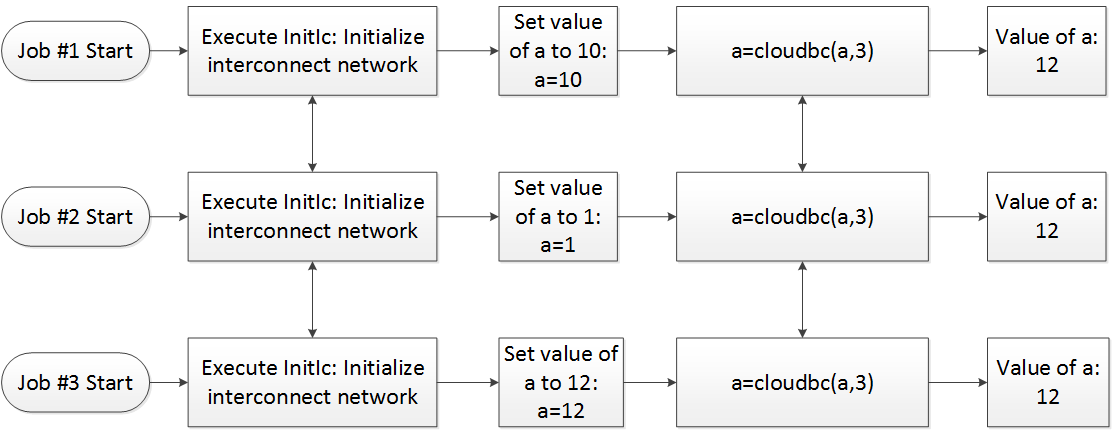
Example: Below is an illustration of what takes place in Jobs when Job #3 broadcasts the value of a variable. Each Job starts by setting the value of variable a to be different: 10 in Job #1, 1 in Job #2 and 12 in Job #3. The CloudBc command is then used to broadcast the value of the variable from Job #3 to all other Jobs in the Project. This broadcasted value is returned by the CloudBc command and stored in the variable a. This means that the value of variable a will be 12 in all Jobs after the CloudBc command has been executed.
4.6. CloudSum
The CloudSum command sums the values of variables in all Jobs and returns the summation result as the output value. Interconnect data packets are transferred by using a binary tree structure, similar to the one described in Chapter 4.4.
Example: Below is an illustration of what takes place in Jobs when the values of variable a are summed. Each Job starts by setting the value of variable a to be different: 10 in Job #1, 1 in Job #2 and 12 in Job #3. The CloudSum command is then used to sum the values of variable a (10+1+12=23). The summation result is returned as the output value of the CloudSum command, which in this example is stored in variable res. The value of the res variable will be 23 in all Jobs after the CloudSum command has been executed.

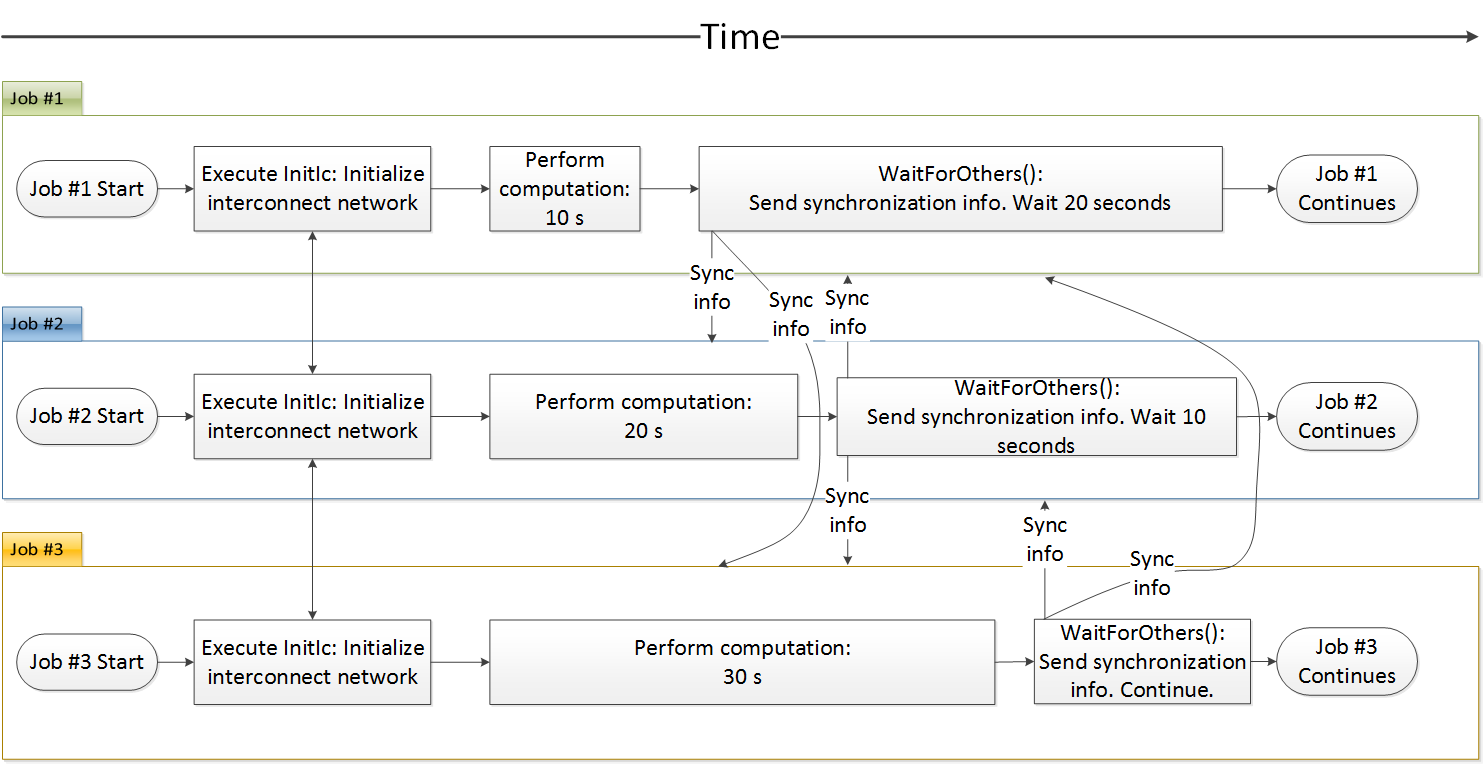
4.7. WaitForOthers
The WaitForOthers command acts as a synchronization point for all the Jobs in the Project.
When this command is executed in a Job, the Job will send a synchronization data package to all other Jobs in the Project. After sending the package, the Job will start to wait until it has received similar synchronization packages from all other Jobs.
Example: The figure below illustrates a situation where three Jobs are performing computations that require a different amount of time to perform: 10 seconds for Job #1, 20 seconds for Job #2 and 30 seconds for Job #3. After the computations are complete, each Job will execute the WaitForOthers command, which will synchronize the Jobs and prevent any Job from continuing before all Jobs have executed the WaitForOthers command. This means that Job #1 will remain waiting for 20 seconds, Job #2 will remain waiting for 10 seconds.