1. Introduction
This Chapter contains a short introduction about Techila Distributed Computing Engine and also describes the purpose of this document.
1.1. Techila Distributed Computing Engine
Techila Distributed Computing Engine is a distributed computing middleware and management solution that brings an on-demand supercomputer to every desk. The solution is designed to save the time of users and IT experts, to solve challenges related to parallel application development and deployment, and to speed up the idea-to-deployment cycle.
The solution, available in Google Cloud Platform Marketplace, uses Techila Distributed Computing Engine’s secure technology to integrate the scalable power of Google Cloud Platform seamlessly into MATLAB, R programming language, Python and other popular tools on your own PC. This brings rocket speed to simulation and analysis, without the complexity of traditional high-performance computing.
Techila Distributed Computing Engine Advanced Edition in Google Cloud Platform Marketplace makes getting rocket speed to computing easier than ever. Google Cloud Platform Marketplace sets up Techila Distributed Computing Engine with just a couple of mouse clicks and the Techila Dashboard allows you to adjust the system’s throughput with simplicity. Techila Distributed Computing Engine Advanced Edition in Google Cloud Platform Marketplace allows you to benefit from rocket speed computing whenever you need it, wherever you need it.
1.2. What is This Document
This document is a guide for persons who are planning to set up Techila Distributed Computing Engine Advanced Edition in Google Cloud Platform Marketplace.
If you are unfamiliar with the Techila Distributed Computing Engine terminology used in this document, please refer to Introduction to Techila Distributed Computing Engine.
Screenshots and dialogs in this document are from Microsoft Windows 10. Depending on your operating system, the appearance of screens might be different. The structure of this document is as follows:
Overview gives an overview about system requirements and how billing is affected by different deployment activities.
Configuring and Managing the Techila Distributed Computing Environment contains step-by-step instructions on how to setup and test a Techila Distributed Computing Engine environment in Google Cloud Platform.
2. Overview
This Chapter contains an overview of the deployment of Techila Distributed Computing Engine.
Note! To use Techila Distributed Computing Engine Advanced Edition in Google Cloud Platform Marketplace, you need to have billing for your Google Cloud Platform account set up. If you are using the free trial, Google creates a billing account for you and stores your credits to that billing account. More information about the billing account and free trial can be found here:
The flowchart in Overview contains documentation pointers, which indicate where you can find more information about the described activity. The documentation pointers have been noted using the following shapes:
These notations refer to Chapters in this document. For example, when you see the following notation, it means that you can find more information about the activity in Chapter 3.1 of this document.
2.1. System Requirements
In order to perform computations in the Techila distributed computing environment, your workstation must meet certain programming language specific requirements.
These requirements are described in the table below.
| Programming Language | Supported Versions | Additional Requirements | Required Operating System |
|---|---|---|---|
R |
3.6.3, 4.0.5, 4.1.3, 4.2.3, 4.3.2 |
Java Development Kit (JDK) or Java Runtime Environment (JRE) (version 6 or newer) |
Microsoft Windows OR Linux (*only on Linux) |
Python |
3.8.18*, 3.9.18*, 3.10.9*, 3.11.8, 3.12.2 |
||
MATLAB |
2012b-2024a |
- MATLAB Compiler Toolbox |
The R version and Python versions listed in the table correspond to the Python and R versions available on Techila Workers. If you are using a different version on your local workstation, you will still be able to use the system, but might run into problems caused by the version differences.
Example 1: If you wish to perform R computations in Techila Distributed Computing Engine, your own workstation must be running either a Microsoft Windows or Linux operating system. Additionally, your own workstation must have JDK or JRE (version 6 or newer) available. Computations will be performed on the Techila Workers using the R version that is the closest match with your local R version. The closest matching version is determined by comparing the major and minor version numbers of R releases.
Example 2: If you wish to perform Python computations in Techila Distributed Computing Engine, your own workstation must be running either a Microsoft Windows or Linux operating system. Additionally, your own workstation must have JDK or JRE (version 6 or newer) available. Computations will be performed on the Techila Workers using the Python version that is the closest match with your local Python version. The closest matching version is determined by comparing the major and minor version numbers of Python releases.
Example 3: If you wish to perform MATLAB computations in Techila Distributed Computing Engine, your own workstation must be running either a Microsoft Windows or Linux operating system. A separate Java installation is not required on your workstation.
2.2. Billing States
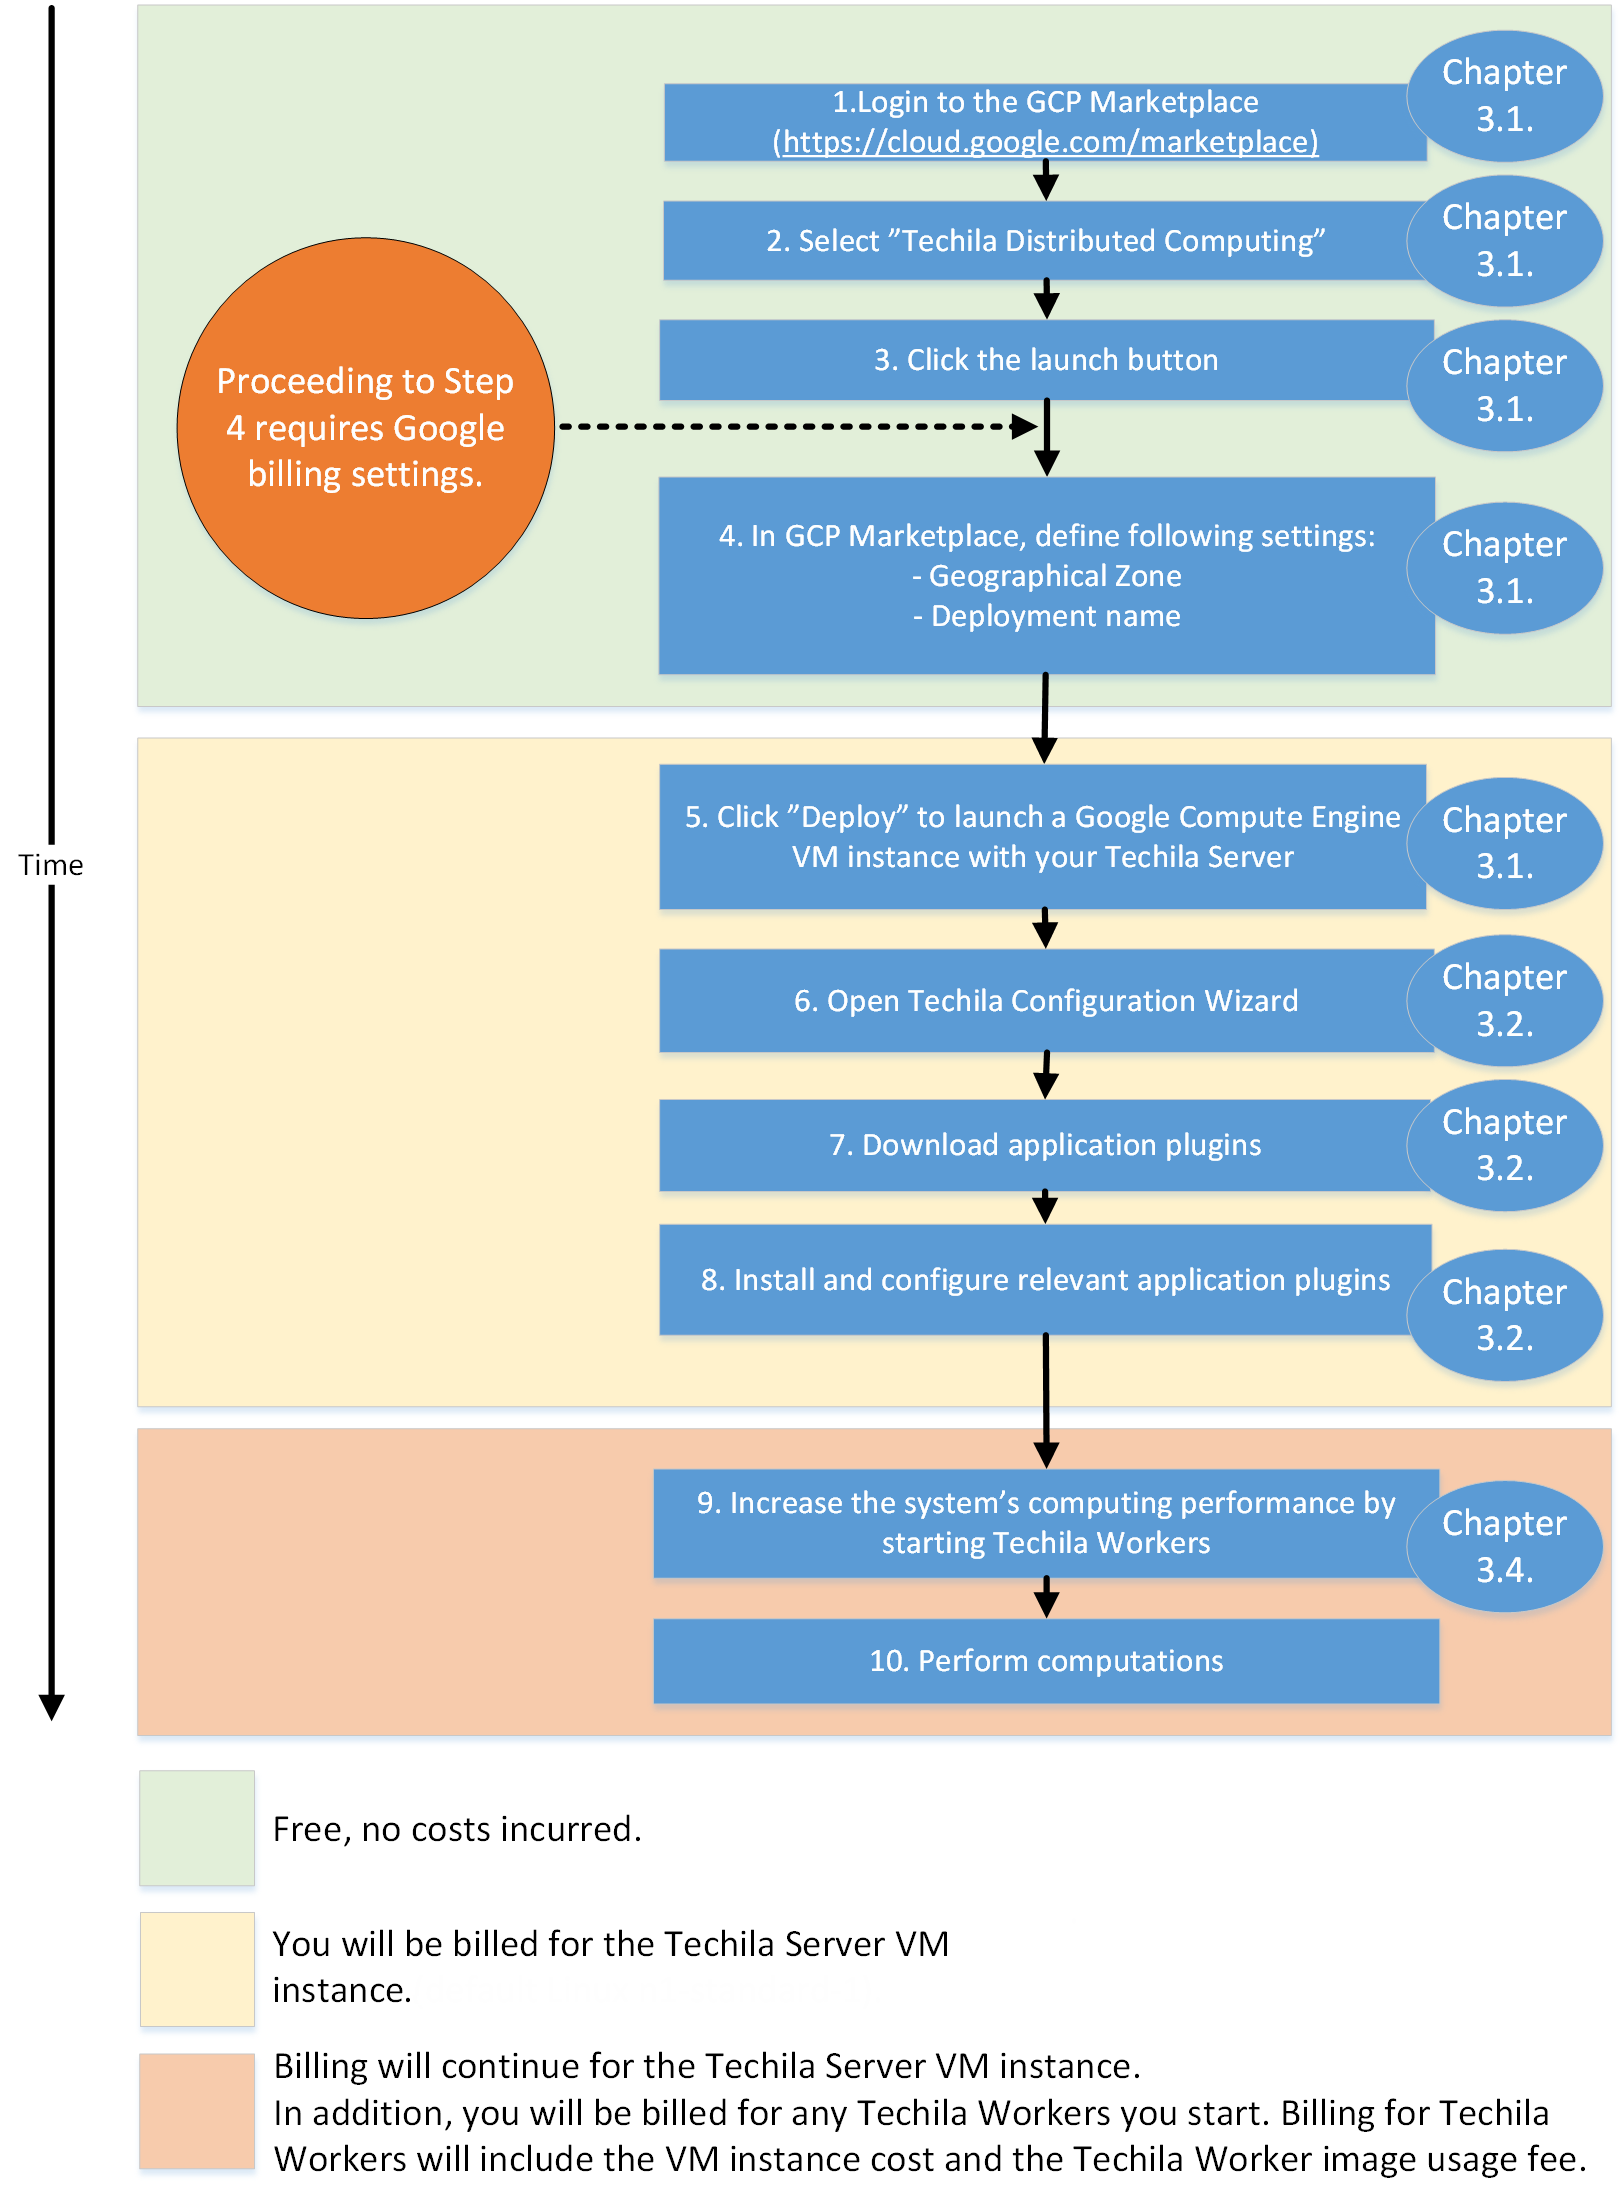
A common question among users is: When does the billing for the service start?
The flowchart in the below image contains a high level overview of the deployment process and billing in different stages. Techila Technologies does not take any responsibility and is not liable for possible inaccurate or outdated information related to other than Techila Server image fee or Techila Worker image fee. More information about setting up billing can be found here.
3. Configuring and Managing the Techila Distributed Computing Environment
This Chapter contains instructions how to manage and configure the Techila distributed computing environment. Instructions are provided for all steps including starting, testing and deleting the VM instances.
3.1. Starting the Techila Server
This Chapter contains instructions on how to start the Techila Server by using Google Cloud Platform Marketplace.
-
Using your web browser, navigate to Google Cloud Platform Marketplace page:
-
Click on
Explore Marketplace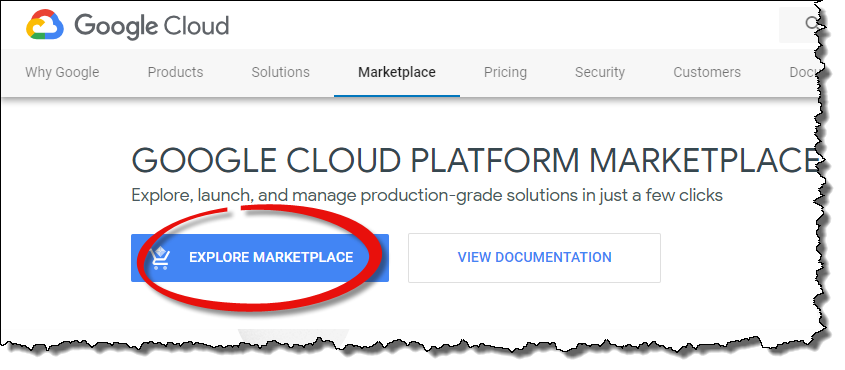
-
Type
Techilain the search box and click on the matching search result.
-
Click the Launch on Google Cloud Platform button to continue.

-
After clicking the launch button, a new page will be displayed. The appearance of this page will depend on whether or not billing has been setup for your Google Cloud Platform account.
If billing has already been setup for your Google Cloud Platform account, please continue from Step 5.
If billing has not been setup on your Google Cloud Platform account, you might receive a page offering a free trial as illustrated below.

In this case, you will either need to apply for the free trial or setup billing for your Google Cloud Platform account. Instructions for setting up billing can be found on the following website:
After billing has been setup for your Google Cloud Platform account, you will be able to proceed with the Techila Distributed Computing Engine setup as described in the following steps.
-
In order to deploy the Techila distributed computing environment, you will either need to create a new or choose an existing Google Cloud Platform project. This Google Cloud Platform project will contain all Techila resources created during the deployment. For the sake of clarity, a new project will be created in the steps described in this document.
Enter a descriptive name for the project (e.g.
techilacomputing) and click theCreatebutton to create the project.
Please note that creating the project may take several minutes. While the project is being created, your view should resemble the one shown below.

-
After the project has been created, define a name for the deployment, define a new Service Account and select a geographical Zone where you want to have the system deployed. Typically it is good practice to choose a geographical zone that is close to your computer’s location. This will help reduce the network latency between your computer and the Techila Server. More information about Zones can be found at:
You can also use the
Machine typedropdown menu to select a different VM instance type for the Techila Server, but this is not required (the default type should be sufficient). If you change the VM instance type, please make sure that you do not choose a VM instance type that exceeds your CPU quota.If you want, you can also use the
Source IP ranges…field to configure the Techila Server to only allow network connections from a limited range. If you choose to do this, please make sure that the CIDR range includes the IP address you are using to make sure you can access your Techila Server after the deployment has been completed. Please note that the default values0.0.0.0/0will allow network connections from any network address, meaning you do not need to edit the values unless you specifically want to limit the range.Click the
Deploybutton to start the deployment process.Please note that the deployment process will take several minutes.

-
Wait for the deployment to complete. This may take several minutes. After the deployment has been completed, a screen similar to one below will be shown where all resources are shown in
Createdstatus.
Note! The deployment process will create a TDCE deployment with a matching name automatically to your Google Cloud Platform environment. This deployment can be viewed in the
Solution deploymentsview in the Google Cloud Platform portal. Only delete the deployment if you wish to discontinue your Techila Distributed Computing Engine usage. If you delete the deployment, all network configurations, computational data and user credentials will be deleted, meaning you will not be able to restart the Techila Server successfully.Please continue from Accessing the Techila Dashboard from the Post Deployment Page, which describes how you can log in to the Techila Dashboard for the first time.
3.2. Accessing the Techila Dashboard from the Post Deployment Page
This Chapter contains instructions on how you can log in to the Techila Dashboard from the post deployment page, after starting the Techila Server for the first time.
Please note that the steps in this Chapter assume that you are accessing the Techila Dashboard for the first time after starting the Techila Server as described in Starting the Techila Server Instructions on how to access the Techila Dashboard without the post deployment page can be found in Accessing the Techila Dashboard.
-
Switch to the
Detailstab. Then click the eye icon to display theAdmin Password. You can then copy the password into the clipboard. Then click on theDashboard Urllink to open the Techila Dashboard login page.
-
After clicking the link, you should see a login page. Note! If the Techila Server deployment is not ready, you will see the following message:
`Techila Server deployment still in progress… Please wait a couple of minutes and refresh the page.`
In this case, please wait a couple of minutes and refresh the page.
The login page is used to access the Techila Dashboard.
Enter 'admin' as the username. In the password field, paste the
Admin Passwordvalue from the Google Cloud Platform Console to the password field as shown in the screen capture below. Click theLog inbutton to log in.Note! Make sure you do not accidentally copy any whitespaces before or after the password.

-
After logging in, you will be presented the first page of the Techila wizard. This wizard will be used to download the application plugins (delivered in a file called TechilaSDK.zip) from the Techila Server.

Instructions for downloading and configuring the application plugins can be found in Downloading and Configuring the Application Plugins.
3.3. Downloading and Configuring the Application Plugins
This Chapter contains instructions for downloading the application plugins to your computer. These application plugins will enable you to push computational workload from your computer to Techila Distributed Computing Engine.
The application plugins are delivered in a file called TechilaSDK.zip. In addition to containing the application plugins for e.g. MATLAB, Python and R, the TechilaSDK.zip contains ready-to-run examples for various programming languages. The application plugins package is also referred to as the "Techila SDK".
Please note that as long as you keep using the same TDCE deployment, the Techila SDK only needs to be downloaded and installed once. After you have done it once, you can click the “Continue” buttons in steps 1/3 and 2/3 in the Techila Dashboard to skip them so you reach step 3/3.
Note! The steps described in this Chapter assume that you have logged in to the Techila Dashboard. If you have not logged in, please log in to the Techila Dashboard before continuing.
-
In the first page of the Techila Dashboard, click the highlighted link to start downloading the application plugins (TechilaSDK.zip) to your computer.

-
Save the TechilaSDK.zip file on your computer.

-
Wait for the download to complete. After the download has been completed, you should have a file called 'TechilaSDK.zip' as illustrated in the example screenshot below. Please make a mental note where you saved the file, as you will need it when configuring the application plugins in the following steps.
In the example screenshot below, TechilaSDK.zip has been saved to 'C:\Downloads'.

-
Select your web browser and click the
Continuebutton.
-
After clicking the
Continuebutton, the second page of the Techila Dashboard will be displayed. This page contains a link to a help page, which contains instructions on how to configure the application plugins on your computer.Click the highlighted link to open a help page containing links on how to configure the application plugins on your computer.
Please follow the instructions on the help page to configure the application plugins for the programming language you are using before continuing.

The below table contains the direct links to programming language specific instructions describing the application plugin configuration steps:
| Programming Language | Link |
|---|---|
MATLAB |
|
Python |
|
R |
3.4. Increasing Computing Throughput
This Chapter contains instructions for increasing computing throughput, which is done by starting Techila Worker VM instances using the Techila Dashboard.
Note! If you are using the Google free trial, the maximum amount of Techila Worker CPU cores you can deploy is 7. This means that you will only be able to, for example, deploy 7 n1-standard-1 instances, or 3 n1-standard-2 instances. Please also note that when using the Google free trial, CPU core quota increase requests are limited as described here: https://cloud.google.com/free/docs/frequently-asked-questions
Note! Before starting any Techila Workers, it is recommended that you configure the application plugins as described in Downloading and Configuring the Application Plugins.
Note! The steps described in this Chapter assume that you have logged in to the Techila Dashboard. If you have not logged in, please log in before continuing.
-
Select your web browser and navigate to Techila Dashboard using the
Donebutton.
-
The Techila Dashboard is used to adjust the computing throughput by starting and shutting down Techila Worker VM instances. Click the
Show deploymentbutton to display the deployment panel.
-
To start Techila Workers, choose the operating system that matches the one you are using on your development machine, select Techila Worker VM instance type and define how many Techila Worker VM instances you want to start.
The settings in the example screenshot below could be used to start 10 Techila Worker VM instances (type n1-standard-8), with a Windows operating system.
Techila Workers will be started when the
Updatebutton is clicked and the action is confirmed.
Note! If you are using Google Free Trial credits, you can only start Techila Workers that have a Linux operating system. Microsoft Windows instances are not included in the Google Free Trial.
Note! If you already have Techila Workers that are running, you can increase (or decrease) the amount of Techila Workers by entering the desired number in the field and clicking the
Updatebutton.Note! It is strongly recommended that the deletion of the instances is always verified using the Google Cloud Console.
The
Computing EnvironmentandInstance Typedropdown menus will only be enabled in situations where no Techila Workers are currently running. If Techila Workers are already running, these menus will default to the values used when starting the existing Techila Workers.It is recommended to choose the same operating system that you are using on the computer where you installed and configured the application plugins package.
Note! When starting Techila Workers, the maximum number of Techila Worker that can be started will be limited by your GCP CPU core quota. Information about resource quotas can be found on the website shown below. This page also contains a link that can be used to request a quota adjustment.
Information on how to perform a Google quota increase request can also be found in this Chapter: Making a Google Quota Increase request
Note! For more information about the advanced settings in the Techila Dashboard, please see Advanced Techila Dashboard Settings.
-
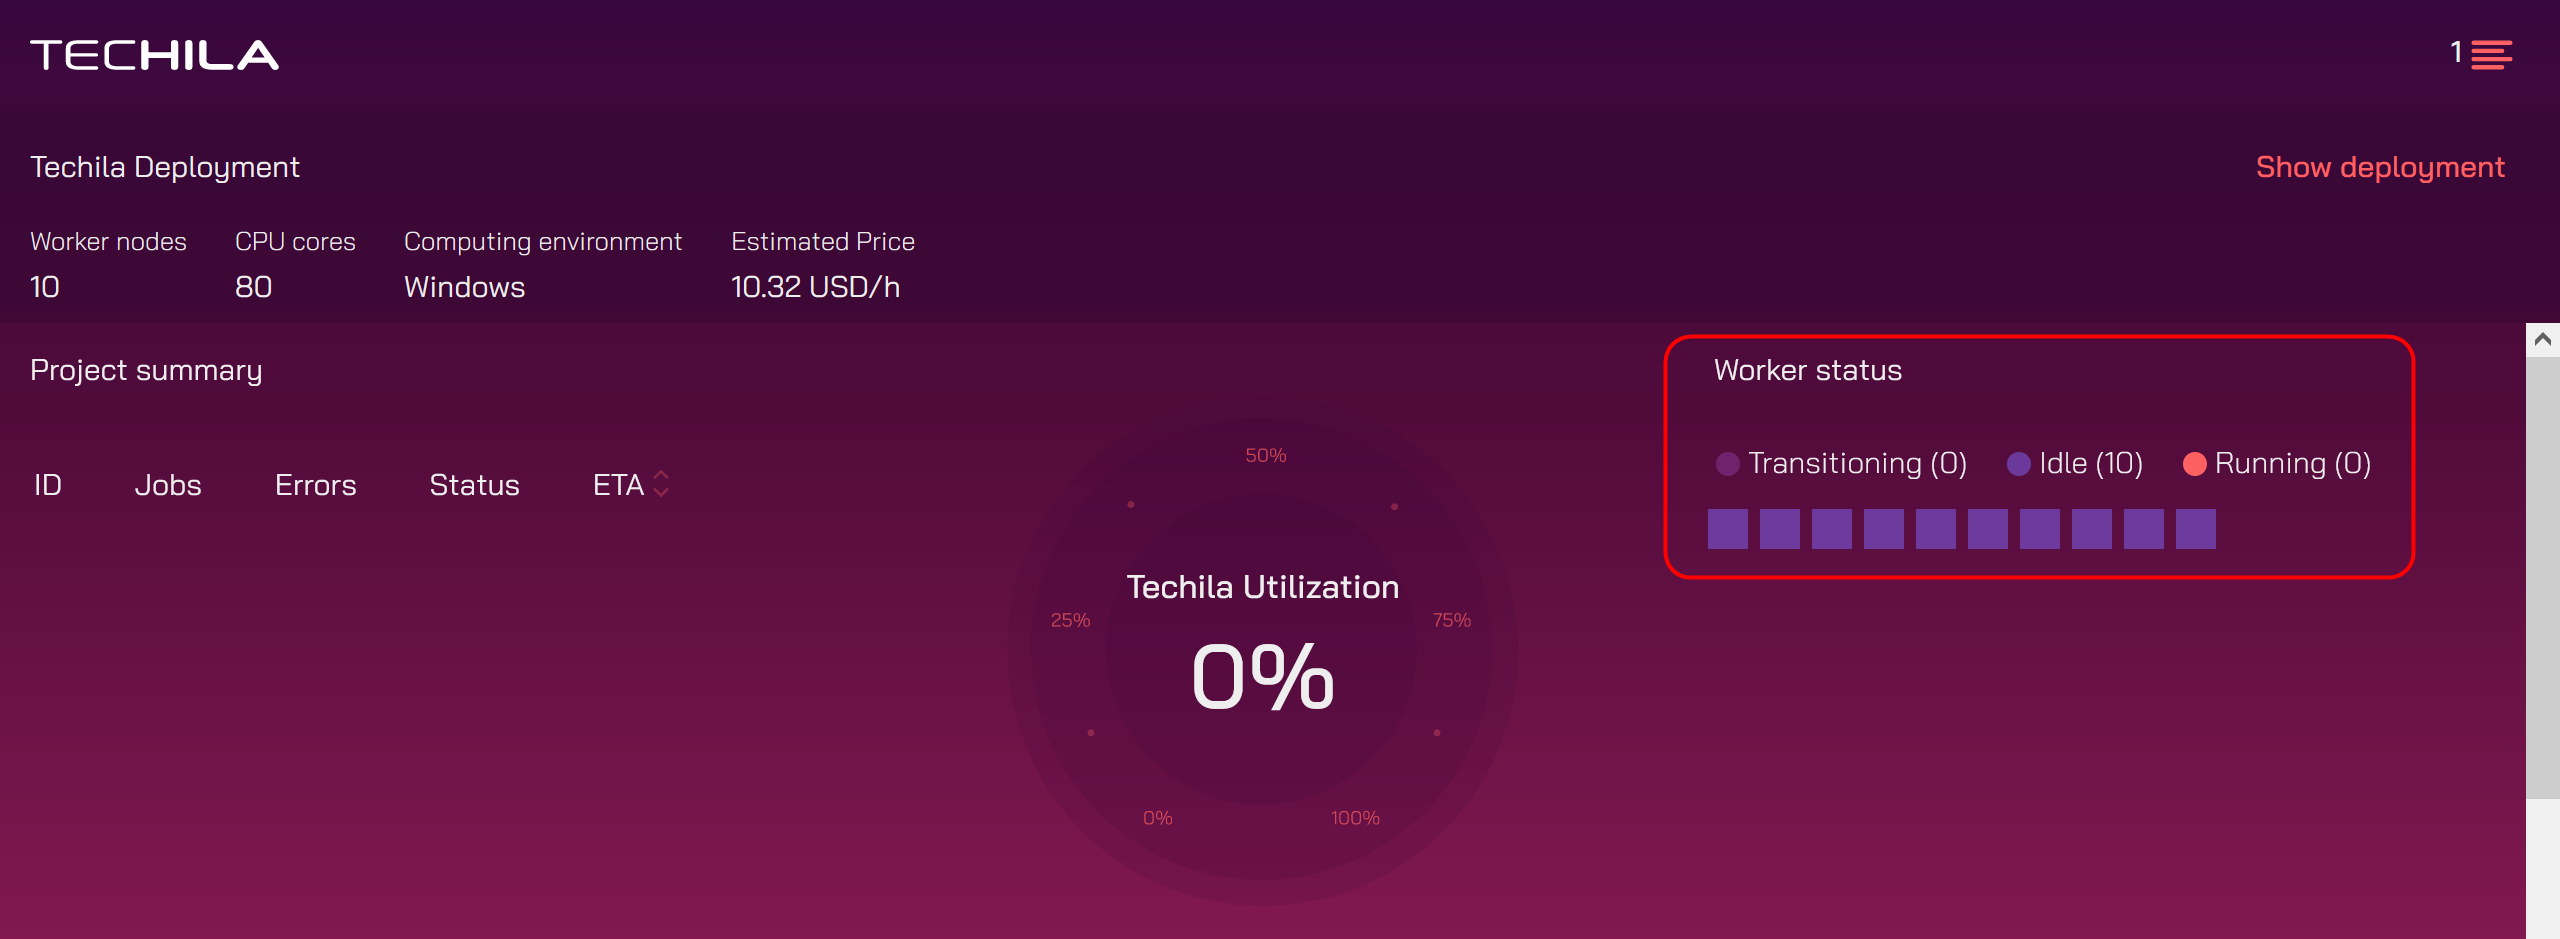
After clicking the button, the deployment process for the Techila Workers will start. Progress information will be displayed in the Operations view (click to expand). As Techila Workers come online, they will visible under
Worker status.Finally, when all 10 Workers are ready, the view would resemble the one shown below:
-
After you have started Techila Workers, you can create a computational Project to test that everything works. You can use the Techila Dasboard to view progress information and statistics about the computeions.
-
Verify functionality by executing one of examples included in the Techila SDK. Examples for R, Python and MATLAB can be found in the following Techila SDK directories:
-
Python examples: 'techila/examples/python'
-
R examples: 'techila/examples/R
-
MATLAB examples: 'techila/examples/Matlab'
The Techila SDK examples contain information on how you add Techila Distributed Computing Engine functionality to your application and how to enable various Techila Distributed Computing Engine features. Additional information on how to use the Techila Distributed Computing Engine functions from different programming languages can be found using the following links.
-
Techila Distributed Computing Engine with MATLAB
Tip! If your computational workloads need large amounts of input data / generate large amounts of output data, you can use Google cloud storage to transfer the files. Information on how Google cloud storage can be used with TDCE can be found in document Managing Large Data Amounts when using Techila Distributed Computing Engine.
Note! After starting Techila Workers, program specific runtime components will be transferred from the Techila Server to the Techila Workers during the first Project. Depending on the programming language you are using, the transfer process may take several minutes. After the runtime components have been transferred, they will be stored on the Techila Workers' hard disks and will be stored there until the Techila Worker VM instances are deleted. During subsequent Projects, the runtime components will be used from the Techila Worker’s hard disk, meaning there will be no network transfer delay.
If you delete the Techila Worker VM instances and restart Techila Workers at a later time, the runtime components will be need to be re-transferred.
-
-
After verifying that the Techila Distributed Computing Engine environment works as expected, you can continue by adding the Techila Distributed Computing Engine functionality to your own application and running it in Techila Distributed Computing Engine.
-
After you have completed processing computational workloads, it is recommended to delete ALL Techila Workers VM instances to prevent unnecessary costs from being incurred. Instructions for deleting Techila Worker VM instances can be found in Decreasing Computing Throughput.
3.5. Decreasing Computing Throughput
This Chapter contains instructions for decreasing computing throughput, which is done by deleting the Techila Worker VM instances using the Techila Dashboard.
Note! The steps described in this Chapter assume that you have logged in to the Techila Dashboard. If you have not logged in, please log in before continuing.
If you, at some later point, again wish to perform computations in the Techila Distributed Computing Engine environment, you will need to start new Techila Workers as described in Increasing Computing Throughput
-
Using your browser, open Techila Dashboard (the page that was bookmarked earlier).
-
Click the
Stopbutton to delete all ALL Techila Worker VM instances that are currently running.Note! If you only want to delete some of the Techila Worker VM instances, you can do this by entering a smaller value in the
Number of Worker Nodesfield and clicking theUpdatebutton. This value should be set to match the number of desired Techila Workers. For example, if you currently have 10 Techila Workers running and you then define value 6 in theNumber of Worker Nodesfield, the number of running Techila Workers would be reduced to 6 when theUpdatebutton is clicked.Clicking the
Stop all capacitybutton and confirming the action will delete ALL Techila Worker VM instances.
-
After clicking the button, verity that the Techila Worker VM instances were successfully deleted by doing checks described in the following steps.
-
Wait for the operation to complete and verify that the Techila Workers were removed from the the
Worker statusview. -
In the Google Cloud Platform Console, navigate to:
Google Cloud Platform Console → Compute Engine → Instance Groups
The Google Cloud Platform Console can be accessed from the following page:
Note! Verify that you have selected the project that you used to deploy Techila Distributed Computing Engine.
-
Verify that there are no instance groups that start with the deployment name you specified when deploying Techila Distributed Computing Engine. For example, if your deployment is named 'techila-1', make sure that there are no instance groups that have a name starting with 'techila-1'.
Note! If there are instance groups that have a name that starts with the deployment name you specified when creating the deployment, select the instance groups and delete them using the
Deletefunctionality in the Google Cloud Platform Console.The example screenshot below illustrates a situation where there are two instance groups for a Techila deployment named 'techila-1'. These instance groups could be deleted by selecting them and by clicking the
Deleteicon.Techila related instance groups can be deleted by selecting them and clicking the highlighted button.

-
If required, confirm the action.

-
After ensuring that there are no Techila Worker related instance groups running, the only Techila related VM in your Google environment is the Techila Server.
The example screenshot below shows the
VM Instancesview when the Techila Server is the only VM running.
3.6. Stopping the Techila Server
This Chapter contains instructions for stopping the Techila Server VM instance using the Google Cloud Console. Stopping the Techila Server VM instance will not remove any important data from the Techila Server. If you stop the Techila Server VM instance, you will be able to restart it at a later time.
Note! When stopping the Techila Server, it is important to use the Stop button in the Google Cloud Console. Do not delete the Techila Server.
Note! Stopping the Techila Server will not delete the Techila Worker VM instances. Please delete all Techila Worker VM instances that are running by using the Techila Dashboard. Instructions for deleting Techila Worker VM instances can be found in Decreasing Computing Throughput.
Please also note that even though you stop the Techila Server VM instance and delete all Techila Worker VM instances, you will be billed for the Techila Server disk and for the static IP address that is reserved for the Techila Server.
-
Navigate to the Google Cloud Platform Console:
-
In the search box, type
compute engineand click on the matching search result to navigate to the Compute Engine view.
-
Tick the checkbox for your Techila Server VM instance and click the
Stopbutton. Note! Make sure to click on theStopbutton, do not click on theDeletebutton. Your Techila Server VM instance name will be <your deployment name>-instance.In this example, the name of the Techila Server VM instance is 'techila-1-instance', which means that the deployment name is 'techila-1'.

-
When prompted, confirm the action.

After confirming the action, the Techila Server VM instance will be stopped.
After the Techila Server VM has been stopped, there should be an icon indicating the stopped state next to the Techila Server VM. The VM instances view should resemble the one shown below.

3.7. Restarting the Techila Server
This Chapter contains instructions for restarting the Techila Server using the Google Cloud Platform Console. After restarting the Techila Server, you can continue using your existing application plugin package. You do NOT need to re-download or re-configure the application plugins.
After restarting the Techila Server VM instance according to the instructions in this Chapter, the IP address of the Techila Server will be the same as in the initial deployment. This means that you can use your existing browser bookmarks to access the Techila Dashboard.
Note! If you have more than one Google Cloud Platform project created, make sure that you have selected the project that contains the Techila Distributed Computing Engine components.
-
Navigate to the Google Cloud Platform Console located at:
-
In the search box, type
compute engineand click on the matching search result to navigate to the Compute Engine view.
-
In the VM instances view, tick the checkbox next to your Techila Server VM instance and click the
`Startbutton to start the VM instance.
-
When prompted, confirm the action.

After the Techila Server has started, an icon indicating the running state should be displayed next to the Techila Server VM instance.

-
After starting the Techila Server VM instance, please follow instructions in Accessing the Techila Dashboard to access the Techila Dashboard.
3.8. Removing all Techila Distributed Computing Engine Components from Google Cloud Platform
This Chapter contains instructions on how to remove ALL components that were created when taking Techila Distributed Computing Engine Advanced Edition in Google Cloud Platform Marketplace into use.
Please note that the steps described in this Chapter are typically only required in situations where you want to discontinue using the Techila Distributed Computing Engine system and plan on never performing any computations using Techila Distributed Computing Engine Advanced Edition in Google Cloud Platform Marketplace.
Note! If you perform the steps described in this Chapter, you will NOT be able to restart the Techila Server. Performing the steps described in this Chapter will also delete all user credentials and computational data stored on the Techila Server.
-
Delete ALL Techila Worker VM instances as described in Decreasing Computing Throughput
-
In the Google Cloud Platform Console, locate the Cloud Storage bucket used by your Techila deployment and delete the bucket. The bucket name will resemble the following:
b_<yourproject>_<yourdeploymentname> -
In the Google Cloud Platform Console, type
deploymentsin the search box and click the matching search result to open theDeploymentsview.
-
Locate the deployment you have been using for your Techila Distributed Computing Engine components and click on the deployment name of it.

-
Clieck the
DELETEbutton.
-
When prompted, confirm the action by entering the name of the deployment and clicking
CONFIRM.
-
Wait for the deployment to be deleted. After the deployment has been deleted, it will no longer be visible on the
Solution deploymentspage as illustrated below.
All components that were created when taking Techila Distributed Computing Engine Advanced Edition in Google Cloud Platform Marketplace into use have now been removed from Google Cloud Platform.
4. Appendix
This Chapter contains a collection of instructions that can be used to implement more advanced deployment flows and how to perform various operations related to managing existing TDCE deployments.
4.1. Deploying the TDCE Environment Programmatically
This Chapter contains instructions on how to deploy the TDCE environment programmatically using the Google Cloud SDK.
Please note that in order to complete the steps described in this Chapter, you will need to have the Google Cloud SDK installed and configured for your Google environment and project you want to use.
-
Using your web browser, navigate to Google Cloud Platform Marketplace page:
-
Click on
Explore Marketplace
-
Type
Techilain the search box and click on the matching search result.
-
Scroll down and download the deployment files (
techila.zip) to the computer where your Google Cloud SDK is installed.
-
Extract the
techila.zipfile to the computer where your Google Cloud SDK is installed. In the example below, the files have been extracted toC:\temp\techila.
-
Open a command prompt / shell and set your current working directory to match the location where the files are located.
Create the TDCE deployment using the
gcloud deployment-manager deployments createcommand.gcloud --project=<yourprojectID> deployment-manager deployments create <yourdeploymentname> --template=techila.jinja --properties="region:'europe-west1',zone:'europe-west1-d',machineType:'n1-standard-4',diskSizeGb:256"
Replace
<yourprojectID>with your project id and<yourdeploymentname>with the name you want to give to the deployment. Values in--propertiescan be used to change deployment properties, such as theregionandzonewhere the deployment will be created. ThemachineTypeanddiskSizeGbparameters are used to define the Techila Server properties.Additionally, you can add custom labels to the deployment using the --labels parameter.
Using the syntax in the screenshot below, a deployment with name
my-techila-deploymentwill be created.
-
After the deployment has been completed, the view should resemble the one shown below:

-
Retrieve the IP address and admin password by using the
gcloud deployment-manager manifests describecommand. In the example snippet below, the information formy-techila-deploymentis retrieved and the output reduced by usinggrep(Linux) andfindstr(Windows). The relevant values are highlighted in the image below.gcloud deployment-manager manifests describe --deployment my-techila-deployment | findstr finalValue gcloud deployment-manager manifests describe --deployment my-techila-deployment | grep finalValue

-
You can now log in to the Techila Dashboard by using your web browser and navigating to the IP displayed in the output. You will need to build the URL as follows:
Replace <ip> with the value displayed when you ran the previous command.
-
When prompted, log in as
adminuser by using the password displayed when you ran the previous command. -
You can now continue as described in Downloading and Configuring the Application Plugins.
4.2. Advanced Techila Dashboard Settings
Advanced Techila Dashboard settings can be displayed by clicking the Advanced Options

The Spot instances settings allows you to use spot instances, which can help you reduce the cost of the computing capacity. Please note that spot instances will also use a different disk quota than regular instances, meaning you might need to apply for the corresponding quota increases.
The Storage settings also allow you to modify the amount of disk space available on each Techila Worker. The default amount of disk space per Techila Worker node is typically sufficient, but if you plan on processing computational workloads that require large amounts of disk space, increasing the amount of disk space per node might be required. Increasing the Boot disk size will increase the standard disk of the Techila Worker. Setting the Disk type to Local disk can be used to attach SSDs to the Techila Worker.
Please note that if you set the amount of disk space to a high value and attempt to start a large number of Techila Worker nodes, you might end up in a situation where the deployment exceeds your GCP local SSD disk quota. In this case, either reduce the amount of disk space per node or use larger, but fewer, instances with more CPU cores per node to reduce the total amount of disks required.
The Idle shutdown settings allow you to enable an idle shutdown for the Techila Workers. Specifying a shutdown delay will automatically cause Techila Worker VM instances to be terminated if no Jobs are detected on Techila Workers within the specified time. The idle shutdown timer will be activated immediately after deployment. If no Jobs are detected, the Techila Workers will remain online for a minimum of 30 minutes after deployment. When Jobs are detected, the value defined in the idle shutdown setting will be applied. When One-by-one mode is set to Off, the defined timer value will start taking effect on all Techila Workers even if only some have processed Jobs.
When One-by-one is enabled, individual instances will be automatically terminated if they remain idling (= not processing Jobs) over the time period defined in the Idle Shutdown field. This differs from the standard mode, where all instances will be deleted in a single delete operation if they have all idled over the specified time period.
The Public IP address setting allows you control whether or not the Techila Workers are assigned a public IP address. If no public IP address is set, the Techila Workers will be unable to access data located in the internet. Additionally, if no public IP address is set, you will not be able to directly establish a remote connection to the Techila Worker via ssh (Linux) or RDP (Windows). Establishing a remote connection is typically needed when you are creating a custom image from a Techila Worker. If you plan on creating an image, it is recommended to set public IP address to On.
4.3. Creating a Custom Image
As described in Google documentation, a custom image is a boot disk image that you own and control access to.
Generally speaking, custom images can be used to create an image from the boot disks of your existing Compute Engine instances. Then use that image to create new boot disks for your instances. This process allows you to create new instances that are preconfigured with the applications that you need without having to configure a public image from scratch.
In TDCE context, custom images can be used to make additional software packages available on Techila Workers. The example flow below illustrates how this could be done:
-
Using your web browser, navigate to your Techila Dashboard view.
-
In the Techila Dashboard, select the base operating system you want to use (Windows or Linux). If you have already created a custom image and want to make further modifications to it, you can select the custom image.
-
In the
Advanced Instance Optionssection, make surePublic IP addressis set toOn -
In the
Advanced Instance Optionssection, make sure thatDisk typeis set toBoot disk only. -
In the
Number of worker nodes, set the count to1. -
Click the
Startbutton to start the Techila Worker. Wait until the Techila Worker is running. This may take several minutes. -
Note! If you started a Techila Worker that has a Windows operating system, you will need to configure the firewall to allow TCP port 3389. This port will be used when you establish the Remote Desktop Protocol (RDP) connection to the Techila Worker. The following steps describe how to configure the firewall. The following steps will only need to be done once per deployment.
-
Using your web browser, navigate to https://console.cloud.google.com/
-
In the Google Cloud Console, navigate to the
VM instancesview and click on the Techila Worker that you just started.
-
Scroll down until you reach the
Network Interfacestable and click on the network. The network will have the same prefix as your TDCE deployment. In this example, the name of the TDCE deployment istest-techila-1, meaning the name of the network istest-techila-1-net
-
In the new view, click on
Firewall rulesand click theAdd firewall rulebutton.
-
Specify the following details for the new rule and click
Create-
Name: Can be freely chosen.
-
Description: Can be freely chose.
-
Targets:
All instances in the network. -
Source IP Ranges:
0.0.0.0/0(you can also enter a smaller subrange, as long as you include the IP address from where you will be connecting from) -
Protocols and ports: TCP:
3389
-
-
The new firewall rule has now been created.
-
-
Establish a remote connection to the VM. Instructions for this can be found here:
-
After establishing a remote connection to the Techila Worker, install the software you want to include in your custom image. Please note that the Techila Worker processes (including the actual Jobs) will run under user
techila-workerand will need to have access to software. -
After you have installed all required software on the Techila Worker, test that everything works. A comprehensive test would be to run an actual computational Project that uses the functionality of the software you just installed. You can remain connected to the Techila Worker while you are running the tests.
-
After verifying that everything is working as intended, return to the Techila Dashboard, enter a descriptive name for the image and create the image.

-
After the image has been created, the new custom image will be listed in the
Computing environmentmenu. You can now choose the custom image to make the previously installed software available on all Techila Workers.
4.4. Accessing the Techila Dashboard
This Chapter contains instructions on how you can access and log in to the Techila Dashboard after restarting the Techila Server, or in other situations where the post deployment page is not accessible (e.g. if you accidentally closed the page after starting the Techila Server).
-
Using your web browser, navigate to the Google Cloud Platform Console:
-
In the search box, type
solution deploymentsand click on the matching search result to navigate to the Compute Engine view.
-
Locate your Techila deployment and click on the deployment name.

-
Switch to the
Detailstab. Then click the eye icon to display theAdmin Password. You can then copy the password into the clipboard. Then click on theDashboard Urllink to open the Techila Dashboard login page. -
Enter 'admin' as the username. In the password field, copy the
Passwordvalue from the Google Cloud Platform Console to the password field as shown in the screen capture. Click theLog inbutton to log in.
4.5. Accessing Techila Dashboard Using https
When accessing the Techila Dashboard, it will be accessed using https. See example of the URL below.
Https:
https://<IP Address>/dashboard
Please note that when opening the Techila Dashboard for the first time using https, your web browser might not trust the Techila Server’s certificate. Accept the certificate using your web browser and continue.
Please note that the process for accepting certificates is different in each web browser, meaning the appearance of this screen may be different than the one illustrated here.
This message is displayed because the default certificate for Techila Dashboard is a self signed cert.

4.6. Making a Google Quota Increase request
This Chapter describes how to request a quota increase.
When making a quota increase request, the following key points need to be taken into account:
-
Quota increases are project-specific, so please make sure that you are increasing the quota for the same Google project you are using for your Techila Distributed Computing Engine environment.
-
Quota increases are location-specific, so please make sure that you are increasing the quota in the same location where your Techila Distributed Computing Engine deployment is running.
The example flow below shows how to request a quota increase for a project called DemoEnvironment which contains a Techila Distributed Computing Engine deployment running in europe-west4 location.
-
Log in to the Google Cloud Console
-
Check that you are using the correct project. After checking, enter "solution deployments" in the search box and click the matching search result.

-
Click on your Techila Distributed Computing Engine deployment.

-
Click to change to the
Detailstab. Check which zone your deployment is running in and make a mental note of it. When making the quota increase request, this is the zone that will need to be used.
-
Next we will start making the quota increase request. In the search box, enter
quotaand click the matching search result (All Quotas).
-
You should see
Quotas & System Limitsto view the quotas for your project. There will be quite a lot of information in the default view, as shown below.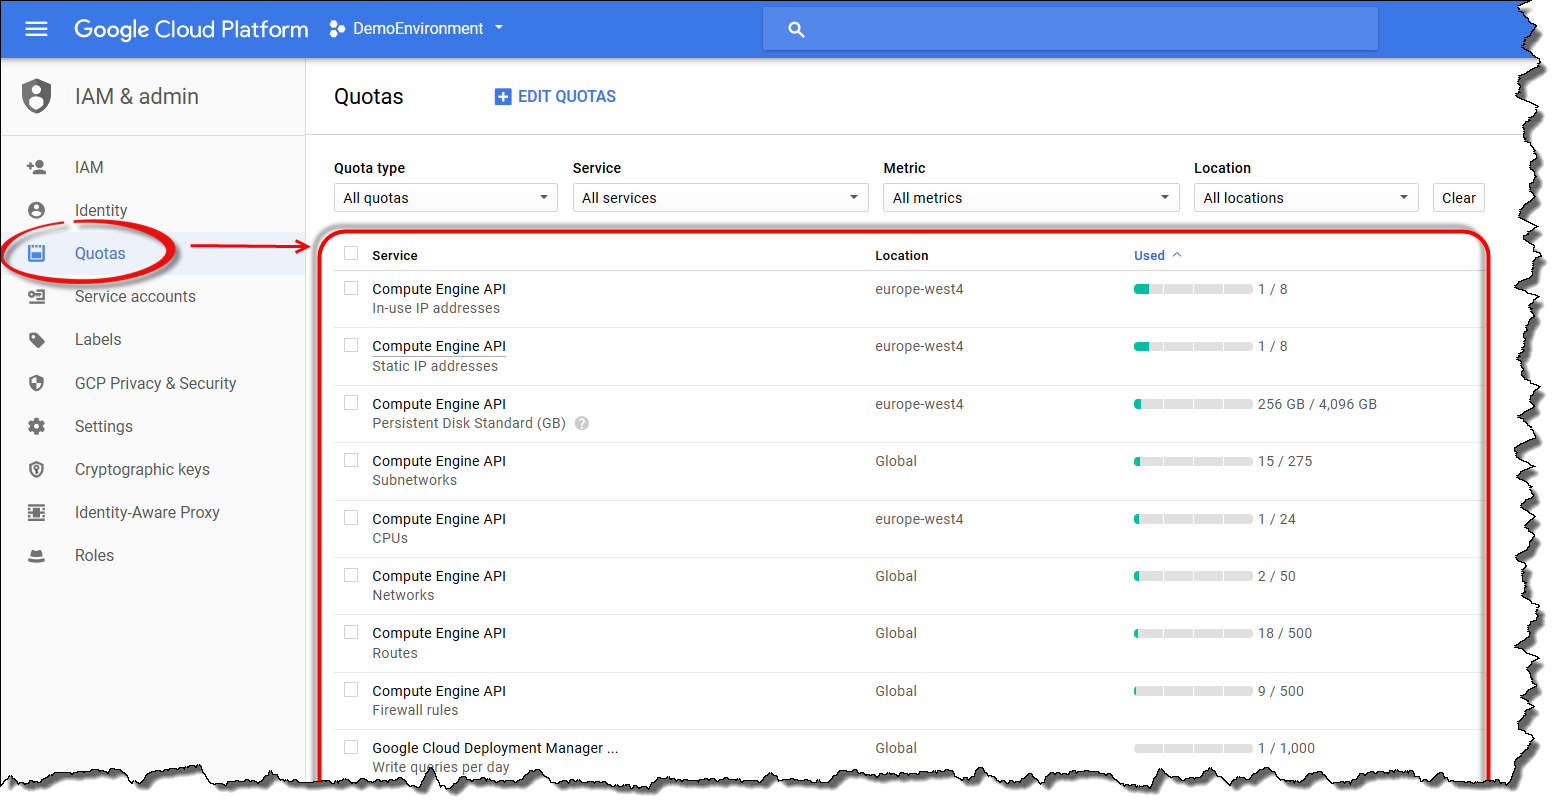
-
Next we will add some filters to reduce the amount of information displayed. In the
Filtermenu, add filters as shown in the screenshot below replacing the region with you deployment region.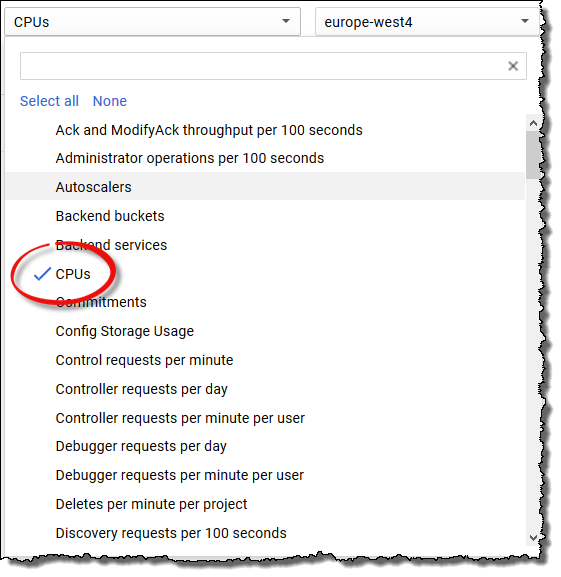
-
Note! The instance types in the list below have separate CPU quotas. If you plan on using any of the the instance types as Techila Workers, you will also need to select metrics for these instance types and ask for a quota increase.
-
a2 -
c2 -
n2d -
n2
-
-
Note! You might also need to request a quota increase for your CPUs quota for all regions, in addition to requesting a region specific quota increase.
-
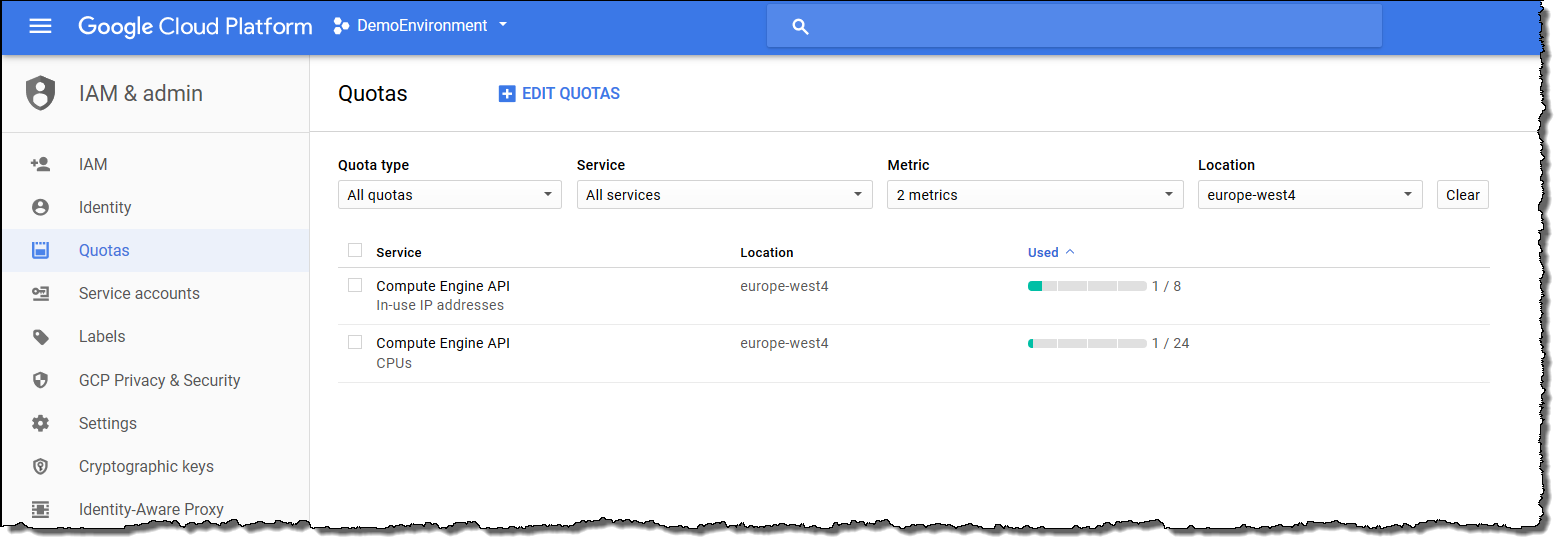
You should now have the metrics selected and the view should resemble the one shown below (quota amounts might differ). If you selected additional quotas, they should also be displayed.
-
Make the quota increase request. Each Techila Worker will require an IP address, meaning when increasing the CPU core quota, it is a good idea to also increase the IP address quota.
To make the quota requests, tick all checkboxes and click
Edit quotas.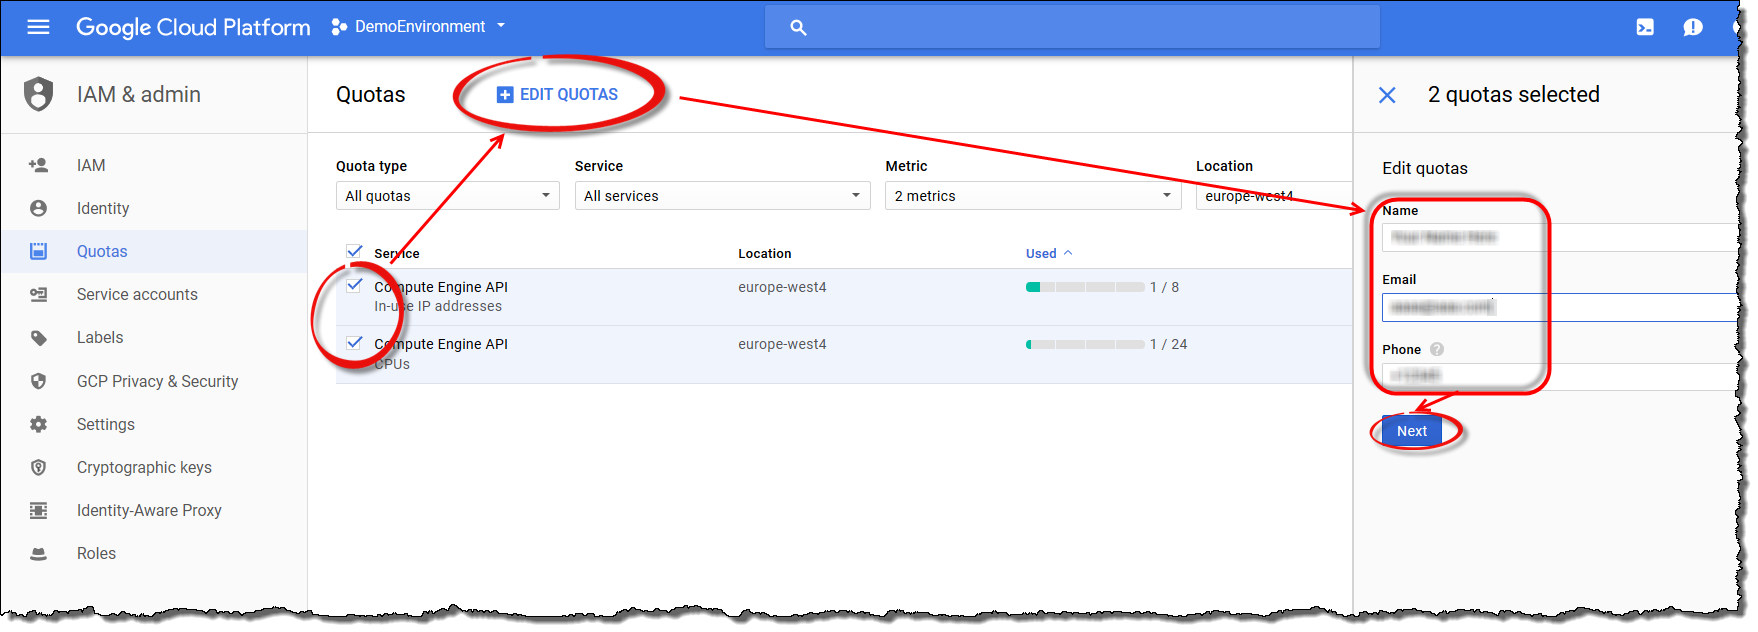
-
Fill in the amount of CPU cores you need. In this example value 1024 is used. The IP address amount should be set to the same value to ensure that you don’t run out of IP addresses when deploying instances with 1 CPU core. Enter a description and click
Done. Then clickNext.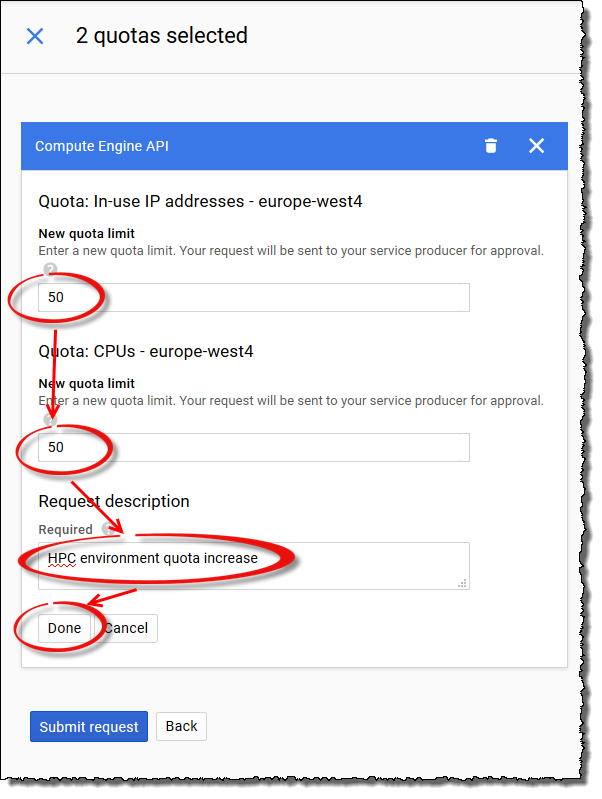
-
Finally, fill in your contact details and click the
Submit requestbutton.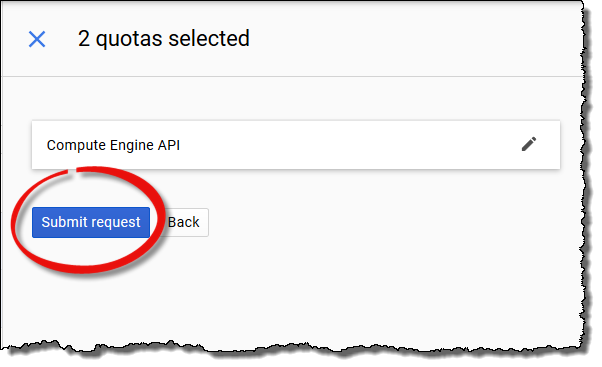
-
A confirmation message should be displayed.
-
When the quota has been increased, you should receive a confirmation email to your inbox in the email address you entered earlier. The screenshot below illustrates the relevant part of the confirmation email.

-
After receiving the confirmation email, the Techila Dashboard will automatically detect the increased quota and you will be able to start instances using the increased quota.
4.7. Checking Monthly Techila Charges
General billing information can be viewed in the Google Cloud Console.
This Chapter contains information on how to check the total amount of costs in a Google project.
-
Log in to the Google Cloud Console
-
Click
Billing.
-
Click
Reports.
-
The
Reportspage can be used to extract billing information. The filter options on the right hand side of the page can be used to define the type of billing information that will be extracted and how it will be presented.The following example filter settings could be used to extract all costs of one Google project for the current month. This includes the Techila License Fees and all other Google related fees (e.g. instances and storage). By changing the values of the filter, you can change what information will be extracted.
-
In the filter settings, set the time range to
Current month. SetGroup bytoProject. Tip! If you want a breakdown on how much money was spent on Techila License Fees and how much was spent on other cloud components, you can setGroup bytoSKU.
-
Open the
Projectsdropdown menu and select the project you want to extract the billing information from. This should be the same project you are using for your TDCE deployment.
-
Check that the
Productsdropdown menu has selected all items.
-
Check that the
SKUsdropdown menu has selected all items. Please note that when allSKUsare selected, the report will include the costs generated by any Google components in the specified project. This means that if you have, for example, some virtual machines set up in the project that are not generated by the TDCE system (e.g. a development virtual machine that you have set up manually) , they will also be included in the bill.If you are only interested in the amount of Techila Software License Fees, you can use the
SKUsdropdown to only select theSKUsthat start withLicensing Fee for Techila Technologies. Please note that this will only extract the information for the License Fee. It will not include the actual instance costs.
4.8. Increasing Techila Server Disk Size
This Chapter contains instructions for increasing the Techila Server disk size. Increasing the disk size will need to be done if the current disk no longer has free disk space available.
Note! The Techila Server disk uses MBR partitions, which are limited to 2 TB in size. Do not resize boot disks beyond 2 TB.
-
Log in to the Google Cloud Console and open the
Compute Engineview.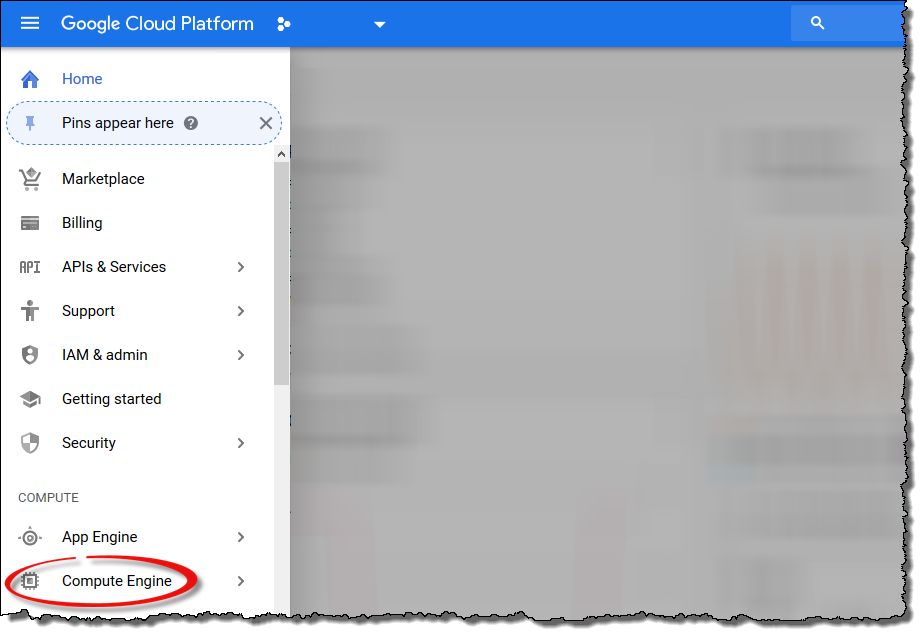
-
Click
VM Instances, select your Techila Server VM and click theStopicon to stop the Techila Server.Note! Make sure to click on the Stop icon, do NOT click on the Delete icon.

-
After the instance has been stopped, click
Disks.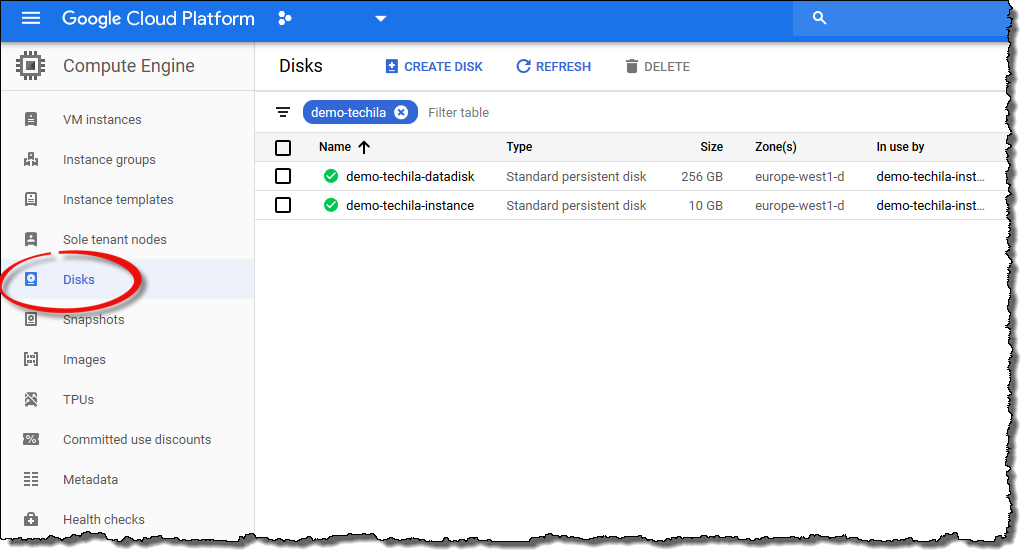
-
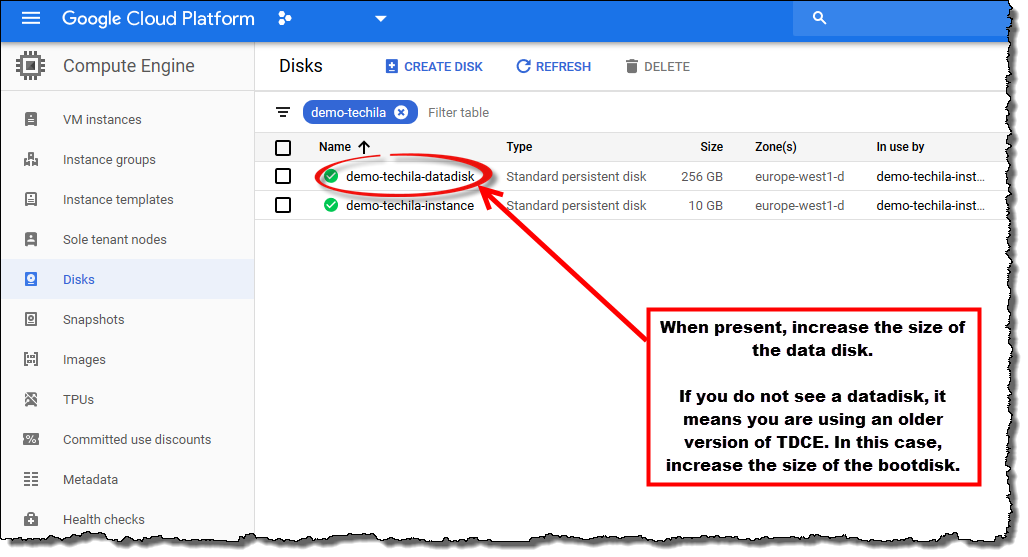
The view on the Disks section will depend on the version of your TDCE environment.
-
In older TDCE deployments, the Techila Server will only have one disk: the boot disk.
-
In newer TDCE deployments, the Techila Server will have two separate disks: the boot disk and a separate data disk.
If you only see one disk for the Techila Server, it means that you are running an older version of TDCE. In this case, click on the disk you are seeing.
If you see two disks for the Techila Server, it means that you are running a newer version of TDCE. In this case, click on the data disk.
The example screenshot below is taken from a newer TDCE version, meaning there are two disks. In this example case, we will increase the size of the data disk.
-
-
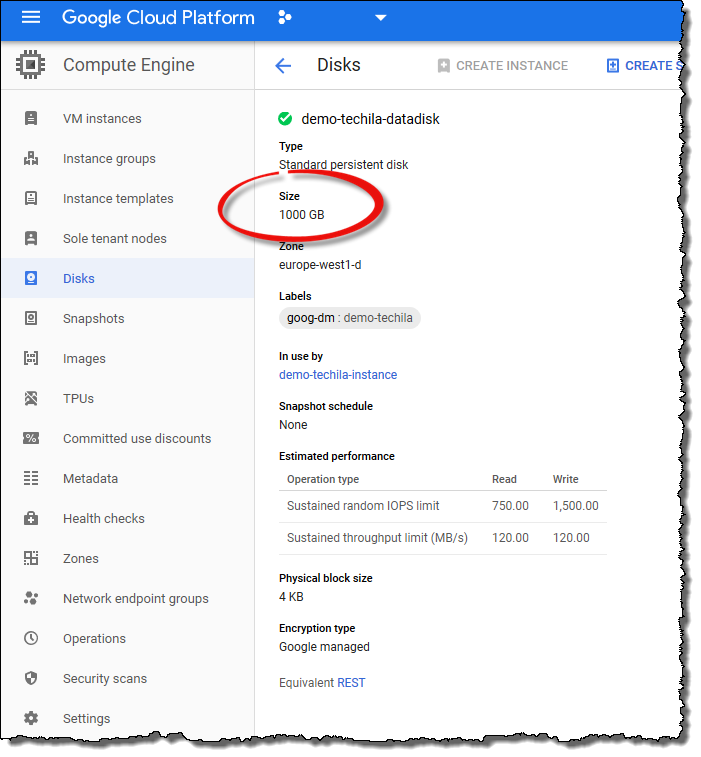
After opening the disk view, the current size of the disk size is shown under the
Sizeheading. In the example screenshot below, the current disk size is 256 GB. Click on theEditicon to edit the disk.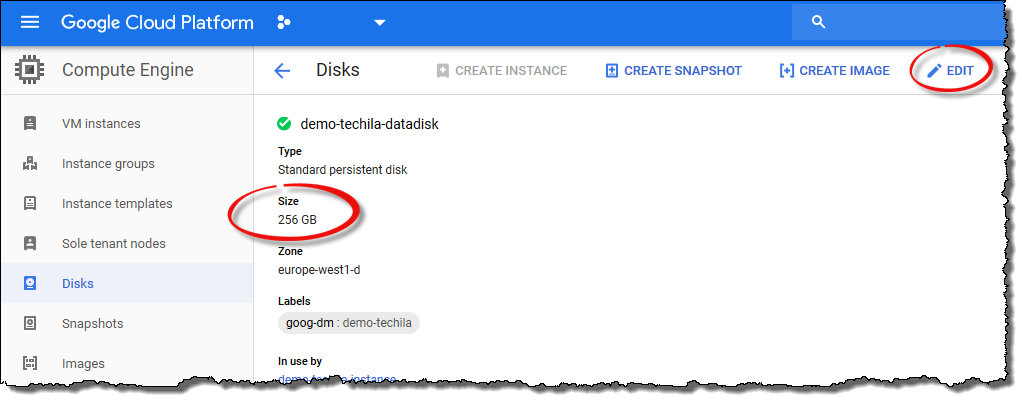
-
Specify the new, desired disk size in the
Sizefield and clickSave.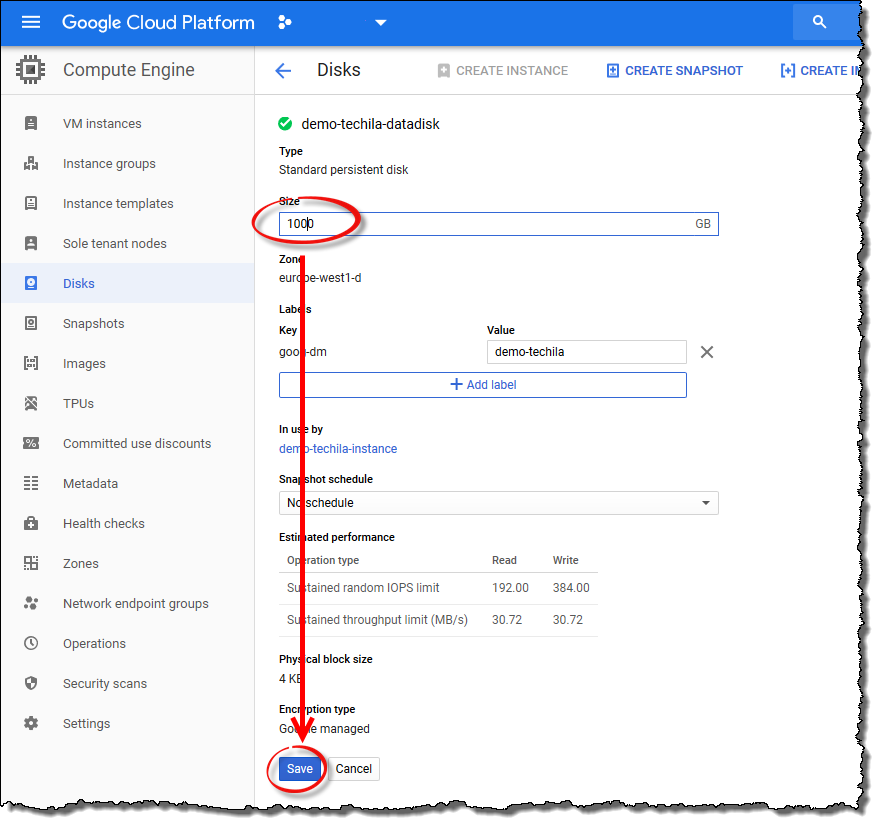
The disk size will now be updated. After the process has been completed, the new size should be visible. In the example screenshot below, the new disk size is 1000 GB.
-
Next, you can restart your Techila Server VM. Open the Compute Engine view, click
VM Instances, select your Techila Server VM and click theStarticon to start the Techila Server.
-
The Techila Server will now use the new, larger disk for storing data. You can now log in to the Techila Dashboard and continue using the system normally. Instrucions for logging in can be found in the following Chapter: Accessing the Techila Dashboard
4.9. Changing Techila Server Instance Type
This Chapter describes how to change the instance type used to run the Techila Server.
-
Log in to the Google Cloud Console and open the
Compute Engineview.
-
Click
VM Instances, select your Techila Server VM and click theStopicon to stop the Techila Server.Note! Make sure to click on the Stop icon, do NOT click on the Delete icon.

-
Click on the Techila Server instance name.

-
Click on the
Editicon.
-
Click the
Customizelink to expand the settings view.
-
Set the CPU and Memory amounts to the desired amounts and click
Save. The VM will now be updated to match the settings.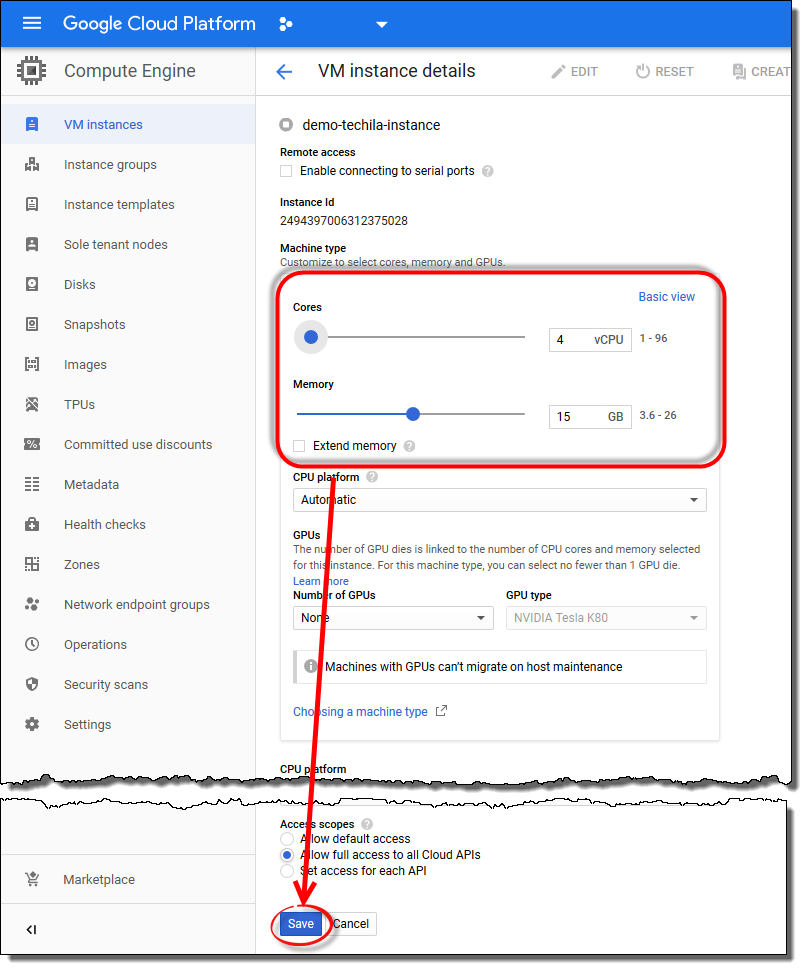
-
Next, you can restart your Techila Server VM. Open the Compute Engine view, click
VM Instances, select your Techila Server VM and click theStarticon to start the Techila Server.
-
The Techila Server will now use the new instance type. You can now log in to the Techila Dashboard and continue using the system normally. Instrucions for logging in can be found in the following Chapter: Accessing the Techila Dashboard
