1. Introduction
This chapter contains a short introduction about Techila Distributed Computing Engine and also describes the purpose of this document.
1.1. Techila Distributed Computing Engine
Techila Distributed Computing Engine (TDCE) is a patented middleware solution designed to handle high throughput and scale-out workloads for demanding parallel applications. It supports popular simulation applications such as MATLAB and programming languages such as R, Python, MATLAB, C, C++, and Windows .Net. Using the TDCE APIs, you can dramatically accelerate your applications and codes by harnessing the full resources of the cloud to run your simulations faster. TDCE delivers time to results that can be 100s or even 1000s of times faster than your workstation, dramatically reducing your "Time to results".
1.2. What is This Document
This document guides persons planning to set up Techila Distributed Computing Engine in AWS Marketplace.
If you are still getting familiar with the Techila Distributed Computing Engine terminology used in this document, please refer to Introduction to Techila Distributed Computing Engine.
The structure of this document is as follows:
Overview gives an overview of Techila Distributed Computing Engine environment in an AWS context and describes some of the system and knowledge requirements relevant to the deployment process.
Deploying and Managing Techila Distributed Computing Engine contains step-by-step instructions on how to set up and test a Techila Distributed Computing Engine environment in AWS.
Appendix contains additional information about several advanced topics such as creating and restoring from backups, estimating the cost of the deployment over a longer period, and how to increase the applicable AWS EC2 limits required to start large numbers of Techila Worker nodes.
2. Overview
This chapter contains an overview of the deployment of Techila Distributed Computing Engine.
2.1. TDCE in AWS Marketplace
TDCE in AWS Marketplace consists of three products, all of which you will need to subscribe to individually. The components are: Techila Server and Techila Worker Linux, Techila Worker Windows. Deploying a Techila Server in AWS Marketplace uses a CloudFormation template. This template will allow you to specify general deployment details, such as the region where the solution will be deployed. After filling out the template and initiating the deployment process, a stack will be created in your AWS account. This stack will contain all of the TDCE components created by the CloudFormation template and allow you to manage the deployment as a single unit. Please see TDCE Components for a comprehensive list of the created AWS resources.
The stack will also include one virtual machine, which is the Techila Server. The Techila Server provides access to the Techila Dashboard, which can be used to start Techila Workers. Please note that to start large amounts of Techila Workers, your Amazon account will need sufficient instance quotas. Please see [Making an Amazon Quota Increase request] for instructions on how to increase your quota if needed. Please see Cost Estimation for more information about the costs incurred when running a TDCE environment.
Please note that when deploying the TDCE solution, everything will run in your AWS account. You will need at least one AWS account to deploy the solution successfully. You must choose which AWS account you will use to deploy the solution if you have multiple accounts.
The CloudFormation template will automatically set the required Techila Server OS (Debian 12), database type (PostgreSQL or Amazon Aurora), and storage options (1024 GB EBS volume) and create the necessary network resources. You do not need to manually create or install these components when deploying the TDCE environment.
2.1.1. Deployment Options
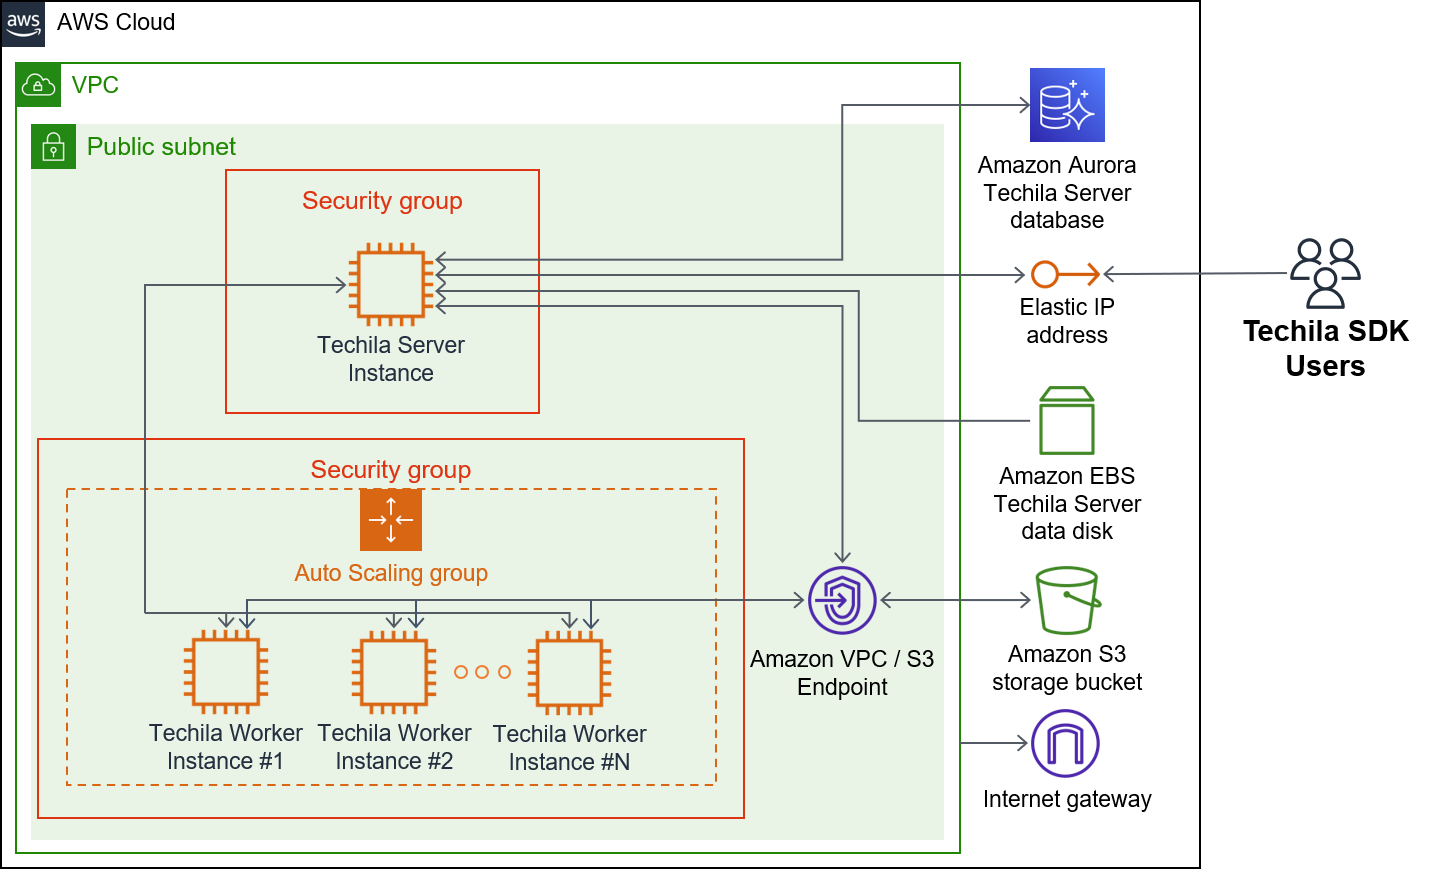
There are two deployment options regarding database options: Amazon Aurora RDS and PostgreSQL. These are illustrated in the architecture diagrams below. The database will be stored in EBS volume when using the PostgreSQL option. When using the Amazon Aurora option, Amazon Aurora Serverless will store the database tables.
When processing computational workloads in the TDCE environment, data will be stored in the EBS volume, S3 storage, and Amazon Aurora RDS. More specifically, the results of computational Projects will be stored on the EBS volume, and Bundles containing input data will be stored in S3.
Users can push computational workloads to the TDCE environment using the Techila SDK, which is automatically configured to connect to the Elastic IP address assigned to the Techila Server. Your Techila SDK will also contain a password-protected keystore file containing a set of Techila user credentials that will be used for authentication when using Techila SDK APIs. The Techila SDK can be downloaded from the Techila Dashboard after deploying the TDCE solution.
| Techila Distributed Computing Engine with Amazon Aurora RDS | Techila Distributed Computing Engine - PostgreSQL |
|---|---|
|
|

2.2. Knowledge Requirements
When deploying the TDCE solution, you must provide an AWS SSH key. If required, this key will enable you to establish an SSH connection to the Techila Server. Establishing SSH connections is not necessary during everyday use but can be helpful when performing Troubleshooting. If you want to familiarize yourself with CloudFormation templates or AWS SSH keys, please check the following links for more information.
If you plan on performing some of the more advanced activities, such as automatically creating backups, knowledge of the following AWS services will be useful:
2.3. System Requirements
To perform computations in Techila Distributed Computing Engine, the workstation where you plan to install the Techila SDK must meet specific programming language-specific requirements.
These requirements are described in the table below.
| Programming Language | Supported Versions | Additional Requirements | Required Operating System |
|---|---|---|---|
R |
3.6.3, 4.0.5, 4.1.3, 4.2.3, 4.3.3, 4.4.3 |
Java Development Kit (JDK) or Java Runtime Environment (JRE) (version 6 or newer) |
Microsoft Windows OR Linux |
Python |
3.10.9*, 3.11.8, 3.12.2, 3.13.9, 3.14.0 |
||
MATLAB |
2012b-2024a |
- MATLAB Compiler Toolbox |
The R and Python versions listed in the table correspond to the Python and R versions available on Techila Workers. If you use a different version on your local workstation, you can still use the system but might run into problems caused by the version differences.
Example 1: If you wish to perform R computations in Techila Distributed Computing Engine, your workstation must run a Microsoft Windows or Linux operating system. Your workstation must also have JDK or JRE (version 6 or newer) available. Computations will be performed on the Techila Workers using the R version closest to your local R version. The closest matching version is determined by comparing the major and minor version numbers of R releases.
Example 2: If you wish to perform Python computations in Techila Distributed Computing Engine, your workstation must run a Microsoft Windows or Linux operating system. Your workstation must also have JDK or JRE (version 6 or newer) available. Computations will be performed on the Techila Workers using the Python version closest to your local Python version. The closest matching version is determined by comparing the major and minor version numbers of Python releases.
Example 3: If you wish to perform MATLAB computations in Techila Distributed Computing Engine, your workstation must run a Microsoft Windows or Linux operating system. A separate Java installation is not required on your workstation.
3. Deploying and Managing Techila Distributed Computing Engine
This chapter contains instructions on managing and configuring the Techila distributed computing environment. Instructions are provided for all steps, including starting, testing, and deleting the VM instances.
If you encounter problems during the deployment process, please see Support Requests for more information on how to request support and include the necessary log files typically needed in the troubleshooting process. After deploying the Techila Server, you can email the support team using the address displayed in the Techila Dashboard.
3.1. Starting the Techila Server
This chapter gives a short description of how to start the Techila Server. After the steps described in this chapter, you will have access to the Techila Dashboard that you can use to download your Techila SDK and start Techila Workers.
You should be able to complete the deployment steps described in this chapter in under 15 minutes.
-
Using your web browser, navigate to the AWS Marketplace:
-
To locate the
Techila Server - Enterprise Editionoffering, use the search box at the top of the marketplace view or click the link below to open the product page in your browser. -
Click the
Continue to Subscribebutton.
-
Agree to the terms by clicking the
Accept Termsbutton.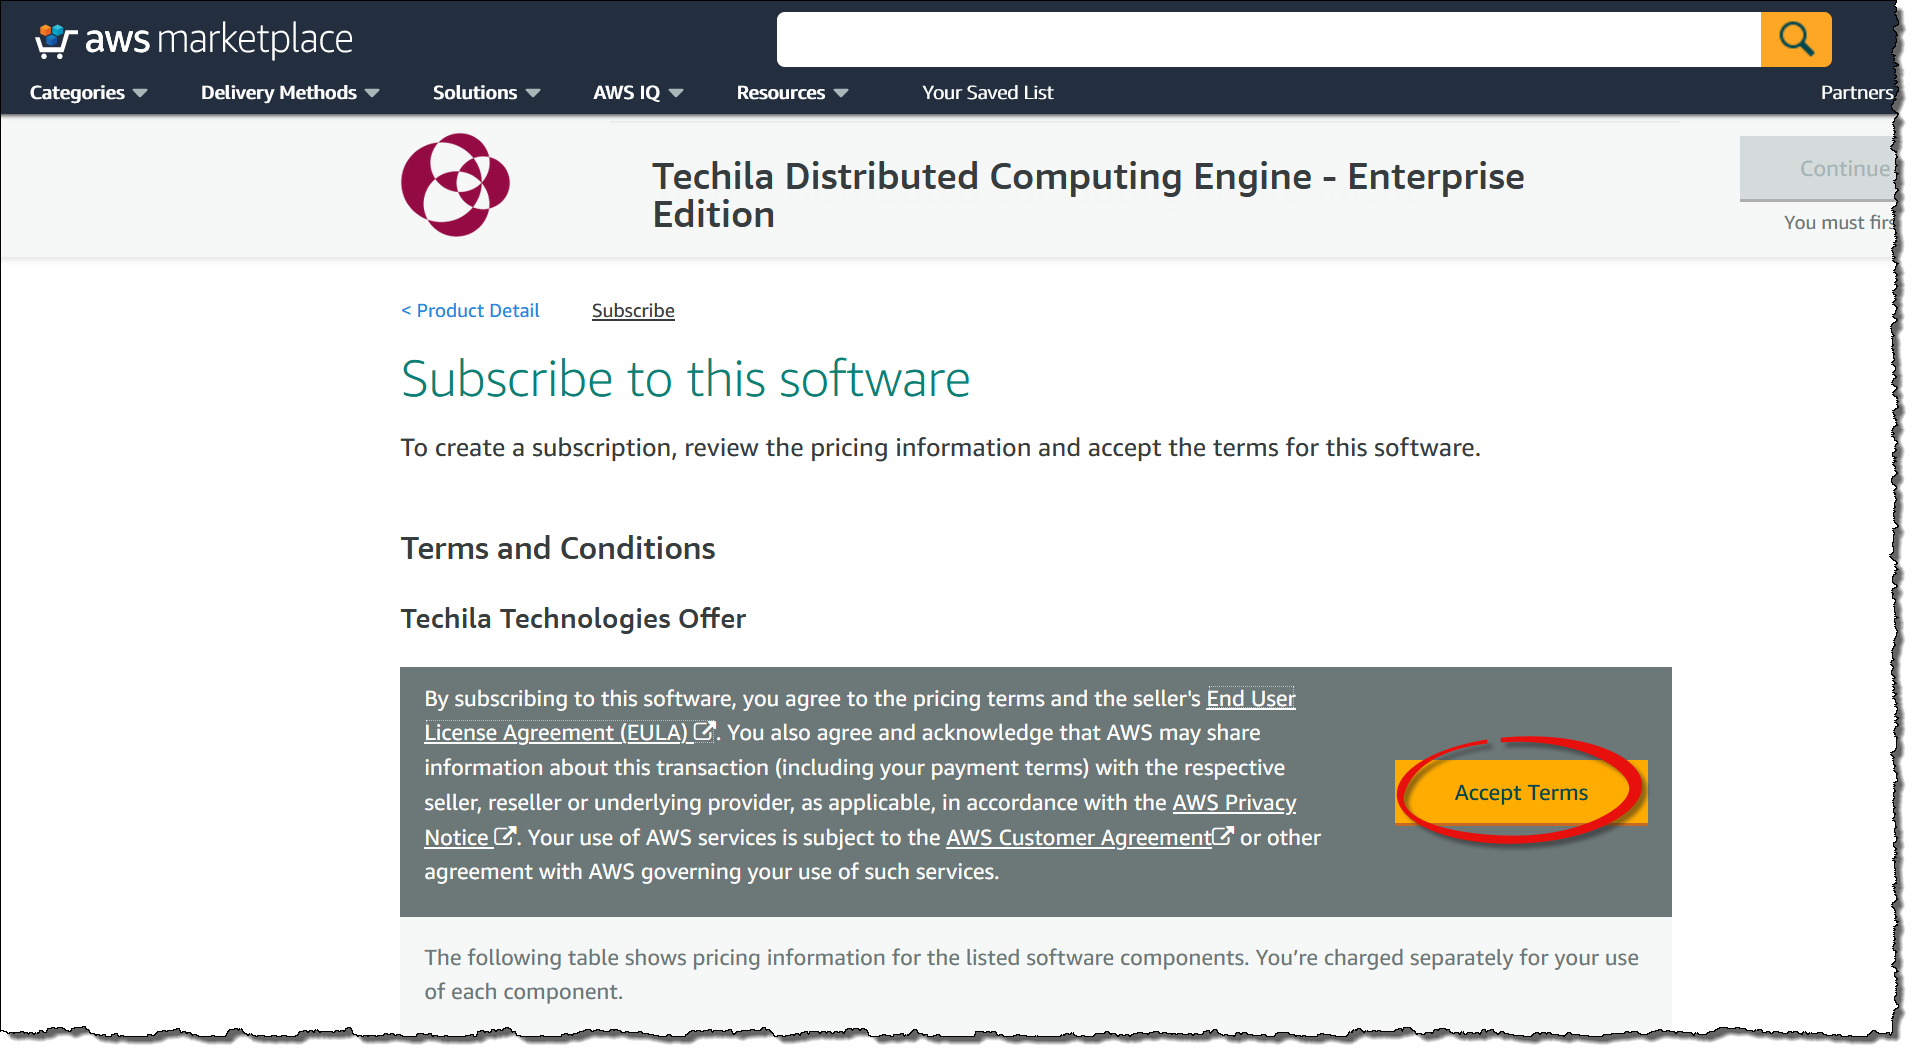
-
Wait for the subscription to activate. After it has been activated, click the
Continue to Configurationbutton.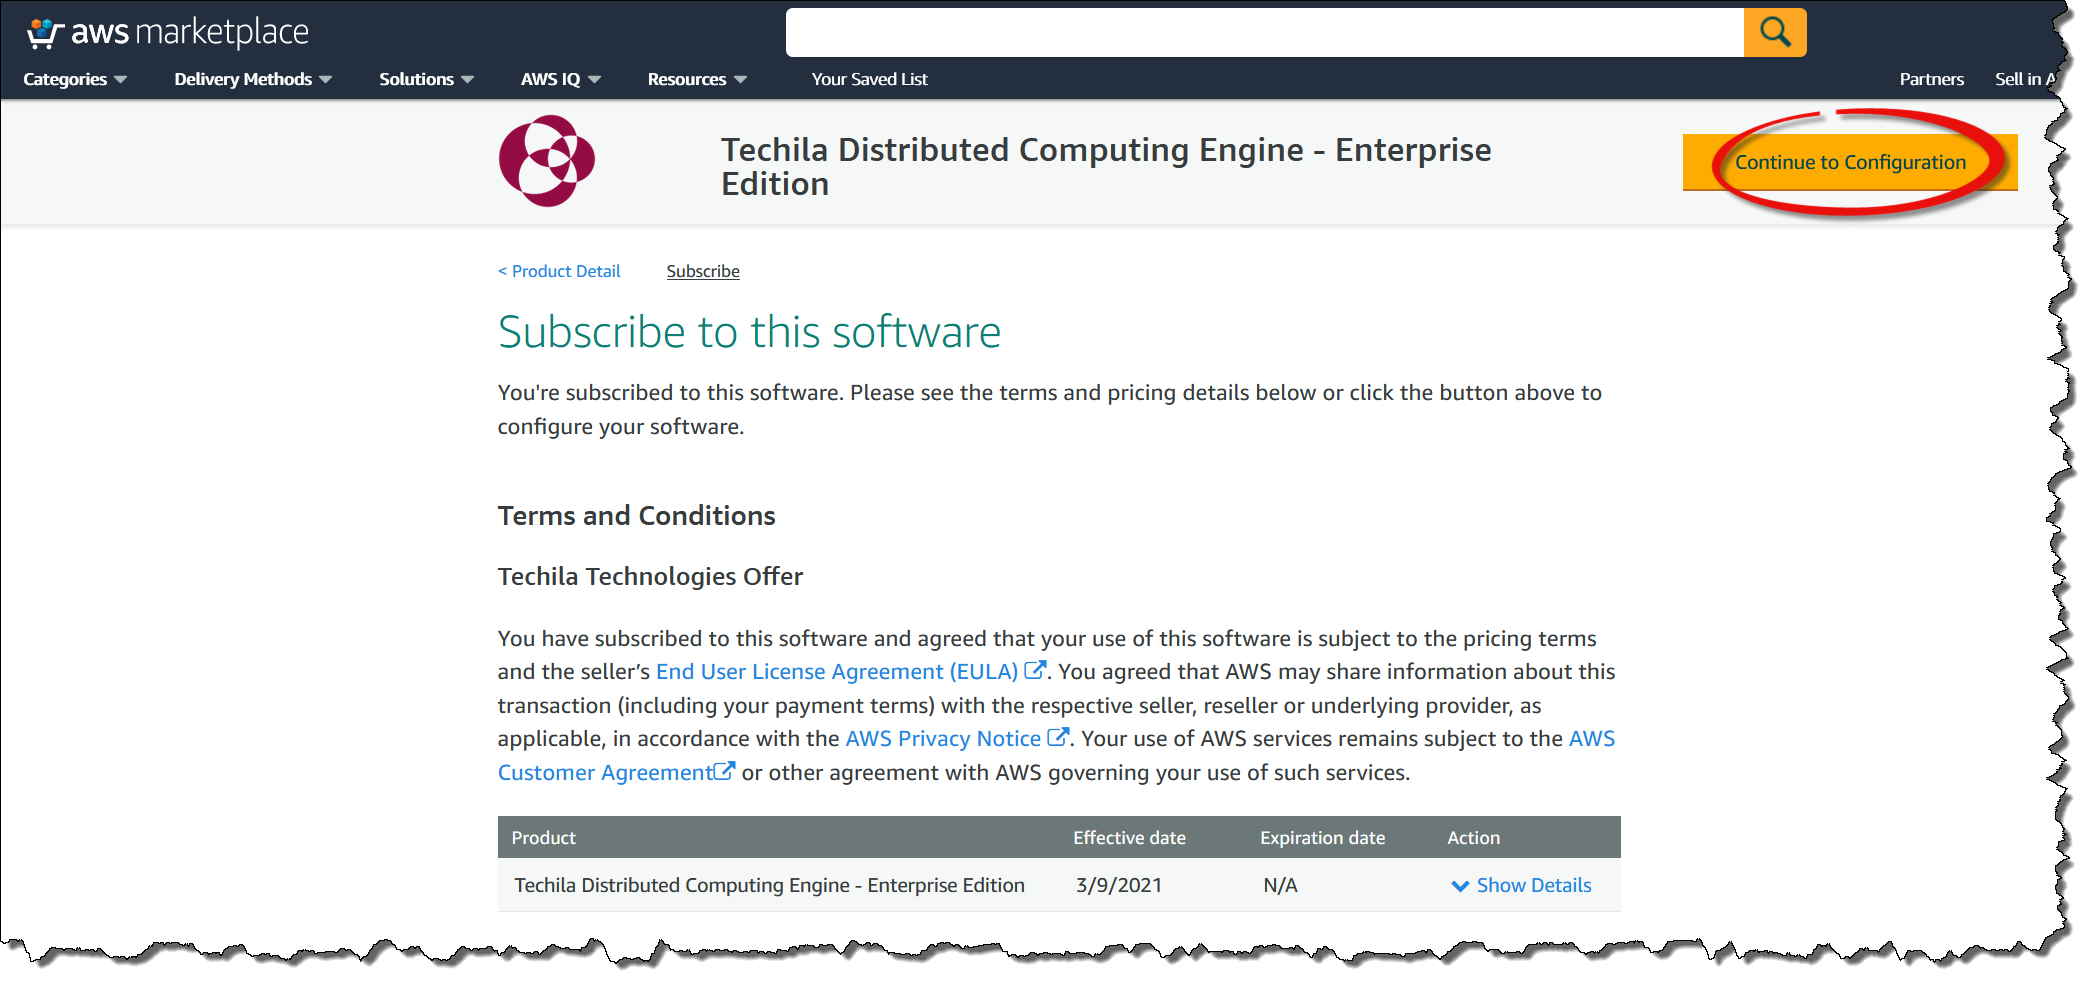
-
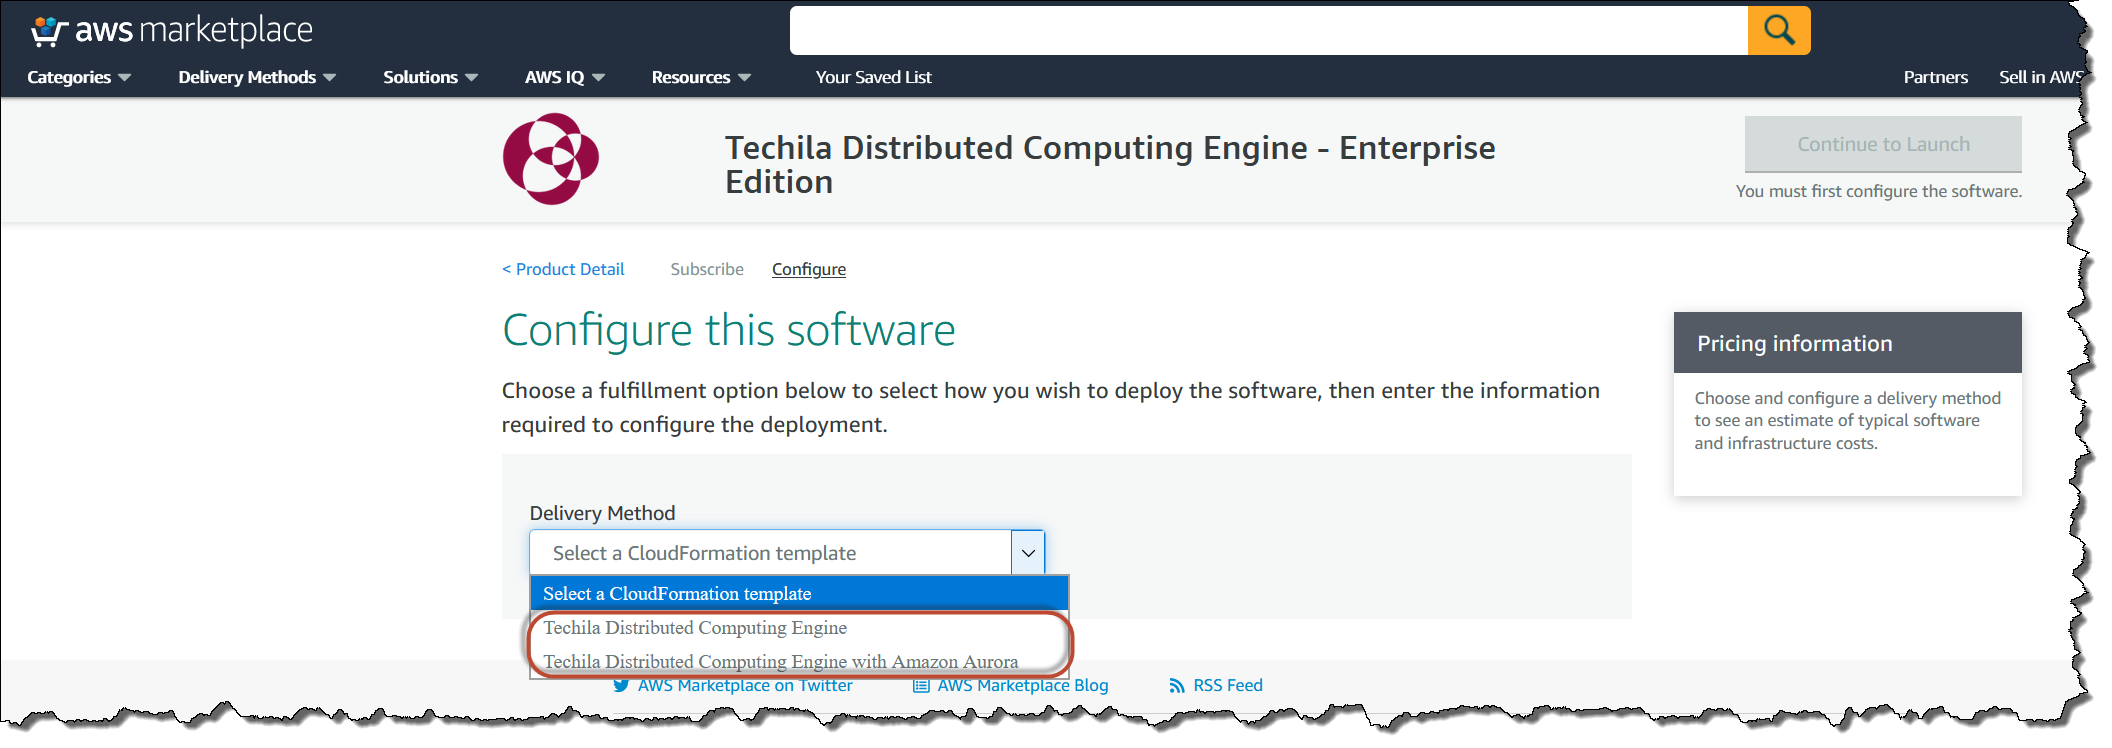
Next, you must select
Techila Distributed Computing EngineorTechila Distributed Computing Engine with Amazon Aurora. If you chooseTechila Distributed Computing Engine, a PostgreSQL database will be used to store the Techila Server data on the Techila Server’s EBS volume. If you select theAmazon Auroraoption, Aurora RDS will be used to store the Techila Server data.Note! Aurora RDS is not available in the following regions:
-
eu-north-1
-
ap-east-1
-
sa-east-1
-
me-south-1
-
us-gov-west-1
-
us-gov-east-1
If you want to use TDCE in these regions, you need to select
Techila Distributed Computing Engine. You cannot useAmazon Aurora.Amazon Aurora has several benefits, including being fully managed, meaning you do not need to update the system manually. More information about Amazon Aurora can be found in the following link:
-
-
After selecting the Delivery Method option, you will be presented with new dropdown menus that allow you to choose the
VersionandRegion. Unless otherwise specified, it is always recommended to use the latest version. The region can be selected to match your geographical location and other usage criteria.After selecting the version and region, click the
Continue to Launchbutton.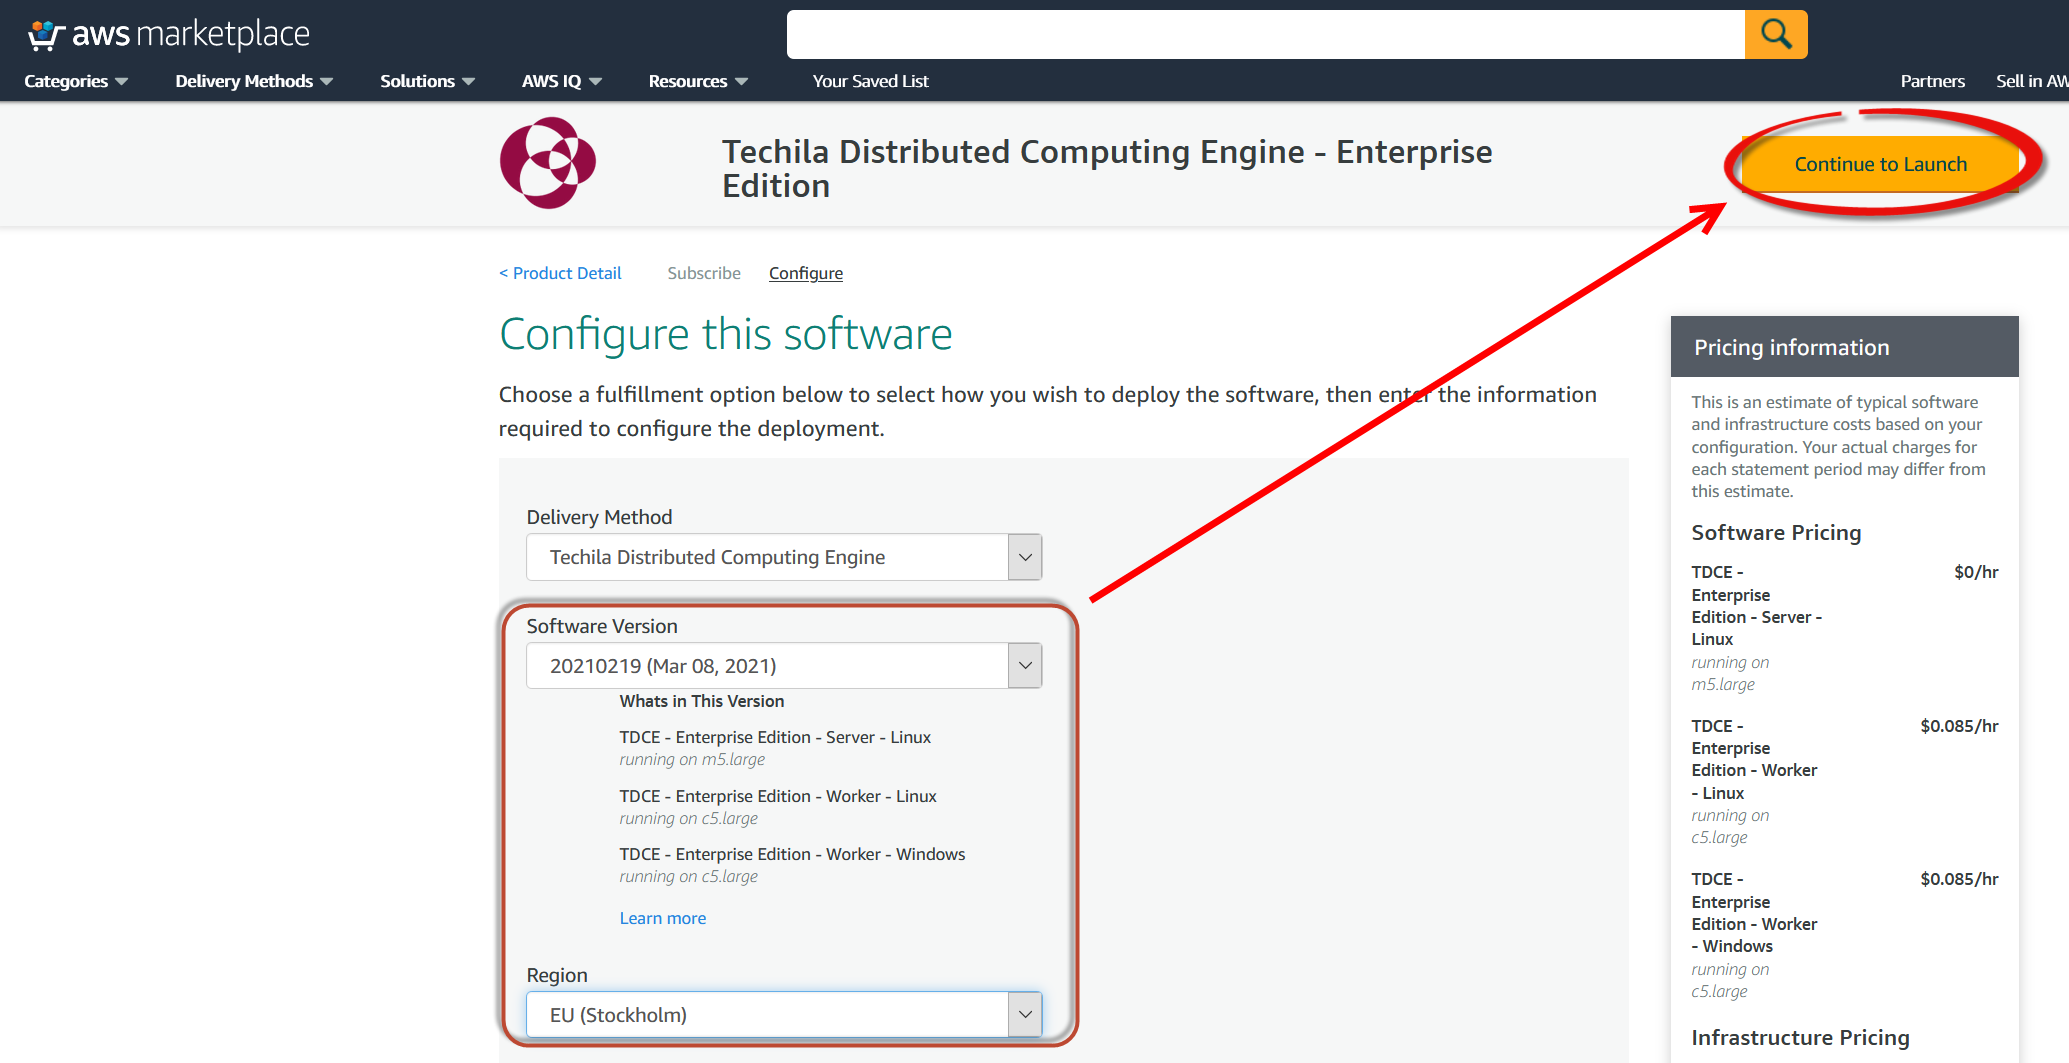
-
Review your settings and click the
Launchbutton.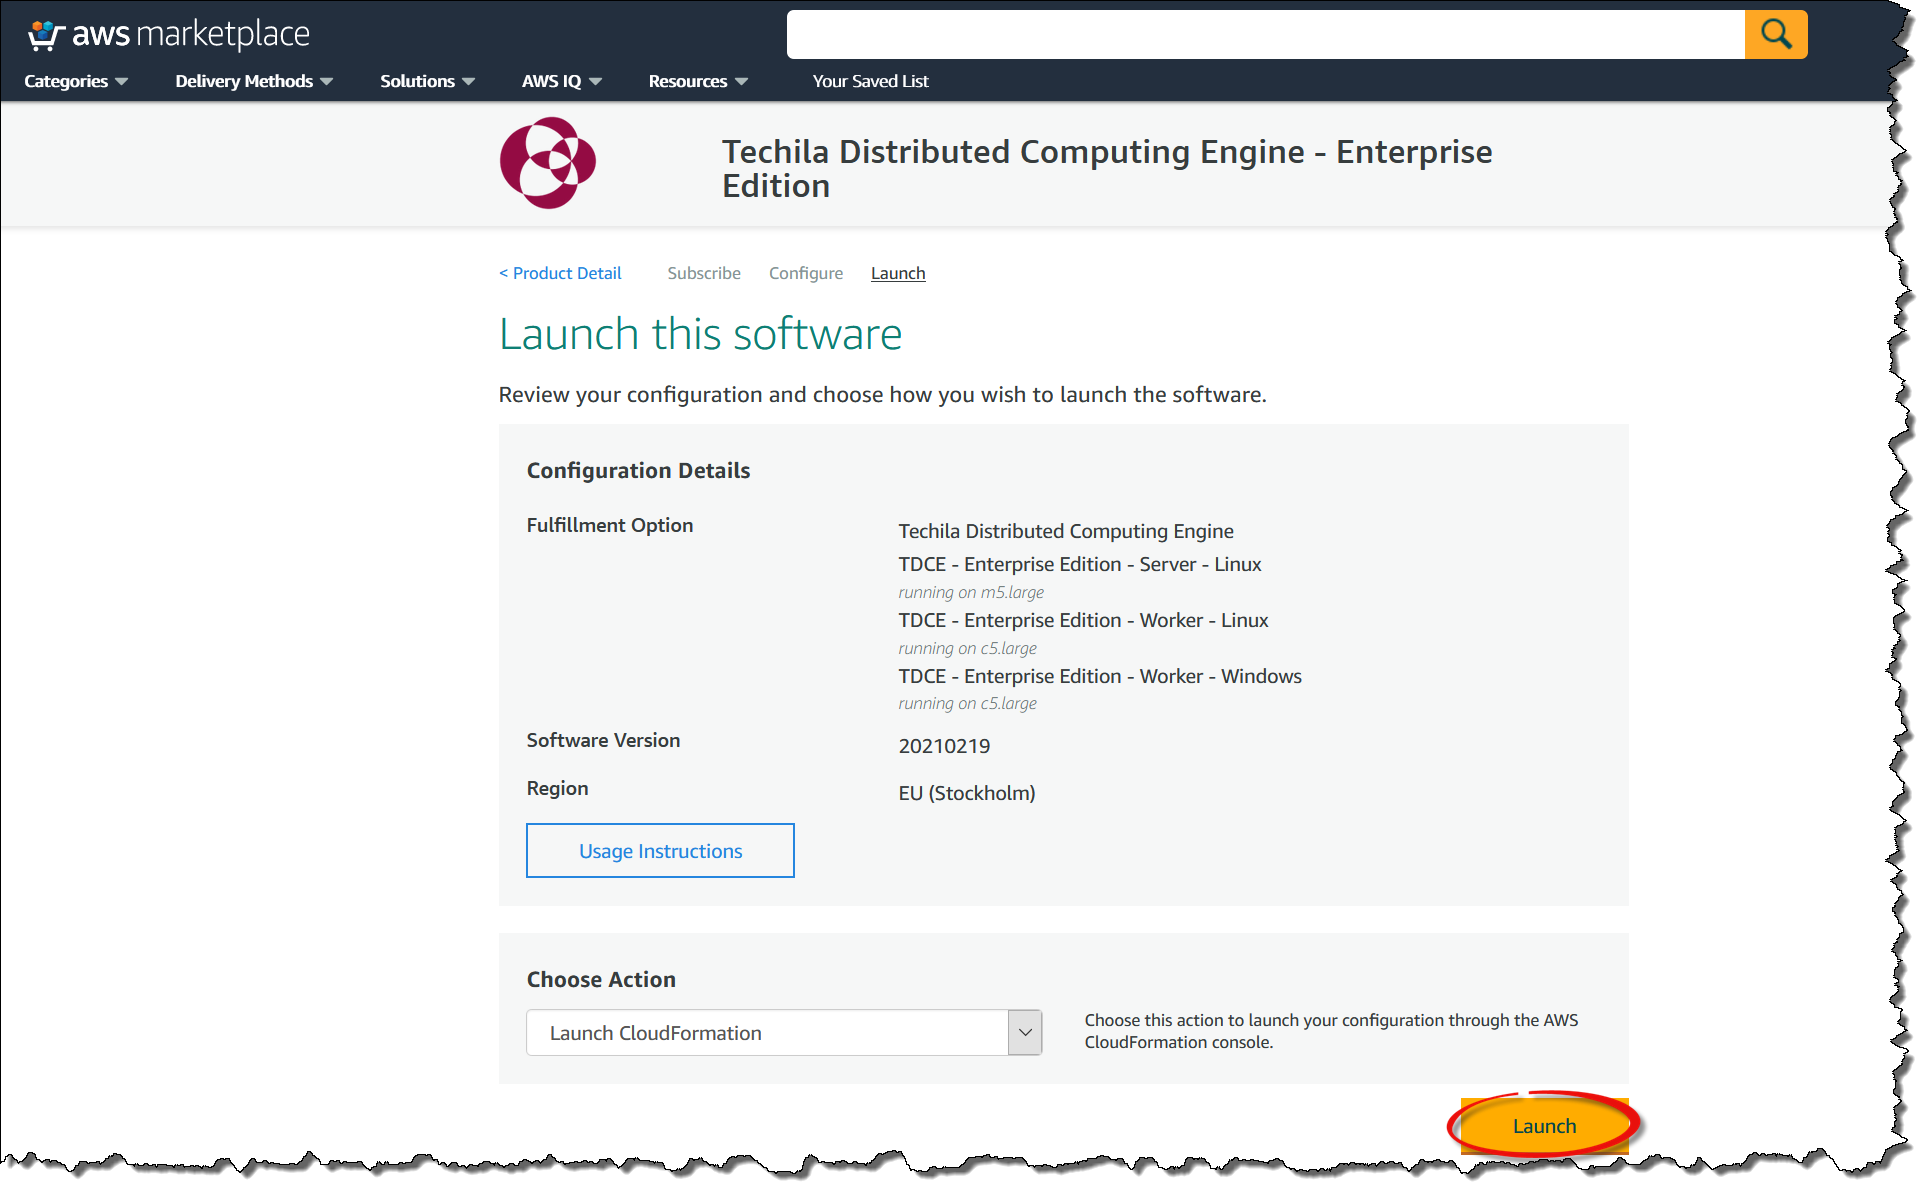
-
The following steps include filling out the CloudFormation template that will be used to deploy the environment. Click the
Nextbutton to continue.
-
The fields in the CloudFormation template will differ slightly depending on whether you chose the
Techila Distributed Computing EngineorTechila Distributed Computing Engine with Amazon Auroraoption earlier. Using the CloudFormation template, you must define a name (1in the screenshot) for the stack and choose the SSH key (2in the screenshot) you want to use. After creating the SSH key, store it in a secure location so you can use it to establish an SSH connection if required.You will also need to define a password (
3in the screenshot) that you will use to access the Techila Dashboard. Please note that when defining any of the passwords, you cannot use punctuation characters defined in the AWS SecretsManager documentation, in theExcludePunctuationsection.If you do not have an AWS SSH key, you must create (or import) a key to select it in
2. SSH keys can be used to establish an SSH connection to the Techila Server or Techila Workers. Establishing SSH connections is not typically needed during normal usage but can be helpful when troubleshooting. Instructions for creating an SSH key can be found using the link below:This SSH key will allow you to establish an SSH connection to the Techila Server or Techila Workers with a Linux operating system. This is typically only needed when performing troubleshooting. Normal usage does not require establishing any SSH connections to either the Techila Server or Techila Workers.
After setting the values, click
Nextto continue to the next page.Note The default recommended EBS volume size for the Techila Server is 1024 GB. This EBS volume will store the output data generated during computational Projects. If you already know that you plan on running computational projects that create a large amount of output data, you can increase the size of the volume by entering a bigger number in the field. The volume type will always be gp2.
Tip! The size of the Techila Server can be increased or decreased depending on your computational workload profile and the number of Techila Workers you plan on starting. Suppose you plan on running large-scale computations using a large number of Techila Worker cores (over 10,000). In that case, it is recommended that you provision a larger instance for the Techila Server using the
Techila Server instance typefield.
-
On this page, everything can left at the default values. Click
Nextto continue.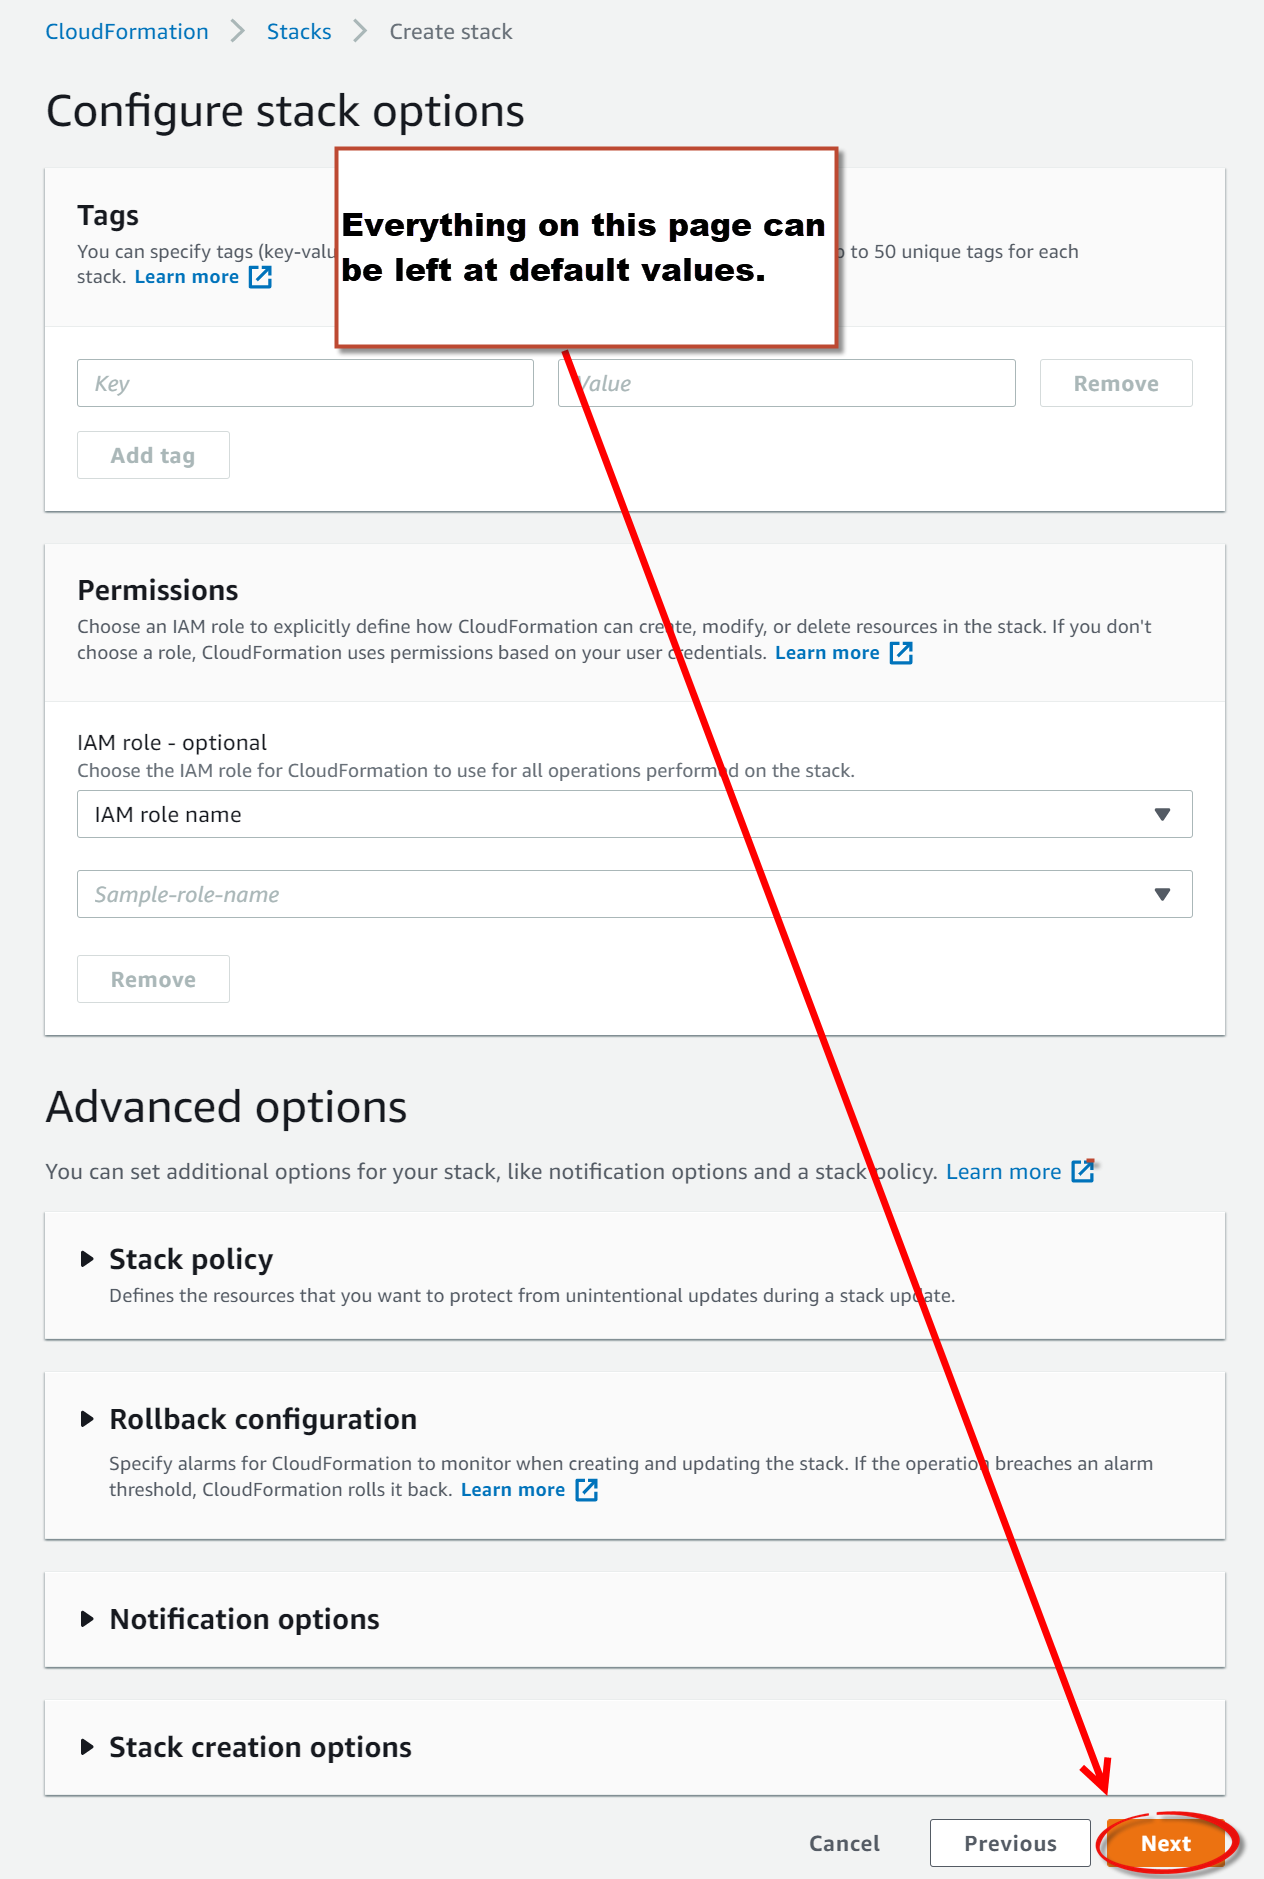
-
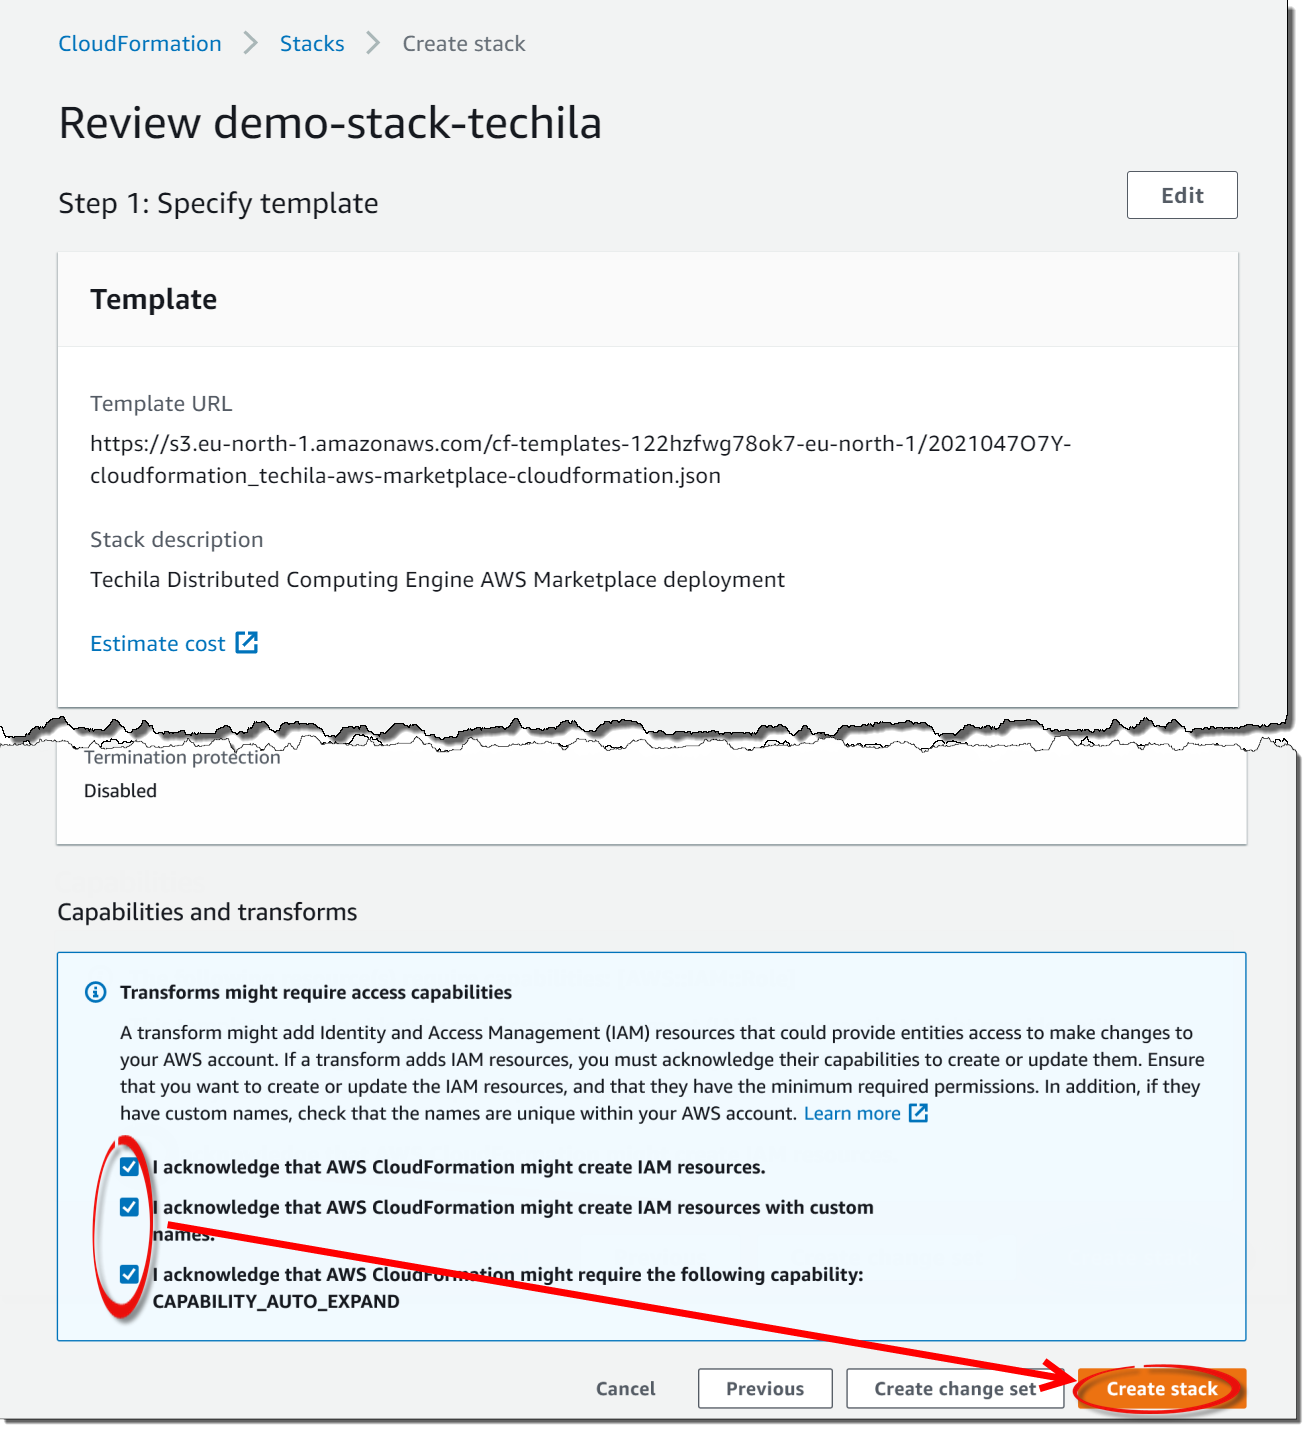
On the final page, you must check the checkboxes at the bottom and click
Create Stackto create the stack.This step of the CloudFormation template contains Identity and Access Management (IAM) resources that are used to enable Techila Worker S3 access; Techila Server functionality used to start and stop computational capacity; and to clean up and delete any files from the S3 storage when you delete your TDCE deployment.
These IAM resources follow the principle of least privilege for all access granted as part of the deployment. You do not need to create any additional IAM resources manually.
The IAM Roles created by the deployment and their purpose are:
- TechilaS3DeleteLambdaRole
-
Used when deleting the whole deployment. This gives the lambda function permission to delete objects in the TechilaS3Bucket (bundle bucket) before deleting the bucket itself. Without this permission the bucket cannot be emptied and thus cannot be removed.
- TechilaServerRole
-
This role is used by the Techila Server to give necessary permissions to start, stop and manage the Techila Workers using Auto Scaling Groups. It also gives Techila Server permissions to use TechilaS3Bucket for file transfer to the Workers. When using Aurora RDS, this role is also utilized to fetch the secrets (hostname, username and password) from the Secrets Manager to access the Aurora database.
- TechilaWorkerRole
-
This role is used by the Techila Workers to access the TechilaS3Bucket to fetch bundle files.
If you are interested in learning more about the best practices related to IAM, please see the following links:
-
The view should now automatically change to display information about the stack creation process. This process can take several minutes.
Please note that the page may not refresh automatically. You will need to refresh the page to update the information displayed manually.
A message stating
CREATE_COMPLETEwill be displayed when the deployment is complete.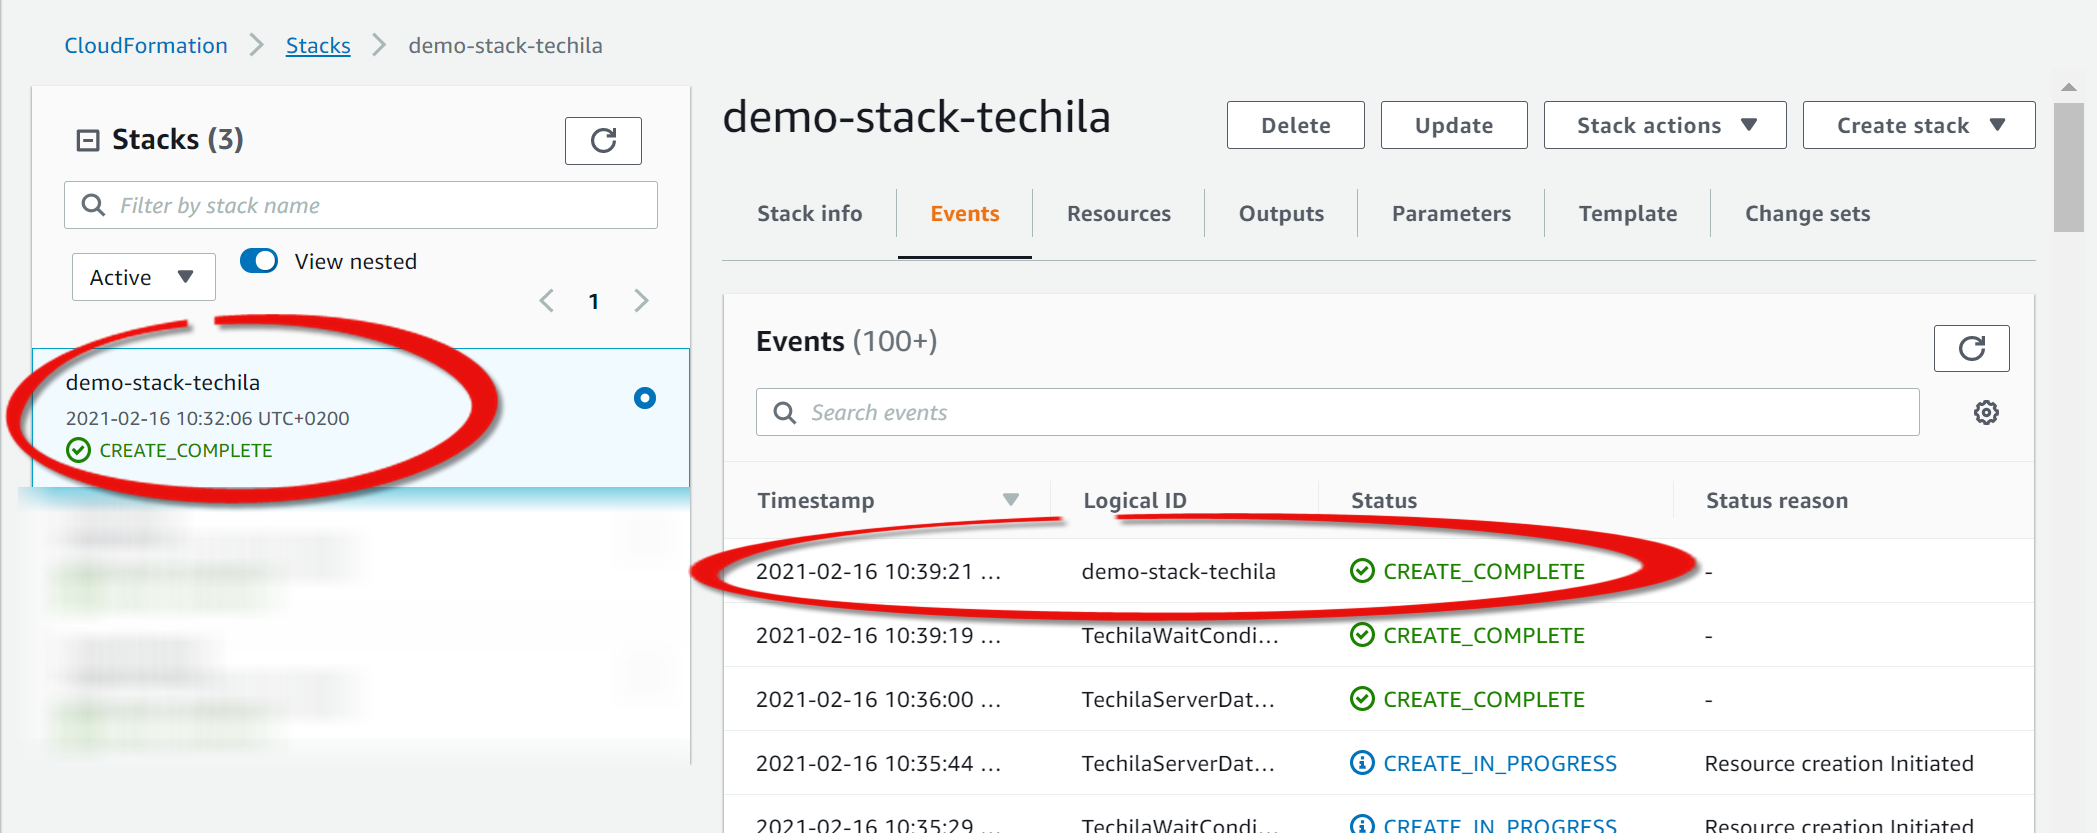
-
Before proceeding, you will need to subscribe also to the Techila Worker images. This can be done using the following links:
-
https://aws.amazon.com/marketplace/pp/prodview-47et3r36j7hqa
-
https://aws.amazon.com/marketplace/pp/prodview-pwqg4edp4ntos
Subscribe to these product and accept the terms just as above for the Techila Server in steps 1-4. But do not proceed to launching the worker images individually. To launch worker, use the Techila Dashboard on the Techila Server as described below.
-
-
Please continue from Accessing the Techila Dashboard from the Post Deployment Page, which describes how to log in to the Techila Dashboard for the first time.
3.2. Accessing the Techila Dashboard from the Post Deployment Page
This chapter contains instructions on logging in to the Techila Dashboard from the post-deployment page after starting the Techila Server for the first time.
Please note that the steps in this chapter assume that you are accessing the Techila Dashboard for the first time after starting the Techila Server as described in Starting the Techila Server Instructions on how to access the Techila Dashboard without the post-deployment page can be found in Accessing the Techila Dashboard.
-
Click on the URL displayed in the
Outputstab.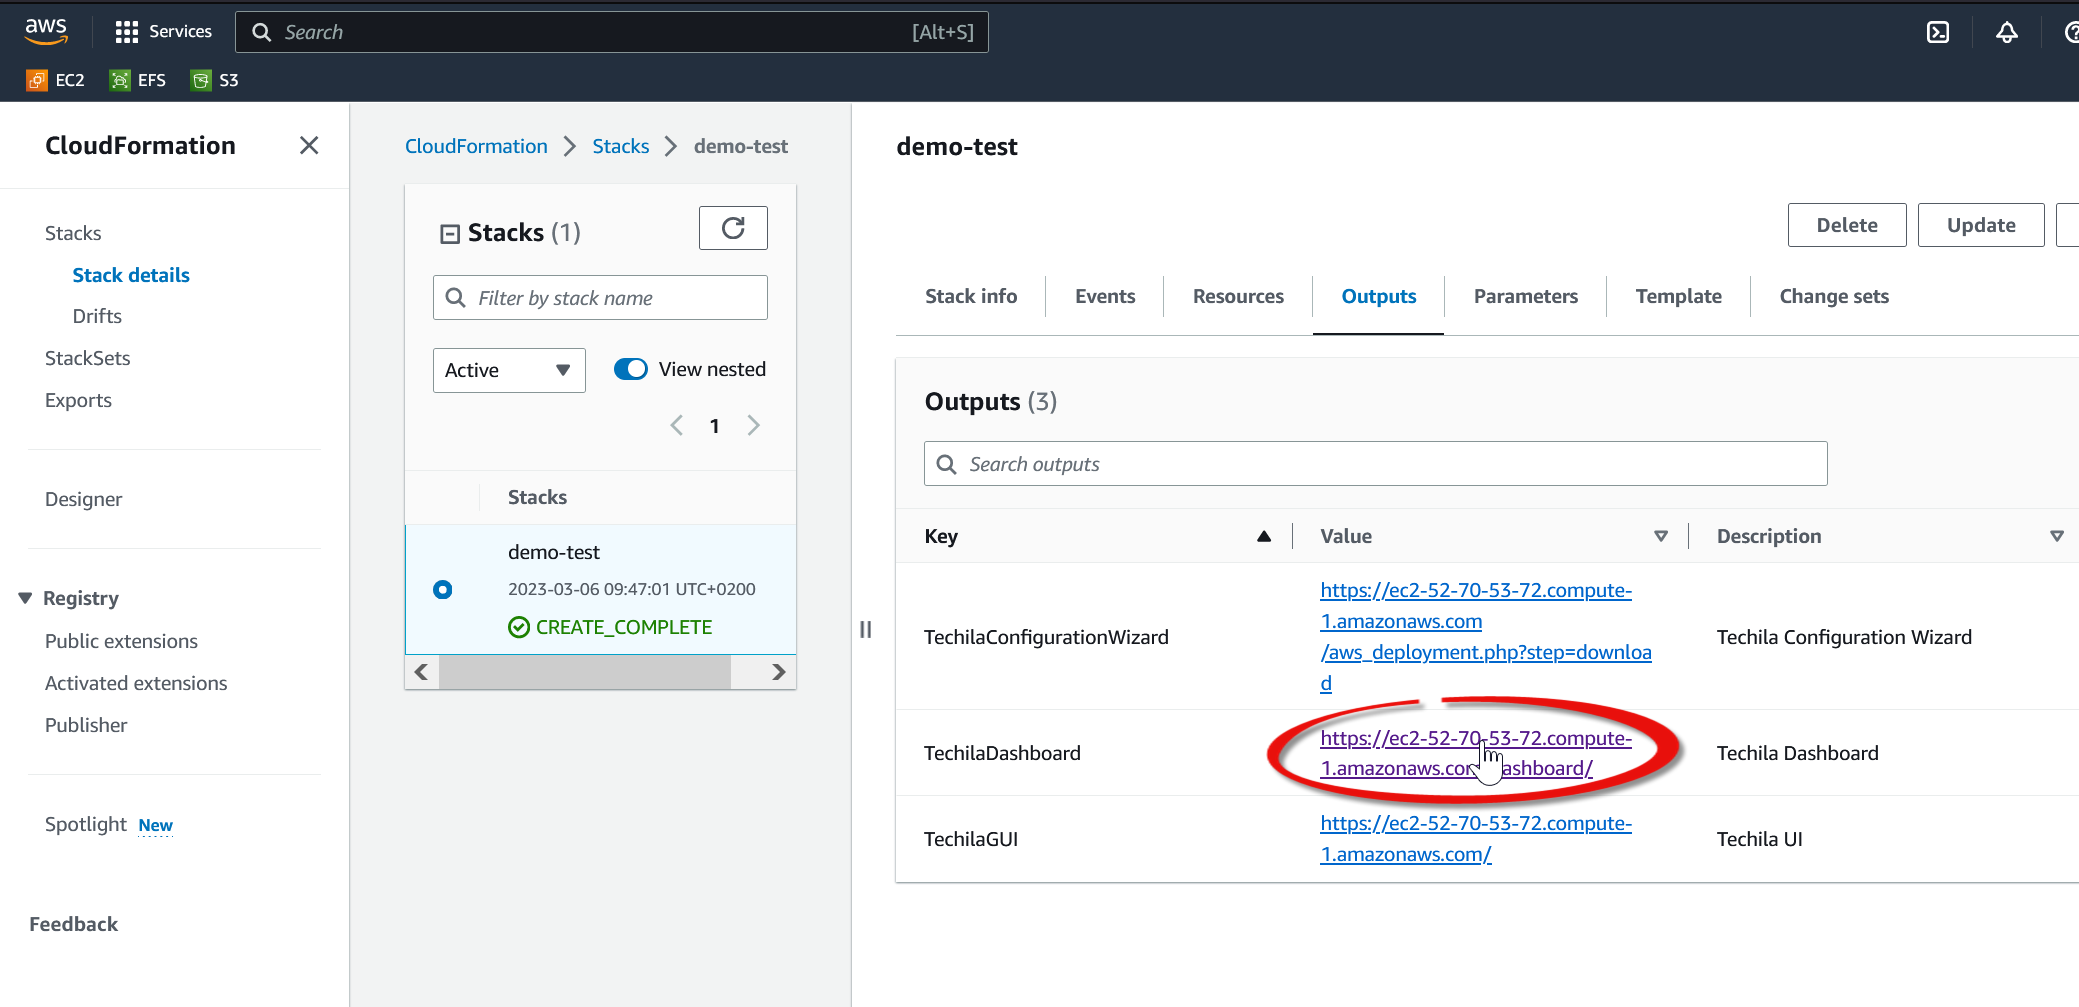
-
Opening the Techila Dashboard might display a credential warning. The appearance of the warning will depend on what browser you are using. Accept the certificate and continue.

-
Enter
adminas the username. In the password field, enter the password you defined when creating the stack. Click theLog inbutton to log in.
After logging in, you will be presented the first page of the Techila Dashboard. This page will be used to download the application plugins (delivered in a file called TechilaSDK.zip) from the Techila Server. This is described Downloading and Configuring the Application Plugins.
3.3. Downloading and Configuring the Application Plugins
This chapter contains instructions for downloading the application plugins to your computer. These application plugins will enable you to push computational workload from your computer to Techila Distributed Computing Engine.
The application plugins are delivered in a file called TechilaSDK.zip. In addition to containing the application plugins for, e.g., MATLAB, Python, and R, the TechilaSDK.zip contains ready-to-run examples for various programming languages. The application plugins package is also referred to as the "Techila SDK".
Please note that as long as you keep using the same TDCE deployment, the Techila SDK only needs to be downloaded and installed once. After doing it once, you can click the "Continue" buttons in steps 1/3 and 2/3 in the Techila Dashboard to skip them to reach step 3/3.
Note! The Techila SDK can be installed on a machine with a Linux or Microsoft Windows operating system. The Mac OS X operating system is not supported.
Note! The steps described in this chapter assume you have logged in to the Techila Dashboard. If you have not logged in, please log in to the Techila Dashboard before continuing.
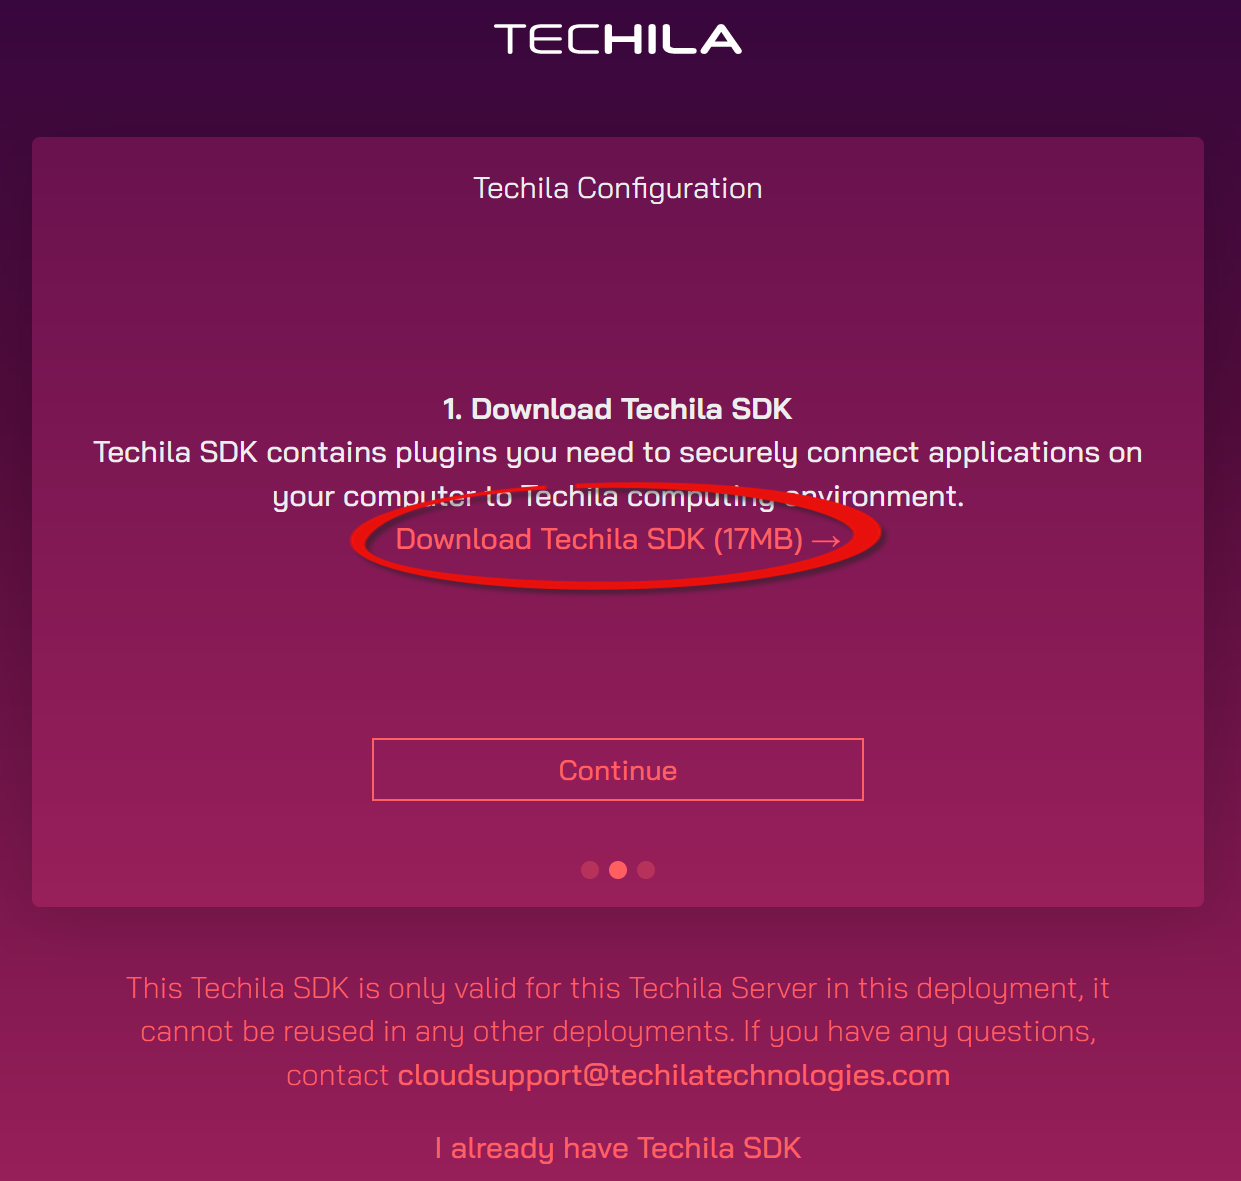
-
On the first page of the Techila Dashboard, click the highlighted link to start downloading the application plugins (TechilaSDK.zip) to your computer.
-
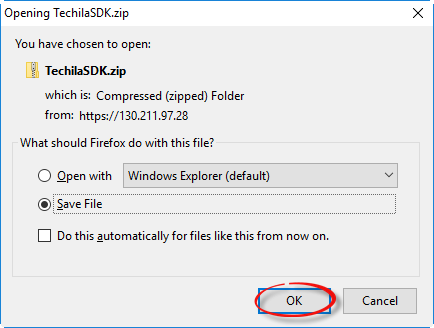
Save the TechilaSDK.zip file on your computer.
-
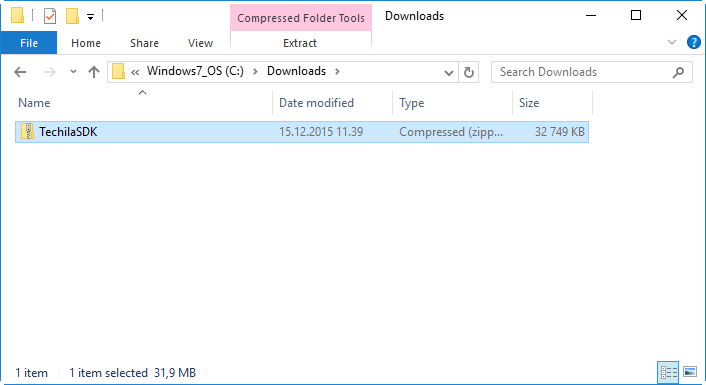
Wait for the download to complete. After the download has been completed, you should have a file called 'TechilaSDK.zip' as illustrated in the example screenshot below. Please note where you saved the file, as you will need it when configuring the application plugins in the following steps.
In the example screenshot below, TechilaSDK.zip has been saved to 'C:\Downloads'.
-
Select your web browser and click the
Continuebutton.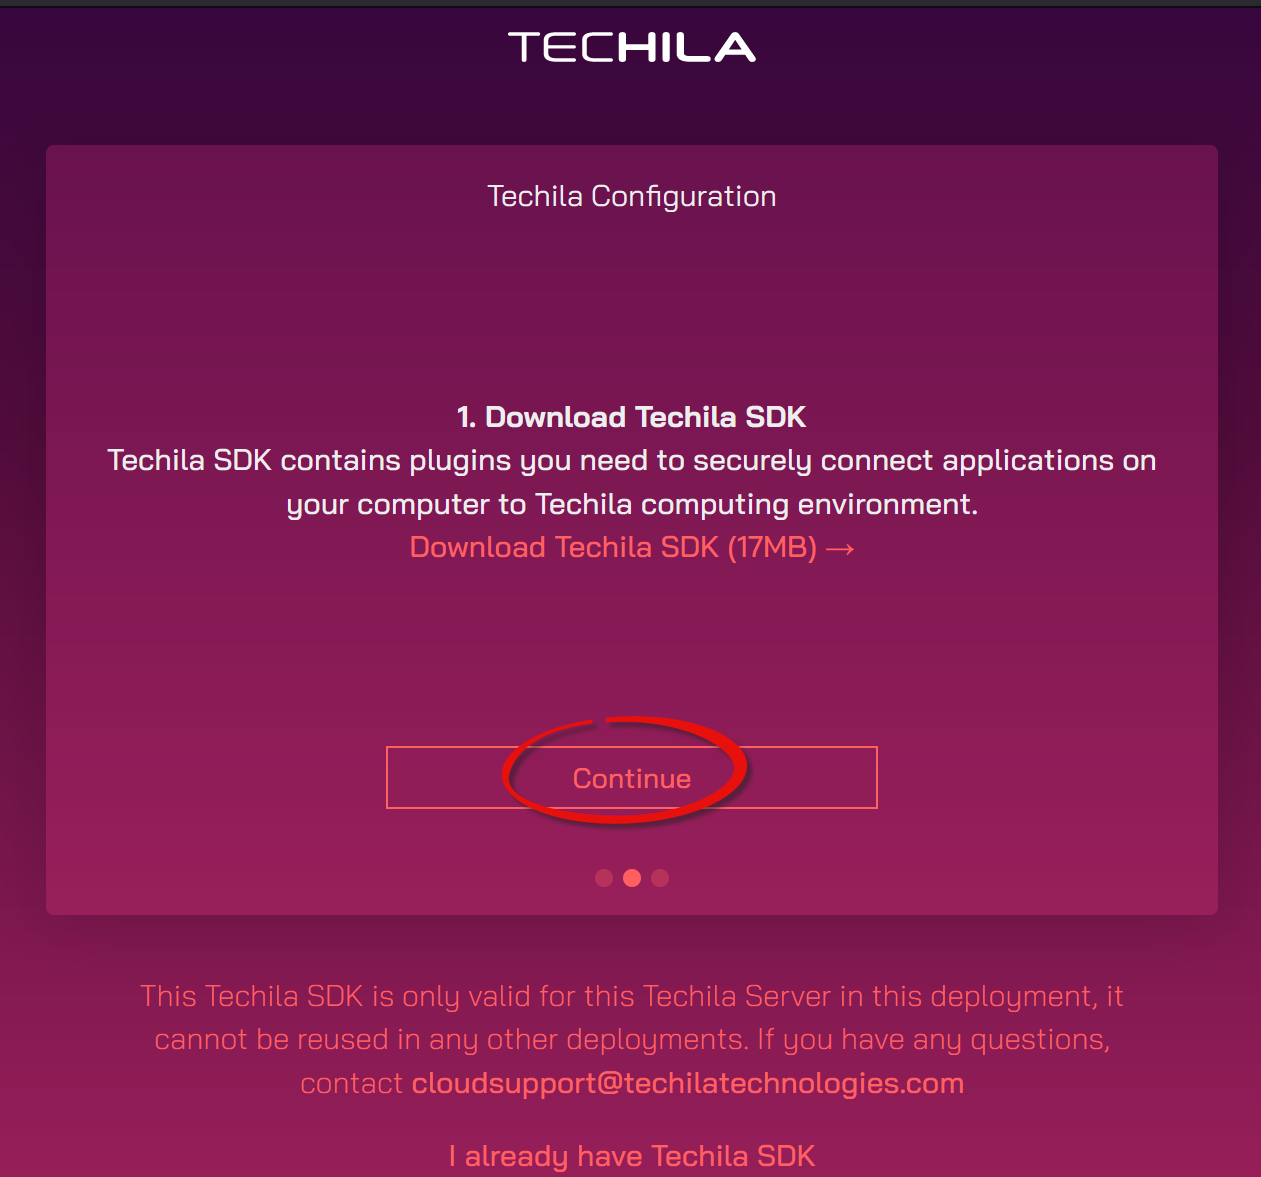
-
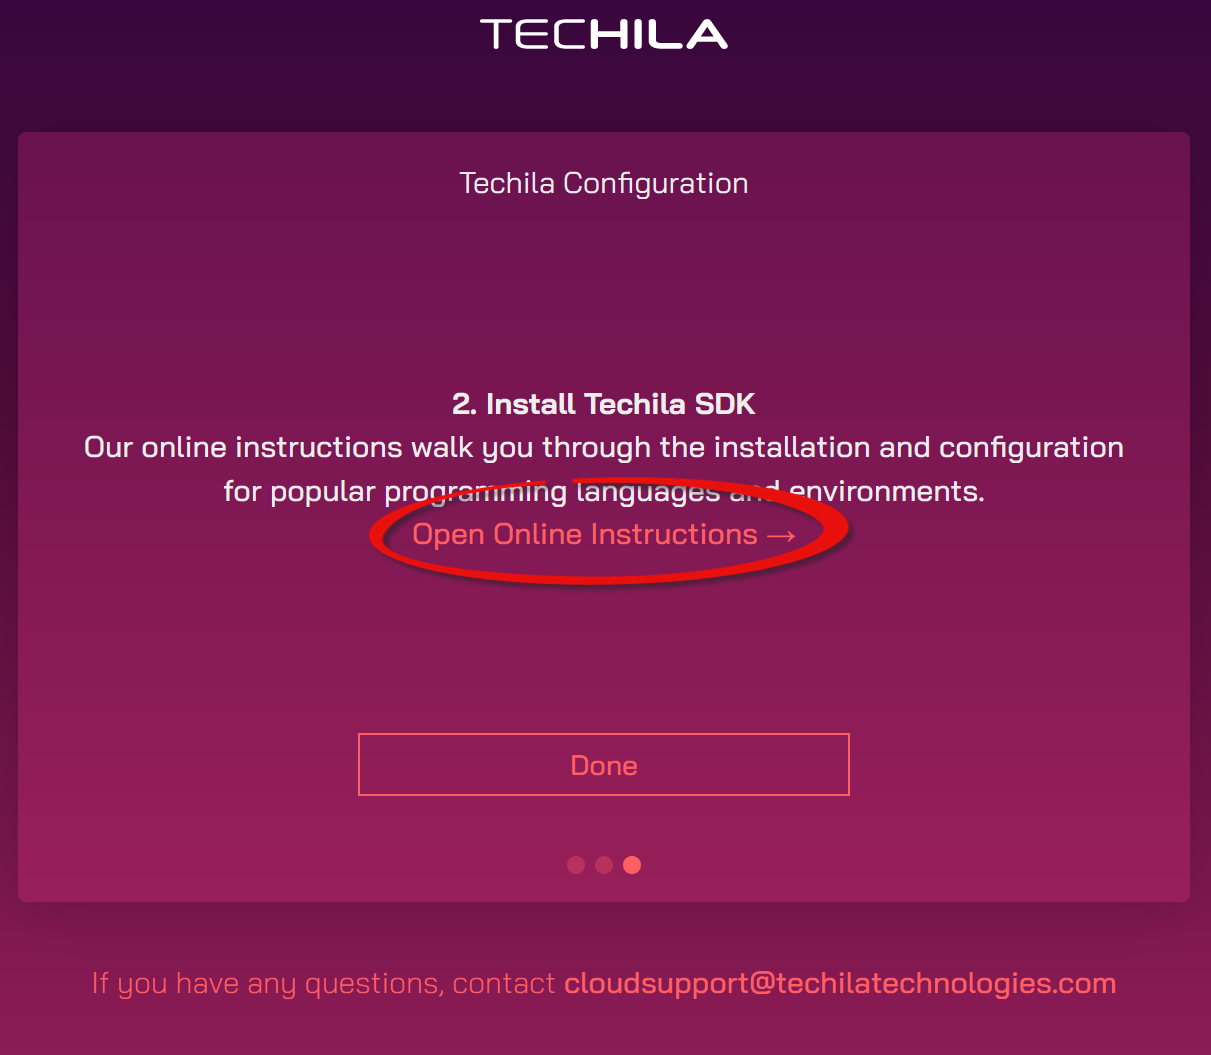
After clicking the
Continuebutton, the second page of the Techila Dashboard will be displayed. This page contains a link to a help page, which contains instructions on configuring the application plugins on your computer.Click the highlighted link to open a help page containing links on configuring the application plugins on your computer.
Please follow the instructions on the help page to configure the application plugins for the programming language you are using before continuing.
The table below contains the direct links to programming language-specific instructions describing the application plugin configuration steps:
Table 3. Configuration Instructions Programming Language Link MATLAB
Python
R
-
After configuring the Techila SDK on your computer, select your web browser and navigate to the third page of the Techila Dashboard using the
Donebutton.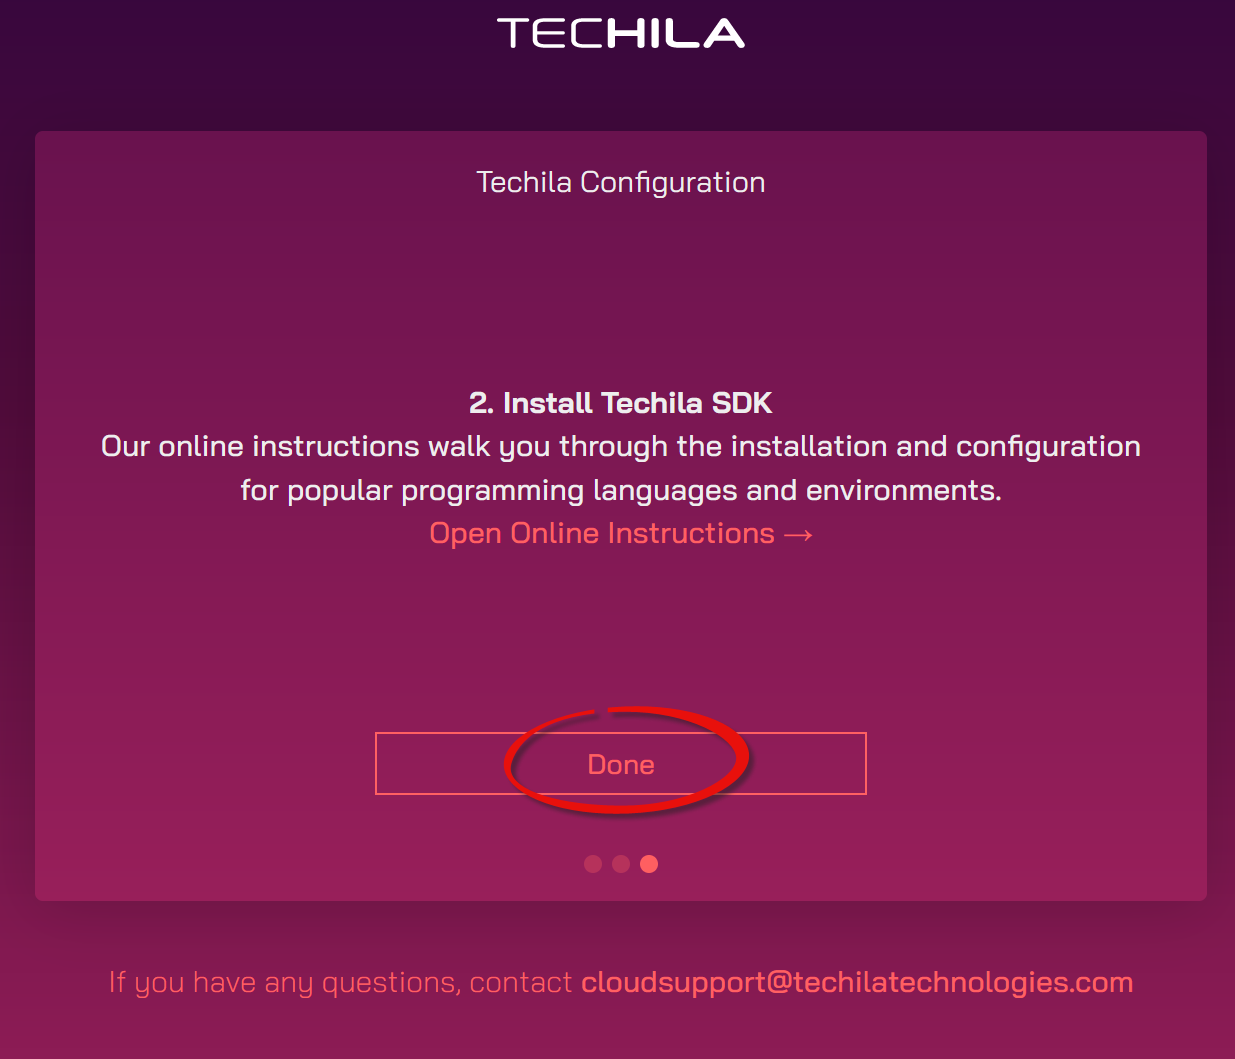
3.4. Increasing Computing Throughput
This chapter describes how to start Techila Workers to increase your computing throughput.
Note As Techila Distributed Computing Engine is purchased via the AWS Marketplace, the Techila Worker software costs are rounded up to the next full hour for each instance. If you deploy 10 Techila Worker instances for 20 minutes, you will be billed for 10 hours of Techila Worker software usage. More details can be found in the following AWS document:
Note! Before starting any Techila Workers, it is recommended that you configure the application plugins as described in Downloading and Configuring the Application Plugins.
The third page of the Techila Dashboard is used to adjust the computing throughput by starting and shutting down Techila Worker VM instances. Tip! Add this page to your browser’s bookmarks to easily access it later.
-
To start Techila Workers, select the Techila Worker VM
instance type, choose theoperating system, and definehow manyTechila Worker VM instances you want to start. When selecting theoperating system, please select the same operating system you use on the workstations where your Techila SDK is installed. For example, if you installed the Techila SDK to a workstation with a Microsoft Windows 10 operating system, please selectWindowsfrom theComputing Environmentmenu.The Techila Worker instance type will need to be selected so it can be used to process your computational workload. For example, suppose you will run a memory-intensive application in TDCE. In that case, it is recommended that you also use instances that have a large amount of memory per CPU core. Workloads that only require a small amount of memory can be processed on machines with a lower memory per CPU core ratio.
Techila Workers will always have a fixed disk size of 50GB, type gp2.
Note! You must not exceed your AWS EC2 instance quota. There are no quota checks in the start process, meaning the system will not work as intended if you try to start more Techila Workers than allowed by AWS EC2 quota. Instructions for viewing quotas can be found in the AWS documentation:
-
After defining the above properties, click the
Startbutton to start the Techila Workers.Suppose you already have Techila Workers that are running. In that case, you can increase (or decrease) the amount of Techila Workers by entering the desired number in the field and clicking the
Update deploymentbutton.Techila Workers will be started when the
Update deploymentbutton is clicked and the action is confirmed.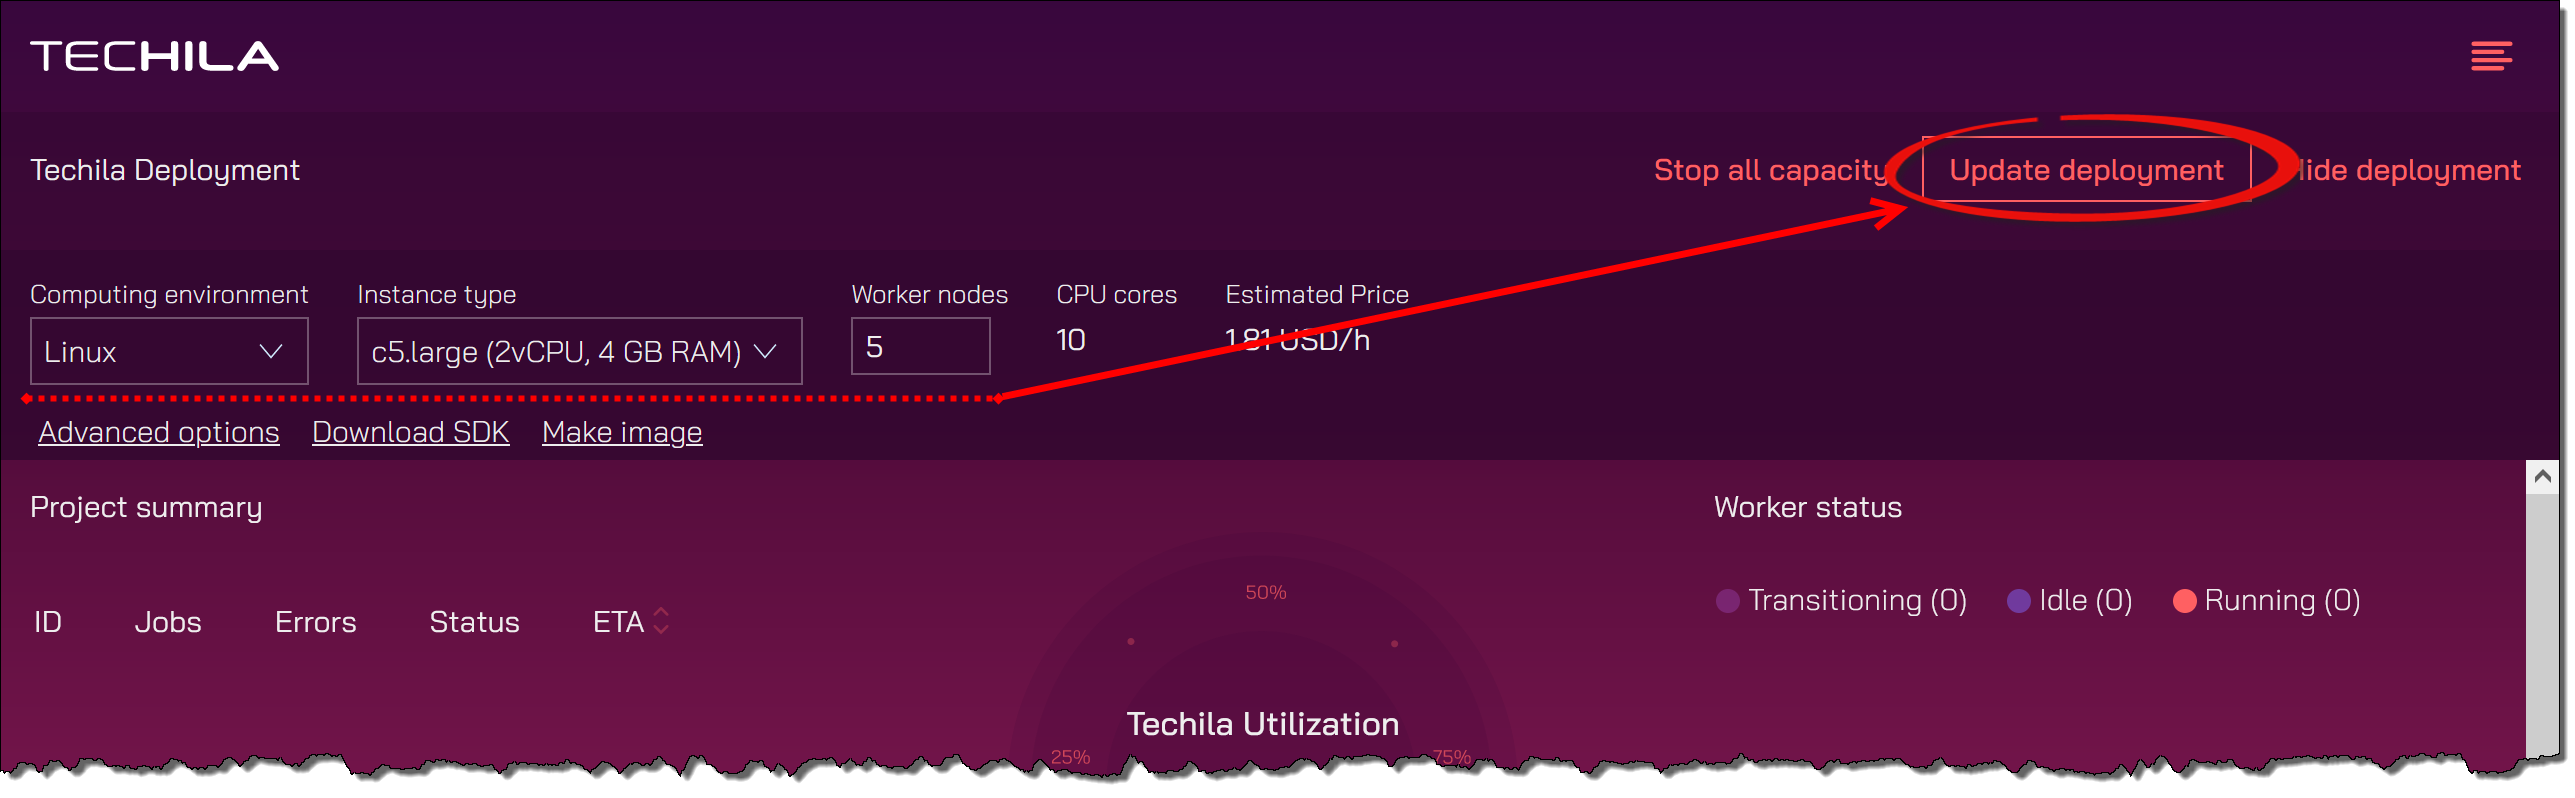
After clicking the button, the deployment process for the Techila Workers will start. After starting, Techila Workers will be displayed under the
Worker statusheading.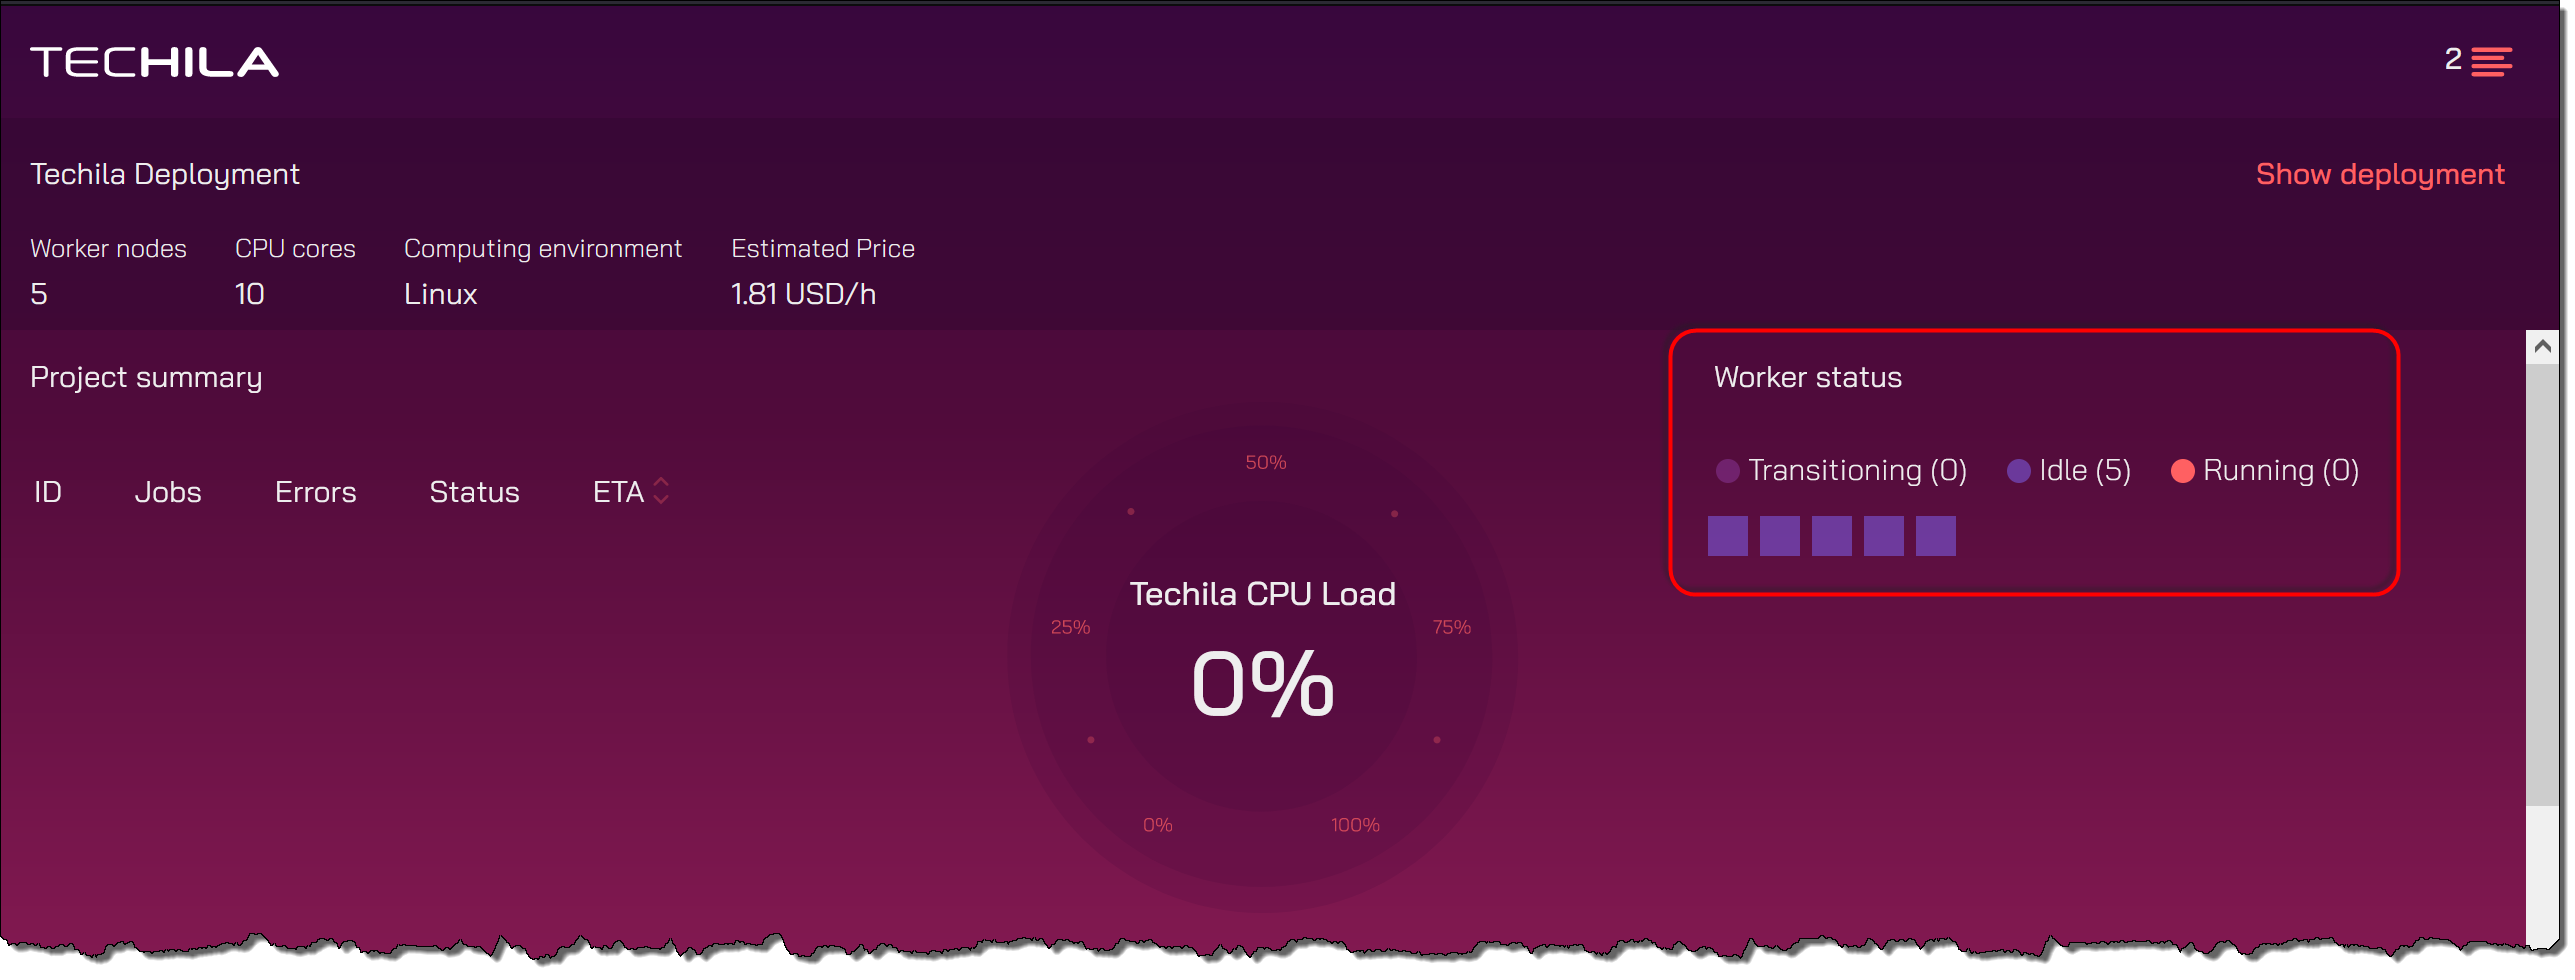
Note! The
Computing EnvironmentandInstance Typedropdown menus will only be enabled when no Techila Workers are running. If Techila Workers are already running, these menus will default to the values used when starting the existing Techila Workers. -
After you have started Techila Workers, EC2 instances will be started in your AWS account and placed in an Auto Scaling group, which will maintain the desired number of instances even if an instance becomes unhealthy.
You can now create a computational Project to test that everything works. You can do this by executing one of the examples included in the Techila SDK. Examples of R, Python, and MATLAB can be found in the following Techila SDK directories:
-
Python examples: 'techila/examples/python'
-
R examples: 'techila/examples/R
-
MATLAB examples: 'techila/examples/Matlab'
The Techila SDK examples contain information on adding Techila Distributed Computing Engine functionality to your application and enabling various Techila Distributed Computing Engine features. Additional information on how to use the Techila Distributed Computing Engine functions from different programming languages can be found using the following links.
-
Techila Distributed Computing Engine with MATLAB
Note! After starting Techila Workers, program-specific runtime components will be transferred from the Techila Server to the Techila Workers during the first Project. Depending on your programming language, the transfer process may take several minutes. After the runtime components have been transferred, they will be stored on the Techila Workers' hard disks until the Techila Worker VM instances are deleted. During subsequent Projects, the runtime components will be used from the Techila Worker’s hard disk, meaning there will be no network transfer delay.
If you delete the Techila Worker VM instances and restart Techila Workers later, the runtime components will need to be re-transferred.
-
-
After verifying that the Techila Distributed Computing Engine environment works as expected, you can continue by adding the Techila Distributed Computing Engine functionality to your application and running it in Techila Distributed Computing Engine.
-
After you have completed processing computational workloads, deleting ALL Techila Worker VM instances is recommended to prevent unnecessary costs from being incurred. Instructions for deleting Techila Worker VM instances can be found in Decreasing Computing Throughput.
3.5. Decreasing Computing Throughput
This chapter contains instructions for decreasing computing throughput, which is done by deleting the Techila Worker VM instances using the Techila Dashboard.
Note! The steps described in this chapter assume you have logged in to the Techila Dashboard. If you have not logged in, please log in before continuing.
If you, at some later point, again wish to perform computations in the Techila Distributed Computing Engine environment, you will need to start new Techila Workers as described in Increasing Computing Throughput
-
Using your browser, open the third page of the Techila Dashboard (the page that was bookmarked earlier). If you did not bookmark the page, navigate to the third page of the Techila Dashboard using the
Continuebutton. -
Click the
Stop all capacitybutton to delete ALL Techila Worker VM instances currently running.Note! If you only want to delete some of the Techila Worker VM instances, enter a smaller value in the
Number of Worker Nodesfield and click theUpdate deploymentbutton. This value should be set to match the number of desired Techila Workers. For example, if you currently have 10 Techila Workers running and you then define value 6 in theNumber of Worker Nodesfield, the number of running Techila Workers would be reduced to 6 when theUpdate deploymentbutton is clicked.Clicking the
Stop all capacitybutton will delete ALL Techila Worker VM instances.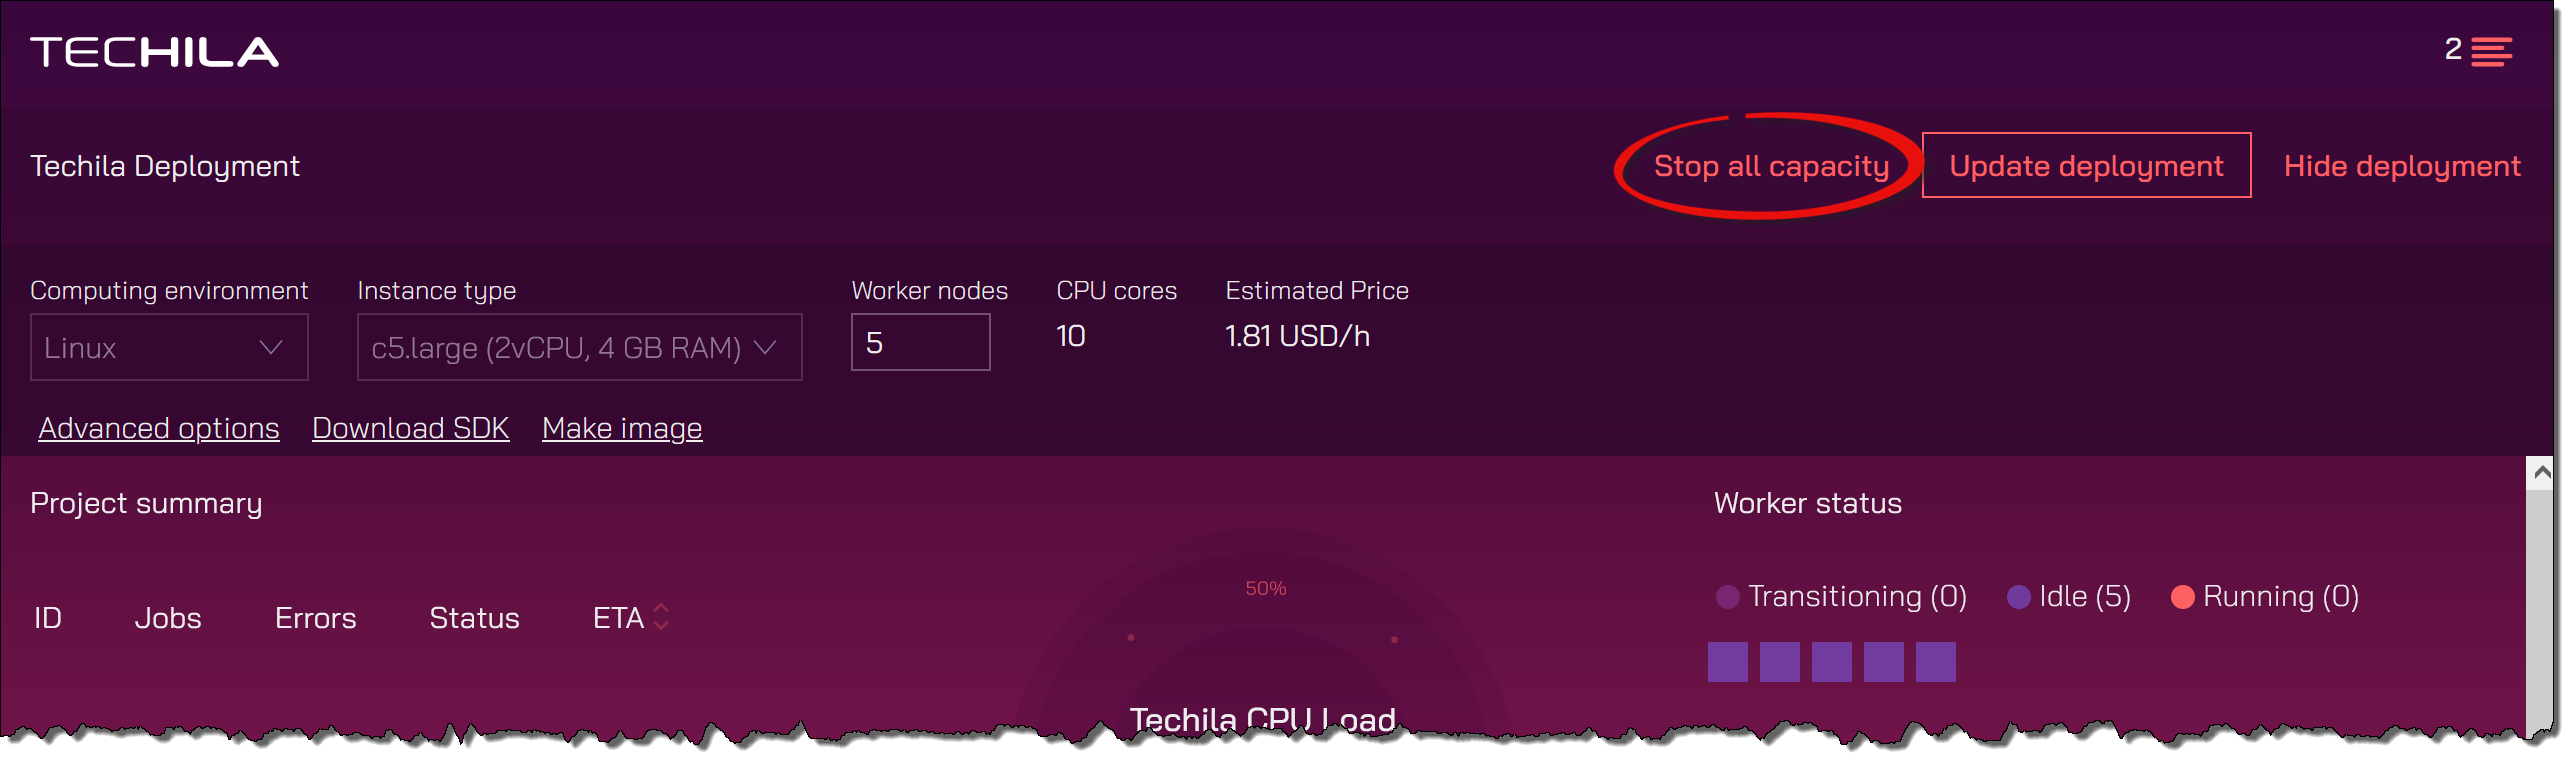
-
After clicking the
Stop all capacitybutton, verify that the Techila Worker VM instances were successfully deleted by doing the checks described in the following steps. -
Open the AWS Management Console
-
Navigate to
EC2and click onAutoscaling Groups. Verify that there are no TDCE-related autoscaling groups. If autoscaling groups exist, delete them using the AWS portal’s delete functionality. The example screenshot below shows the view when no autoscaling groups exist.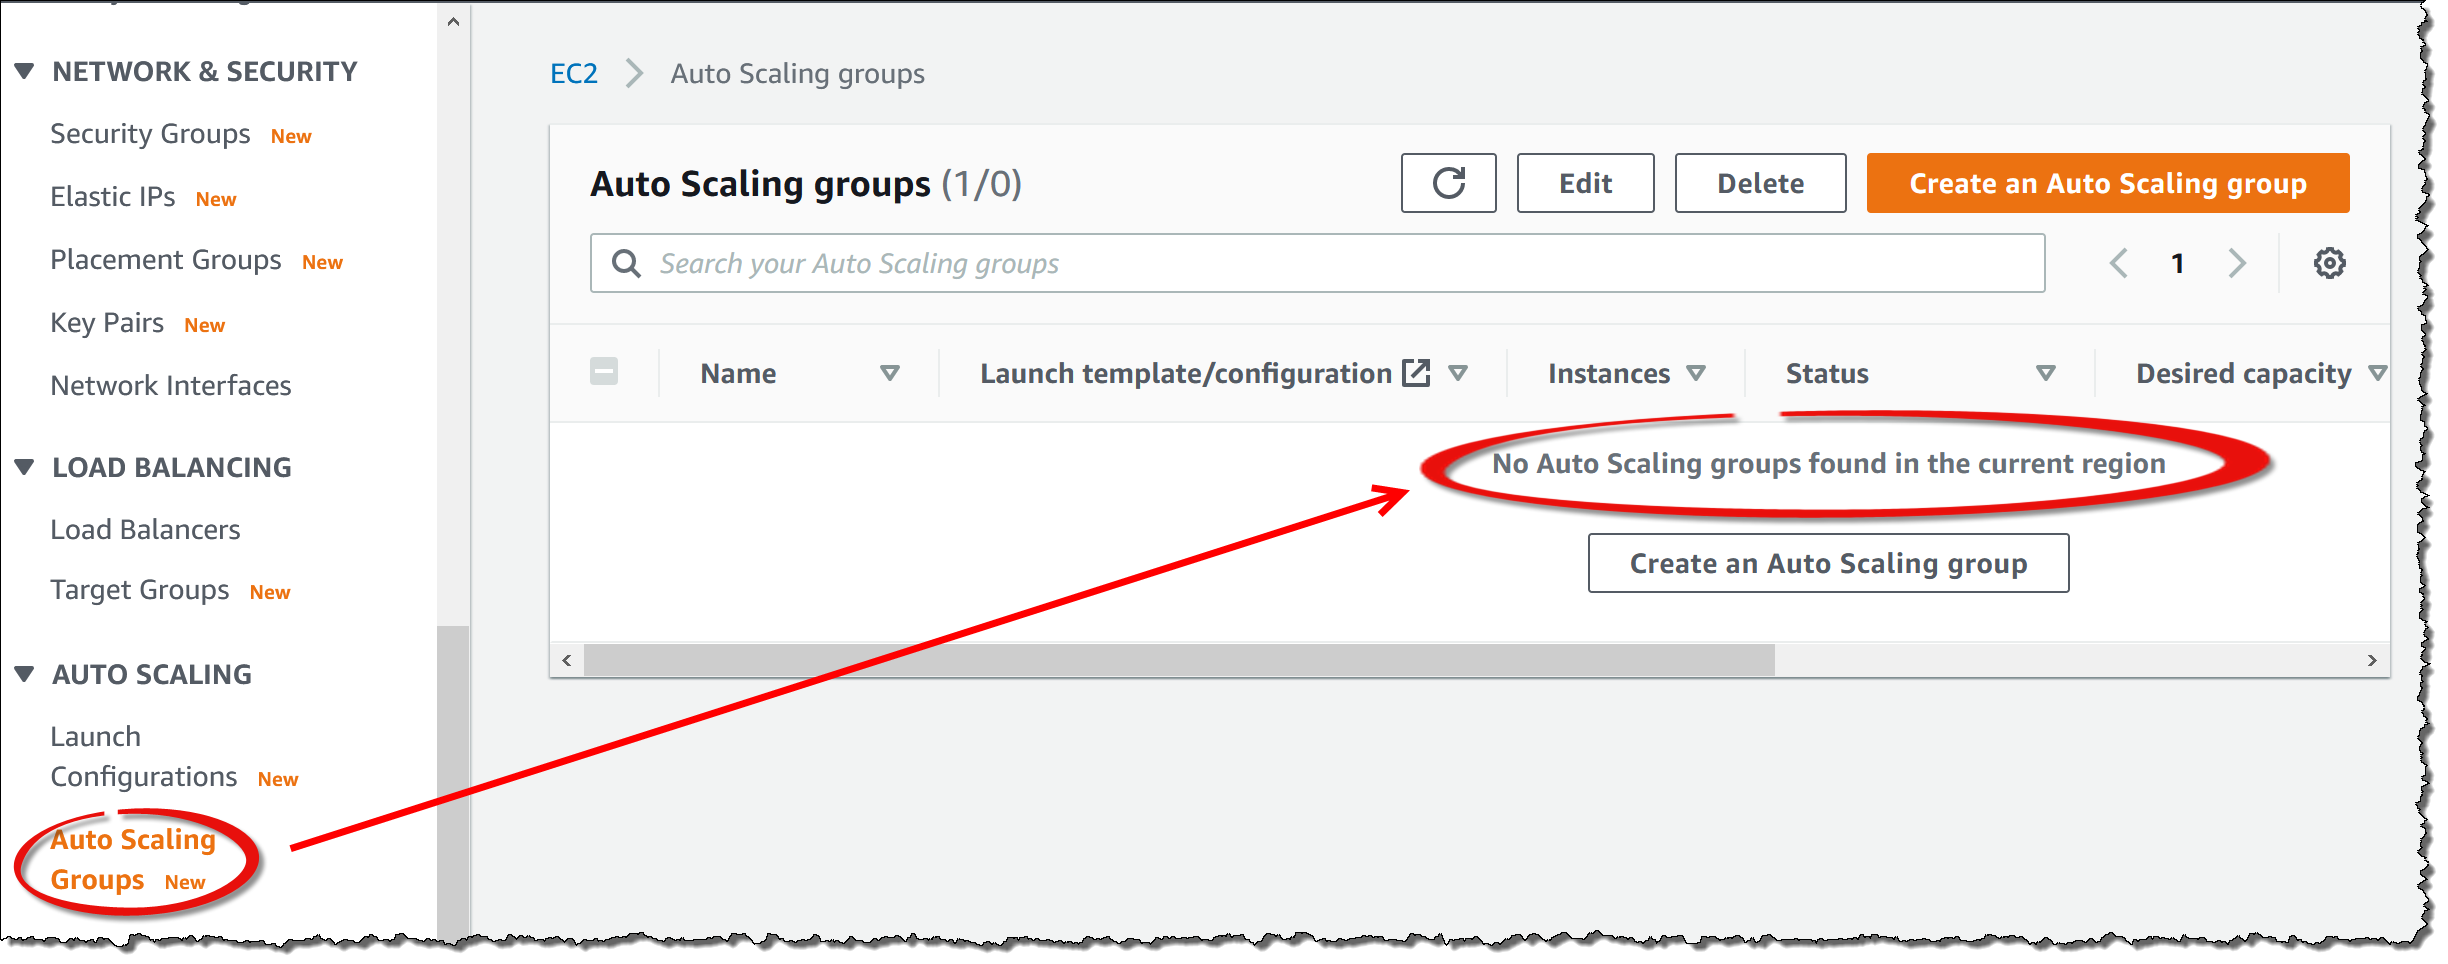
3.6. Stopping the Techila Server
This chapter contains instructions for stopping the Techila Server VM instance using the AWS Management Console. Stopping the Techila Server VM instance will not remove any critical data from the Techila Server. If you stop the Techila Server VM instance, you will be able to restart it at a later time.
Note! When stopping the Techila Server, using the Stop button in the AWS Management Console is essential. Do not delete the Techila Server.
Note! Stopping the Techila Server will not delete the Techila Worker VM instances. Please delete all Techila Worker VM instances running using the Techila Dashboard. Instructions for deleting Techila Worker VM instances can be found in Decreasing Computing Throughput.
Please also note that even though you stop the Techila Server VM instance and delete all Techila Worker VM instances, you will be billed for the Techila Server disk and the static IP address reserved for the Techila Server. Additionally, if you are using Techila Distributed Computing Engine with Amazon Aurora, any data stored in Aurora RDS will continue to incur costs.
-
Navigate to the AWS Management Console located at:
-
Navigate to
EC2→Instances→ select your Techila Server → SelectInstance State→ ClickStop instance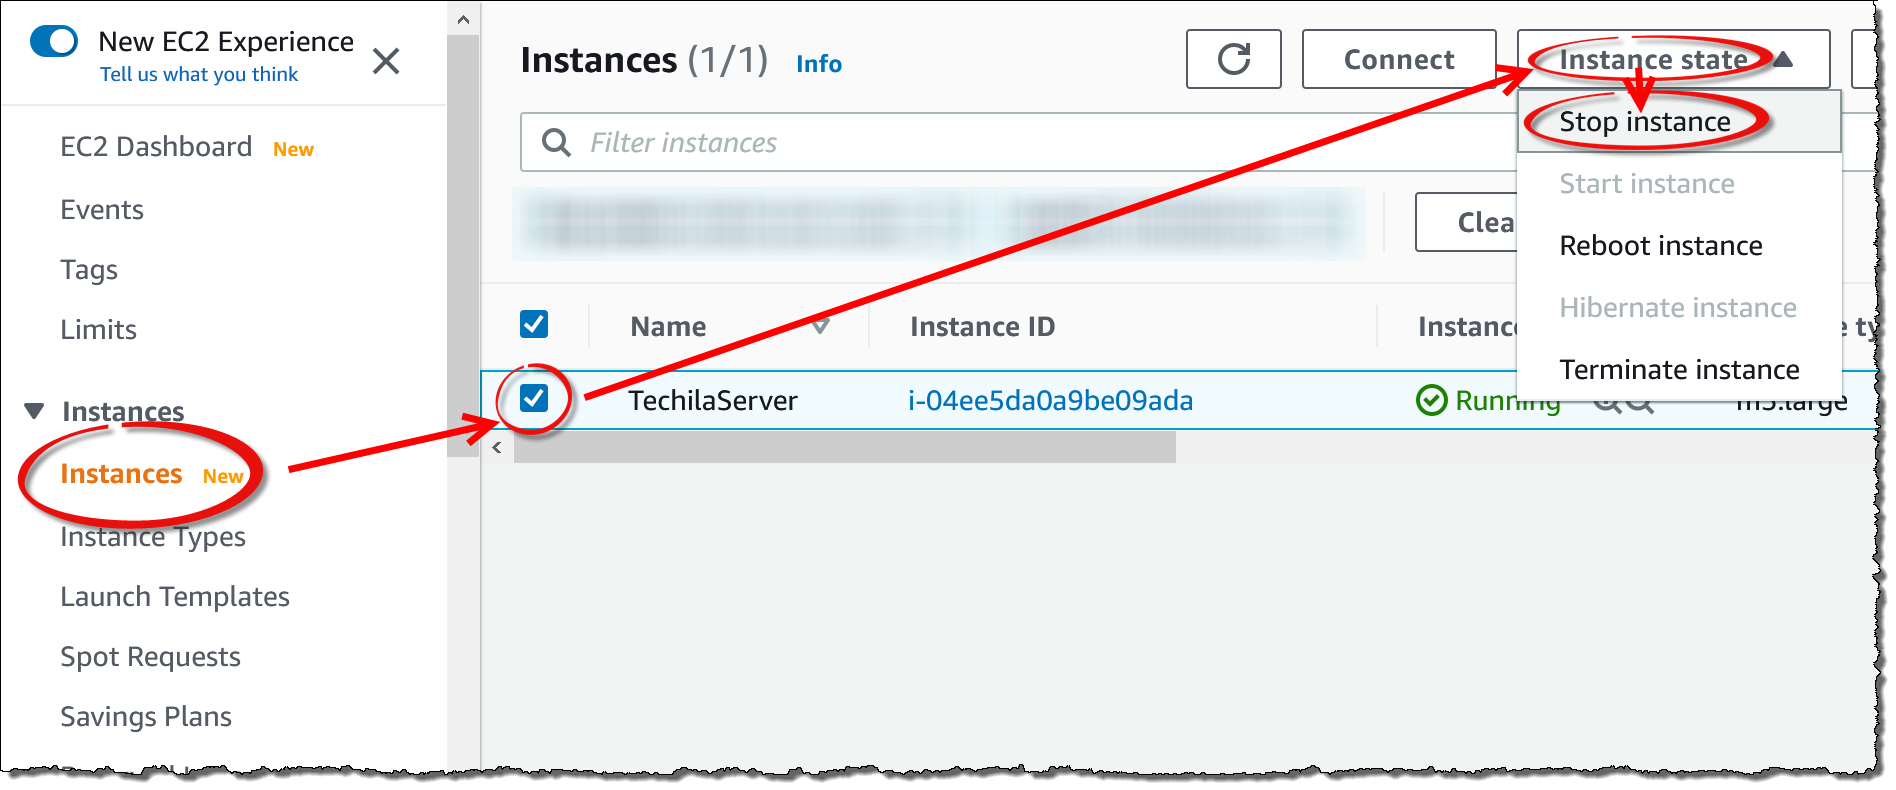
-
When prompted, confirm the action.
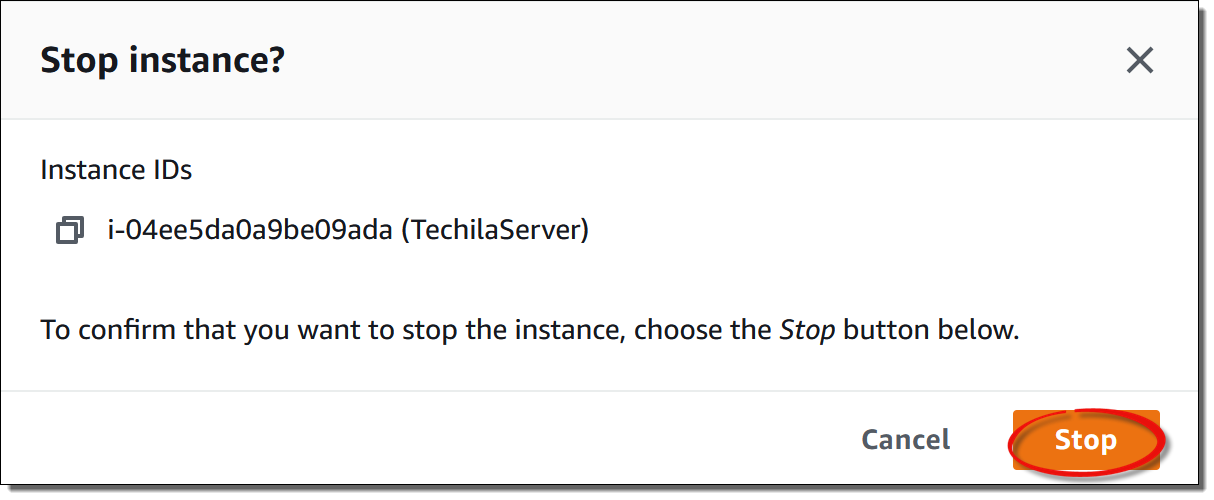
After confirming the action, the Techila Server VM instance will be stopped.
3.7. Restarting the Techila Server
This chapter contains instructions for restarting the Techila Server using the AWS Management Console. After restarting the Techila Server, you can continue using your existing application plugin package. You do NOT need to re-download or re-configure the application plugins.
After restarting the Techila Server VM instance according to the instructions in this chapter, the IP address of the Techila Server will be the same as in the initial deployment. This means you can use your existing browser bookmarks to access the Techila Dashboard.
Note! Make sure you have selected the region containing the Techila Distributed Computing Engine components.
-
Navigate to the AWS Management Console located at:
-
Navigate to
EC2→Instances→ select your Techila Server → SelectInstance State→ ClickStart instance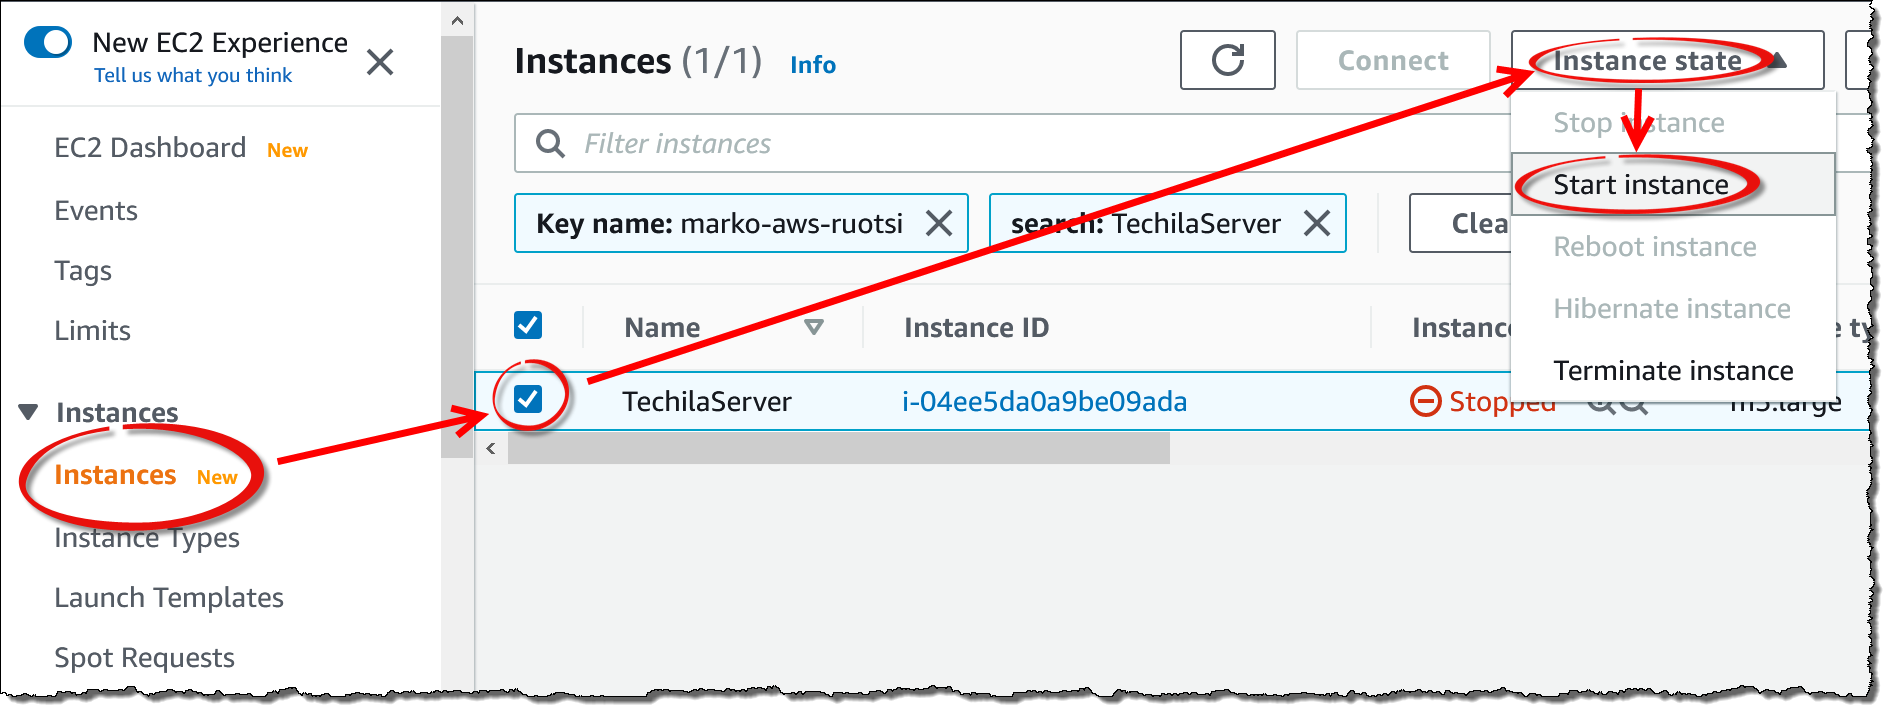
-
After starting the Techila Server VM instance, please follow the instructions in Accessing the Techila Dashboard to access the Techila Dashboard.
3.8. Removing all Techila Distributed Computing Engine Components from AWS
This chapter contains instructions on how to remove ALL components that were created when taking Techila Distributed Computing Engine in AWS Marketplace into use.
Please note that the steps described in this chapter are typically only required when you want to discontinue using the Techila Distributed Computing Engine system and plan on never performing any computations using Techila Distributed Computing Engine in AWS Marketplace.
Note! If you perform the steps described in this chapter, you will NOT be able to restart the Techila Server. Performing the steps described in this chapter will also delete all user credentials and computational data stored on the Techila Server.
-
Delete ALL Techila Worker VM instances as described in Decreasing Computing Throughput
-
In the AWS Management Console, type
CloudFormationin the search box and click the matching search result to open the view.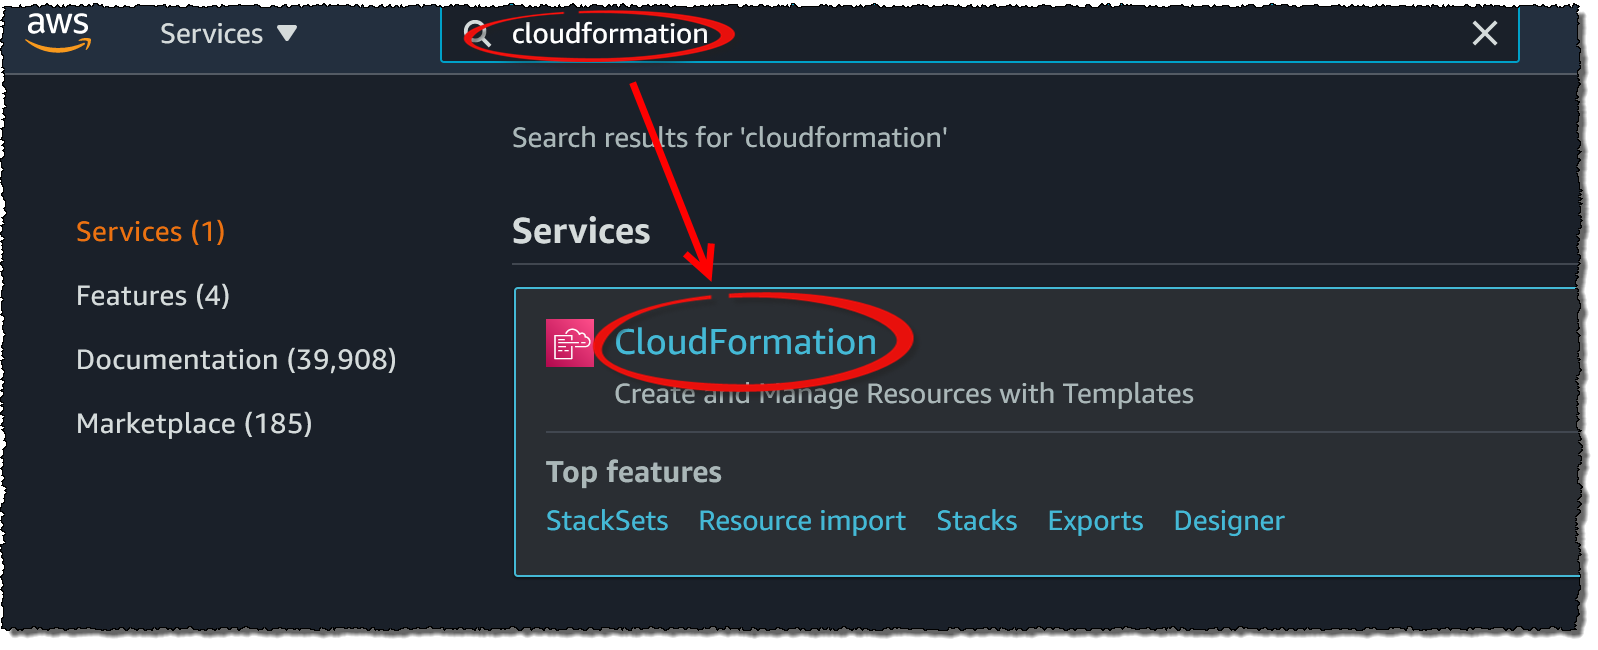
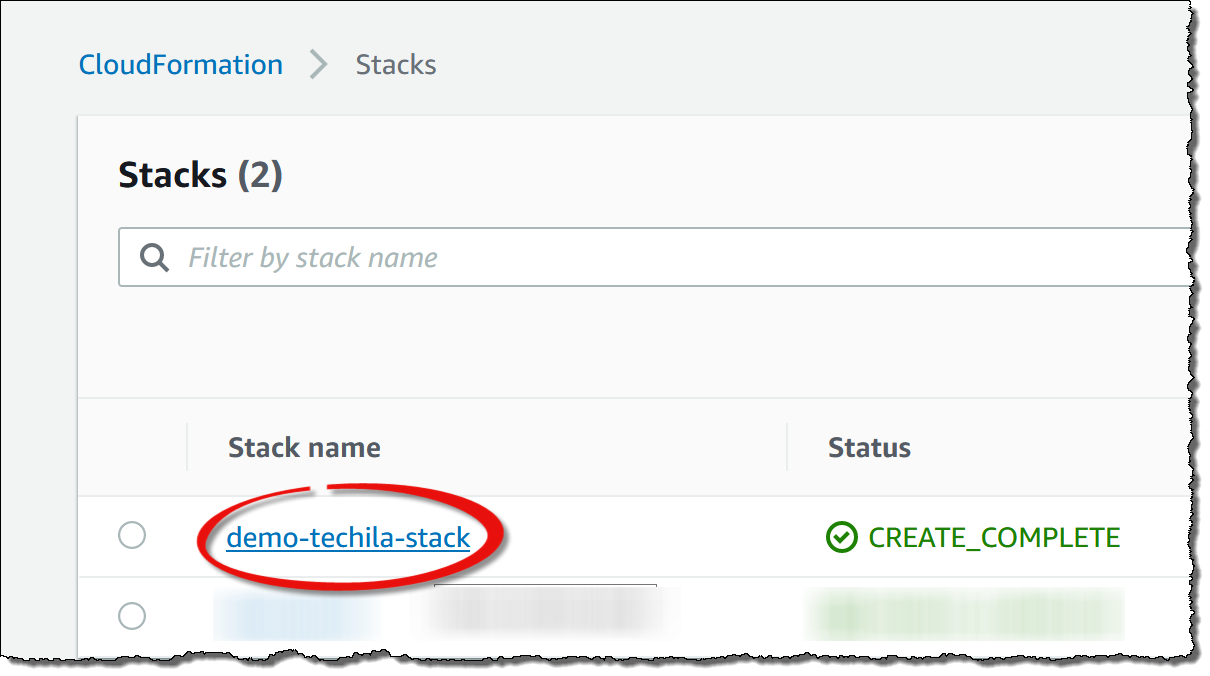
-
Locate and select the stack you have been using for your Techila Distributed Computing Engine components and click the
Deletebutton.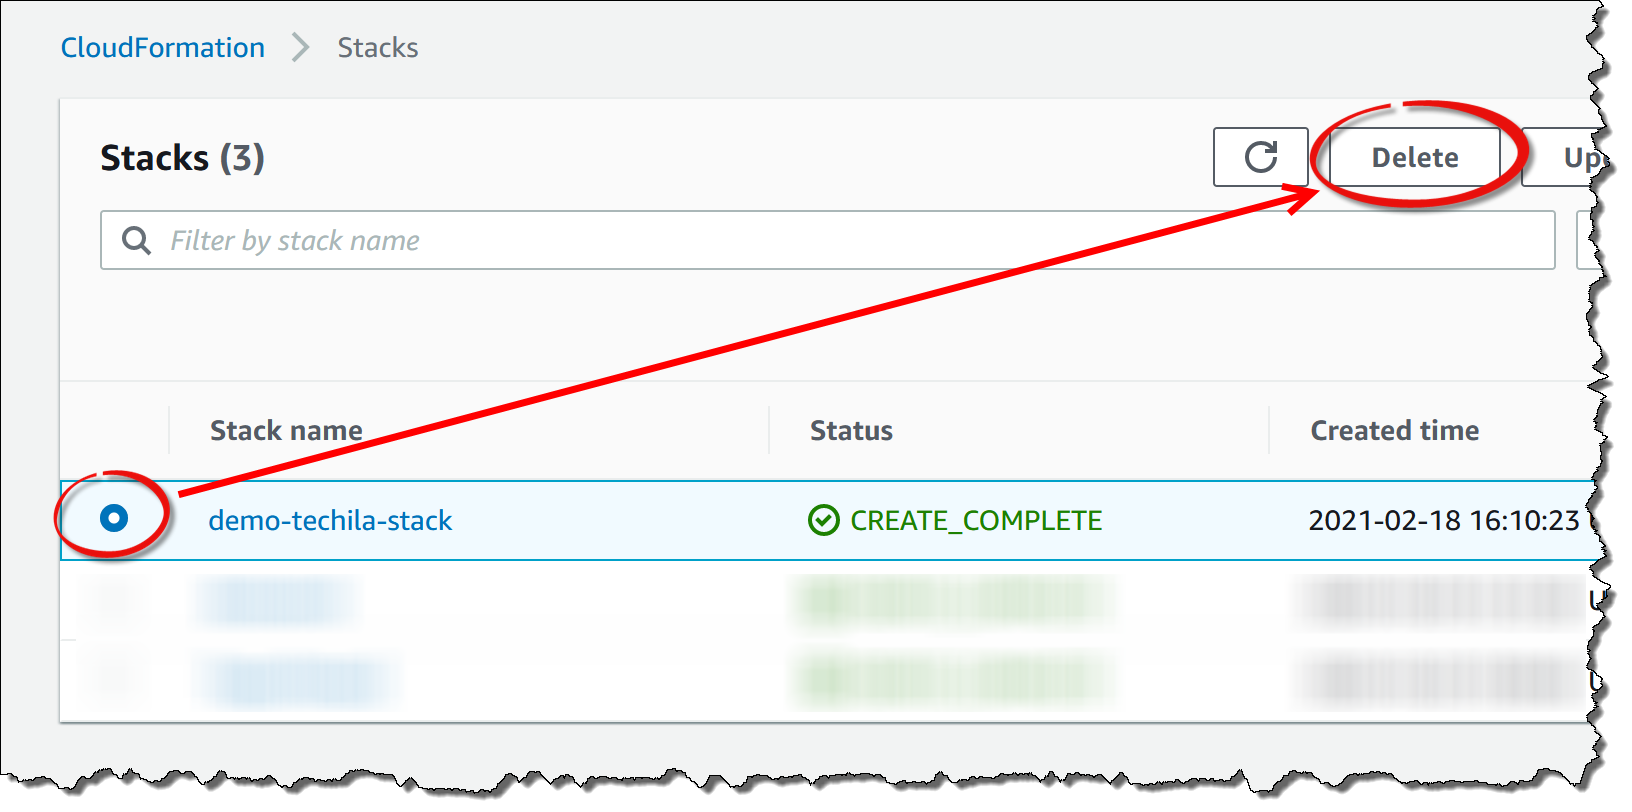
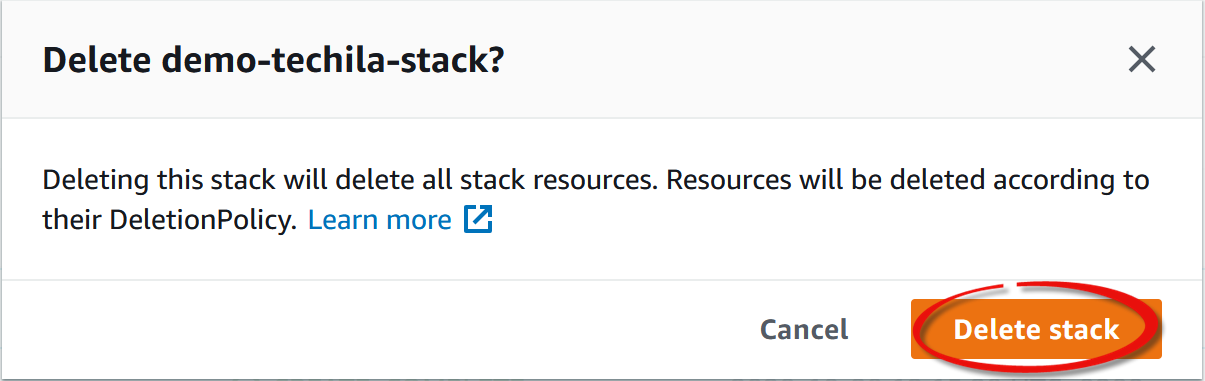
-
When prompted, confirm the action.
-
Wait for the stack to be deleted. After the stack has been deleted, it will no longer be visible on the
Stacksview. All components created when taking Techila Distributed Computing Engine in AWS Marketplace into use have now been removed. -
Note! If you have manually created snapshots or images using the Techila Dashboard, the snapshots and images will need to be removed manually using the AWS Management Console.
4. Appendix
4.1. Advanced Techila Dashboard Settings
Advanced Techila Dashboard settings can be displayed by clicking the Advanced link highlighted in the image below.
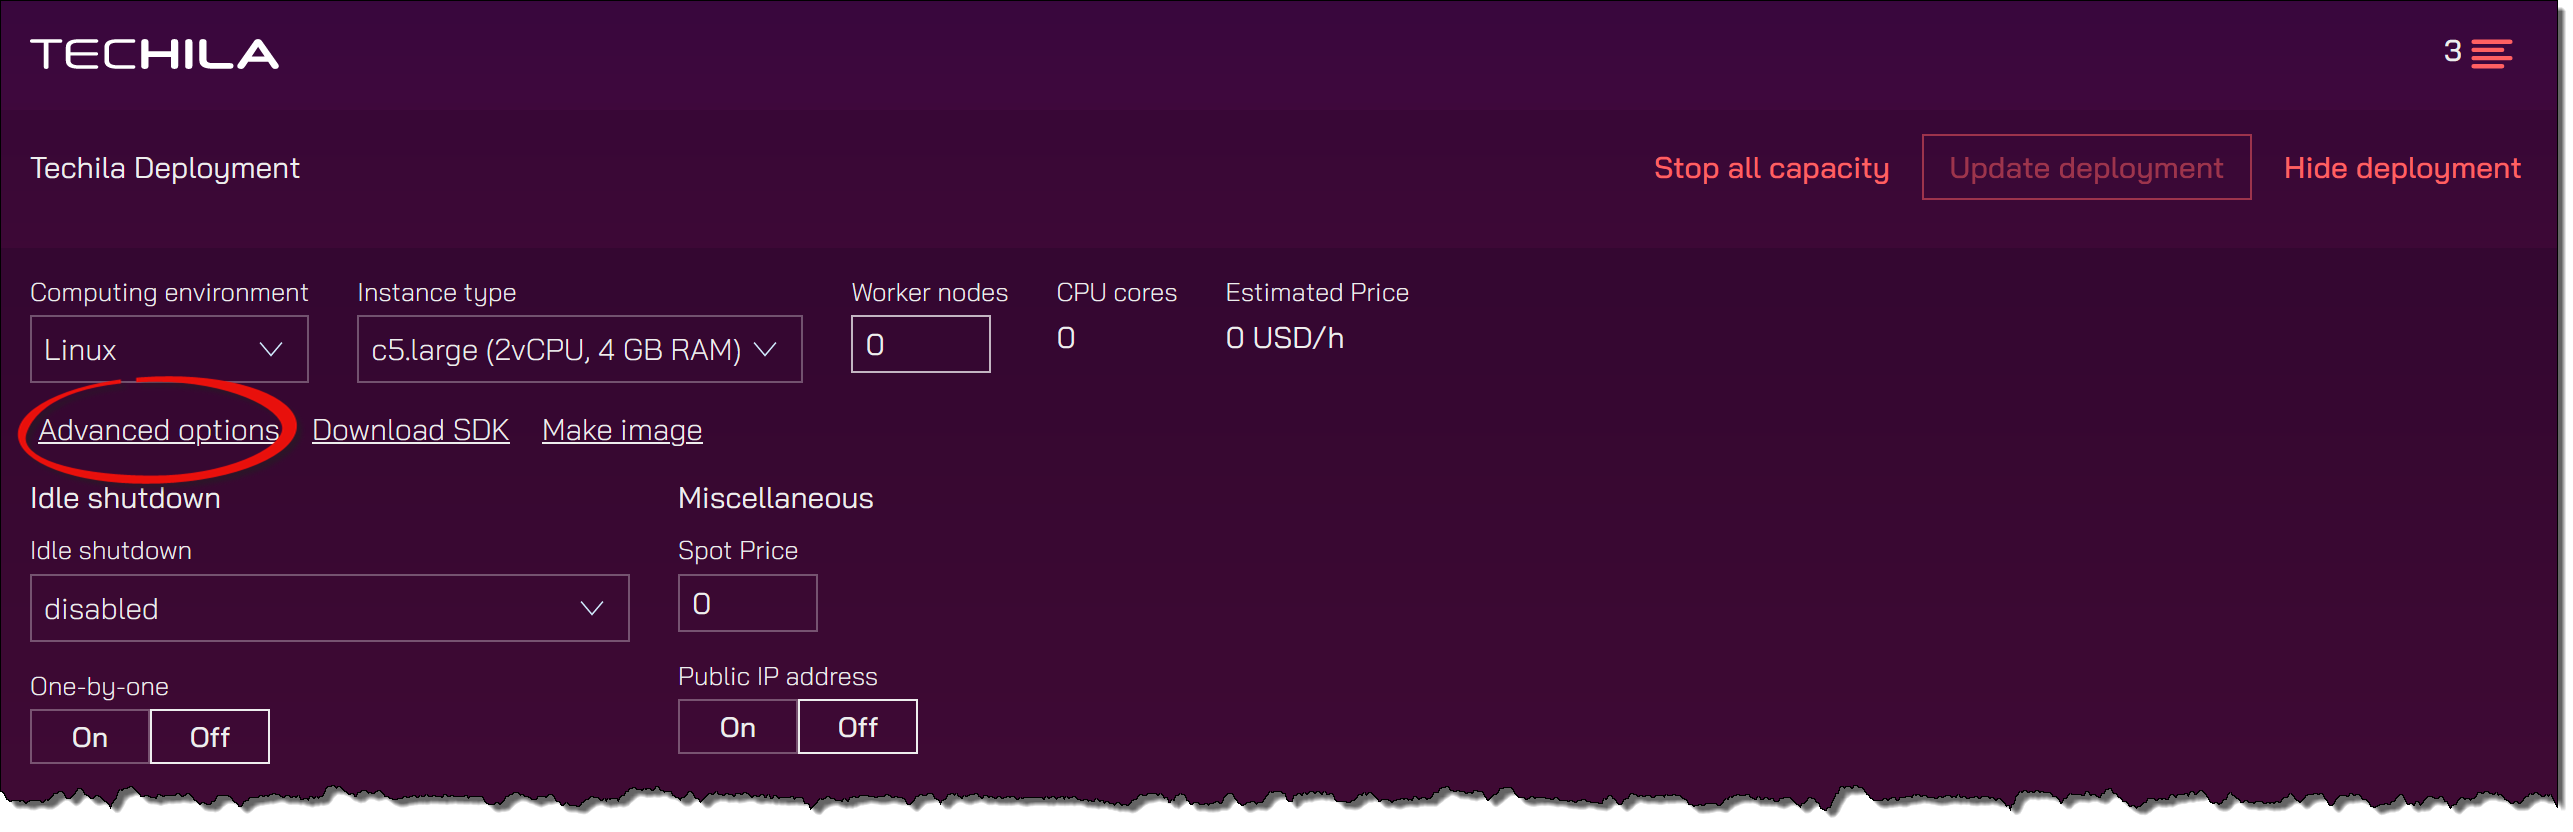
The Spot price field allows you to use spot instances, which can help you reduce the cost of computing capacity.
The public IP address setting allows you to control whether or not the Techila Workers are assigned a public IP address. If no public IP address is set, the Techila Workers will be unable to access data located on the internet. Additionally, if no public IP address is set, you cannot establish a direct remote connection to the Techila Worker via SSH (Linux) or RDP (Windows). A remote connection is typically needed when creating a custom image from a Techila Worker. If you plan on creating an image, it is recommended to set public IP address to On.
The Idle shutdown settings allow you to enable an idle shutdown for the Techila Workers. Specifying a shutdown delay will automatically cause Techila Worker VM instances to be terminated if no Jobs are detected on Techila Workers within the specified time. The idle shutdown timer will be activated immediately after deployment. If no Jobs are detected, the Techila Workers will remain online for a minimum of 30 minutes after deployment. The value defined in the idle shutdown setting will be applied when Jobs are detected. When the One-by-one mode is set to Off, the defined timer value will start taking effect on all Techila Workers, even if only some have processed Jobs.
4.2. Techila Worker GPU Instances
GPUs can be used by selecting an instance that includes GPUs. Please see the AWS documentation for a list of instance types that include GPUs.
Techila Workers with a Linux operating system include the latest NVidia drivers available in the distribution:
Techila Workers with a Windows operating system do not include NVidia drivers and need to be installed manually. After installing Nvidia drivers, a custom image can be created as described in Creating a Custom Image.
4.3. Techila Workers + Instance Storage SSD
Techila Worker software is always installed on the instance EBS volume. When Techila Workers process computational Jobs, temporary working directories are created in the installation directory, also located on the EBS volume. This means all I/O operations related to data accesses performed during a computational Job will be, by default, done using the EBS volume.
If you are using Techila Worker instances with instance SSD storage available, you will need to consider this if you want to use the instance storage in your Jobs to manage the data. Please note that any data stored in instance storage will not be kept if you create an image from the Techila Worker.
More information about instance storage can be found here:
4.4. Creating a Custom Image
As described in Amazon documentation, a custom machine image is a boot disk image you own and control access to.
Generally speaking, custom images can be used to create an image from the boot disks of your existing AWS EC2 instances. You can then use that image to create new boot disks for your instances. This process allows you to create new instances that are preconfigured with the applications you need without configuring a public image from scratch.
In the TDCE context, custom images can be used to make additional software packages available on Techila Workers. The example flow below illustrates how this could be done:
Note! You cannot create images from spot instances. If you plan on creating an image, please make sure you start on-demand capacity.
-
Using your web browser, navigate to your Techila Dashboard.
-
In the Techila Dashboard, select the base operating system you want to use (Windows or Linux). If you have already created a custom image and want to make further modifications to it, you can select the custom image.
-
In the
Advanced Instance Optionssection, ensure thePublic IP addressis set toOn. -
In the
Number of worker nodes, set the count to1. -
Click the
Startbutton to start the Techila Worker. Wait until the Techila Worker is running. This may take several minutes. -
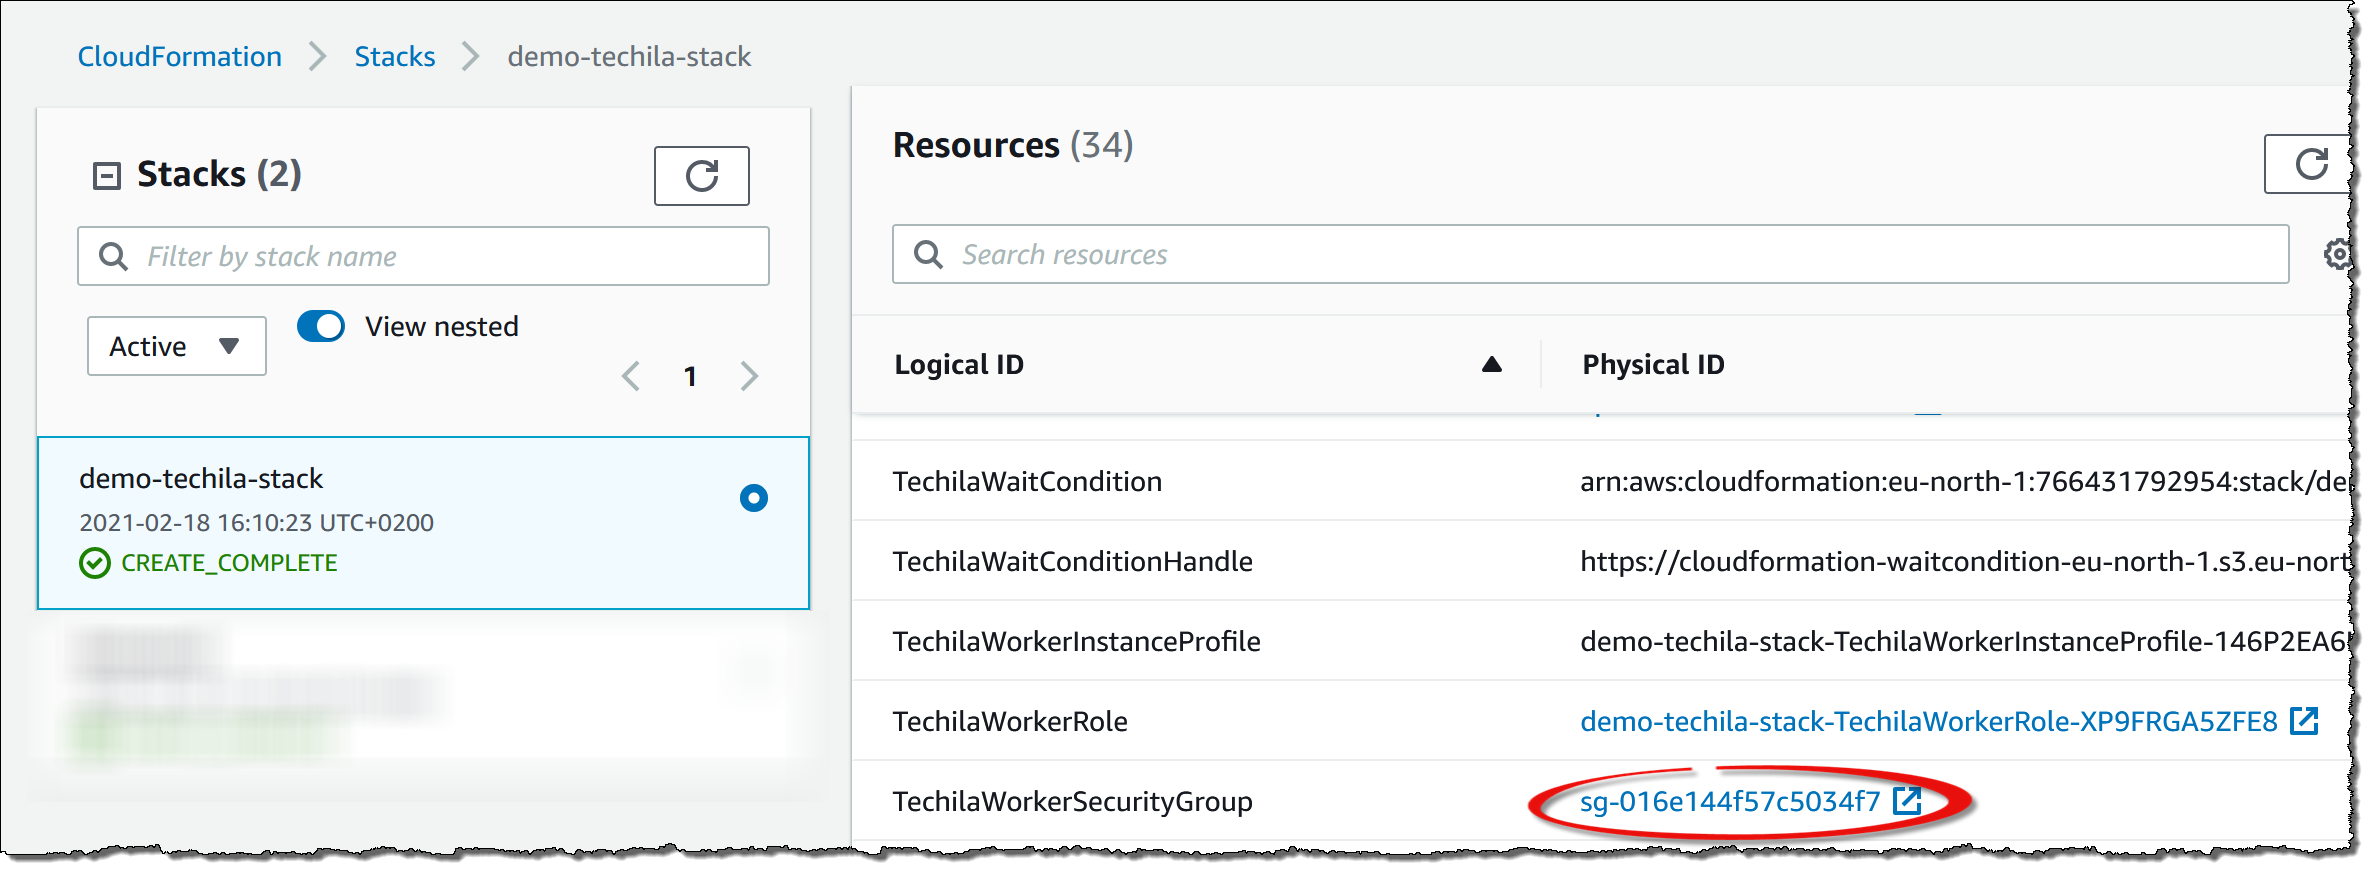
Establish a remote connection to the VM. By default, the Techila Servers will accept SSH (port 22) and RDP (port 3389) connections if the connections are routed via the Techila Server. If you want to establish remote connections directly to Techila Workers, you must configure the
TechilaWorkerSecurityGroupsecurity group. This can be found underStack→ResourcesGeneral instructions for establishing remote connections to instances can be found here:
-
After establishing a remote connection to the Techila Worker, install the software you want to include in your custom image. Please note that the Techila Worker processes (including the actual Jobs) will run under user
techila-workerand will need to have access to software. -
After you have installed all required software on the Techila Worker, test that everything works. A comprehensive test would be to run an actual computational Project that uses the functionality of the software you just installed. You can remain connected to the Techila Worker while running the tests.
-
After verifying that everything is working as intended, return to the Techila Dashboard and give the image a descriptive name by using the
Image namefield and creating the image.
-
After specifying a name, click the
Make imagebutton. This will start the image creation process. Progress information will be displayed in the Techila Dashboard. Please note that the Techila Worker will be automatically shut down at the end of the process. -
After creating the image, the new custom image will be listed in the
Computing environmentmenu. You can now choose the custom image to make the previously installed software available on all Techila Workers.
4.5. Accessing the Techila Dashboard
-
In the AWS Management Console, type
CloudFormationin the search box and click the matching search result to open the view.
-
Click on the stack that contains your TDCE environment.
-
Select the
Outputstab and click on theTechilaDashboardURL.
-
Opening the Techila Dashboard might display a credential warning. The appearance of the warning will depend on what browser you are using. Accept the certificate and continue.
-
Enter
adminas the username. In the password field, enter the password you defined when creating the stack. Click theLog inbutton to log in.
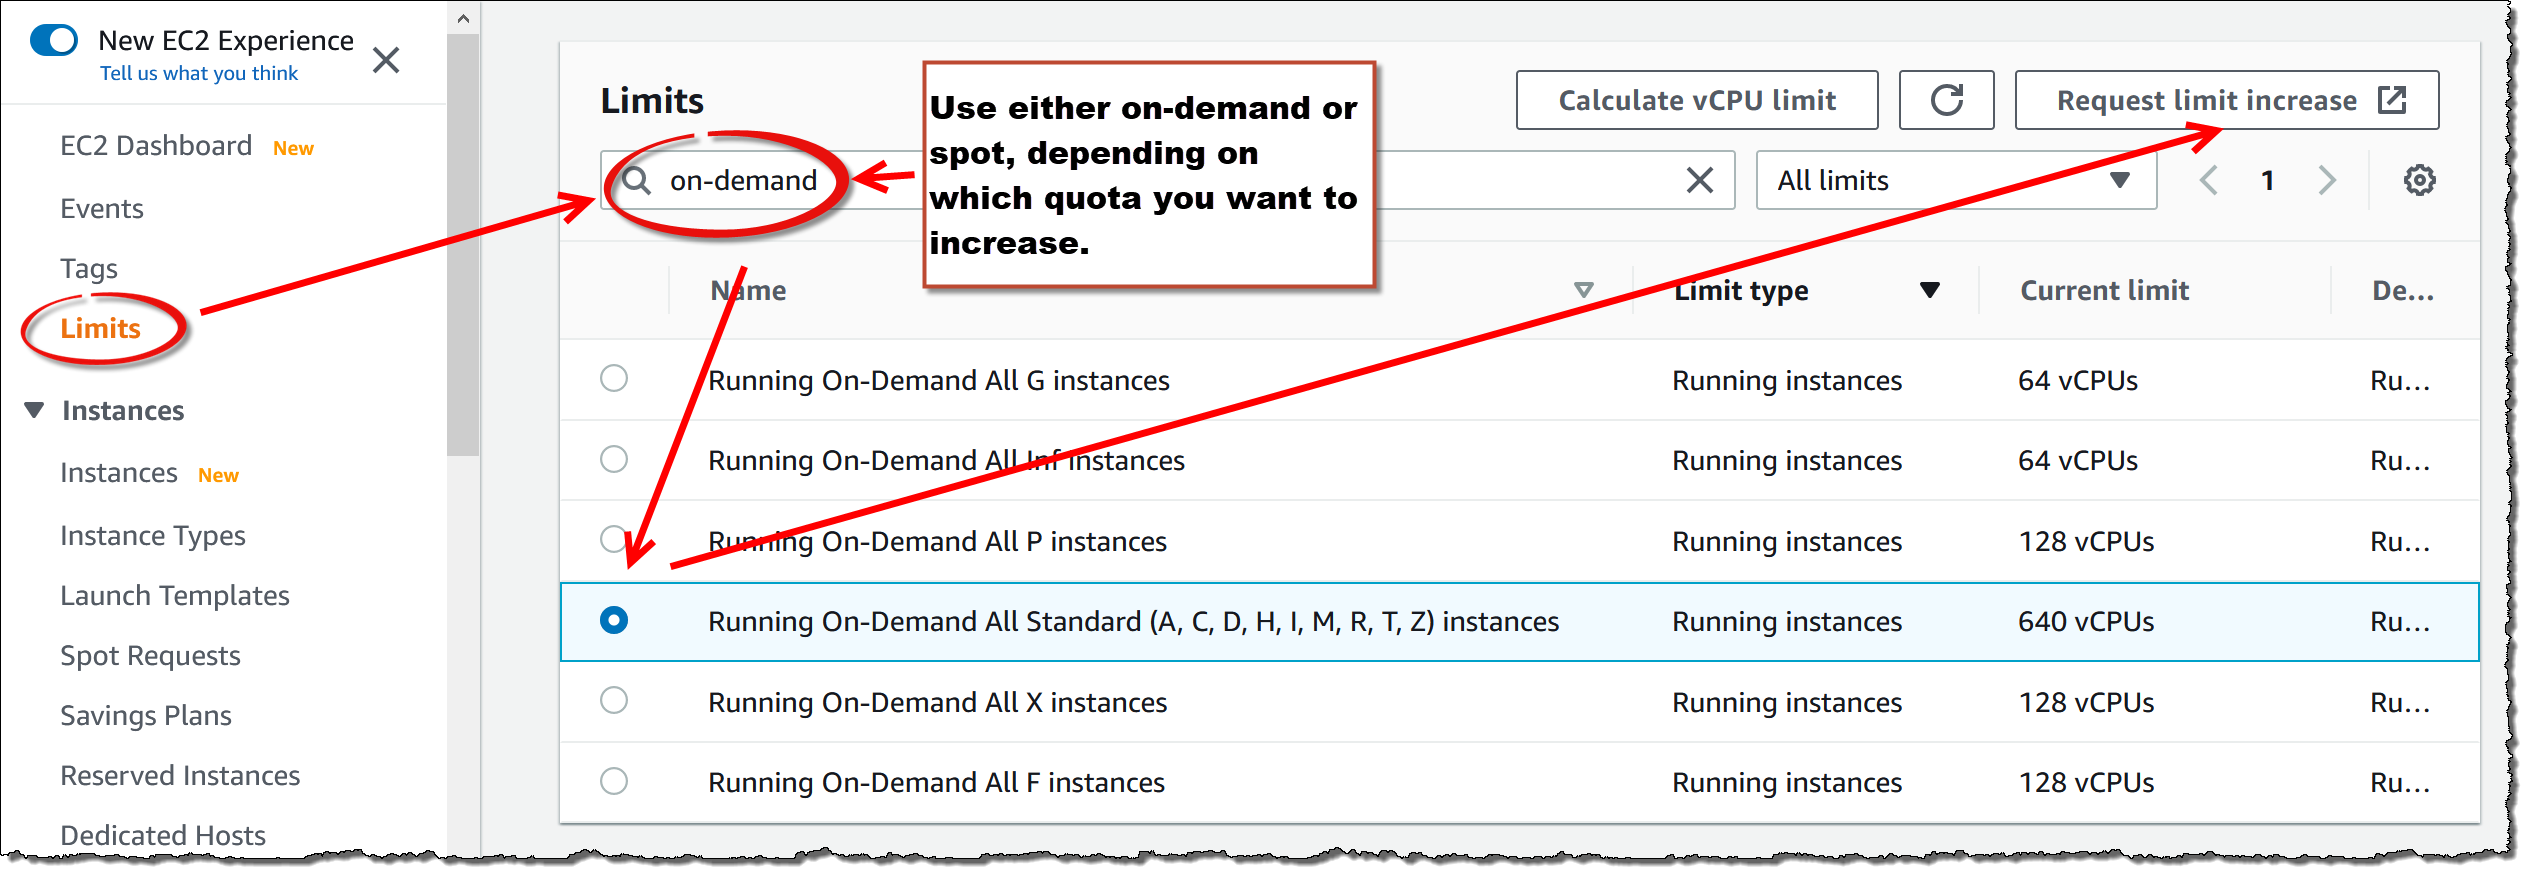
4.6. Making an Amazon Quota Increase Request
To start a large number of Techila Workers, you might need to increase your AWS EC2 quota. Please follow the following instructions for making the quota increase request:
The screenshot below shows an example of the typical quotas that will typically need to be increased to start larger amounts of Techila Workers.
4.7. Changing Techila Server Instance Type
The Techila Server can be run on M5 instances, m5.xlarge and larger. To change your Techila Server instance type, please follow the steps below.
-
Navigate to the AWS Management Console located at:
-
Navigate to
EC2→Instances→ select your Techila Server → SelectInstance State→ ClickStop instance
-
When prompted, confirm the action.
After confirming the action, the Techila Server VM instance will be stopped.
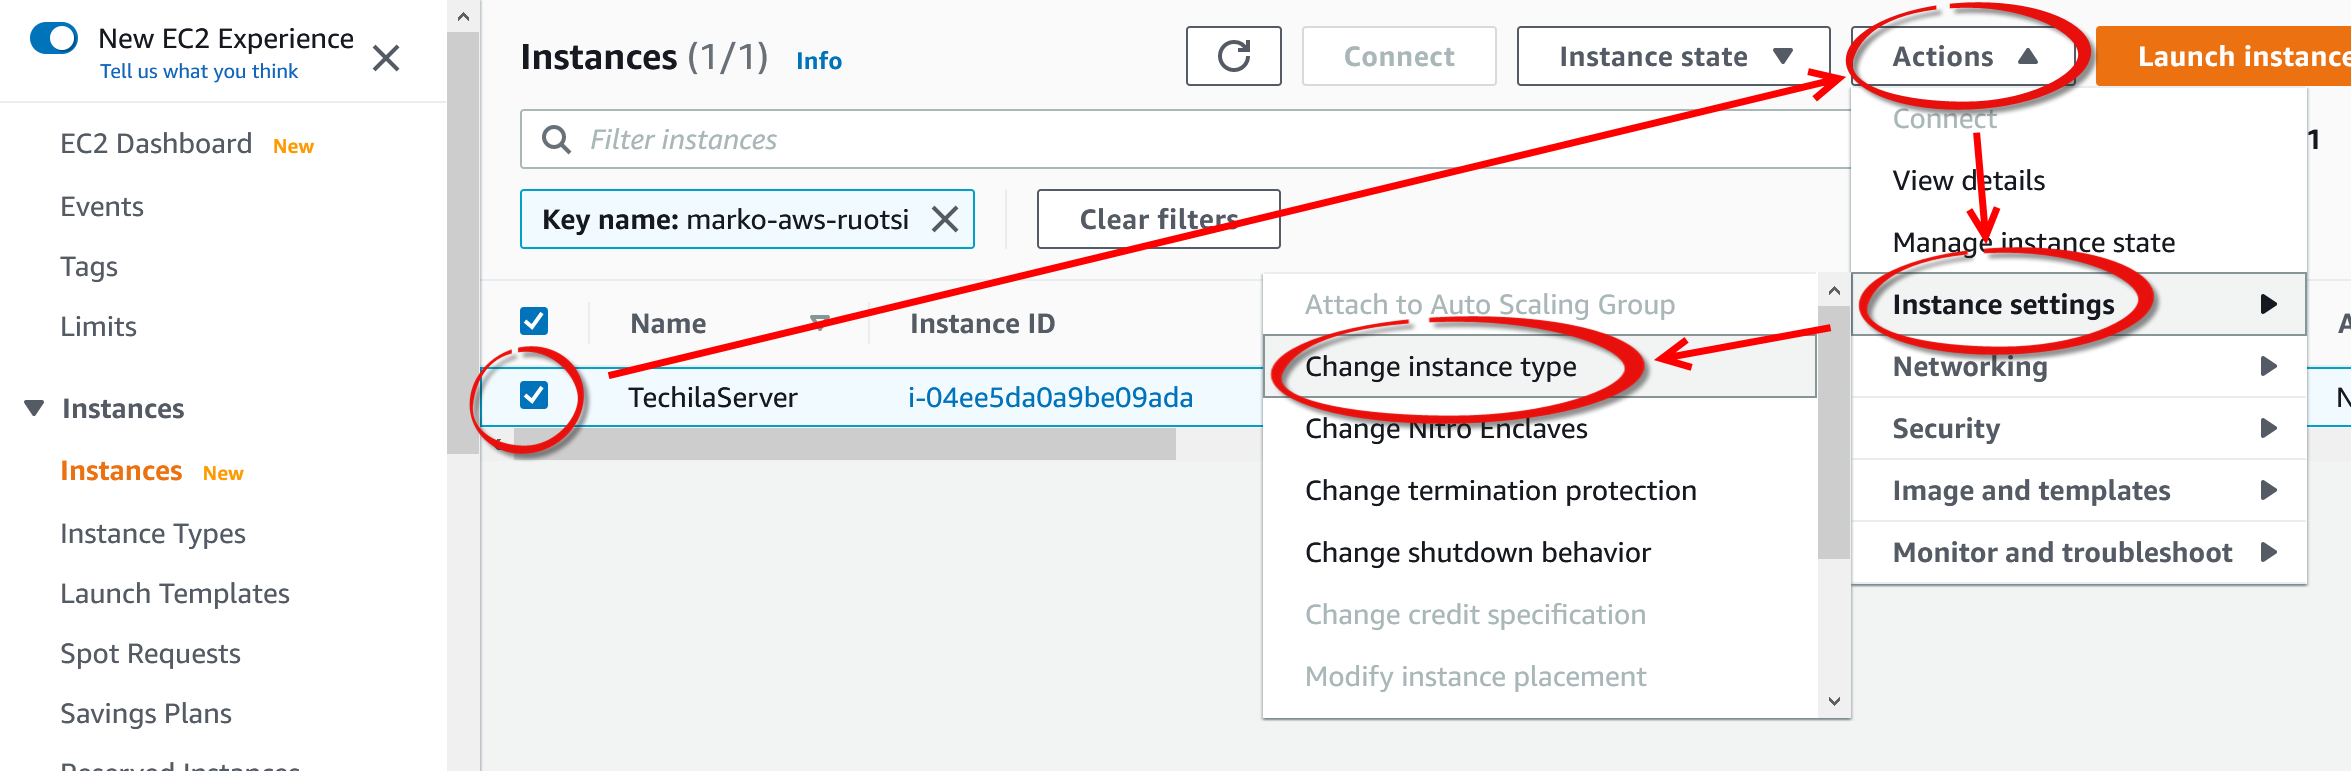
-
After it has been stopped, select the instance and change the instance type as illustrated in the image below.
-
Select the desired instance type from the
m5family.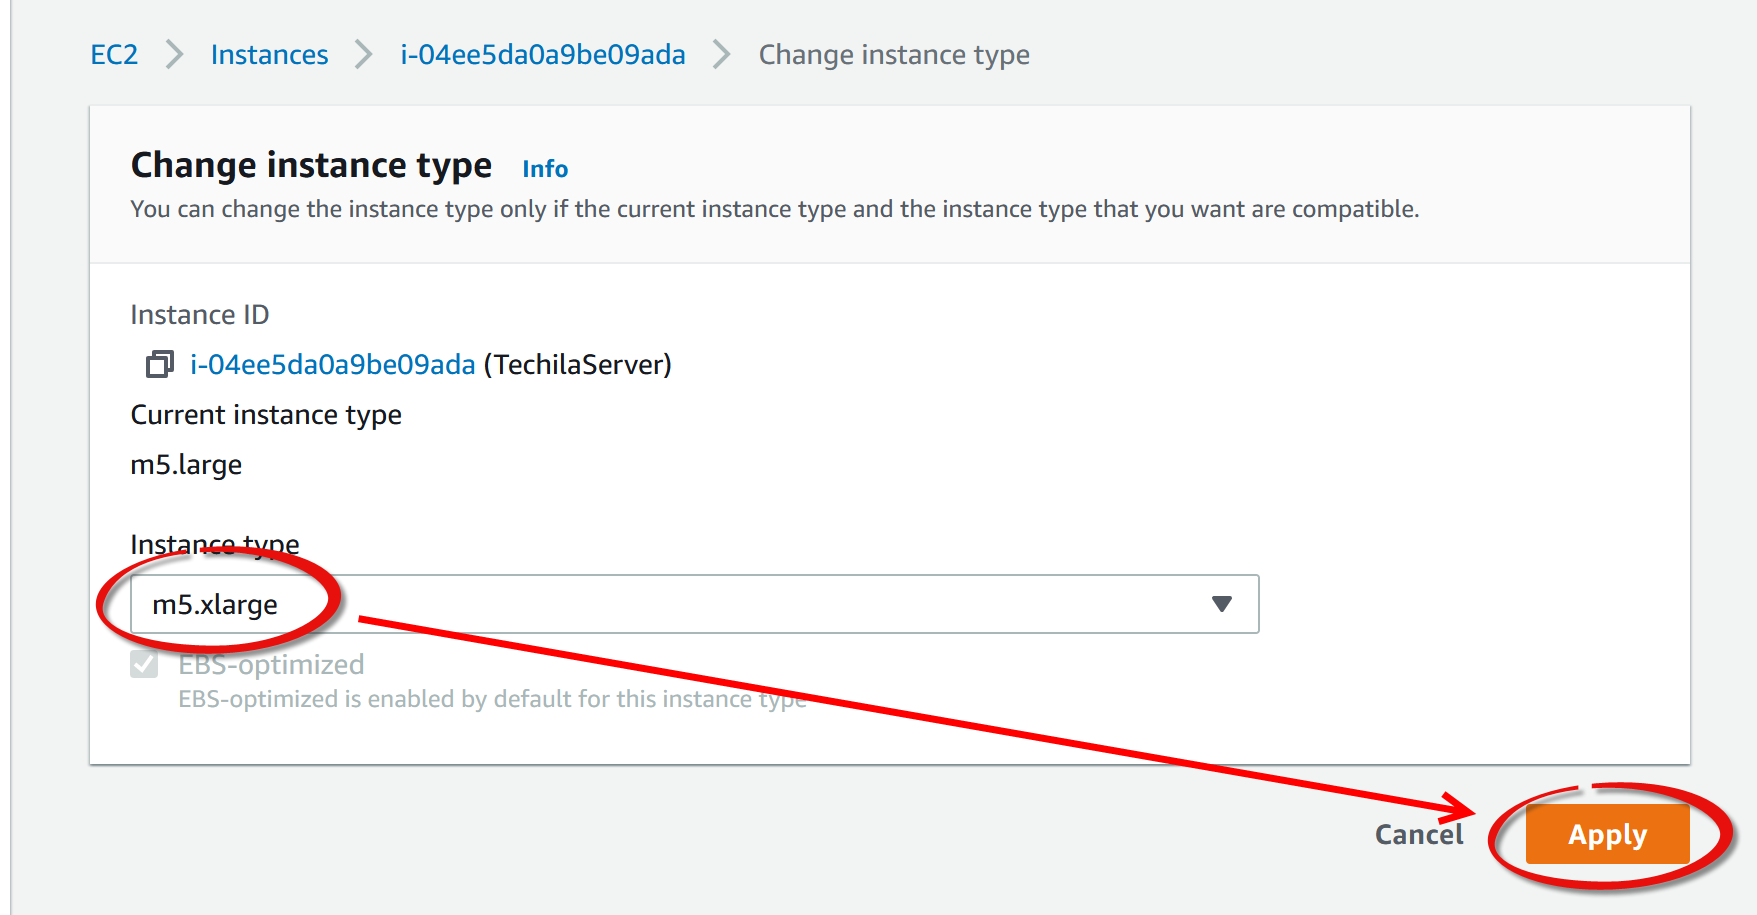
-
Start the Techila Server by selecting
Instance State→ ClickStart instance
4.8. Techila Server Instance Migration Instructions
This chapter contains instructions for migrating your Techila Server to a new AWS MP deployment. Please follow the steps applicable to your TDCE deployment:
The migration process is divided into two steps: creating required snapshots and deploying a new TDCE environment using the snapshot files. You should be able to complete the entire migration process in under one hour. If you are restoring the environment from existing snapshot files, you should be able to complete the process in under 30 minutes.
Please note that any changes made to the system since the last snapshot was taken will be lost, meaning the amount of potential data loss depends on the snapshot frequency.
Please also note that if you plan on migrating your Techila Server to a different availability zone, you must check that you have a sufficient AWS EC2 instance quota to allow Techila Worker deployments. If required, increase the quota as described in [Making an Amazon Quota Increase request].
4.8.1. Migrating Techila Server that uses Postgres
Migrating a Techila Server that uses Postgres is done by taking a snapshot of the data disk. This snapshot can then be used to restore the TDCE deployment. These are described in the following chapters:
Techila Distributed Computing Engine Backup
This chapter contains instructions for backing up your existing Techila Server.
-
Stop all Techila Workers as described in Decreasing Computing Throughput
-
Stop the Techila Server as described in Stopping the Techila Server
-
Navigate to the AWS Management Console located at:
-
Navigate to
Volumes→ Select the TechilaServerDataDisk → ClickActions→ Create snapshot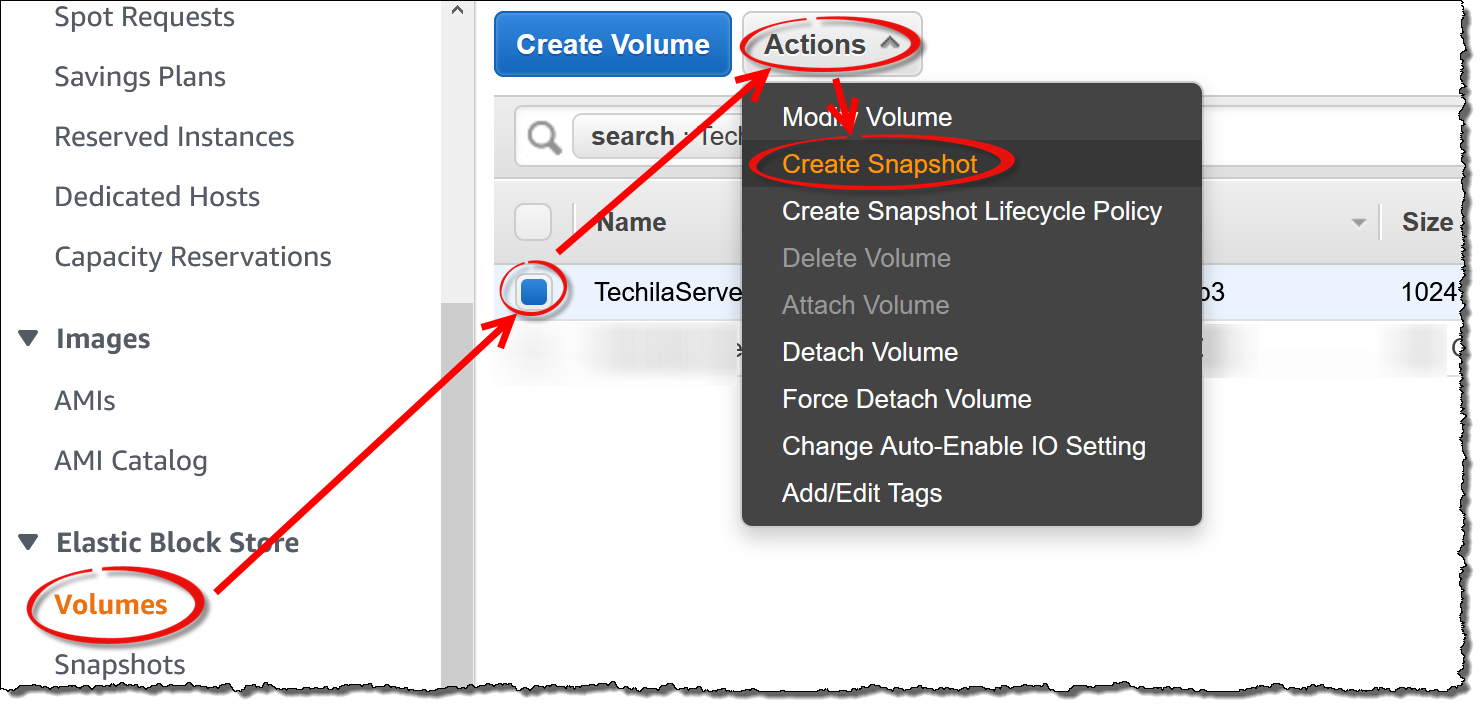
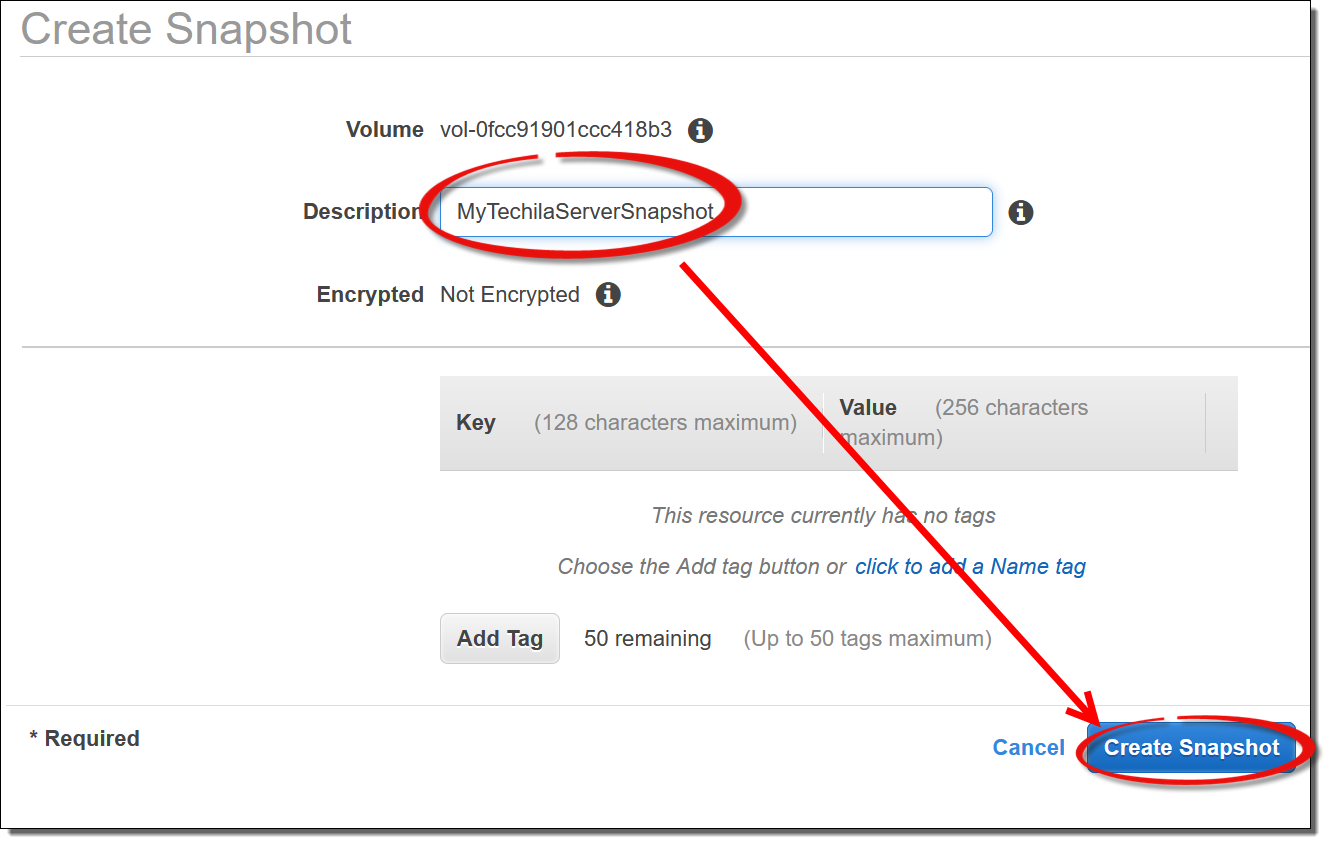
-
Define a name for the snapshot and create the snapshot.
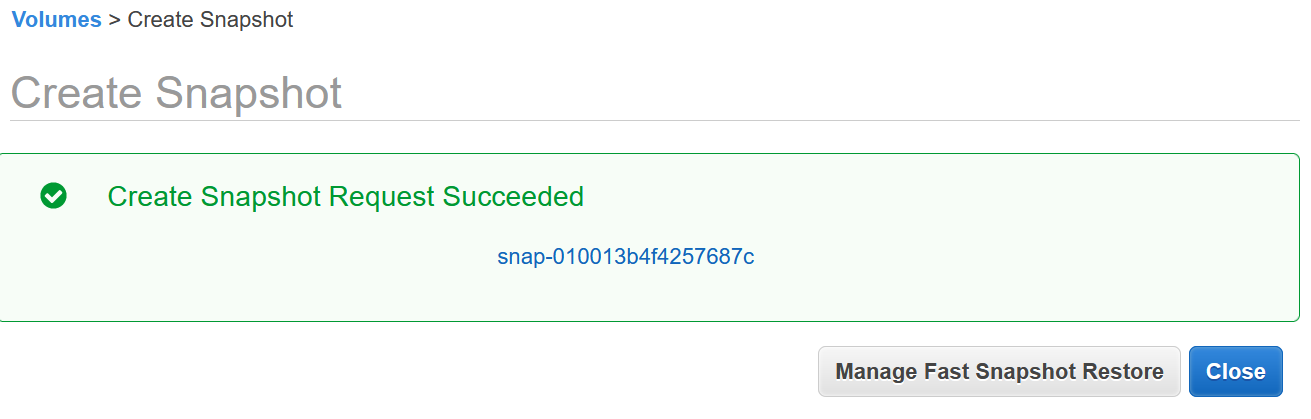
-
The snapshot will now be created.
-
The snapshot creation process may take several minutes. Navigate to
Snapshotsand wait until the Techila Server snapshot has been created. You can restore the Techila Server using this snapshot described in Techila Distributed Computing Engine Restore.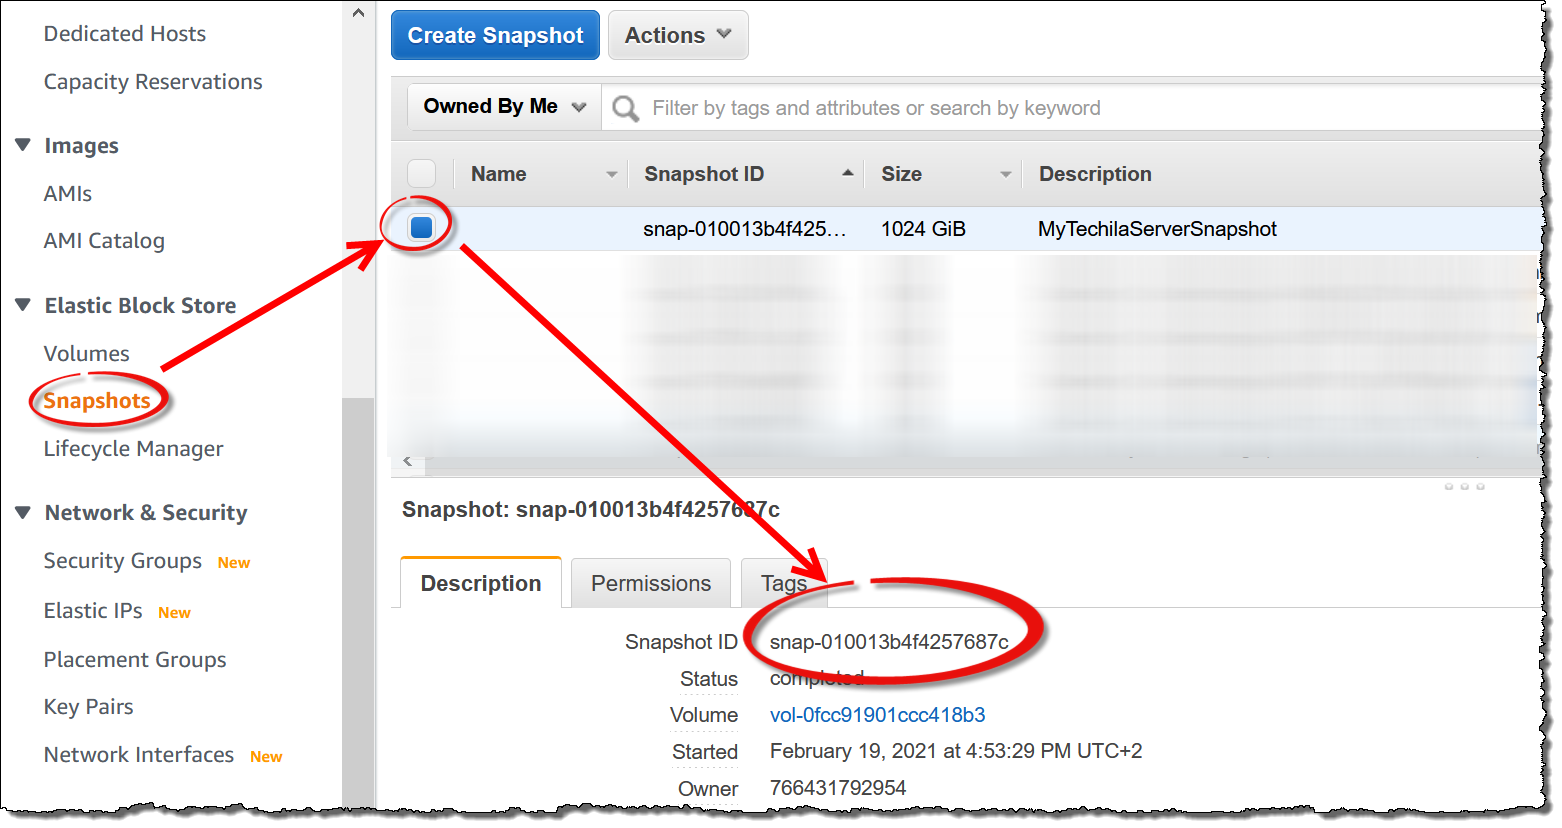
Techila Distributed Computing Engine Restore
Restoring a Techila Server requires an existing Techila Server datadisk snapshot as described in Techila Distributed Computing Engine Backup.
Restoring a Techila Server from a previous snapshot is described below.
-
Navigate to
Snapshotsand copy the snapshot ID of your previously created snapshot to your clipboard.
-
Next, you can create a new TDCE deployment using AWS Marketplace. While filling out the CloudFormation template, enter the snapshot ID you copied earlier.

-
After this, please follow the deployment steps described in Starting the Techila Server.
4.8.2. Migrating Techila Server that uses Aurora
Migrating a Techila Server that uses Amazon Aurora is done by taking a snapshot of the data disk and a snapshot of the Amazon Aurora database. Additionally, you will need to retrieve and store the current passwords from Amazon Secrets Manager. When using TDCE with Amazon Aurora, database passwords are automatically rotated by Amazon Secrets Manager at 30-day intervals.
The snapshots and passwords obtained when creating backups can be used later to restore the TDCE deployment.
These are described in the following chapters:
Backup Techila Distributed Computing Engine with Aurora
This chapter contains instructions for backing up your existing Techila Server that uses Aurora.
-
Stop all Techila Workers as described in Decreasing Computing Throughput
-
Stop the Techila Server as described in Stopping the Techila Server
-
Navigate to Amazon Secrets Manager located at: https://console.aws.amazon.com/secretsmanager/
-
From the list of secrets in your account, choose the name of the secret to view. The Aurora database will have two secrets associated with it. You will need to retrieve the secrets for both of these.

-
The Secret details page appears. The page displays all of the chosen secret configuration details except for the encrypted secret text.
-
In the Secret value section, choose Retrieve secret value.
Choose the Secret key/value to see the credentials parsed out as individual keys and values. Retrieve the password and store it for future use. If you restore the Techila Server from the snapshot, you will need this secret.
-
Repeat the above steps so you have both current passwords.
-
After retrieving the passwords, navigate to
EC2→Volumes→ Select the TechilaServerDataDisk → ClickActions→ Create snapshot
-
Define a name for the snapshot and create the snapshot.
-
The snapshot will now be created.
-
The snapshot creation process may take several minutes. Navigate to
Snapshotsand wait until the Techila Server snapshot has been created. After it has been created, save the snapshot ID for future usage.
-
Next, you will need to create a snapshot of the Aurora database. In the AWS Management Console, navigate to
Amazon RDS→ ClickDatabases→ Select your Techila Server database → ClickActions→ ClickTake Snapshot.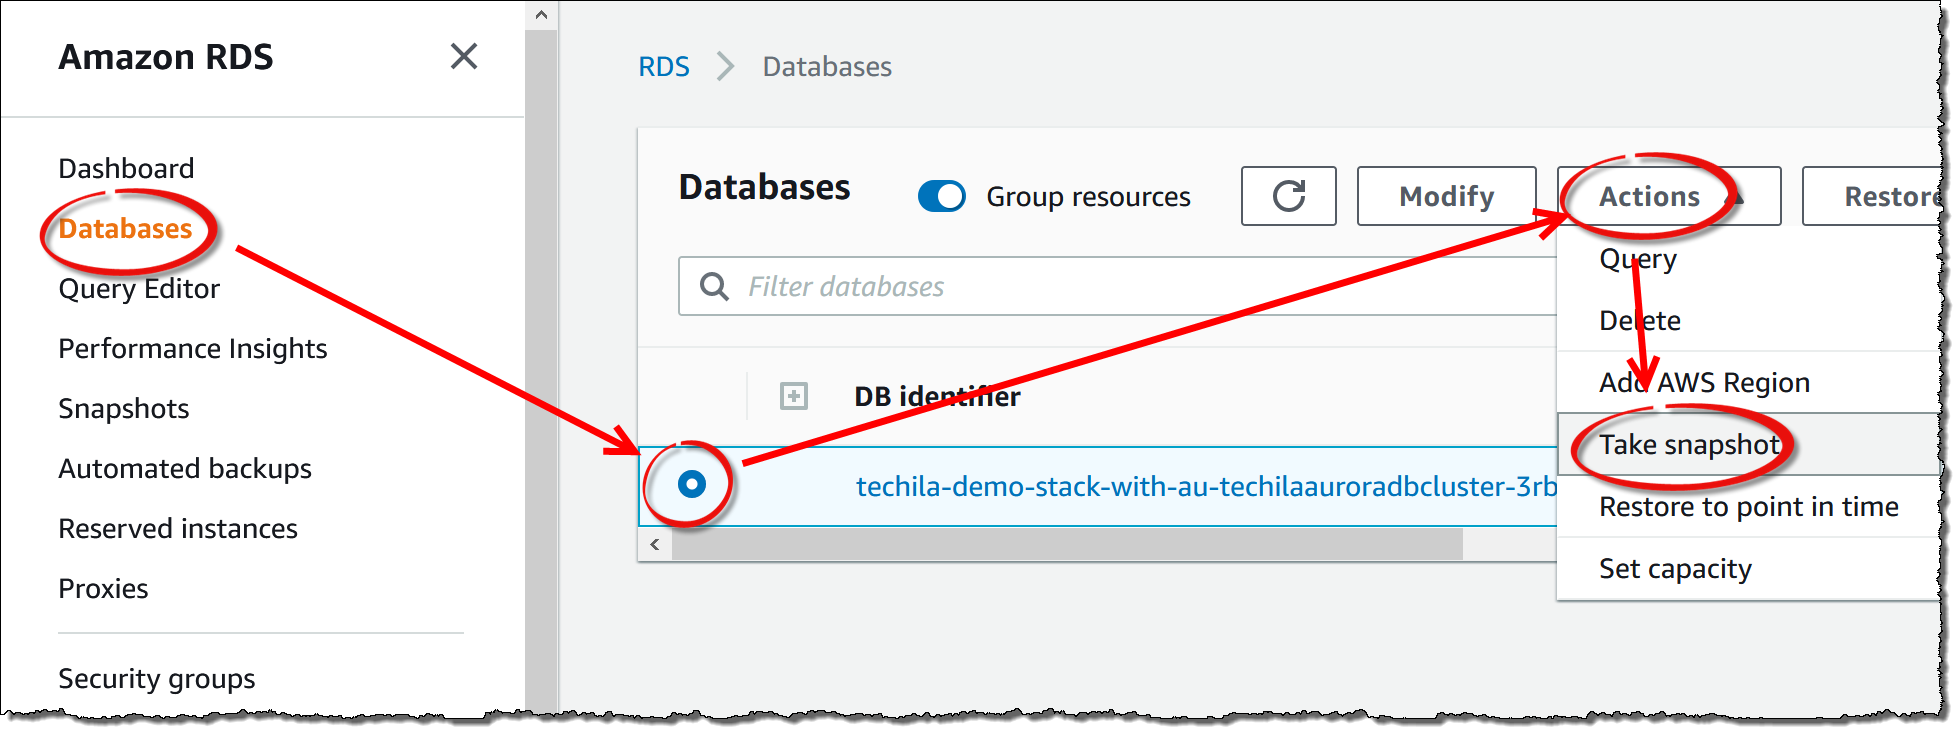
-
Define a name for the snapshot and click
Take Snapshot. -
Wait for the snapshot to be created. After the snapshot is ready, the backup process is completed. You can restore the Techila Server using the snapshots described in Restore Techila Distributed Computing Engine with Aurora.
Restore Techila Distributed Computing Engine with Aurora
Restoring a Techila Server requires an existing Techila Server datadisk snapshot and Aurora database snapshot as described in Backup Techila Distributed Computing Engine with Aurora.
-
Using the AWS console, retrieve the Techila Server datadisk snapshot name and the Aurora snapshot ID.
-
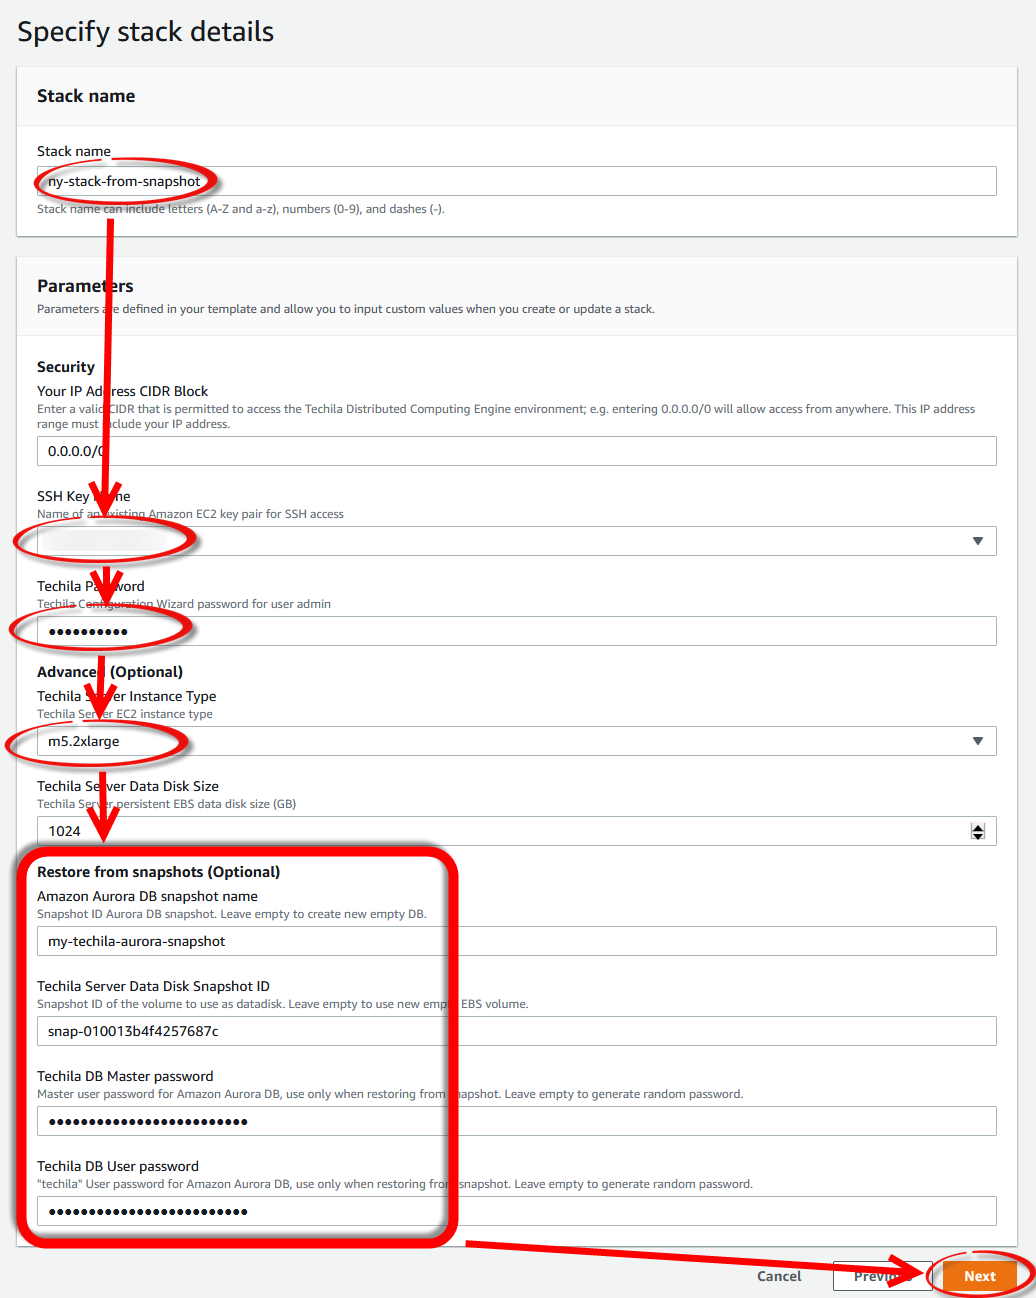
Next, you can create a new TDCE deployment using AWS Marketplace. While filling out the CloudFormation template, enter the snapshot ID and Aurora snapshot name you copied earlier.
Note! When entering the passwords, you must enter the same ones you retrieved when creating the snapshots.
-
After this, please follow the deployment steps described in Starting the Techila Server.
4.9. Network Configuration Details
The table below describes the network connections used in TDCE. In the AWS Marketplace context, all network connections between Techila Server and Techila Workers are established inside Amazon Virtual Private Cloud. Chapter TDCE Components contains more information about the various network components created during the deployment process.
| Data Channel | Signal Channel | Management Channel | Web Access | Amazon S3 | |
|---|---|---|---|---|---|
Port |
TCP/20002 |
TCP/20001 |
TCP/25001 or TCP/25002 |
TCP/443 |
TCP/443 |
Protocol |
HTTPS |
HTTPS + XML-RPC like |
HTTPS + XML-RPC |
HTTPS |
HTTPS |
Direction of Initialization |
Techila Worker → Techila Server |
Techila Worker → Techila Server |
End-User → Techila Server |
Browser →Techila Server |
Techila Worker → S3, Techila Server → S3 |
Description |
Transfer slots and request queues in the server. |
Always open. |
Synchronous requests. |
Techila Web Interface |
Used to transfer Bundles. |
4.10. TDCE Components
This chapter lists the name and type of components created by the CloudFormation in the following format:
-
ComponentName (Component type)
List of components:
-
TechilaGatewayAttachment (AWS EC2 VPCGatewayAttachment)
-
TechilaInternetGateway (AWS EC2 InternetGateway)
-
TechilaRoute (AWS EC2 Route)
-
TechilaRouteTable (AWS EC2 RouteTable)
-
TechilaRunS3DeleteLambda (AWS CloudFormation CustomResource)
-
TechilaS3Bucket (S3 Bucket)
-
TechilaS3DeleteLambda (AWS Lambda Function)
-
TechilaS3DeleteLambdaRole (AWS IAM Role)
-
TechilaS3Endpoint (AWS EC2 VPCEndpoint)
-
TechilaServerDataDisk (AWS EC2 Volume)
-
TechilaServerDataDiskMountPoint (AWS EC2 VolumeAttachment)
-
TechilaServerEIP (AWS EC2 EIP)
-
TechilaServerEIPAssociation (AWS EC2 EIPAssociation)
-
TechilaServerInstance (AWS EC2 EIPAssociation)
-
TechilaServerInstanceProfile (AWS EC2 EIPAssociation)
-
TechilaServerRole (AWS IAM Role)
-
TechilaServerSecurityGroup (AWS EC2 SecurityGroup)
-
TechilaServerSecurityGroupIngressData (AWS EC2 SecurityGroupIngress)
-
TechilaServerSecurityGroupIngressHTTPS (AWS EC2 SecurityGroupIngress)
-
TechilaServerSecurityGroupIngressManagement (AWS EC2 SecurityGroupIngress)
-
TechilaServerSecurityGroupIngressP2P (AWS EC2 SecurityGroupIngress)
-
TechilaServerSecurityGroupIngressSSH (AWS EC2 SecurityGroupIngress)
-
TechilaServerSecurityGroupIngressSignal (AWS EC2 SecurityGroupIngress)
-
TechilaSubnet (AWS EC2 Subnet)
-
TechilaSubnetRouteTableAssociation (AWS EC2 SubnetRouteTableAssociation)
-
TechilaVPC (AWS EC2 VPC)
-
TechilaWaitCondition (AWS CloudFormation WaitCondition)
-
TechilaWaitConditionHandle (AWS CloudFormation WaitConditionHandle)
-
TechilaWorkerInstanceProfile (AWS IAM InstanceProfile)
-
TechilaWorkerRole (AWS IAM Role)
-
TechilaWorkerSecurityGroup (AWS EC2 SecurityGroup)
-
TechilaWorkerSecurityGroupIngress (AWS EC2 SecurityGroupIngress)
-
TechilaWorkerSecurityGroupIngressRDP (AWS EC2 SecurityGroupIngress)
-
TechilaWorkerSecurityGroupIngressSSH (AWS EC2 SecurityGroupIngress)
The following additional components will be created when using the TDCE Amazon Aurora deployment option:
-
TechilaAuroraDBCluster(AWS RDS DBCluster)
-
TechilaAuroraDBMasterSecret (AWS SecretsManager Secret)
-
TechilaAuroraDBUserSecret (AWS SecretsManager Secret)
-
TechilaAuroraDBMasterSecretAttachment (AWS SecretsManager SecretTargetAttachment)
-
TechilaAuroraDBUserSecretAttachment (AWS SecretsManager SecretTargetAttachment)
-
TechilaMasterSecretRotationSchedule (AWS SecretsManager RotationSchedule)
-
TechilaDBClusterSecurityGroupIngressPSQL (AWS EC2 SecurityGroupIngress)
-
TechilaDBClusterSecurityGroupIngressPSQLLambda (AWS EC2 SecurityGroupIngress)
-
TechilaDBClusterSecurityGroup (AWS EC2 SecurityGroup)
-
TechilaSecretsLambdaSecurityGroup (AWS EC2 SecurityGroup)
-
TechilaSecretsEndpointSecurityGroup (AWS EC2 SecurityGroup)
4.11. Establishing SSH Connections to the Techila Server
Establishing SSH connections to the Techila Server is not required during the deployment or normal operation. However, if you want to establish an SSH connection, this can be done using the SSH key defined during the deployment process.
Please note that the Techila Server processes are automatically started under the dedicated user account. If you establish an SSH connection to the Techila Server, do not change the processes to run under root. If you need to either stop, start, or restart the Techila Server processes, please use the following commands:
sudo systemctl stop tgs.init
sudo systemctl start tgs.init
sudo systemctl restart tgs.init
4.12. Cost Estimation
Your TDCE environment will consist of one Techila Server instance and several Techila Worker instances. You can set the number and type of Techila Worker instances based on your computational needs by using the Techila Dashboard.
The Techila Server does not have any software costs. Techila Worker software is billed using an hourly rate determined by the instance type you are using. Billing for Techila Worker software follows AWS Marketplace billing, meaning usage is rounded up to the nearest whole hour. Please see the following link for more details:
Billable infrastructure components in a standard TDCE deployment include:
-
Techila Server EC2 instance;
-
Techila Worker EC2 instances;
-
EBS storage;
-
S3 storage;
-
Outbound traffic (if exceeding the limit of 1 GB free per region per month ); and
-
Amazon Aurora - Optional. The PostgreSQL database will be stored on the EBS volume if you are not using Amazon Aurora.
For example, let’s consider an environment consisting of one Techila Server running 24/7 and 20 Techila Workers running 8 hours/day using c5.large instances. The table below shows the Techila Worker software costs for c5.large instances.
| Techila Worker Software Pricing for c5.large | ||
|---|---|---|
TDCE - Enterprise Edition - Worker - Linux |
running on c5.large |
$0.27/hr/instance |
TDCE - Enterprise Edition - Worker - Windows |
running on c5.large |
$0.27/hr/instance |
Please see the following link for more details about the infrastructure costs used in this example:
For ease of reference, the infrastructure cost estimate in this example environment would be $831.00/month.
In addition to the infrastructure costs, the Techila Workers in this example (20 x c5.large instances running for 8 hours a day) would incur an additional software cost of approximately $1317.60/month.
The total cost of this deployment would be approximately: $831.00/month + $1317.60/month = $2148.60 / month
4.13. Troubleshooting
This chapter contains a list of items that can be checked if the TDCE is not working correctly and your computations are not progressing as expected.
-
If you cannot connect to the Techila Server, check that the Techila Server instance is running, i.e., not stopped. If required, please restart the instance as described in Restarting the Techila Server.
-
If the Techila Server instance is running, but you are still unable to connect to it, check that Techila Server processes are running. To do this, establish an SSH connection and check the status using the command:
systemctl status tgs.init
If the processes are not running, start them using the command:
sudo systemctl start tgs.init
-
If the Techila Server instance and processes are running but you are still unable to connect to it, check the Techila Server logs for errors. Relevant log files can be found in the following directories on the Techila Server:
-
Wrapper log:
/ebs/techila/server/bin/wrapper.log -
Log files in the folder:
/ebs/techila/server/bin/logs
-
-
To verify that the network connections are working correctly, test TCP port 443 by connecting to the Techila web interface using your web browser. Also, check TCP port 25001 and 25002 connectivity by running a Techila SDK command to test network connectivity as described in the configuration instructions Downloading and Configuring the Application Plugins.
-
Check for any new warning messages in the Techila web interface
Statuspage. The URL of theStatuspage ishttps://<TechilaServerNetworkAddress>/status.php -
Check that free disk space is available on the Techila Server. This can be checked from the
Statuspage, from the table located at the bottom of the page.If you need to free up disk space, this can be done by removing either old computational Project results or old Bundles that are no longer needed. These can be removed using the Techila web interface.
Bundles can be removed in
Admin→Bundles→DB Bundles. When removing Bundles, do not remove any Bundles with a defined category, as these can contain runtime components required during all computations.Projects can be removed in
Projects→DownloadedandCompleted. When removing Projects, you will also be removing the actual result data. Please make sure that you have downloaded the results before deleting any Projects. -
If your computational Project is not progressing, please check if you have the computational capacity (=Techila Workers) deployed. Please start capacity as described in Increasing Computing Throughput if required.
-
If Jobs are not being assigned to Techila Workers, verify that you selected the operating system that matches the machine where you have the Techila SDK. If needed, you can change the operating system of Techila Workers when launching capacity as described in Increasing Computing Throughput.
-
If computational Projects are started, and Jobs are assigned to Techila Workers but are not completed successfully, please check if errors are being generated in the Jobs. These error messages can be viewed in the Techila SDK
techila\logs\project_errorsdirectory. If errors are generated, the log files can be viewed for more information about what is causing the problem. -
If the problem persists, please see Support Requests for information on how to request troubleshooting assistance. If the problem cannot be resolved, you can restore the system to its last saved working state by restoring it from a snapshot described in Techila Server Instance Migration Instructions.
4.14. Healthcheck
Monitoring the application’s health can be done by checking the instance status and performing some simple network connectivity tests to verify that the Techila Server software is responding as expected. The list below contains some quick checks that can be done on a daily basis to verify that everything is working as expected.
-
Check the status of the Techila Server instance using AWS EC2 Management Console
-
Verify that you can access the Techila web interface and that the interface is responsive (uses TCP port 443).
-
Verify that you can establish Techila SDK connections (uses TCP port 25001 and 25002).
-
Verify that the Techila Server has sufficient free disk space available. This can be checked on the Techila web interface
Statuspage. You can also add automatic disk space monitoring by creating a status check alarm as described in the AWS documentation.
4.15. System Updates
Keeping the system up to date can be done by regularly running operating system updates on the Techila Server virtual machine.
sudo apt-get update
sudo apt-get upgrade
Techila Technologies regularly makes new versions of the TDCE solution available in the AWS Marketplace. To upgrade your TDCE version to the latest one, you can create snapshots of your existing TDCE environment and use these snapshots when launching the new TDCE version from the AWS Marketplace. This process is described in Techila Server Instance Migration Instructions. After migrating the Techila Server, the new environment will automatically have all of the latest available operating system updates as well as the latest version of the TDCE software.
4.16. Creating Backups Programmatically
The process for creating backups and restoring from backups is described in detail in Techila Server Instance Migration Instructions. This chapter describes how you can use a programmatic approach to do the backup process by using AWS Lambda functions and the AWS EC2 CLI.
-
Create a script that does the following operations
-
Create a Lambda function that runs the script
-
Create a rule that runs the lambda function at desired intervals
After you have automated the backup procedure, you can verify that the backups are generated correctly by restoring your Techila Server from the backup described in Techila Server Instance Migration Instructions.
4.16.1. Techila SDK Credentials
When you download a TechilaSDK.zip file from the Techila Dashboard, a Java keystore file named admin will be included in the package. This keystore contains a key with a validity period of 365 days.
If you want to rotate your user credentials, you can download the TechilaSDK.zip again from the Techila Web Interface. Each time you download the TechilaSDK.zip file, a new set of user credentials will be created and stored in the package.
To disable your old Techila SDK user credentials, you will need to set the status of the old End-User Key to untrusted using the Techila web interface as described below:
-
In the Techila Web Interface, navigate to
Admin→End-Users→End-User List→ Click onAdmin -
Click the
Untrustbutton next to the old key you want to disable.
4.16.2. Support Requests
Support for TDCE in AWS Marketplace can be requested using the following online form.
Please note that there is no SLA included in this support offering. If you want to learn more about dedicated, premium technical support levels that include SLA, please get in touch with sales@techilatechnologies.com for more information.
When requesting support, the following document describes how you can create a log file package for troubleshooting purposes.
4.16.3. Rotating Credentials
This Chapter contains a description of how to rotate your Techila user credentials and how the AWS Secret Manager rotates secrets on a regular basis.
Techila Credentials
The Techila SDK downloaded from the Techila Dashboard contains a Java keystore file containing your Techila user credentials. The key in the keystore file is valid for 365 days from the moment you download Techila SDK.
If you want to rotate the user credentials and start using a new set of Techila user credentials, please follow the steps below:
-
Download and install a new Techila SDK as described in Downloading and Configuring the Application Plugins
-
In the Techila web interface, navigate to
Admin→End-Users→End-User List→ Click onadmin(in theLogincolum) -
Click the
Untrustbutton next to the old key you no longer want to use
Amazon Aurora Secrets Manager
When using TDCE with Amazon Aurora, database passwords are automatically rotated by AWS Secrets Manager at 30-day intervals. More information about rotating secrets can be found at AWS documentation.
4.17. Accessing Secrets Stored in AWS Secrets Manager
This Chapter contains instructions on configuring your AWS environment to enable Techila Workers to access secrets stored in AWS Secrets Manager.
Please note that the following steps only apply to TDCE environments that use Aurora RDS. If you use PostgreSQL, you must manually configure an endpoint for the AWS Secrets Manager.
-
Open AWS Secrets Manager and click
Store a new secret.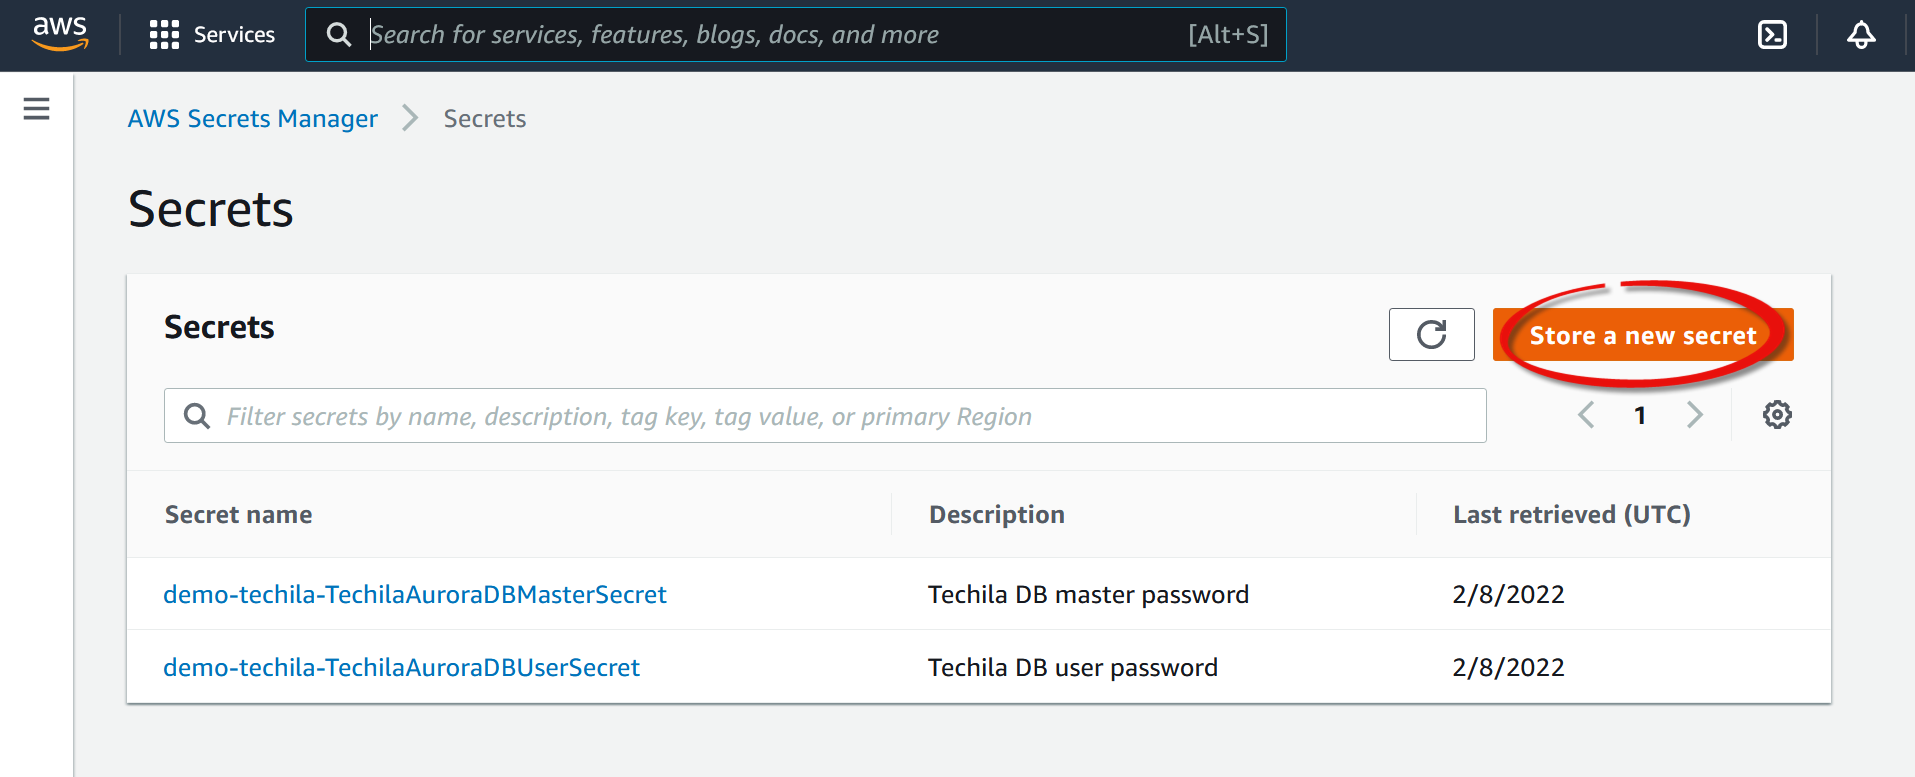
-
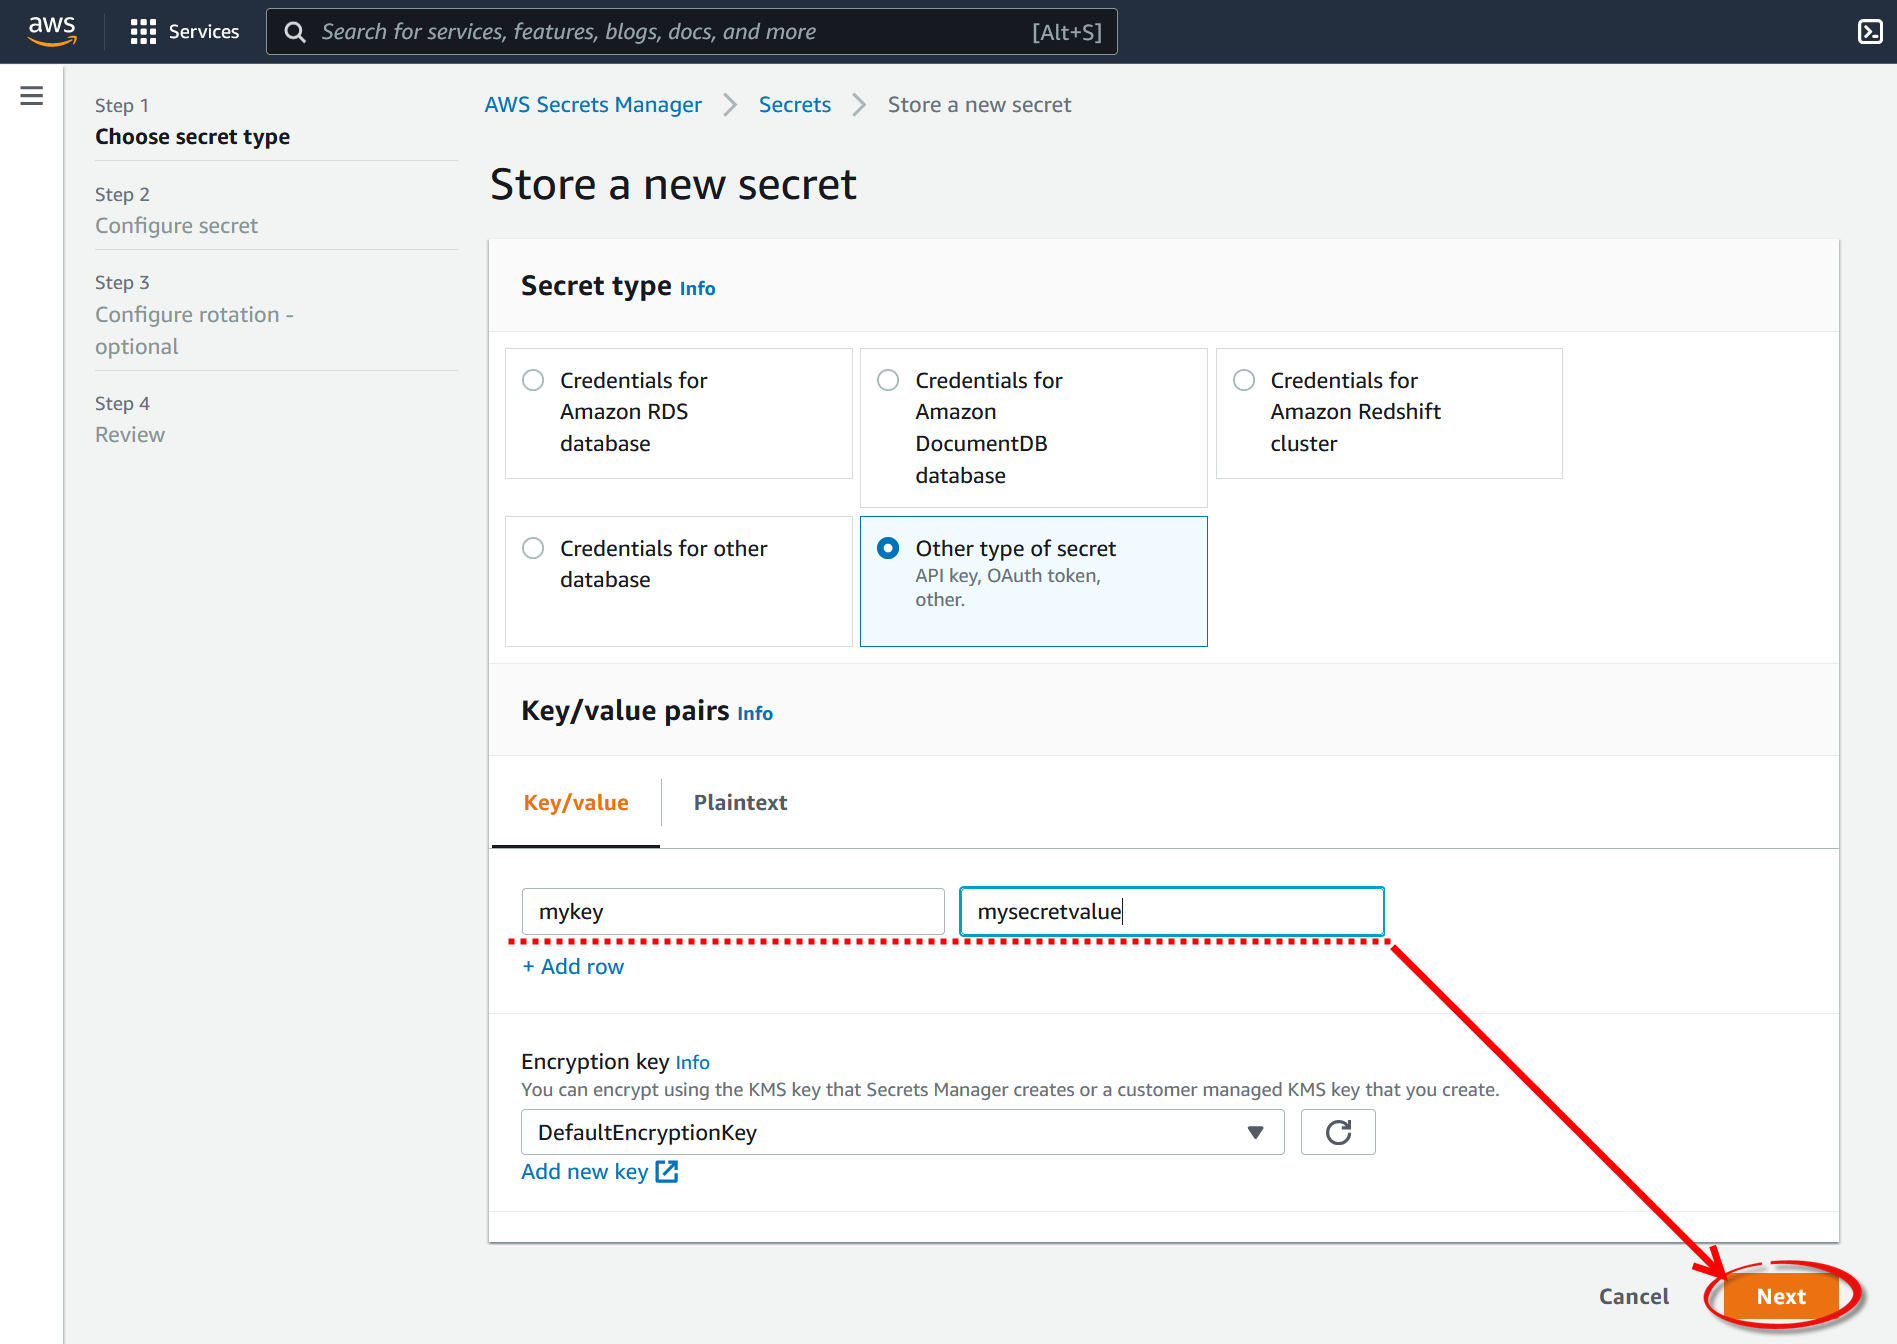
Create a new secret. The value of this secret will be later retrieved using a code snippet run on Techila Workers.
-
Give the secret a descriptive name and click
Next.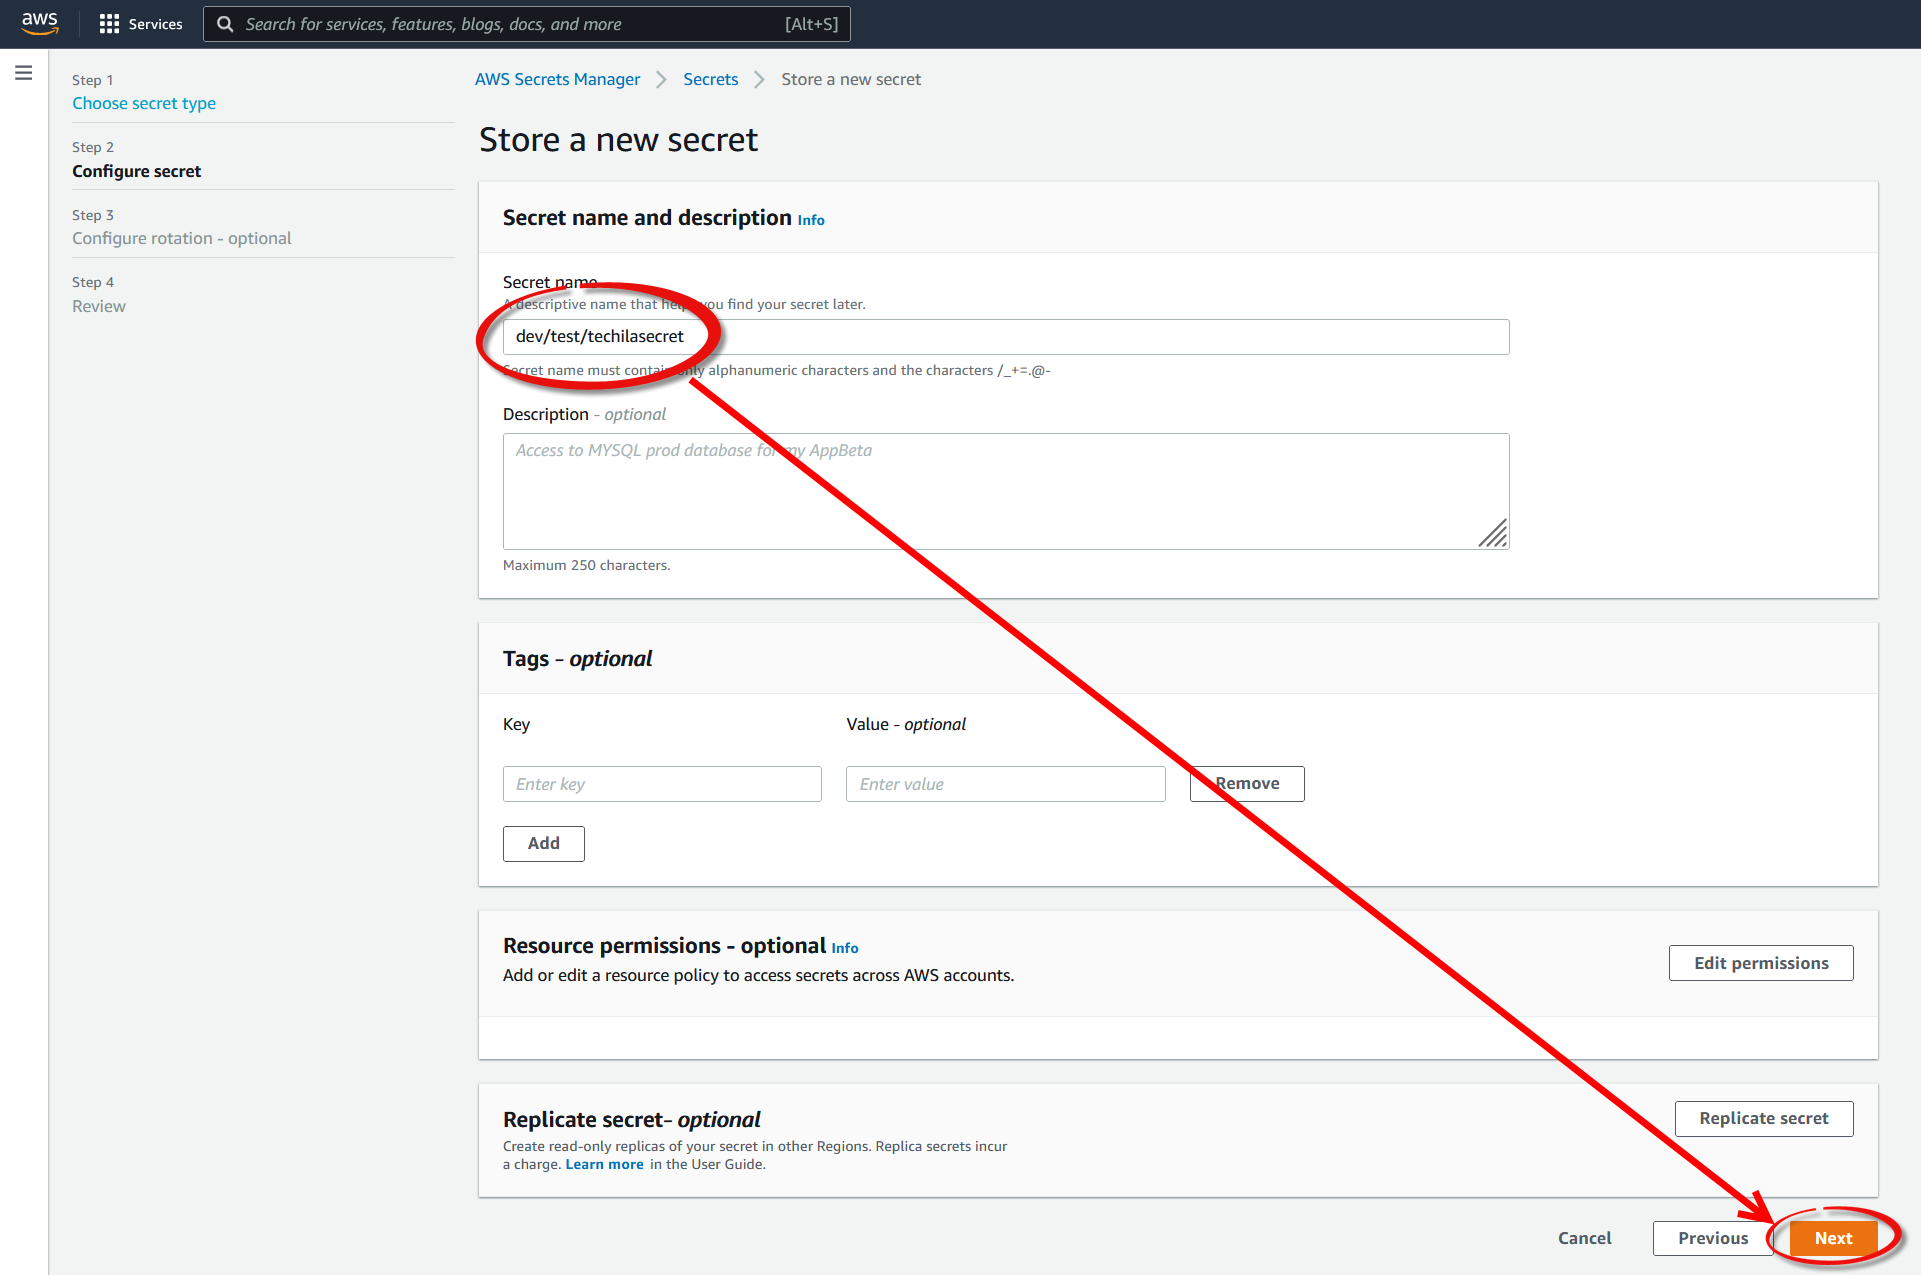
-
Click
Next, and on the final page, clickStoreto store the secret. The secret should now be visible in the list.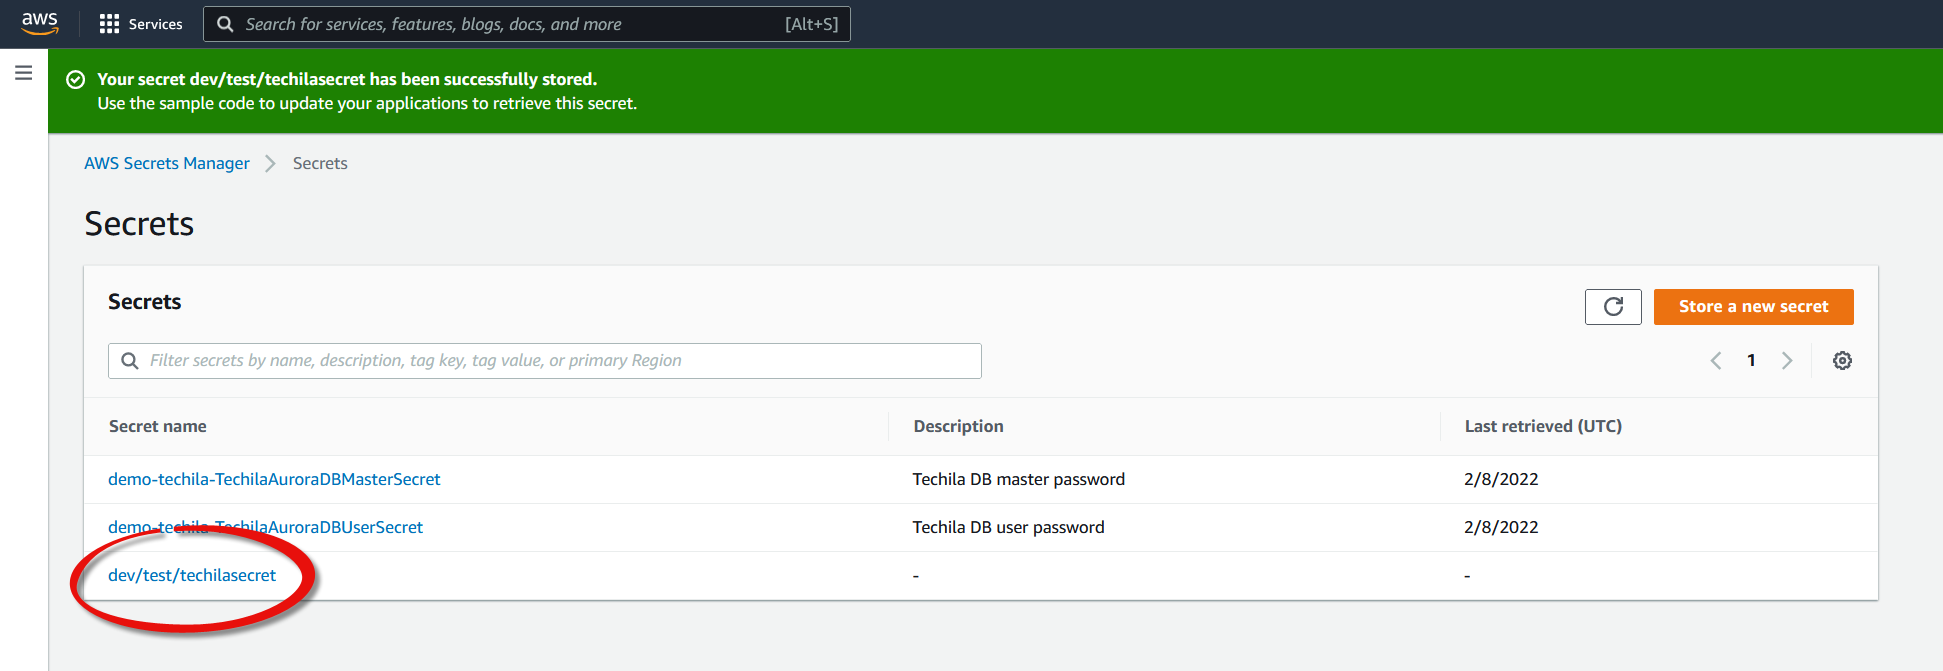
-
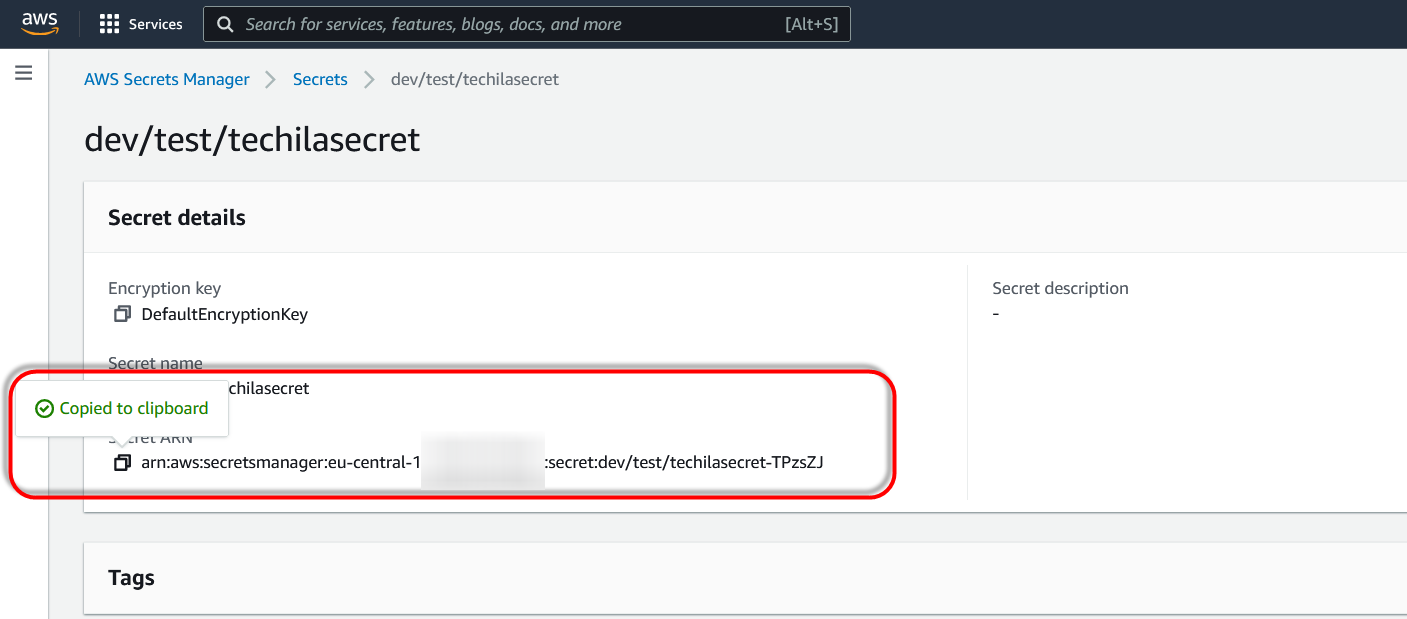
Retrieve the Amazon Resource Name (ARN) of the secret that was just created and store it for future use.
-
In the AWS console, navigate to
IAM→Policiesand clickCreate Policy.
-
In the policy settings, set the service to
Secrets Manager, permissions toRead, and then click theAdd ARNlink.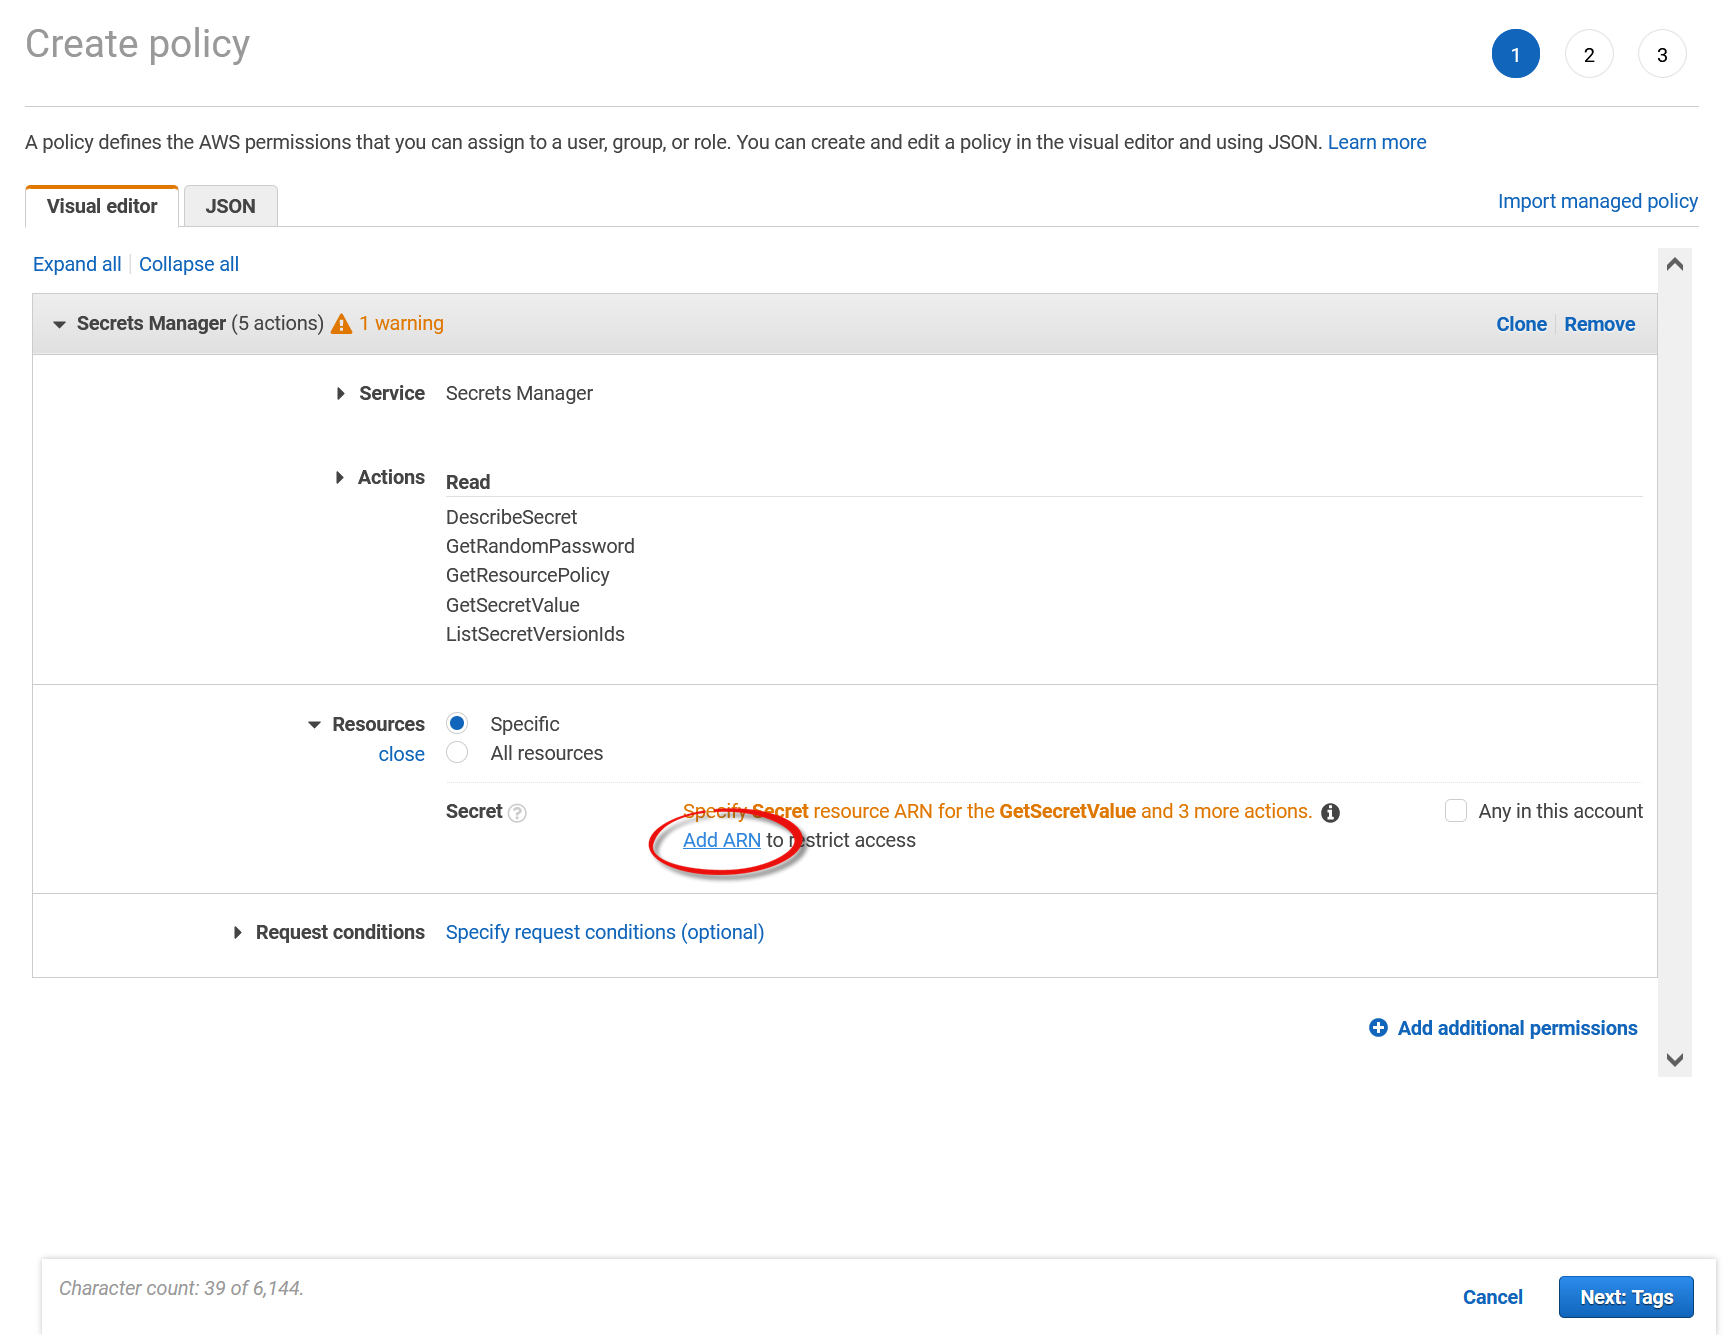
-
In the ARN settings, enter the ARN of the secret created in the previous steps.
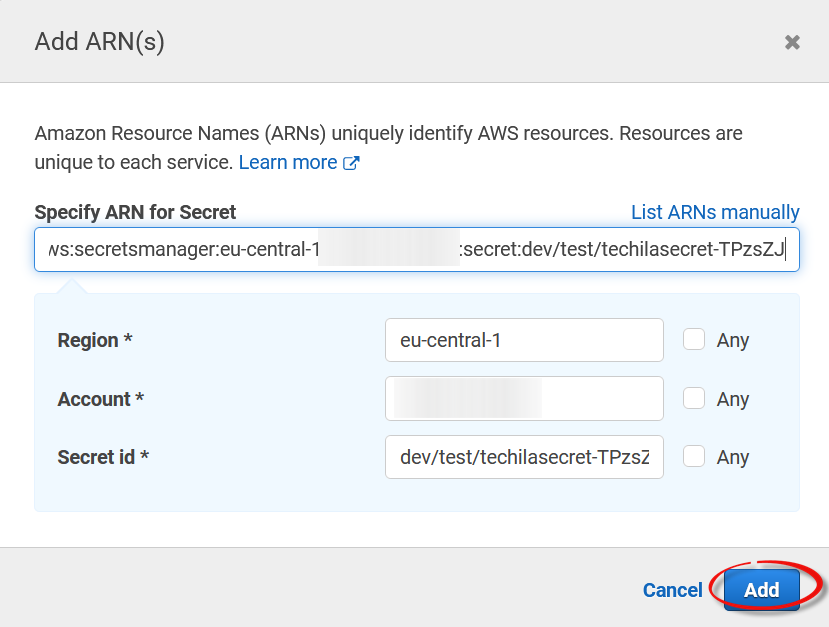
-
After adding the ARN, click
Next: Tagsand also clickNextin the next view.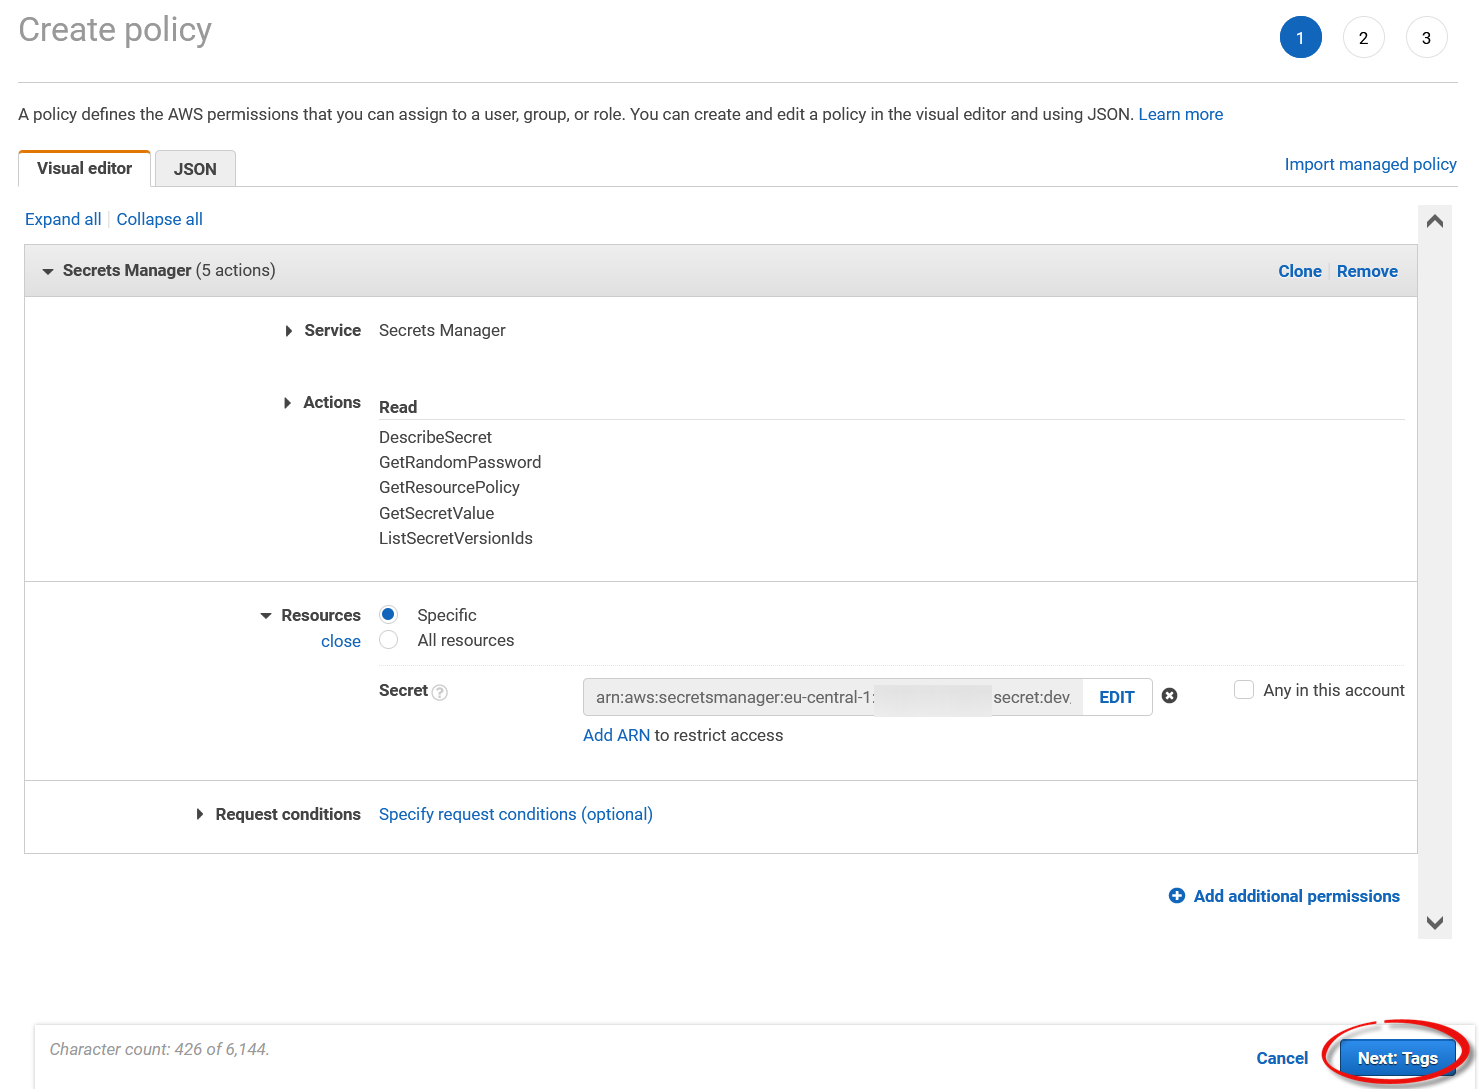
-
Define a descriptive name for the policy and click
Create policy.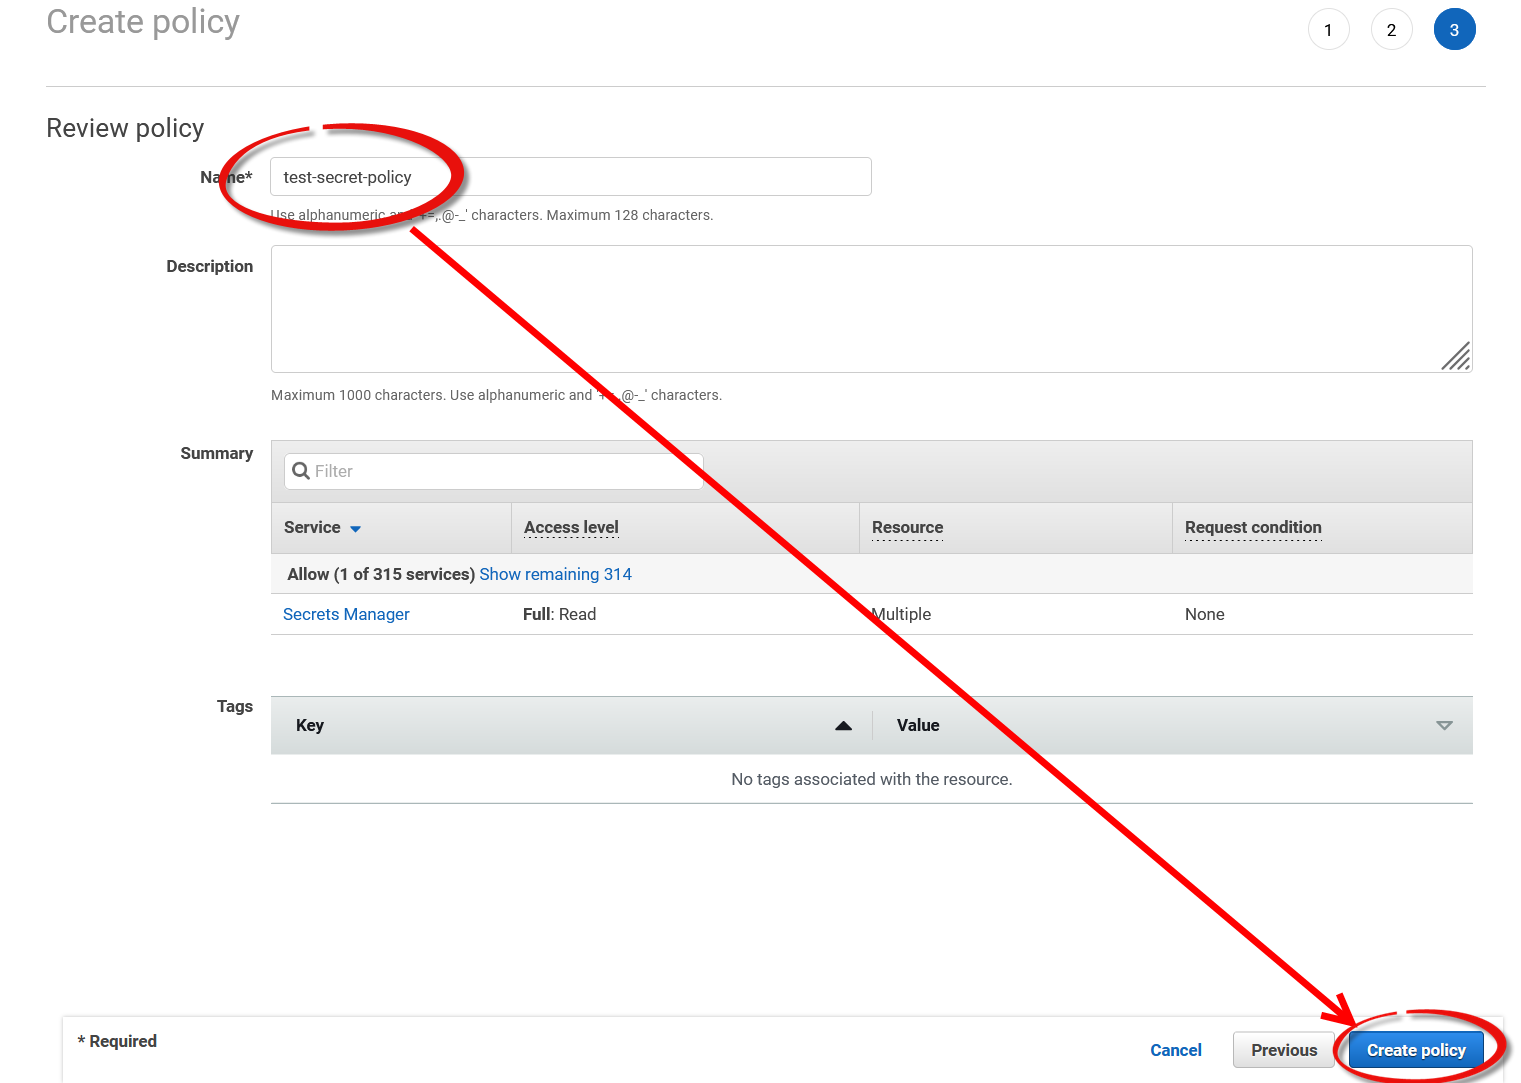
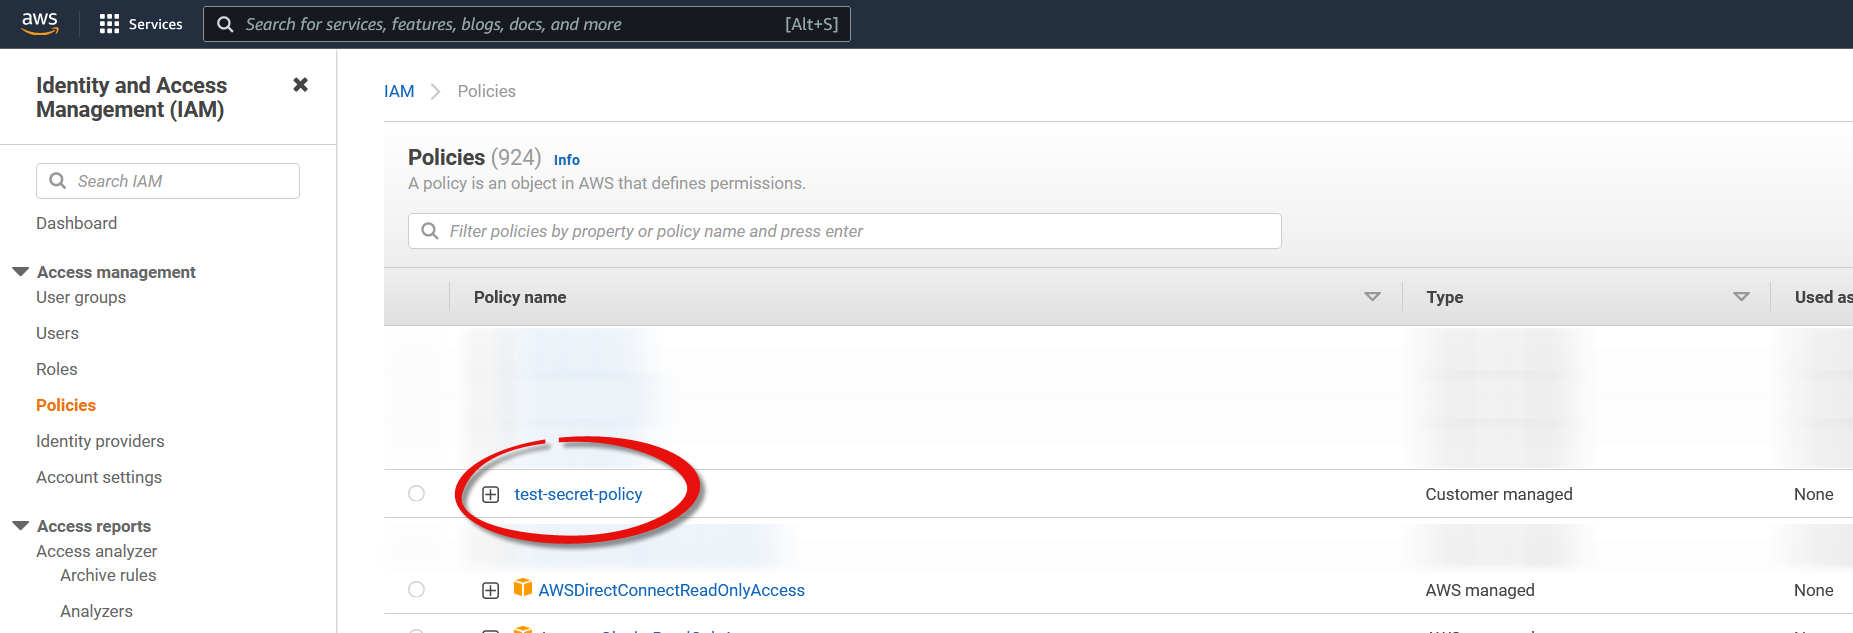
-
The policy should now be visible in the list.
-
Next, you must create another policy allowing Techila Workers to retrieve Bundles from the bucket associated with your TDCE deployment. This bucket is used to transfer runtime components required during computations.
Start by getting the ARN of the bucket by navigating to
S3→Bucketsin the AWS console and clicking on your Techila bucket.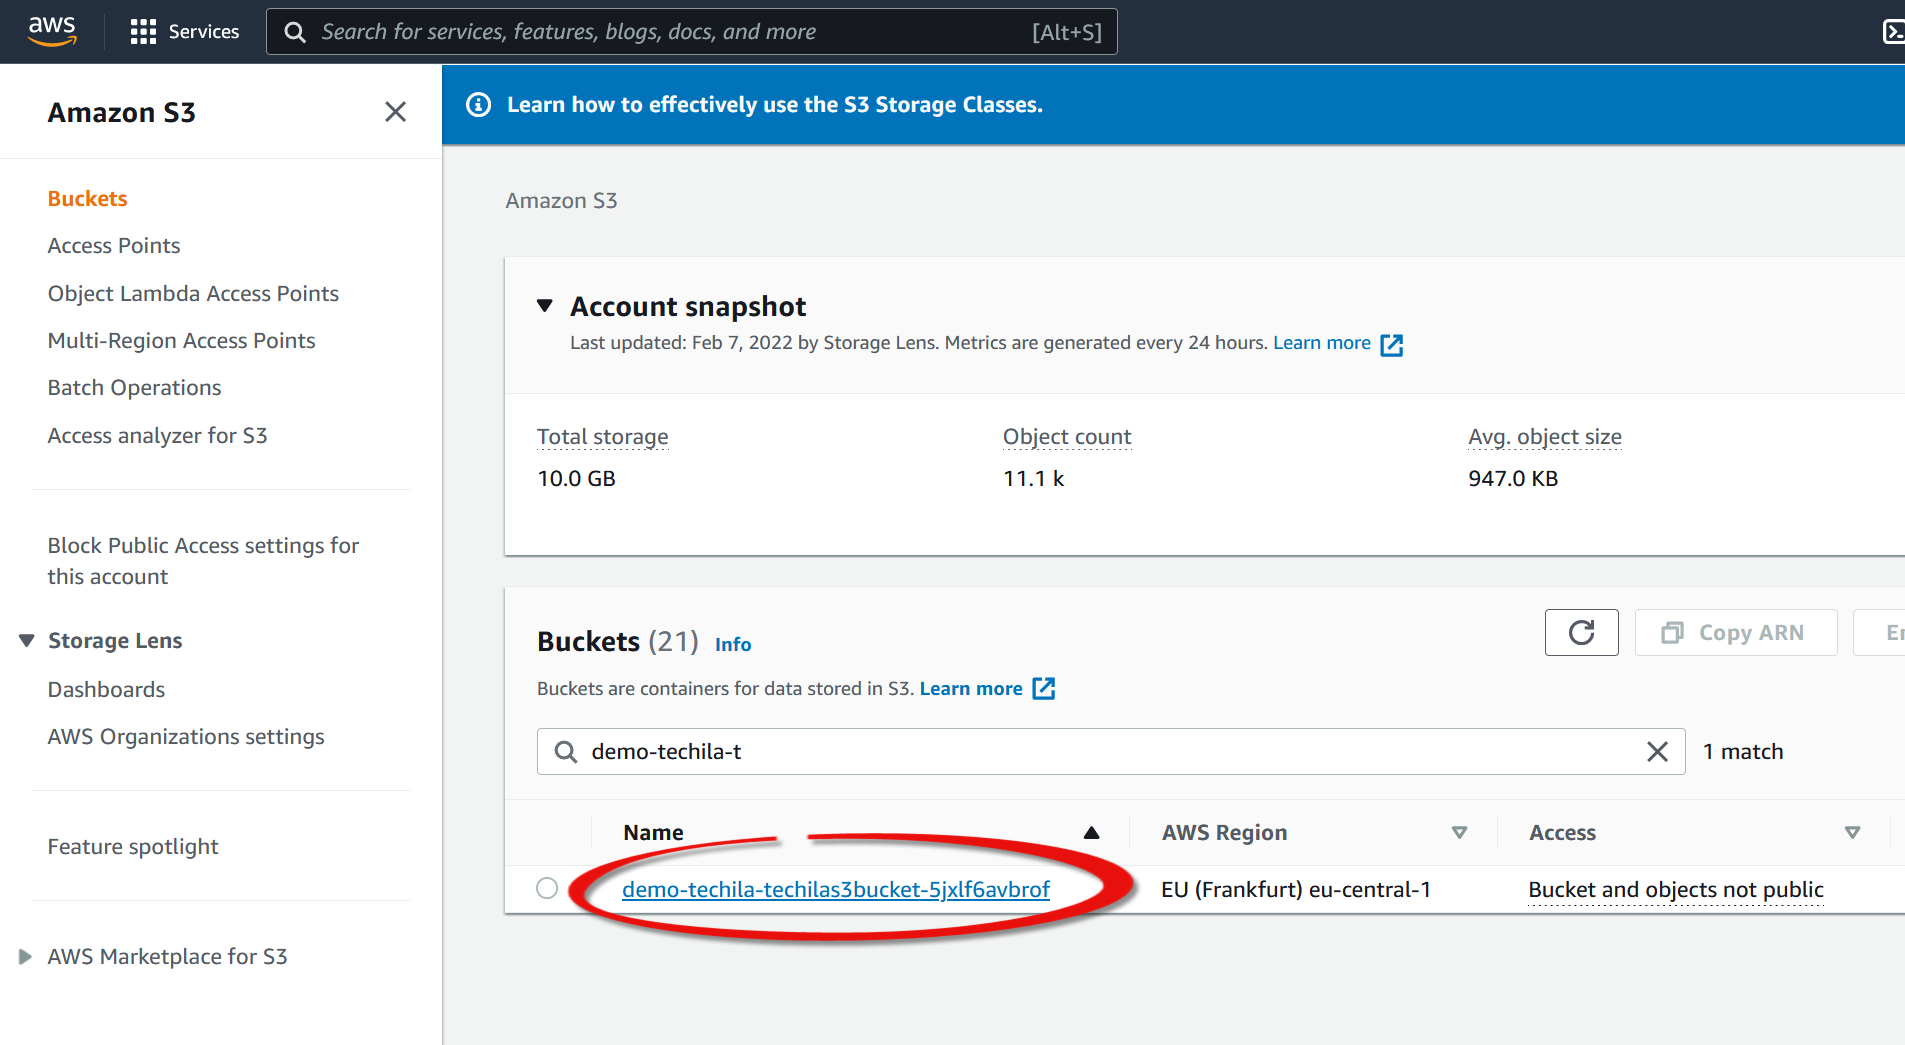
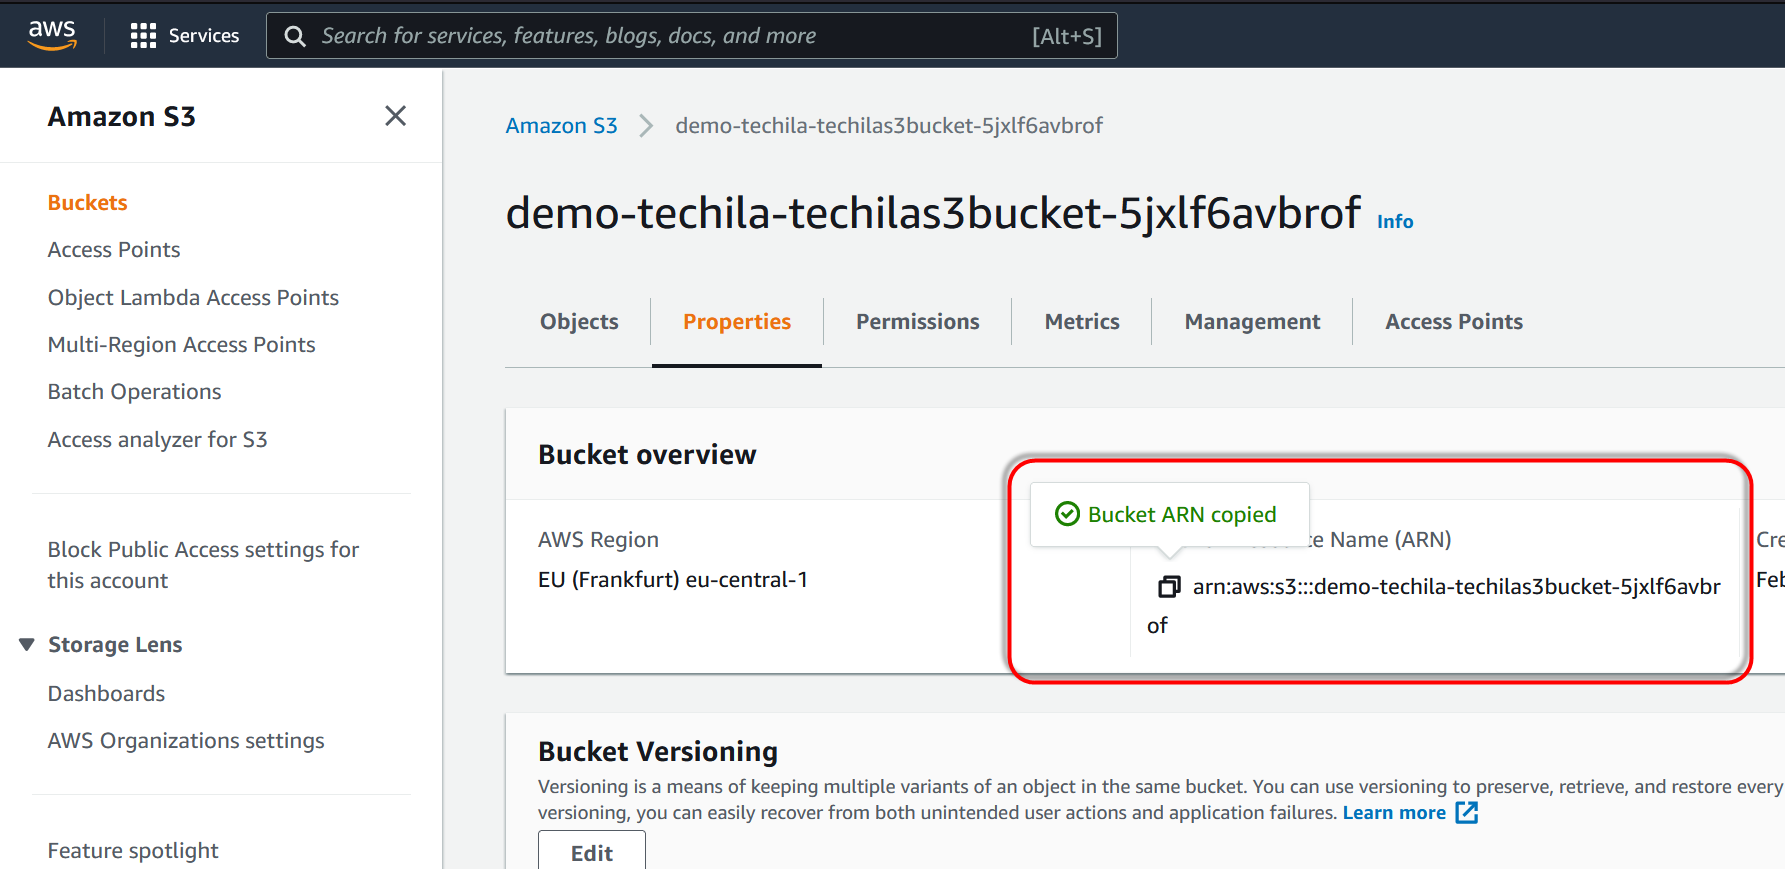
-
Copy the bucket ARN to your clipboard.
-
Next, you need to create the actual policy for accessing the bucket. In the AWS console, navigate to
IAM→Policiesand clickCreate Policy.
-
Set the service to
S3and actions toGetObjectand click theAdd ARNlink.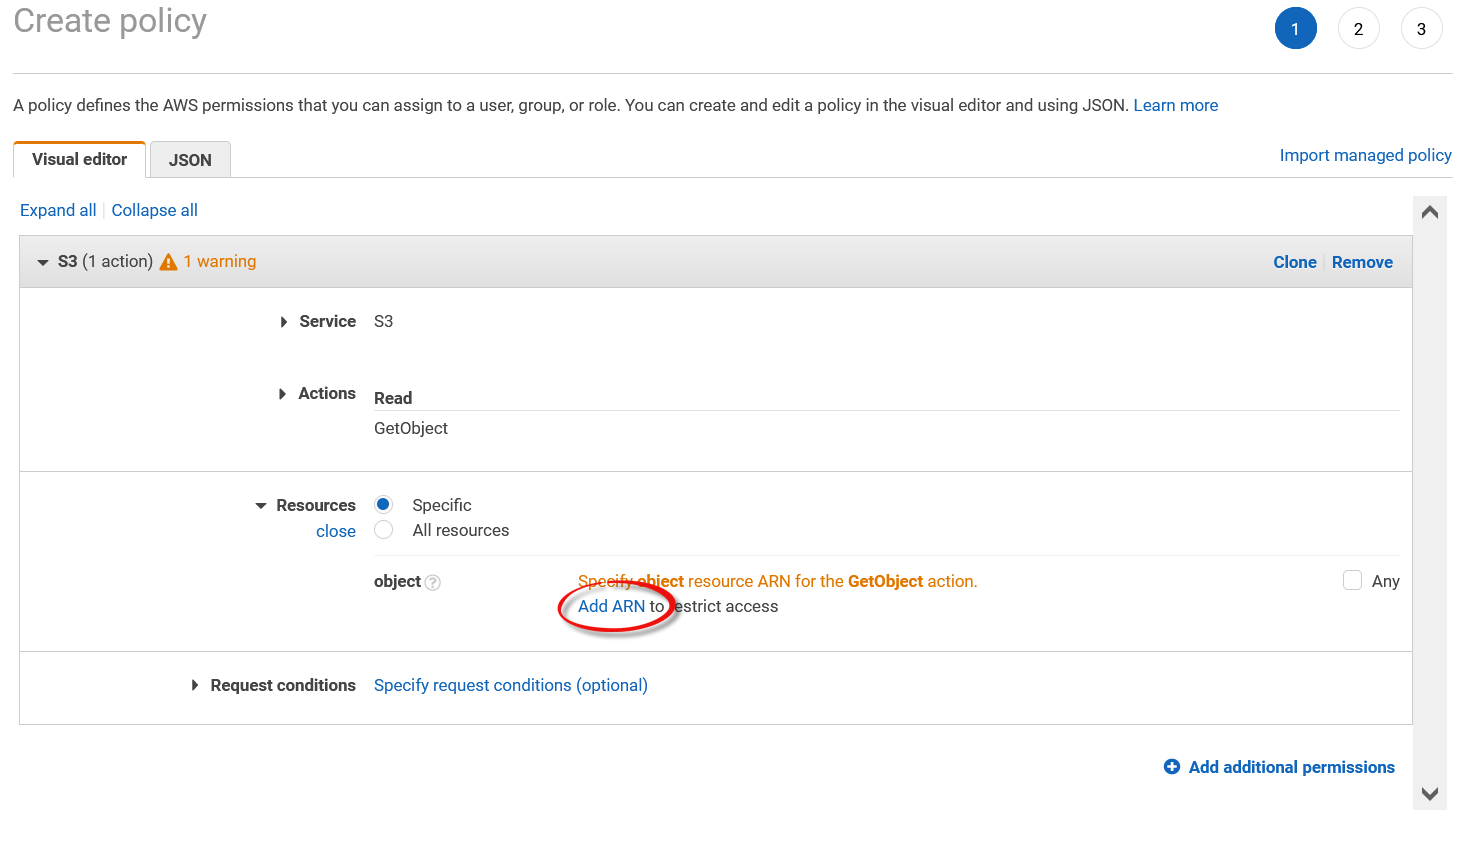
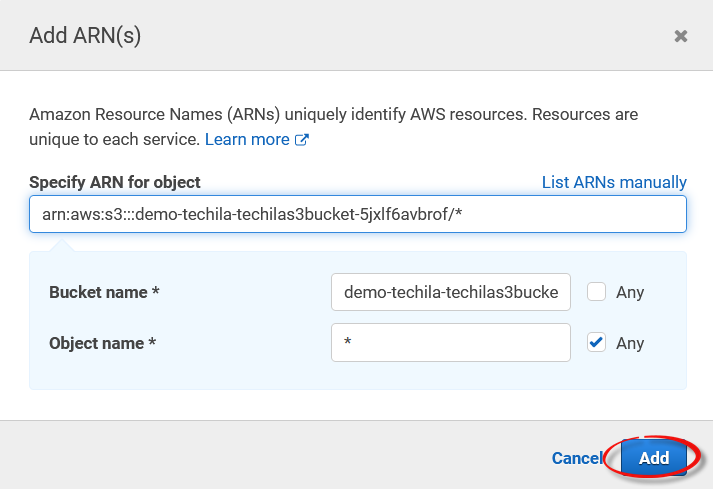
-
Add the ARN and allow access to all objects by suffixing the ARN with
/*.
-
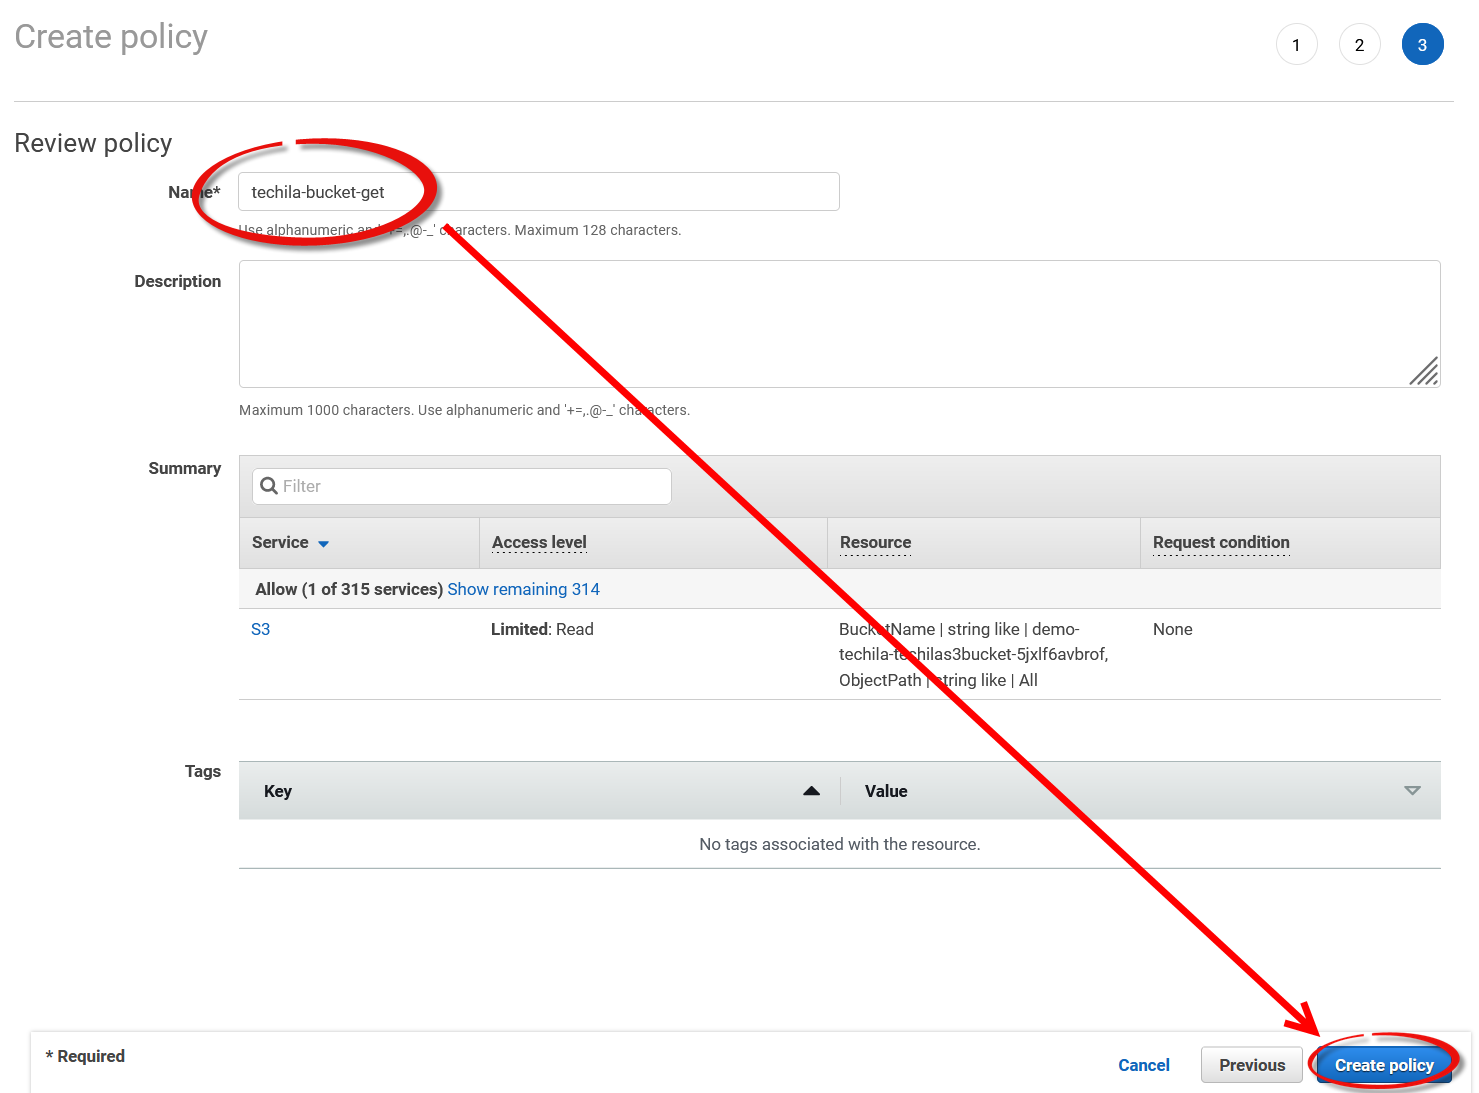
Click
Next:tagsand also clickNextin the next view.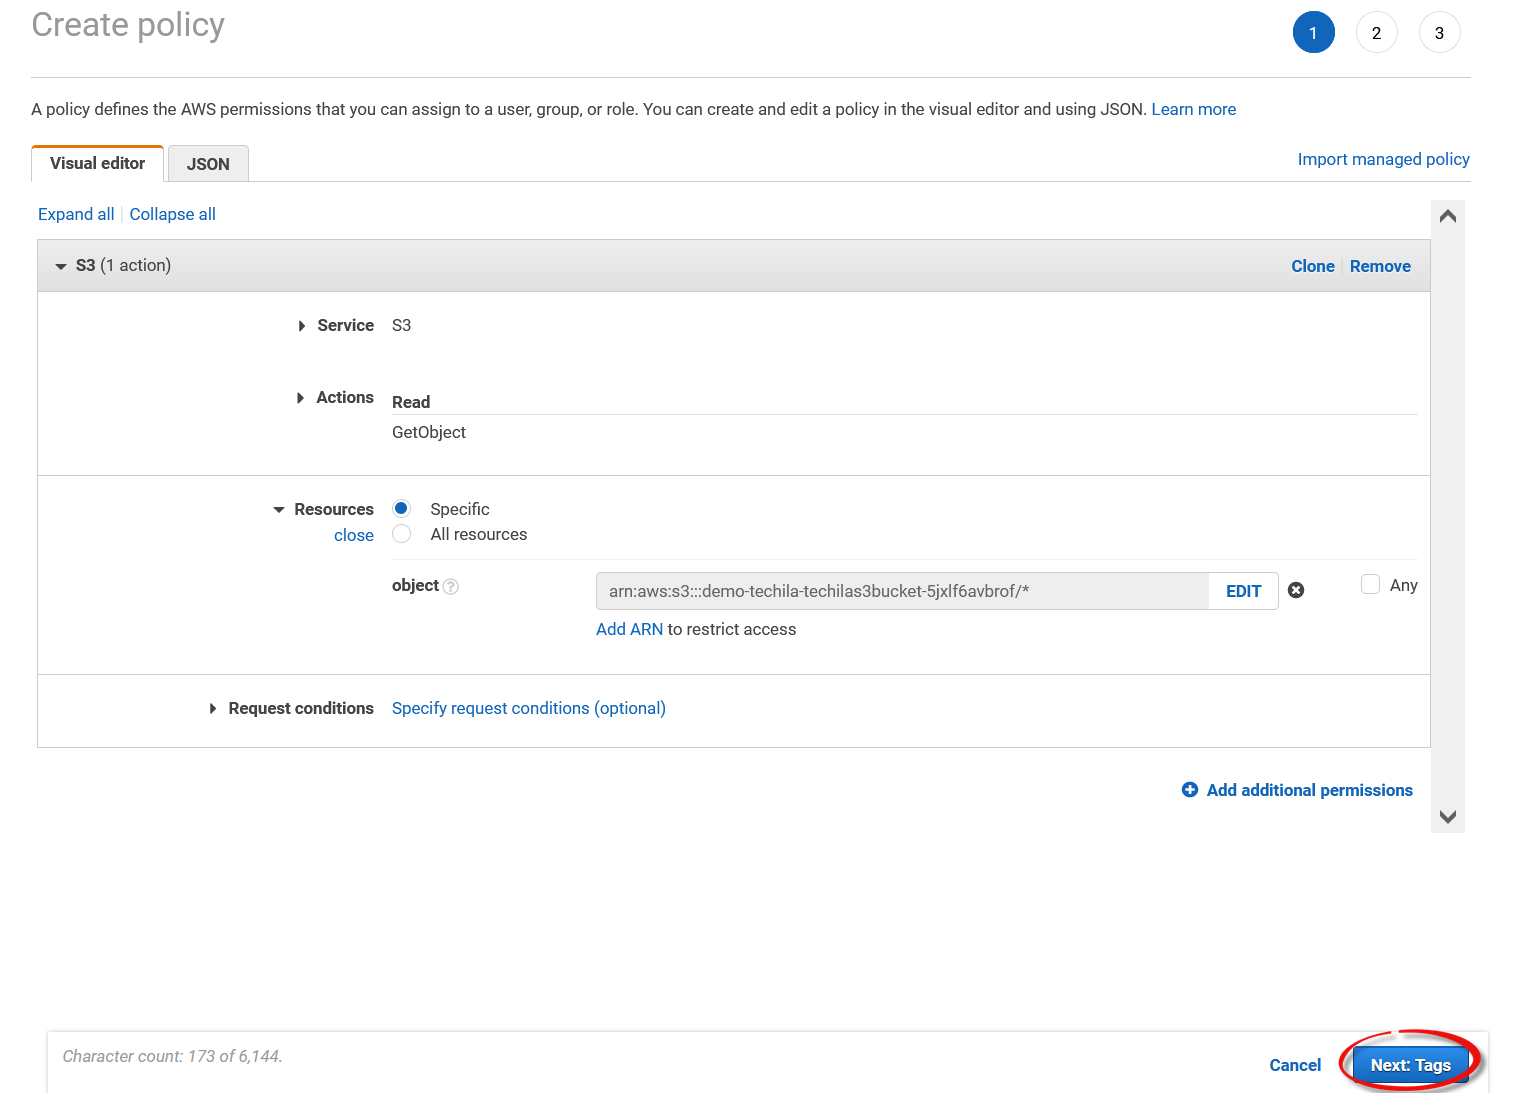
-
Finally, give a descriptive name to the policy and create the policy.
-
Next, you need to create a new role that contains these policies. This role will later be linked with Techila Worker instances, enabling them to access the secret.
-
In the AWS console, navigate to
IAM→Rolesand clickCreate role.
-
Select
AWS ServiceandEC2and clickNext.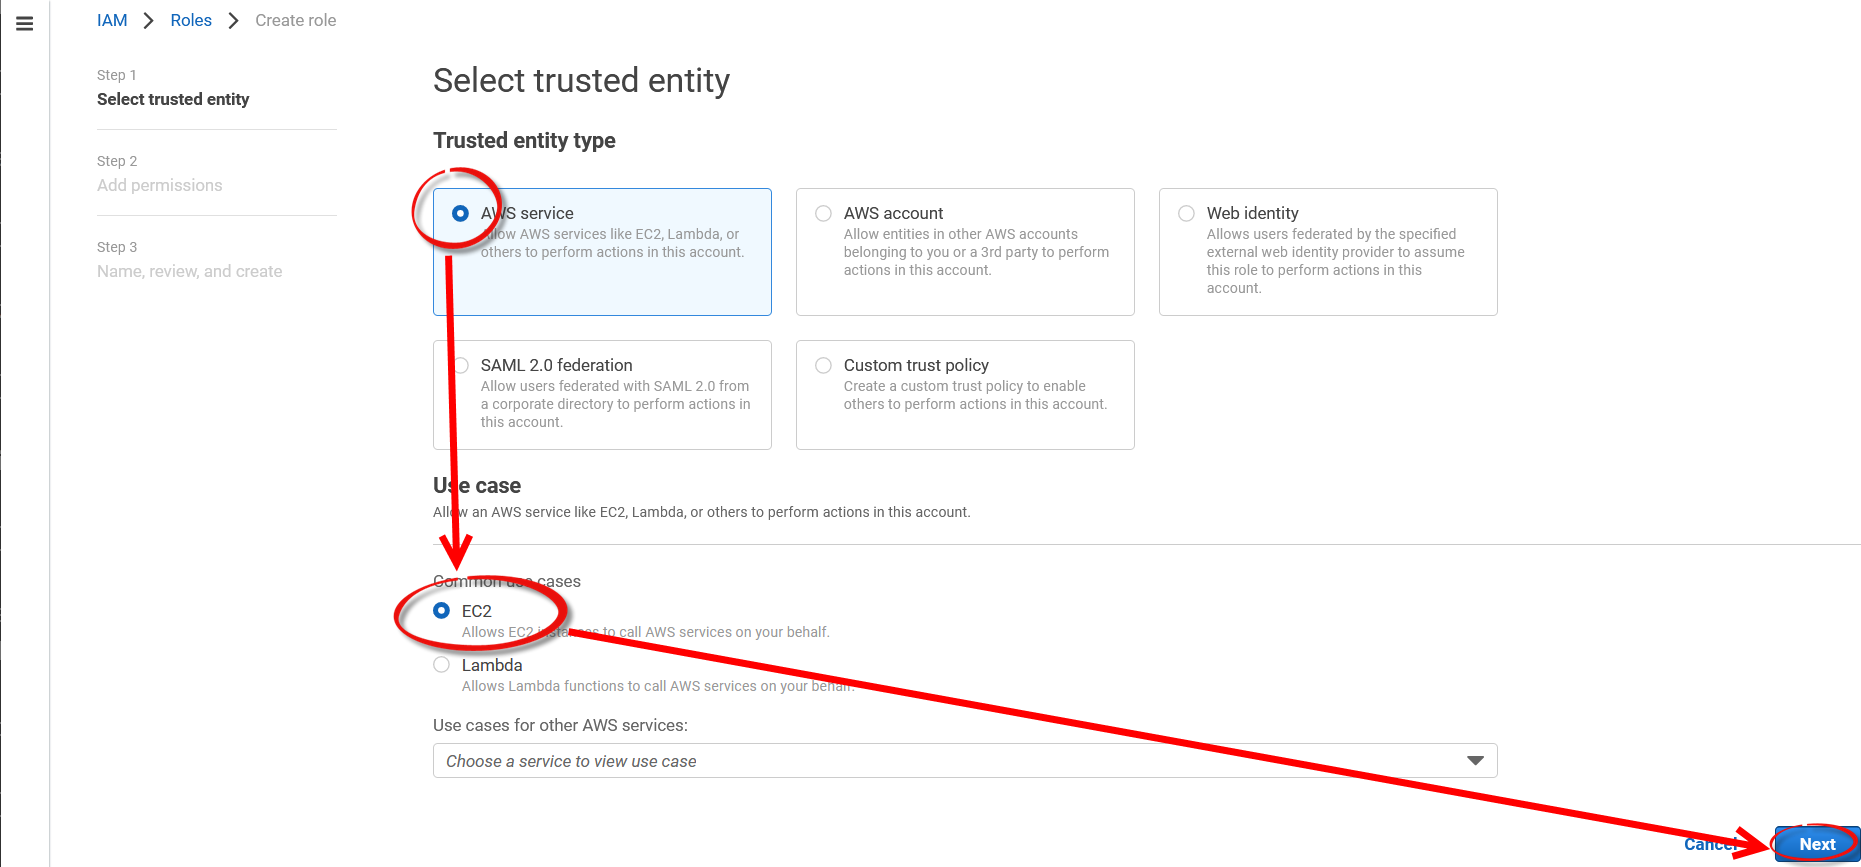
-
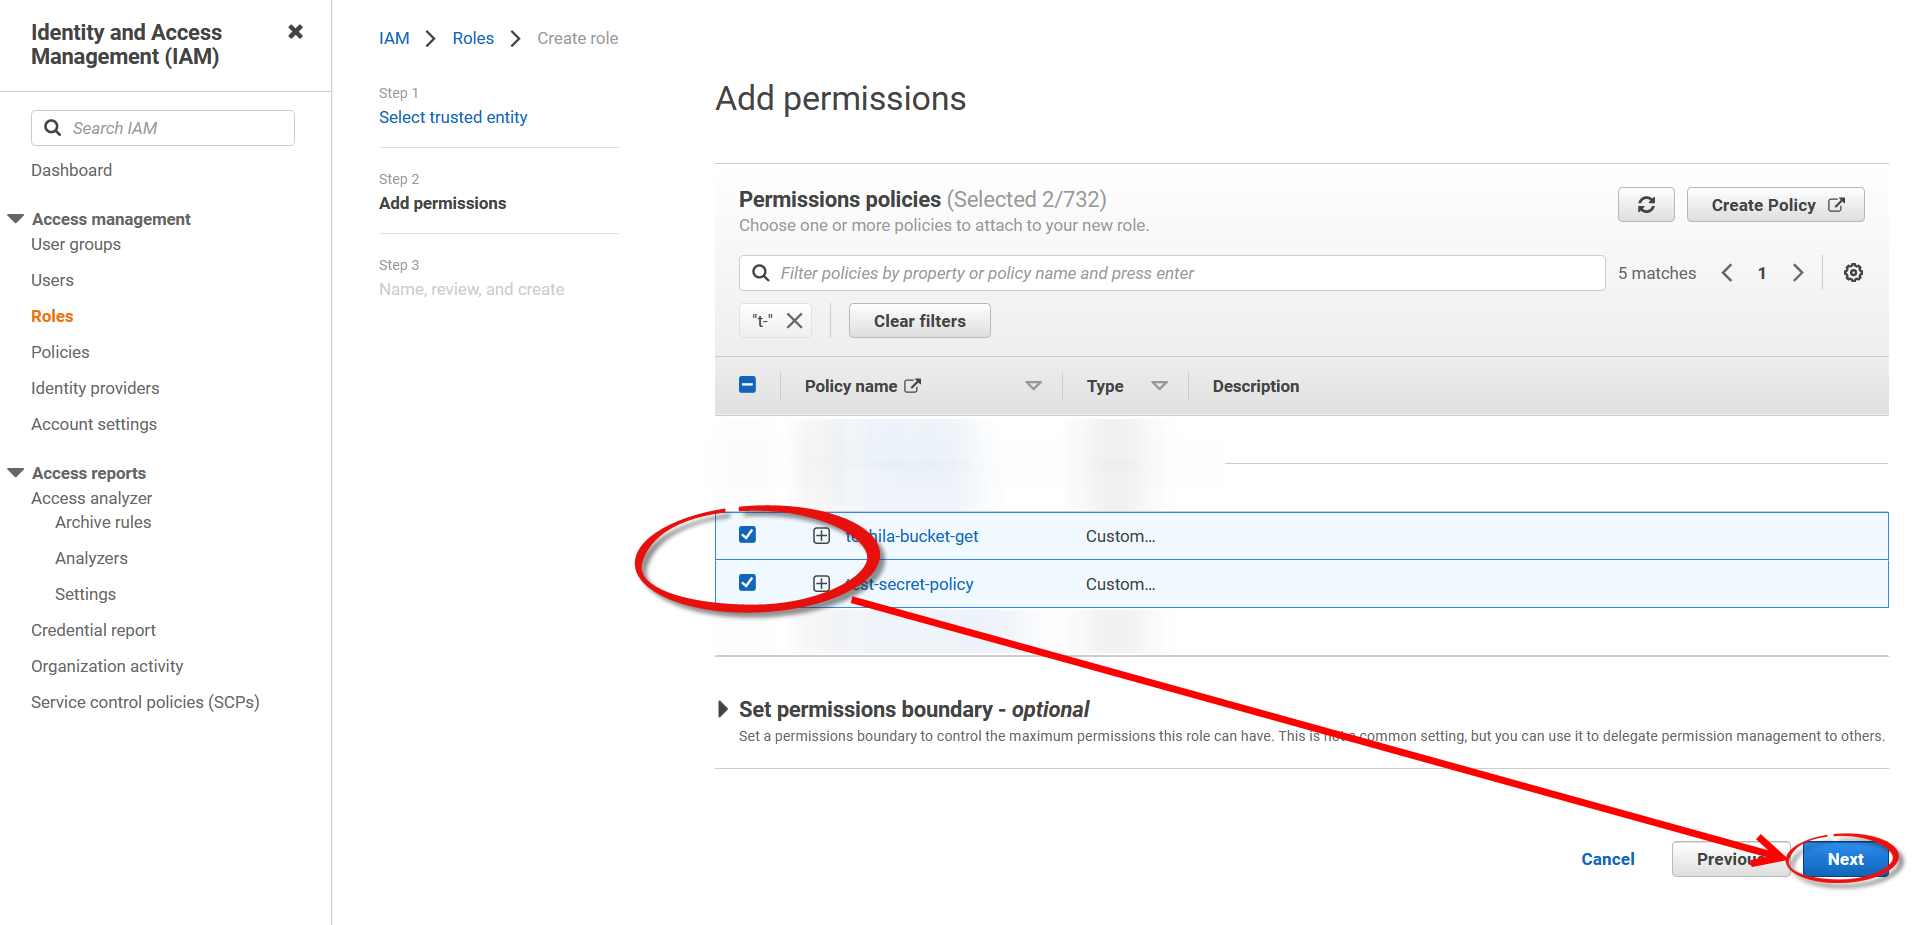
Select the two policies created in the previous steps and add them to the role.
-
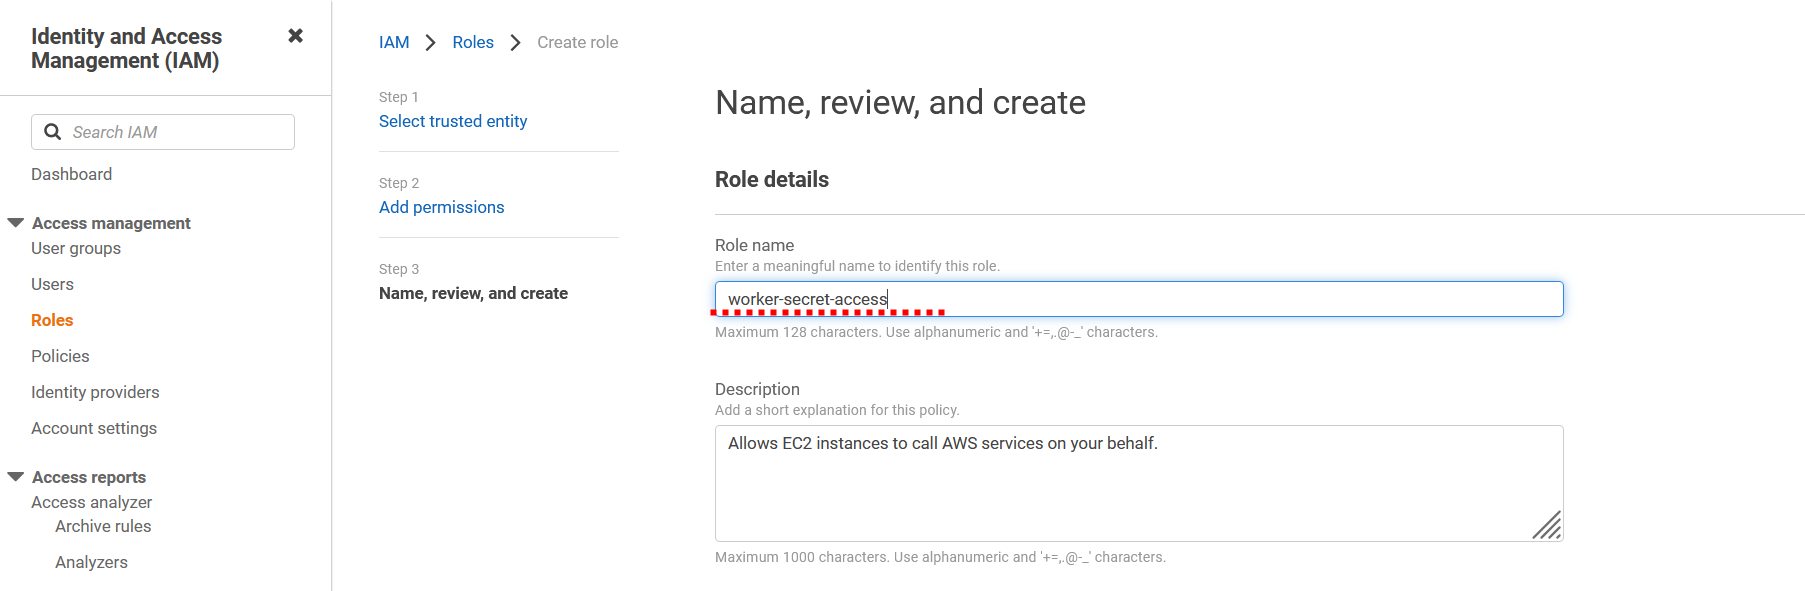
Give the role a descriptive name and create the role.
-
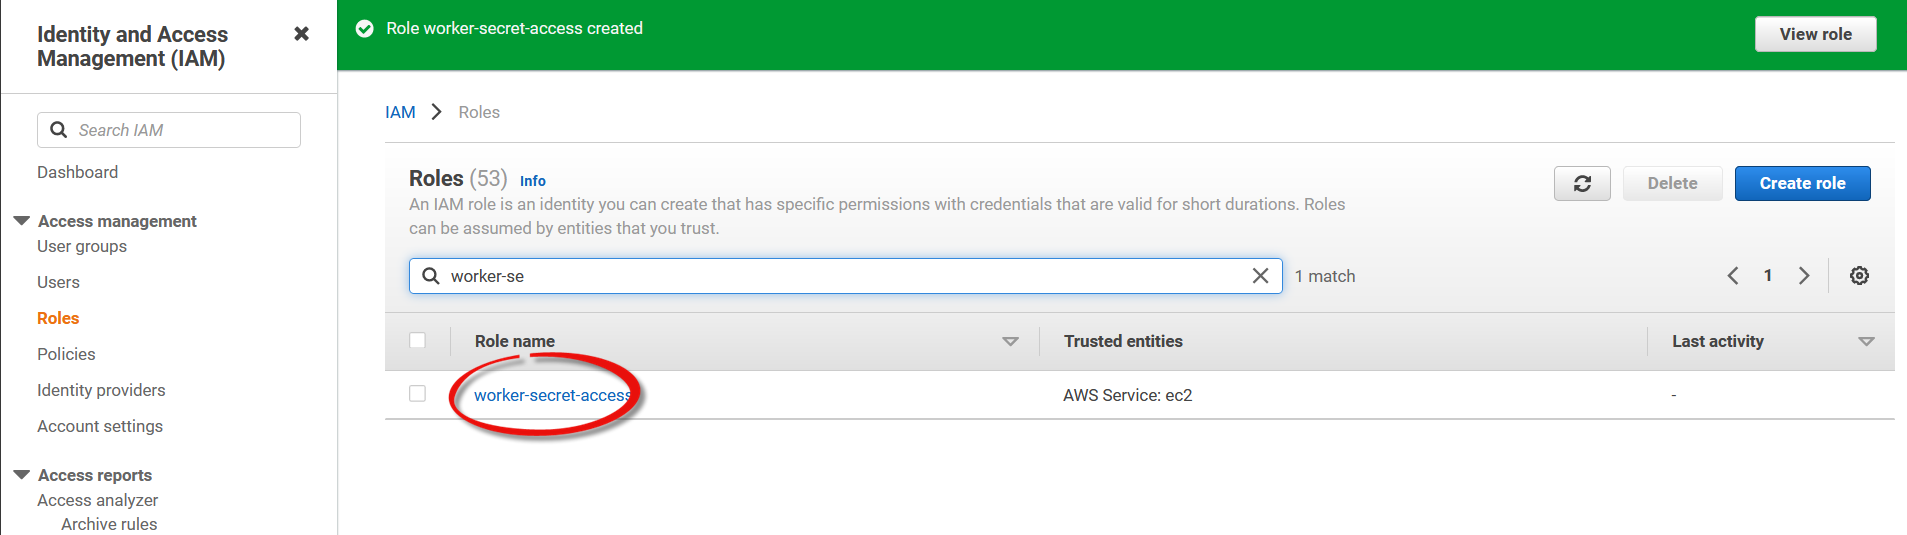
The role should now be visible in the list. View the role by clicking it.
-
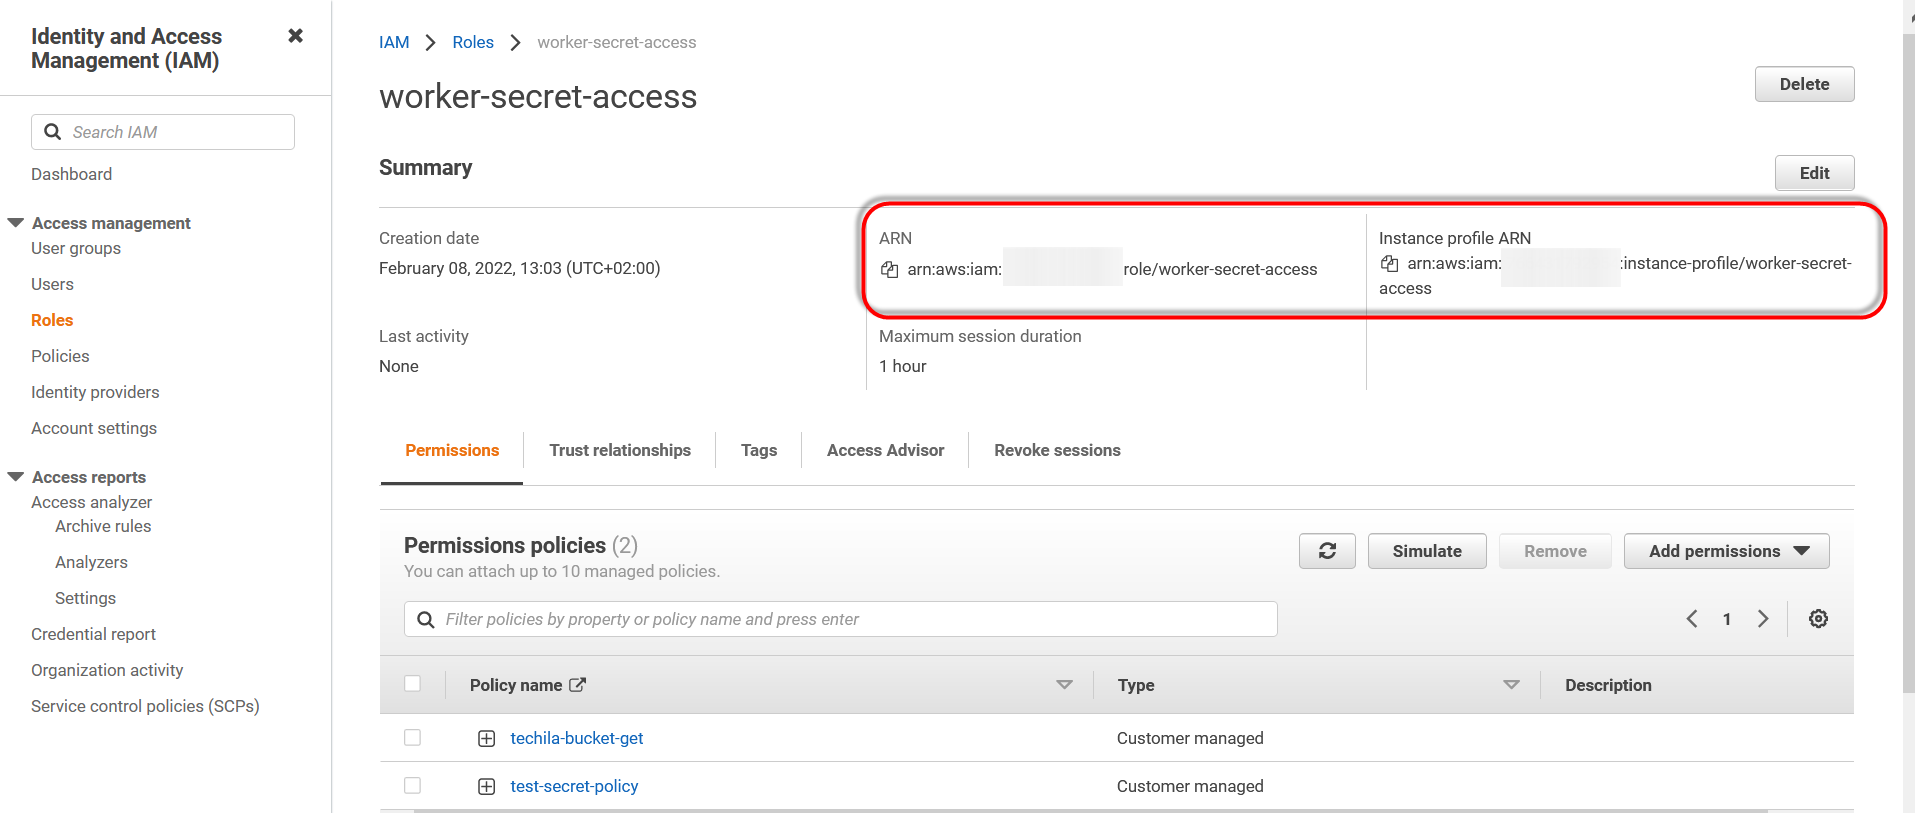
Retrieve the ARN and instance profile ARN for future use. You will need these later when modifying the policies.
-
Next, the Techila Worker Virtual Private Network (VPC) must be configured to allow access to the Secrets Manager endpoint.
To start, retrieve the Techila Worker security group ID by navigating to the
VPC→Security Groupsview in the AWS console. Copy the security group ID for future use.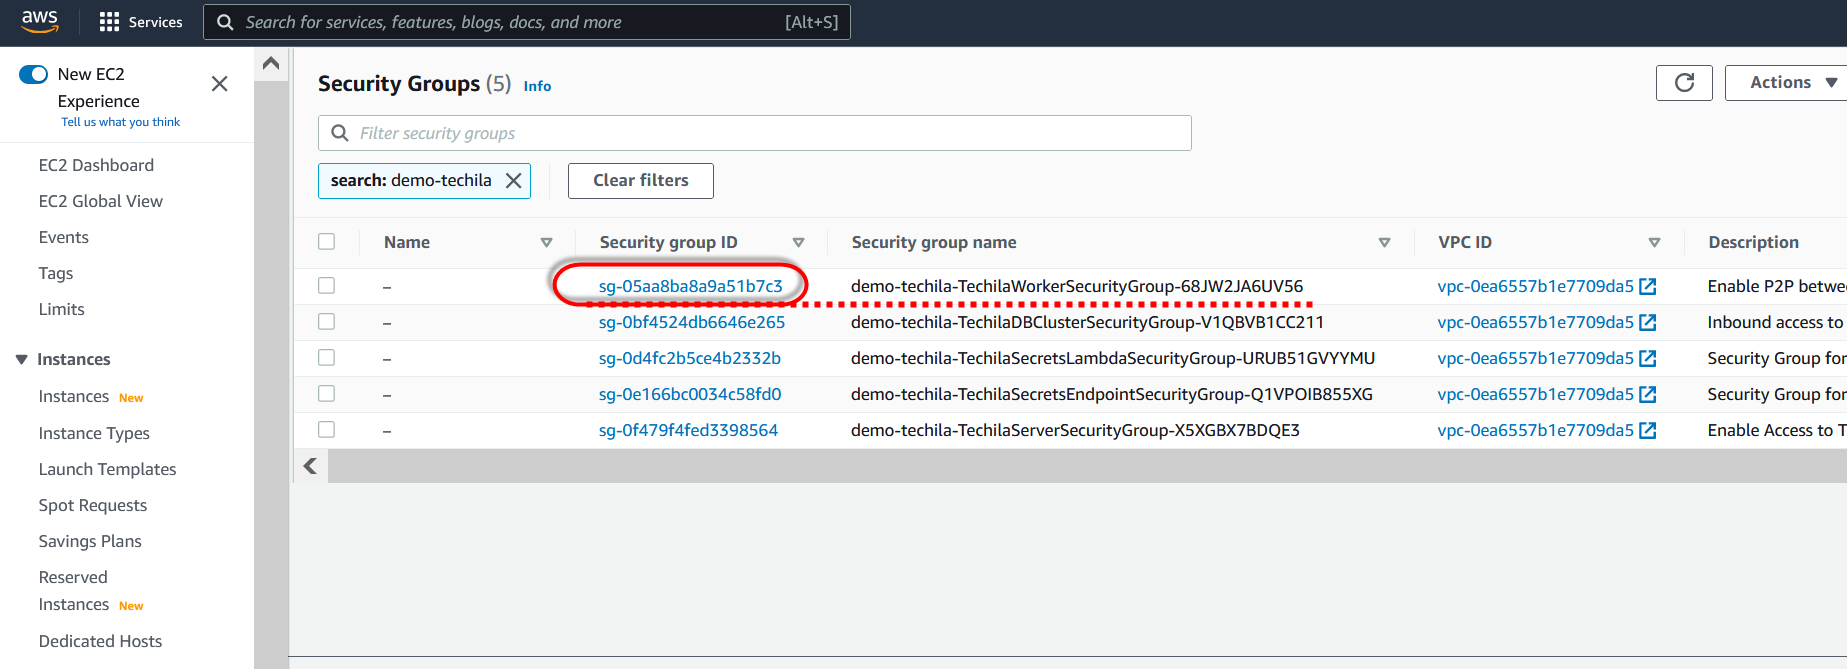
-
Next, locate the security group named
TechilaSecretsEndpointSecurityGroupand click on it.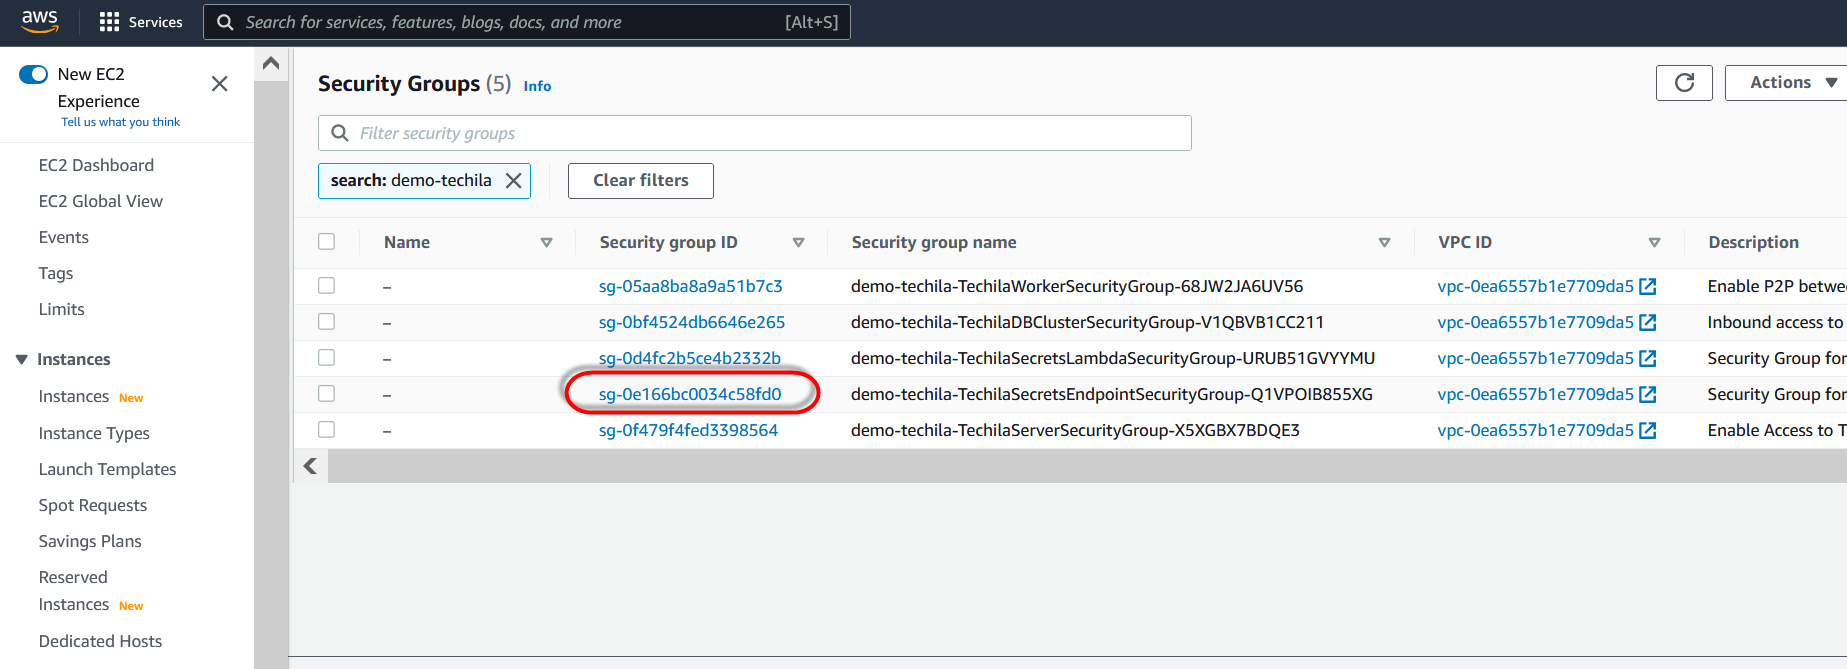
-
Click on
Edit inbound rules.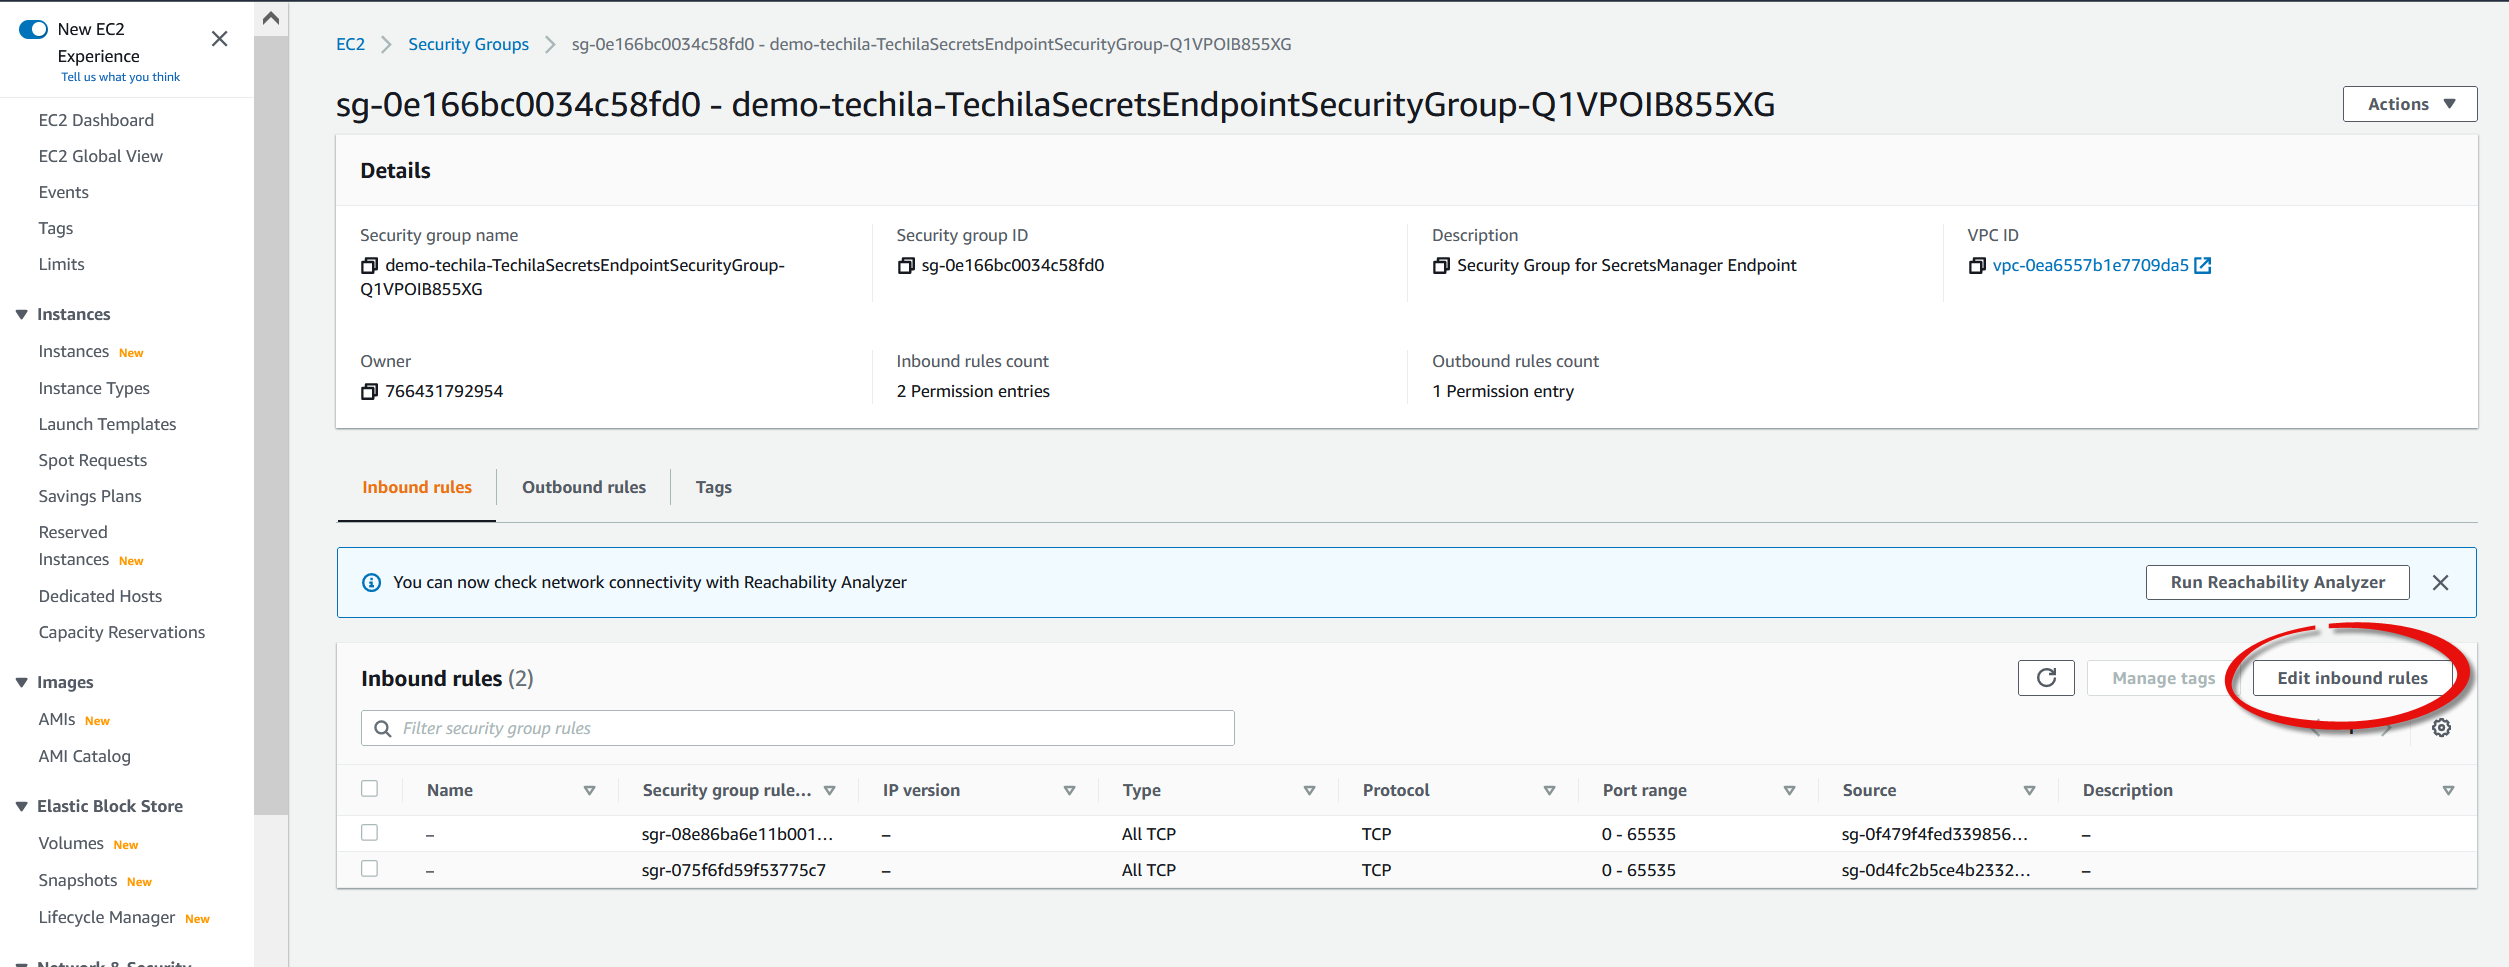
-
Click
Add rule.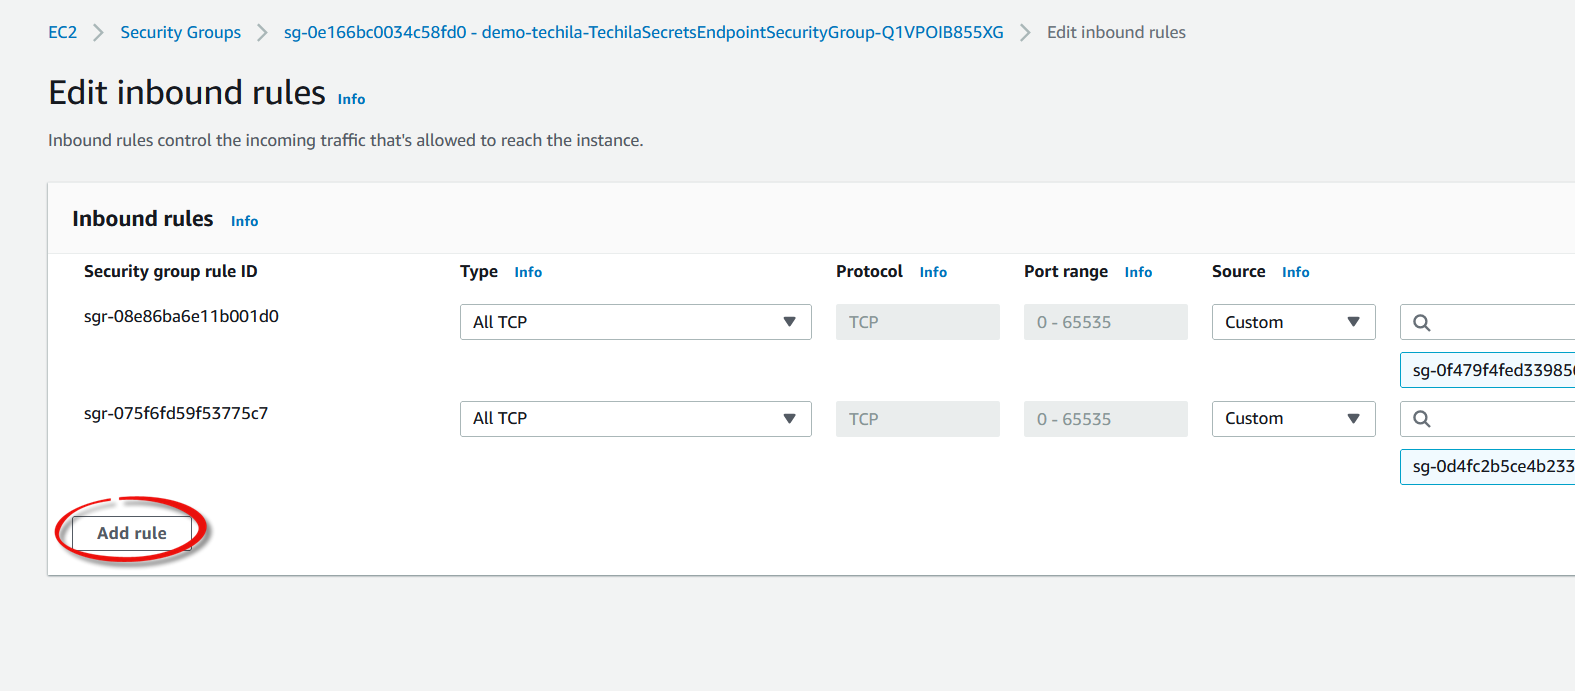
-
Create a new rule by setting type to
All TCP, source toCustom, and select the Techila Worker security group ID you retrieved in the previous step. Click theSave rulesbutton to create the rule.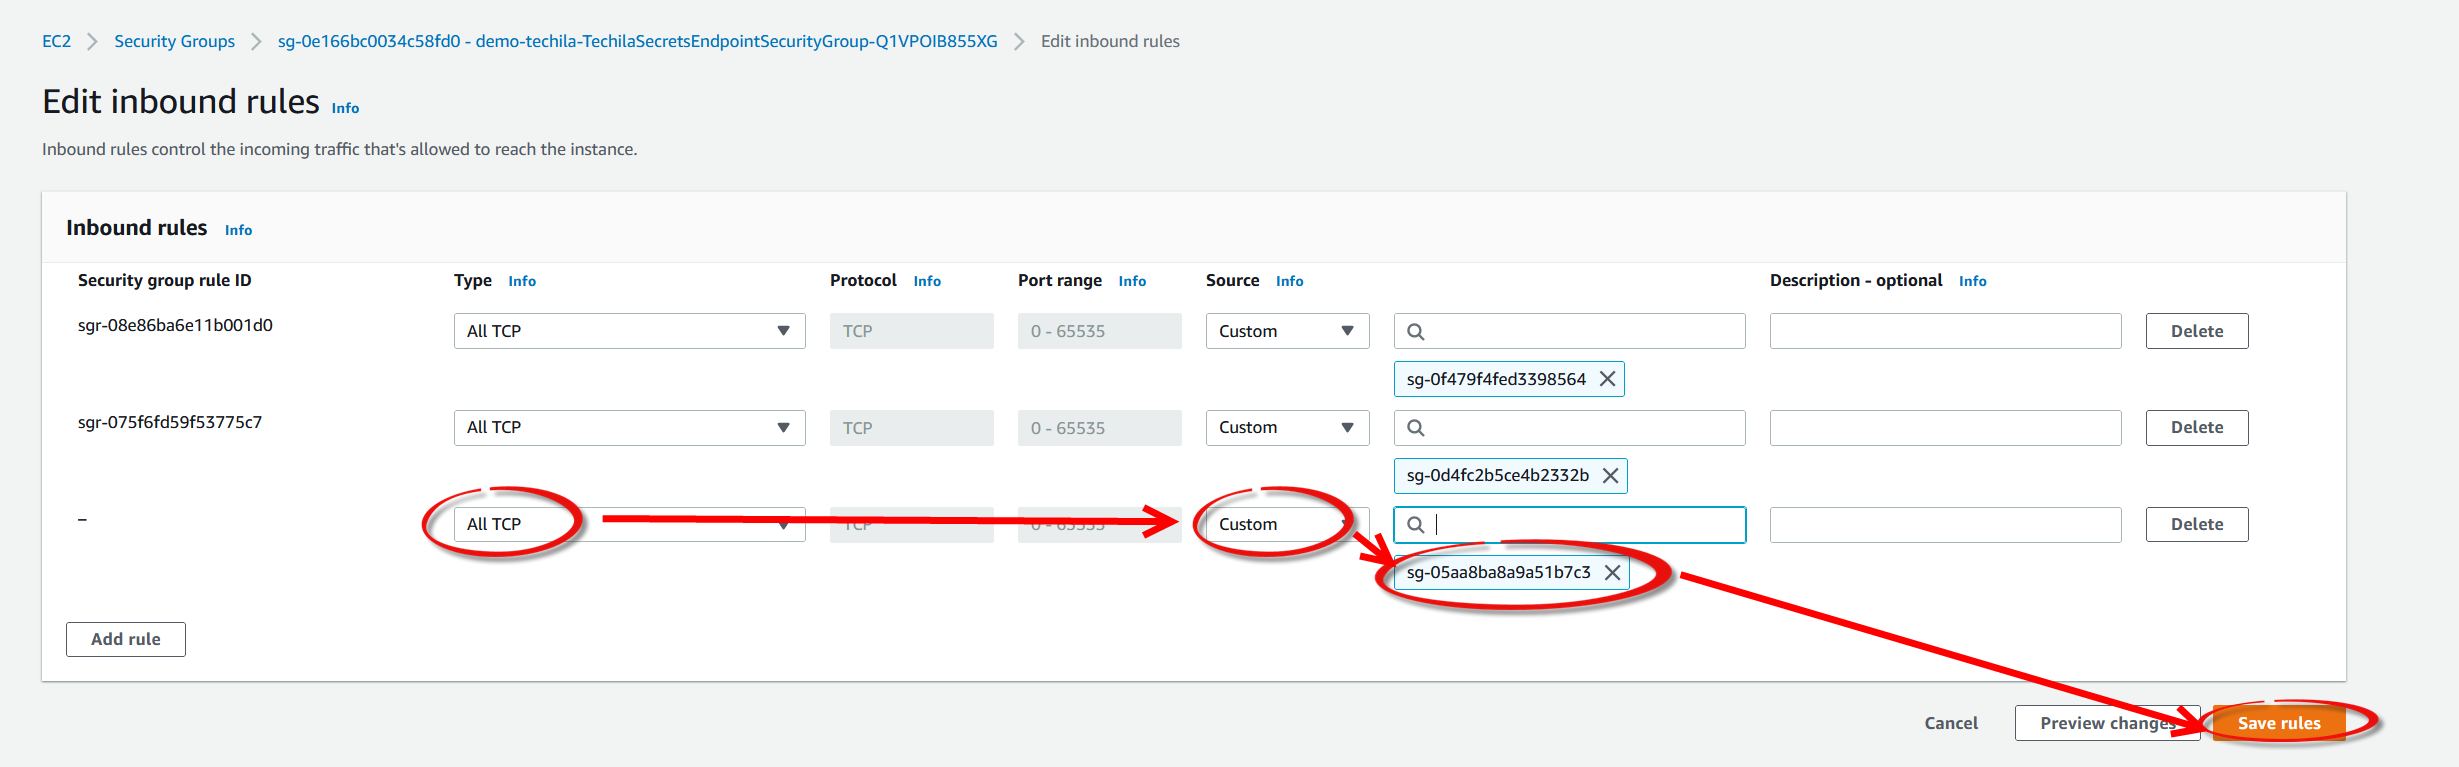
-
In the AWS console, navigate to
IAM→Rolesand open theTechilaServerRole.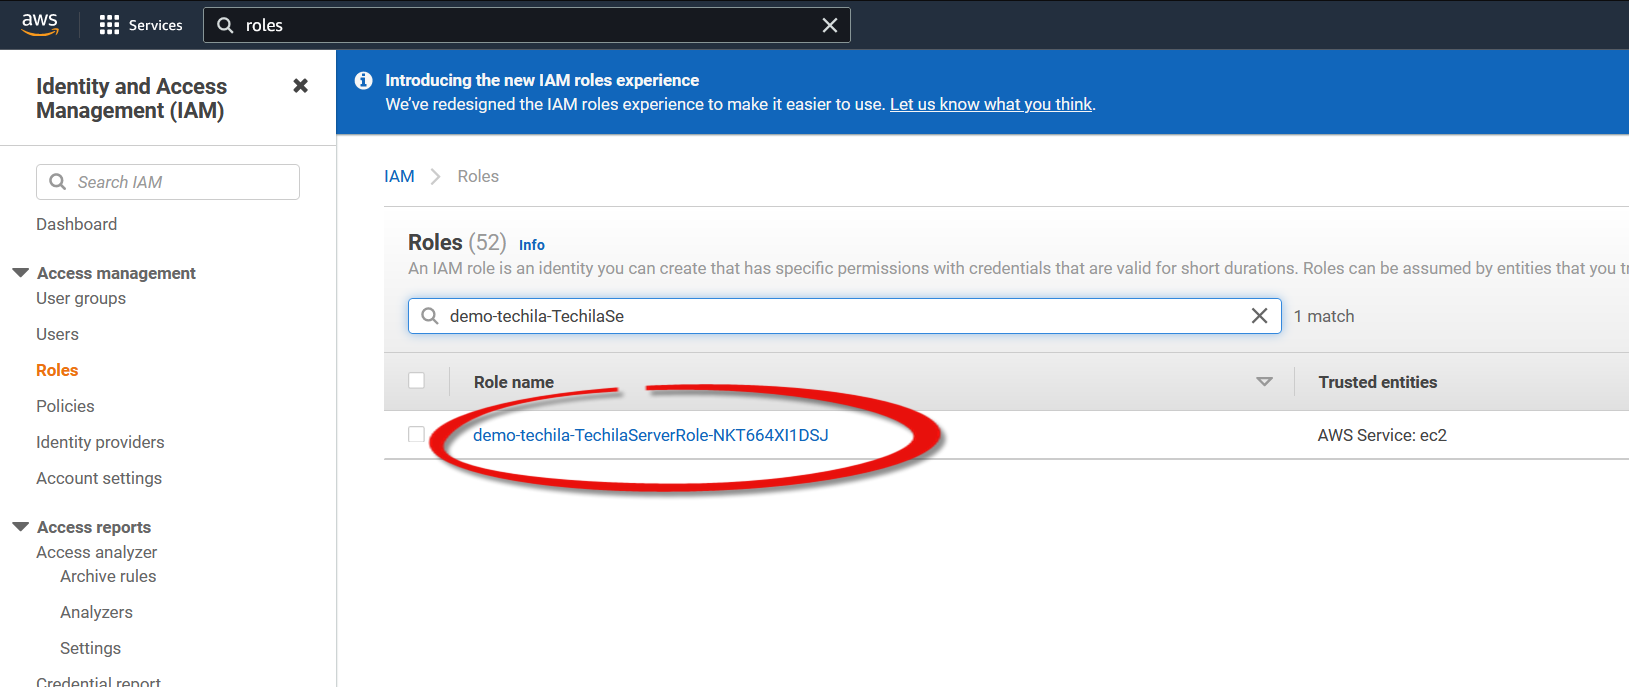
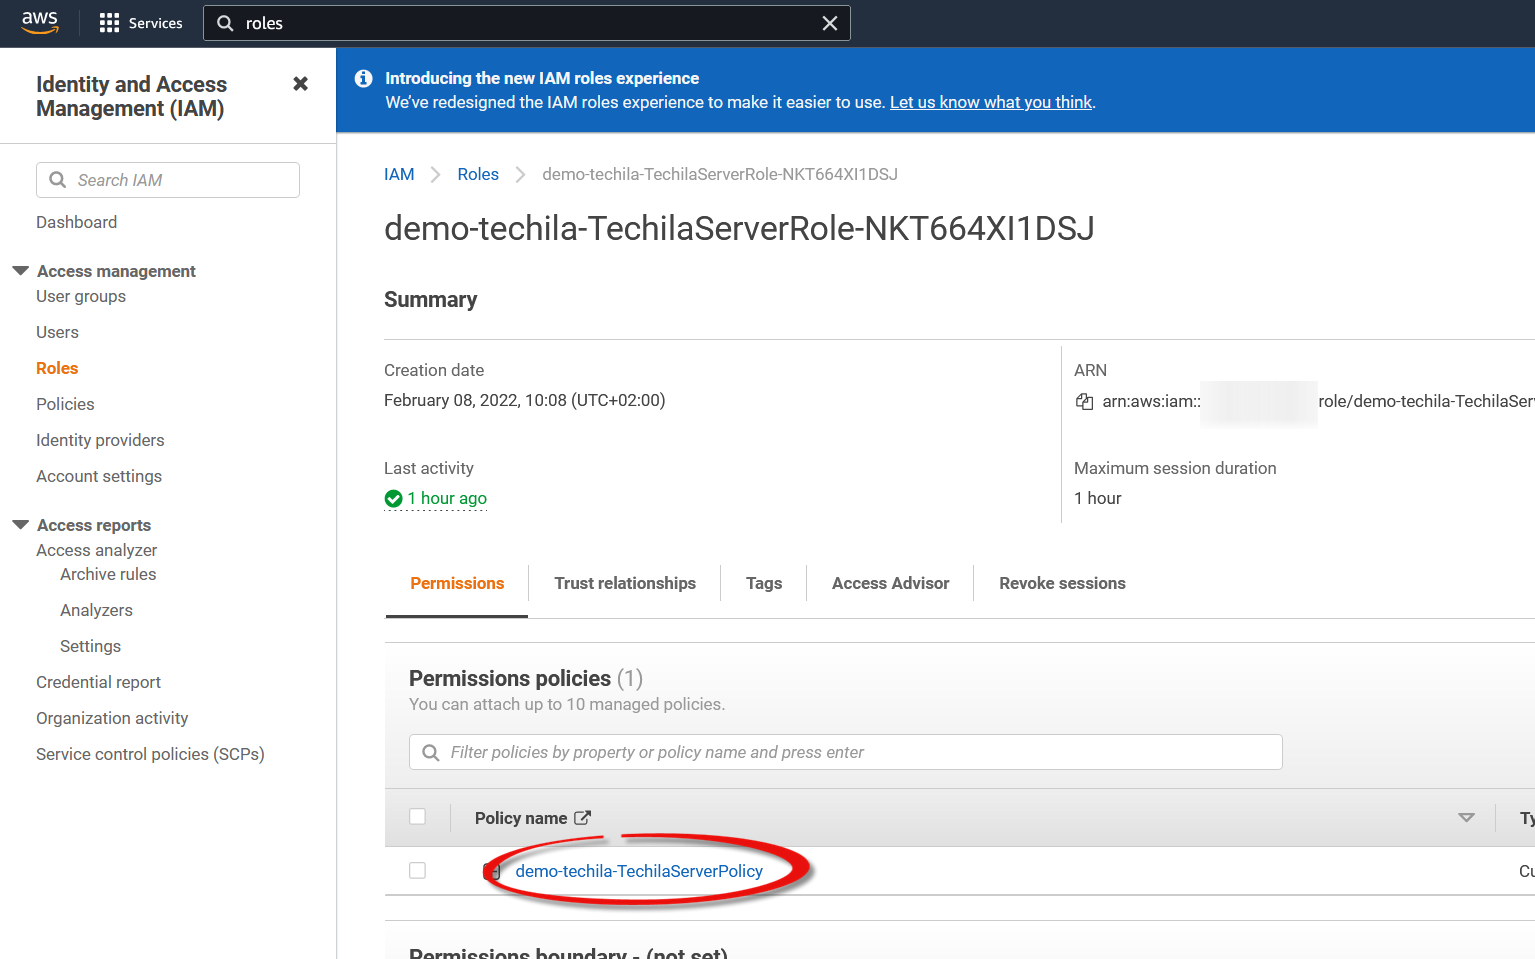
-
Open the TechilaServerPolicy.
-
Under
IAM, click theAdd ARNlink.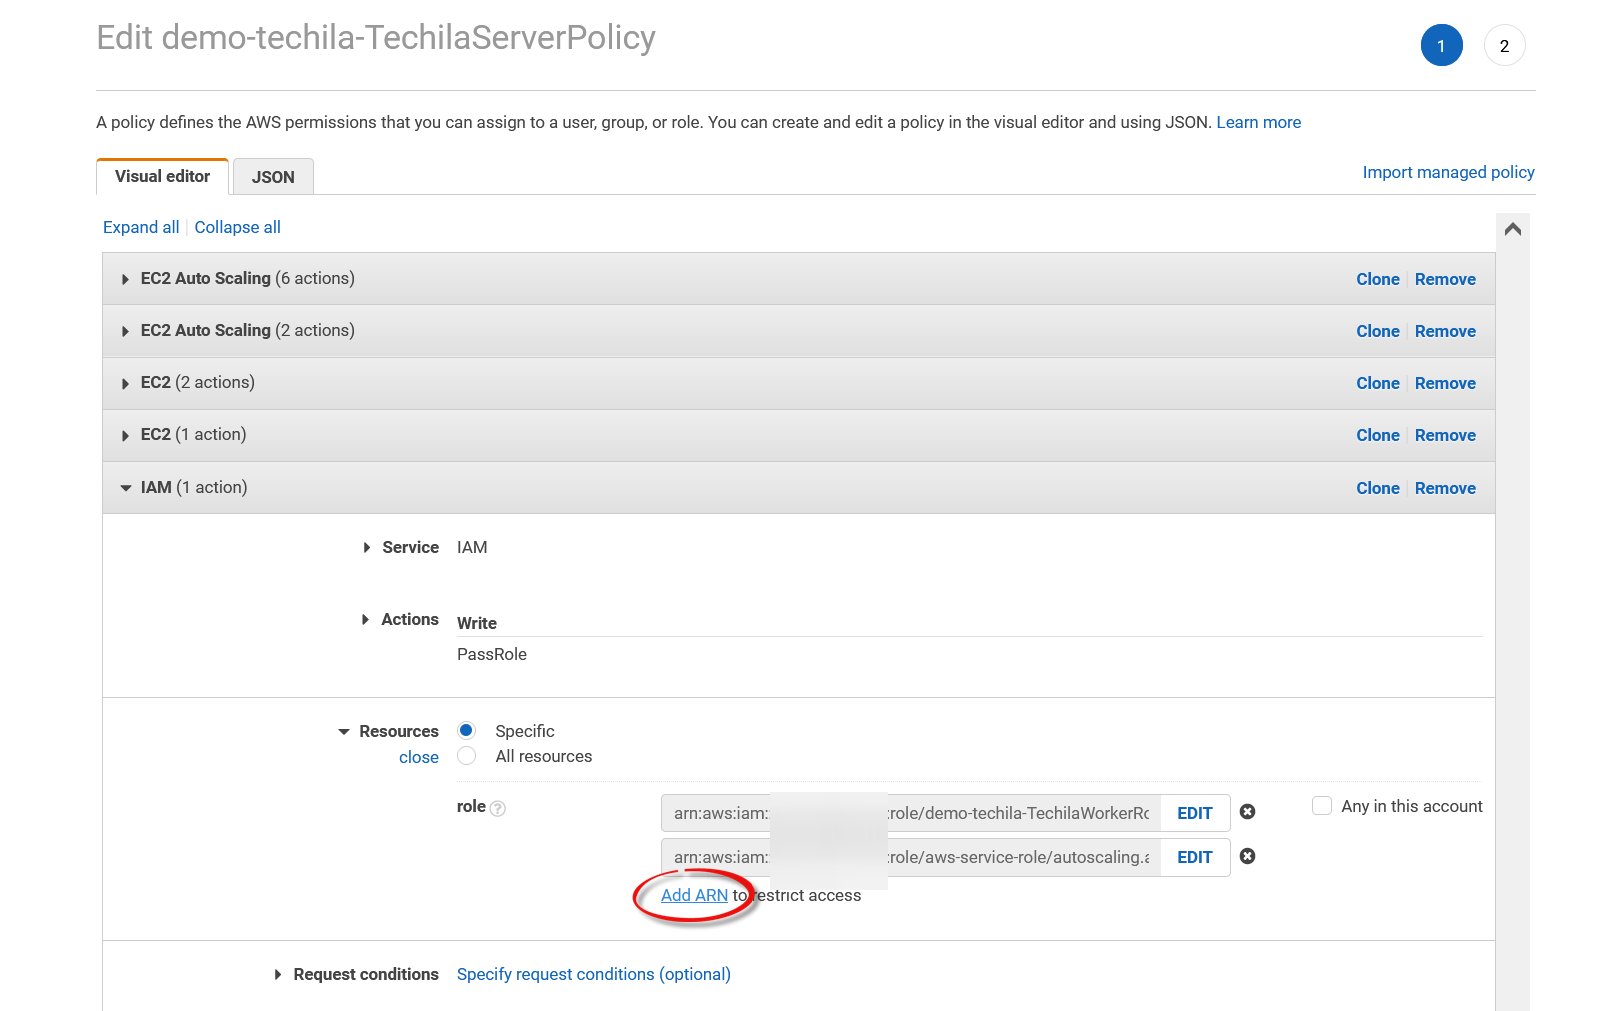
-
Enter the ARN of the Techila Worker role created during previous steps and click
Add.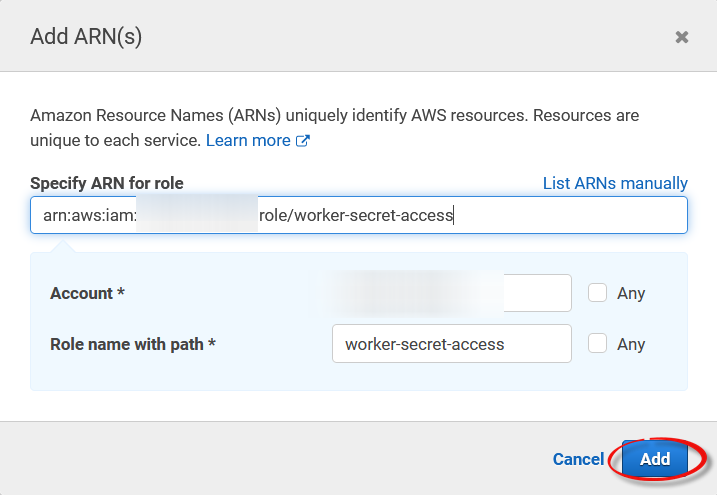
-
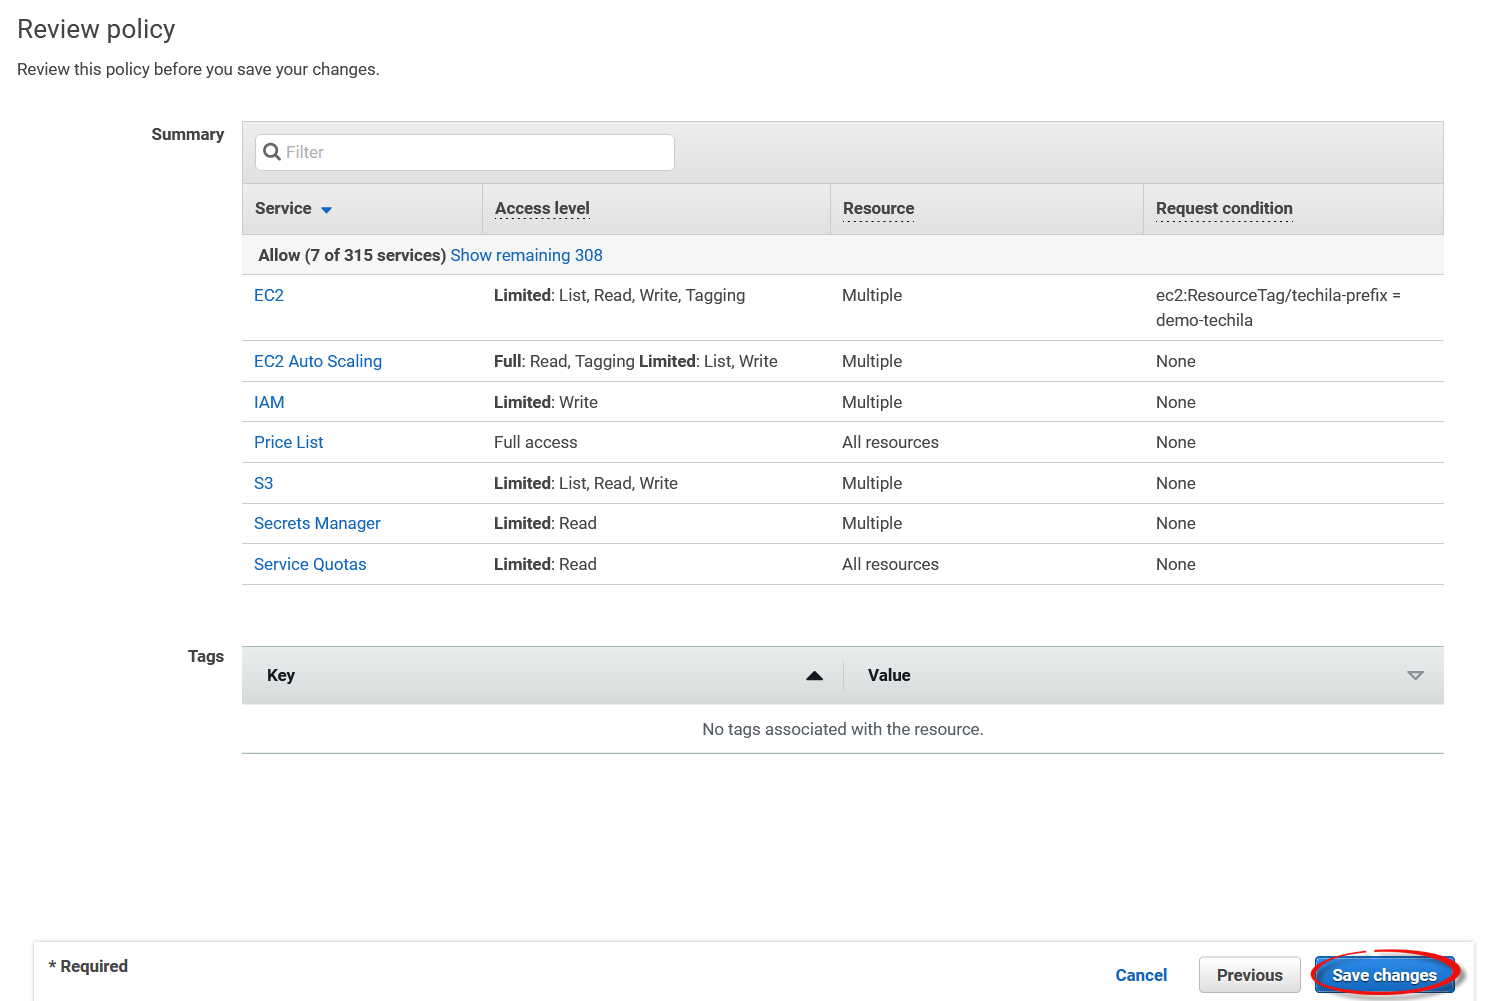
After adding the ARN, click
Review policy.
-
Save changes.
-
Open the Techila web interface and navigate to
Admin→End-Users. Select the user that you want to be able to access the secrets.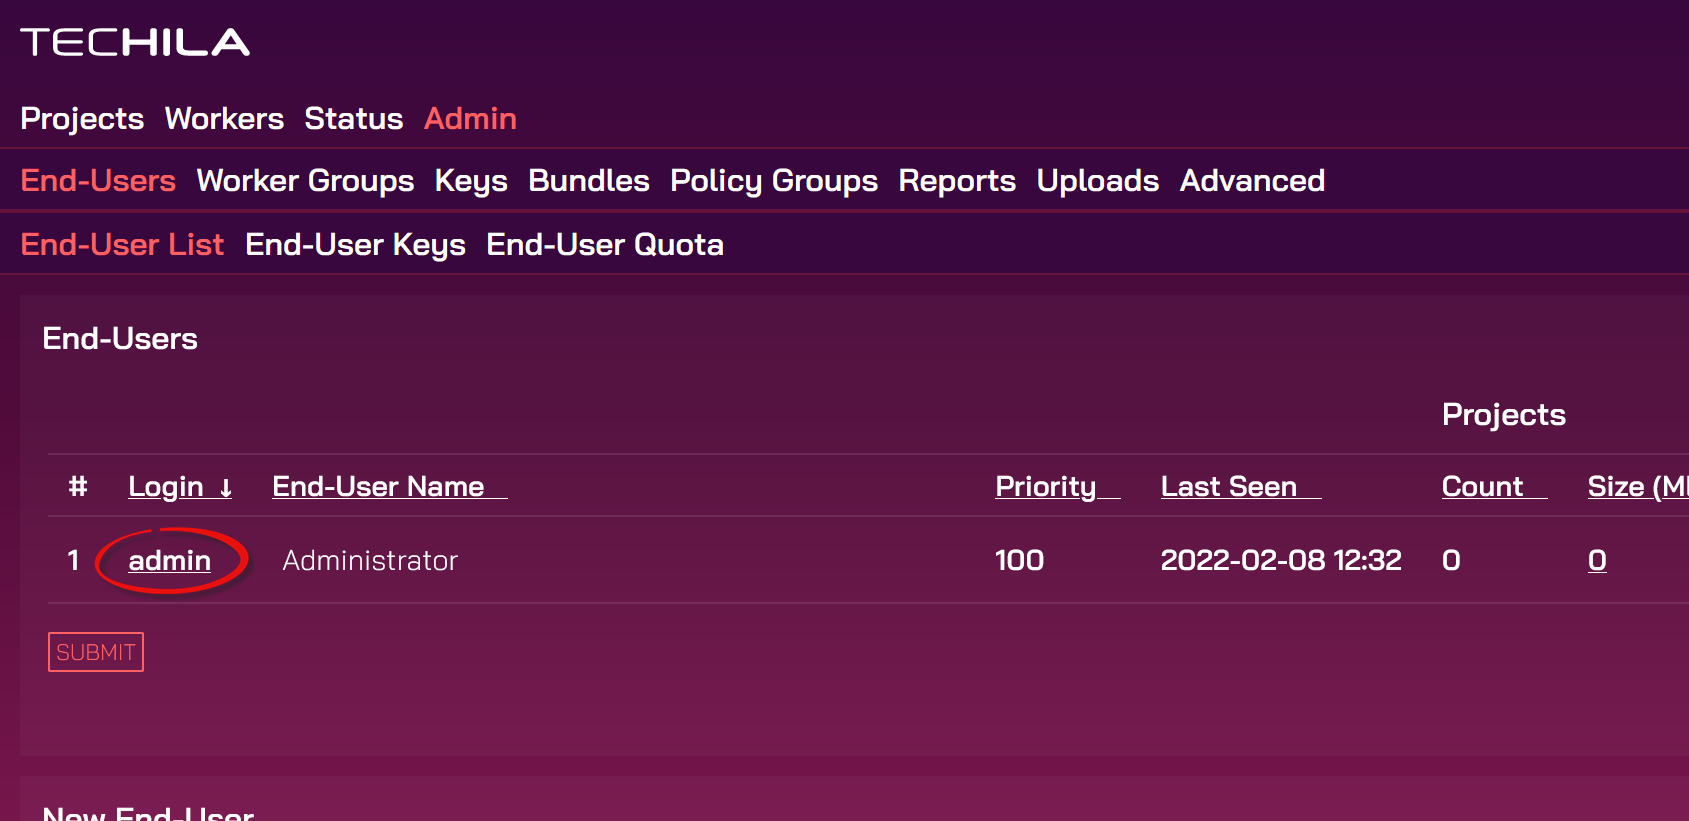
-
Scroll down, and in the
User Featurestable, enter the keyaws-worker-profile-arnand set the value to match the Instance profile ARN of the worker policy created earlier and clickSubmit.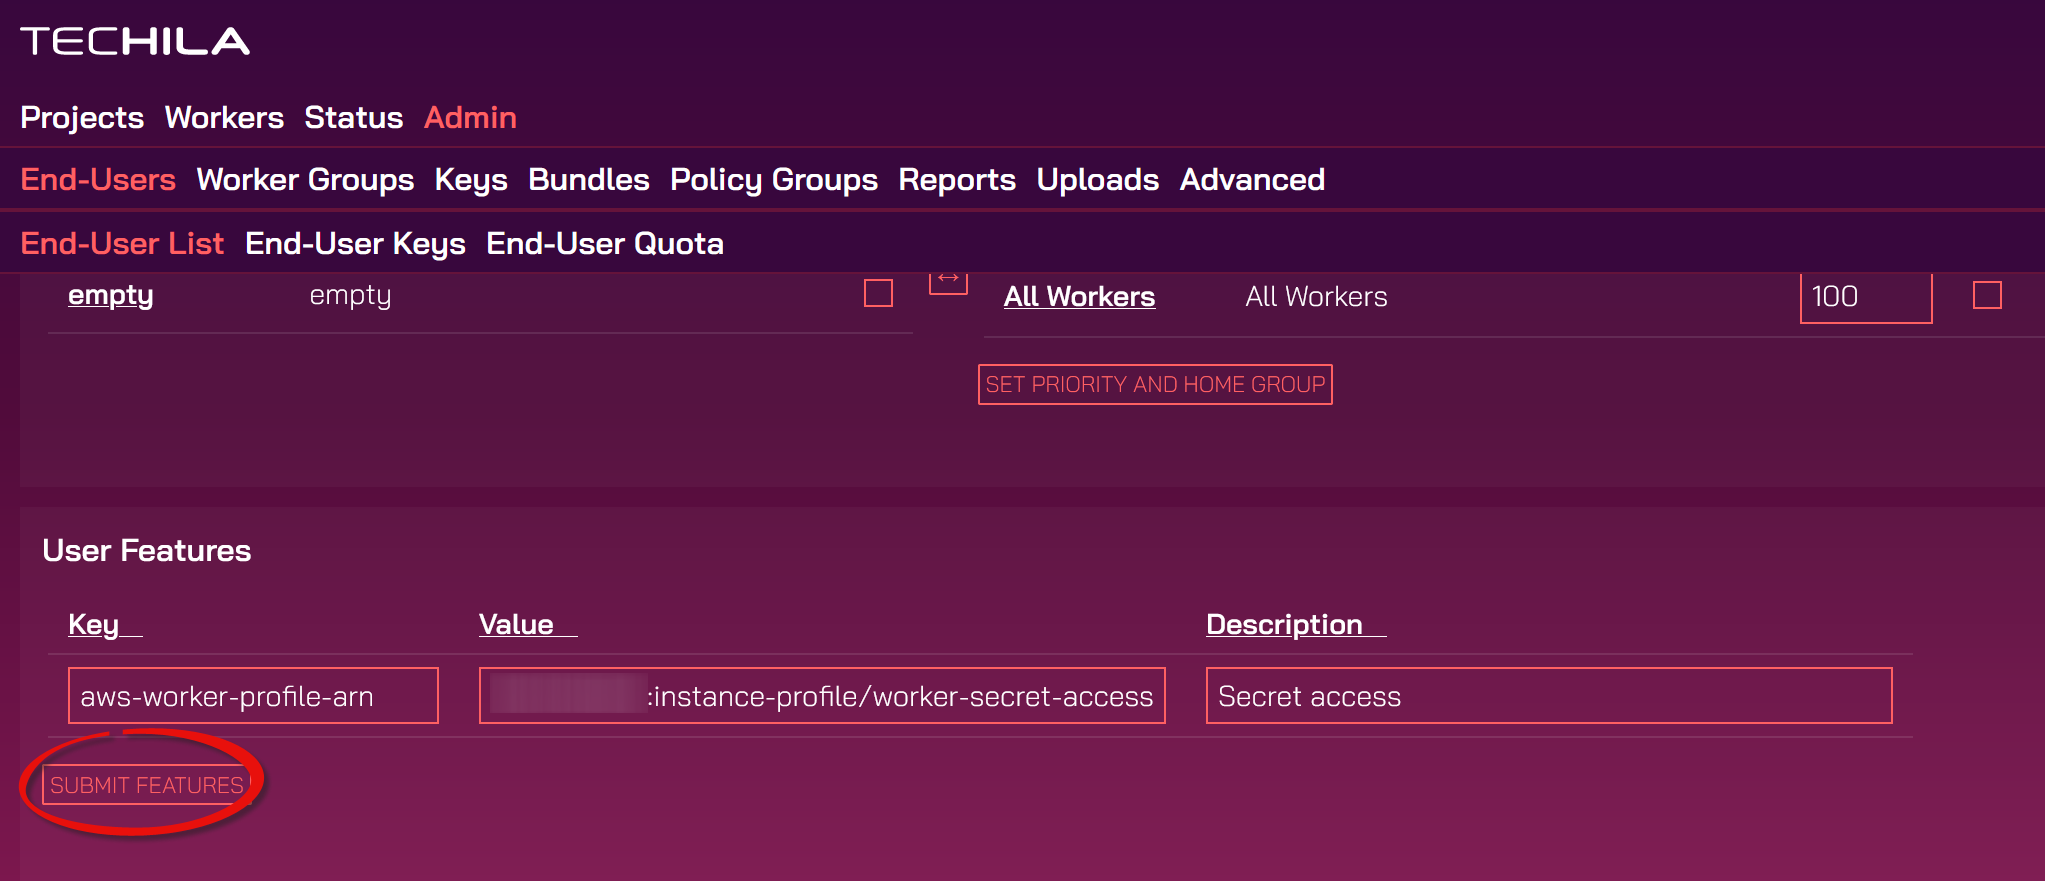
-
Next, you can test the system by starting Techila Workers and running the following Python test code. Edit the values of
secret_nameandregion_nameto match the values you are using.
If everything works as expected, the test code should display the value stored in the AWS Secrets Manager.
import boto3
import base64
from botocore.exceptions import ClientError

def secret_test():
    import boto3
    import base64
    from botocore.exceptions import ClientError

    secret_name = "arn:aws:secretsmanager:eu-central-1:xyz:secret:dev/test/techilasecret-TPzsZJ" # Replace this with your secret arn
    region_name = "eu-central-1" # Replace this with your region

    session = boto3.session.Session()
    client = session.client(
        service_name="secretsmanager",
        region_name=region_name,
    )

    get_secret_value_response = client.get_secret_value(
        SecretId=secret_name
    )

    # Store the value of the secret in the variable.
    secret = get_secret_value_response['SecretString']

    # Secret can now be used in the code to access DBs and other resources requiring authentication
    # ...

    # Return value to verify that the secret was retrieved successfully.
    return(secret)


def runme():

    # Import the techila package
    import techila

    # Create the computational Project with the peach function.
    result = techila.peach(funcname = secret_test, # Function that will be called on Workers
                           jobs = 1, # Number of Jobs in the Project
                           packages=["boto3", "botocore", "urllib3", "jmespath"],
                           )

    # Display results after the Project has been completed. If the secret was retrieved successfully,
    # the secret value should be displayed.
    print(result)
    return(result)

runme()
4.18. Adding Custom AWS Tags to Techila Workers
AWS tags can be used to add metadata to Techila Worker instances started by End-Users. By using the aws-custom-worker-tags key, capacity started by End-Users can be given unique tags, which allows tracking of both usage and costs using the AWS console.
The following example describes how to add custom tags to instances started by a specific Techila End-User.
-
Log in to the Techila web interface, navigate to
Admin→End-Users, and click on the End-User you want to modify.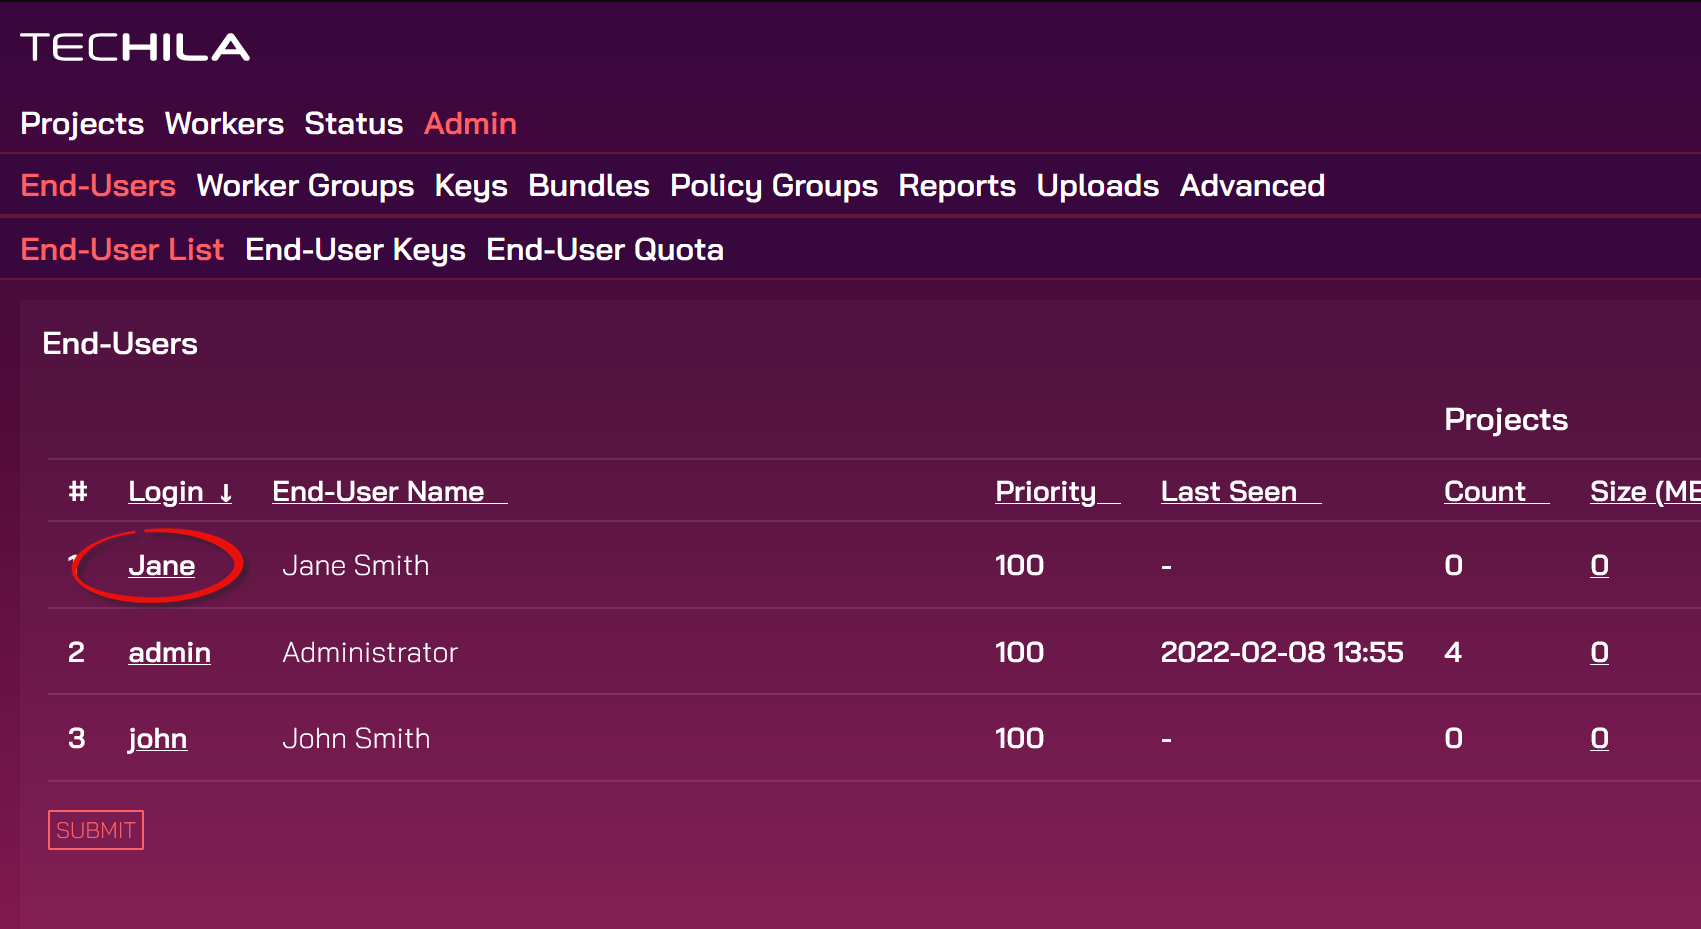
-
Scroll down and edit the
User Featurestable to contain the tags and values you want to use. A single tag can be defined as follows:Multiple tags can be defined by using a comma-separated list as in the example syntax below:
[[tag1,value1],[tag2,value2]]
The screenshot below shows two defined tags: the
departmenttag would be set tomathandgrantidto123456for all Techila Worker instances the End-User starts.Submit the tags by clicking
Submit.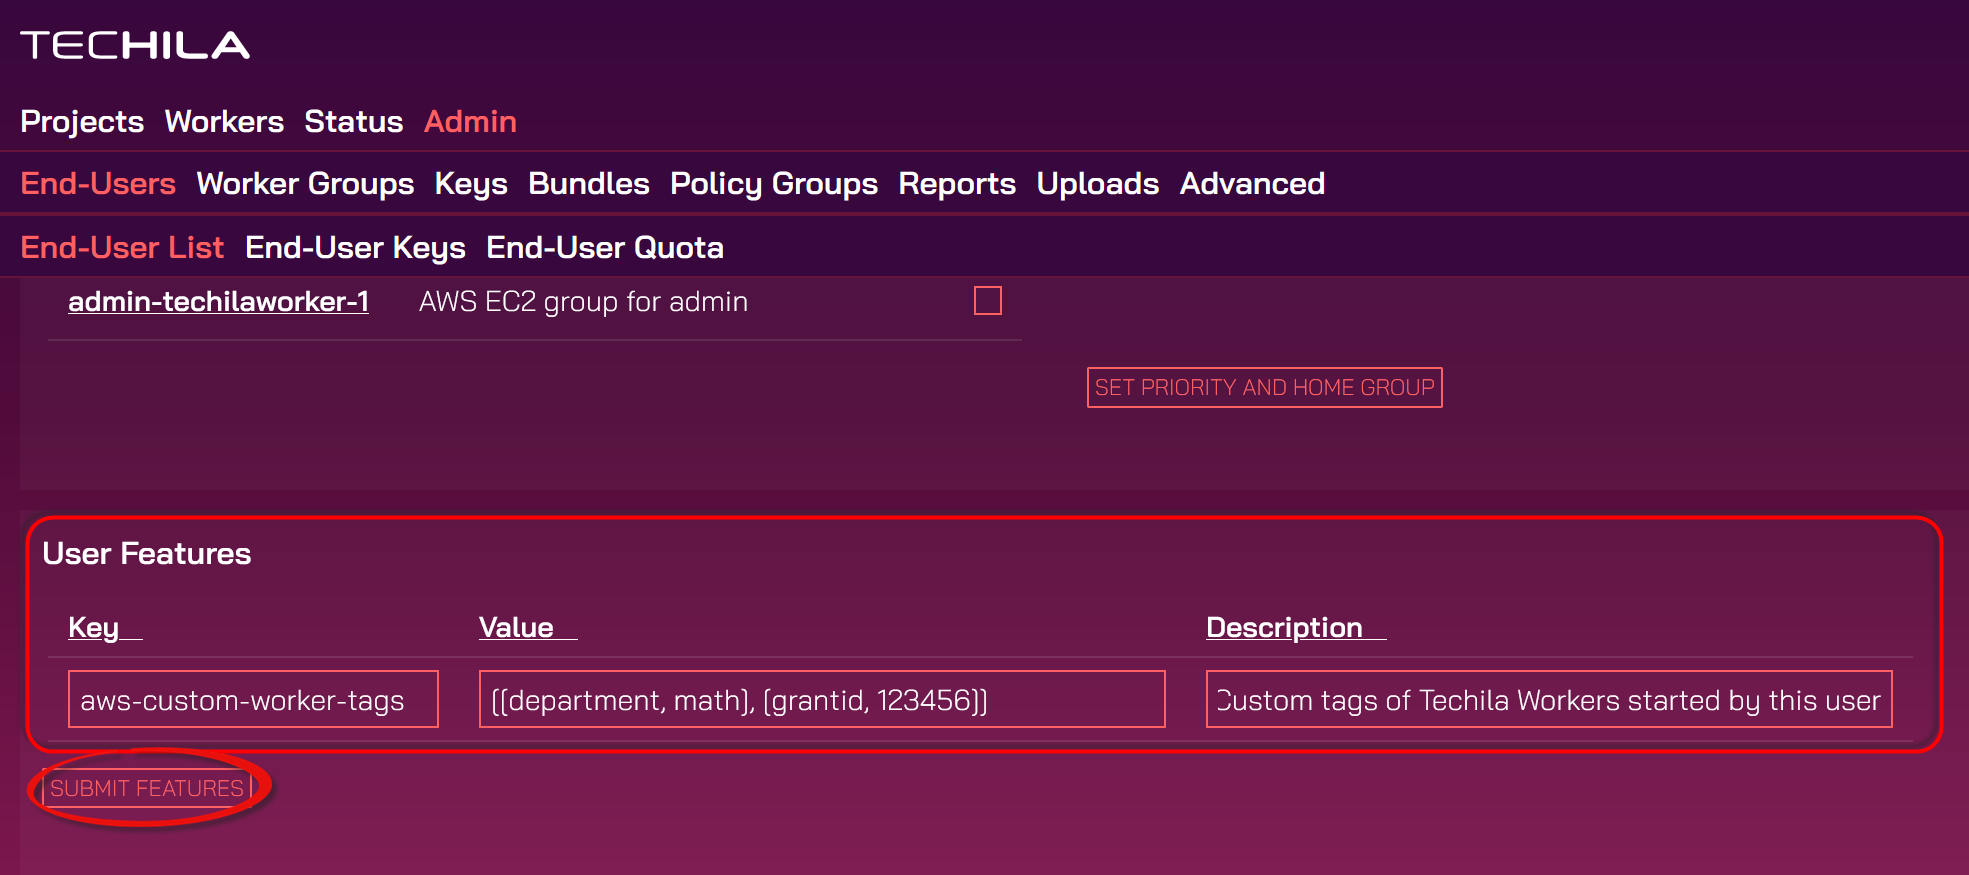
-
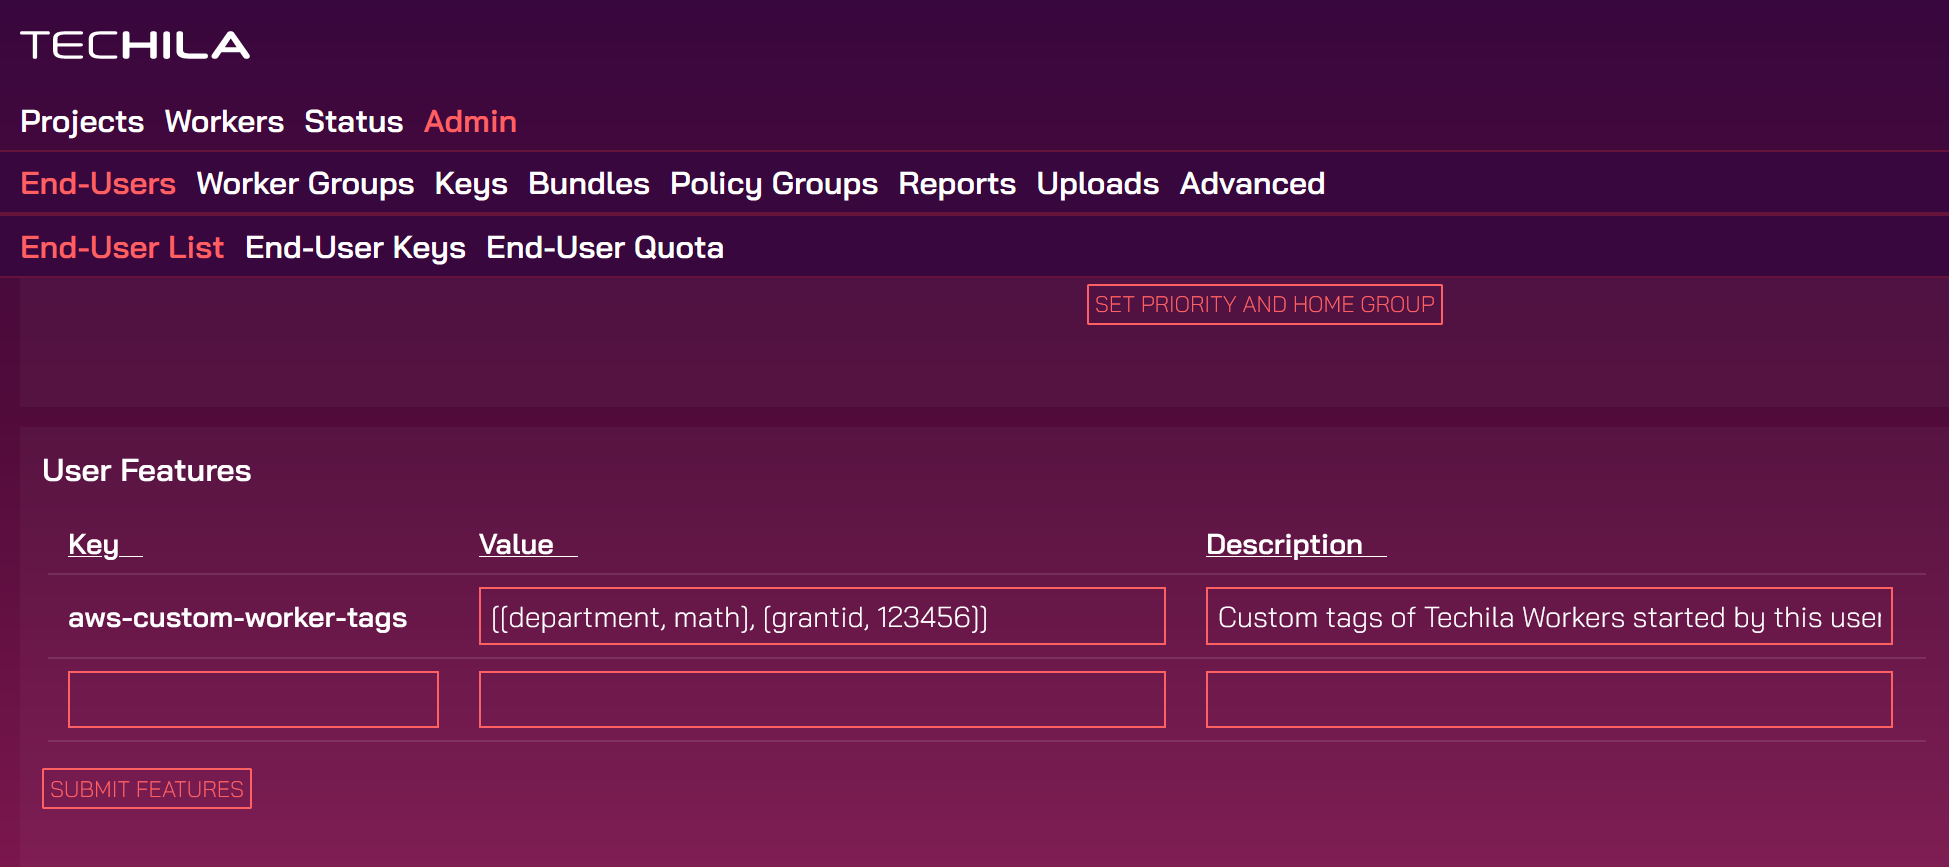
After submitting, the tags will be visible in the list. Any Techila Worker instances the End-User starts will now have the tags listed in the table.
4.19. Assigning Techila Workers to Custom Security Groups
By default, all Techila Workers are assigned to the same, default AWS security group. This behavior can be modified using the aws-custom-worker-security-groups key to list additional security groups for individual End-Users. Any security groups listed will be assigned to the Techila Workers that the End-User deploys. This can be beneficial, for example, when the goal is to grant a specific user access to secured resources during computations.
The following steps describe how to add additional security groups to Techila Worker instances started by a specific End-User.
-
Log in to the Techila web interface, navigate to
Admin→End-Users, and click on the End-User you want to modify.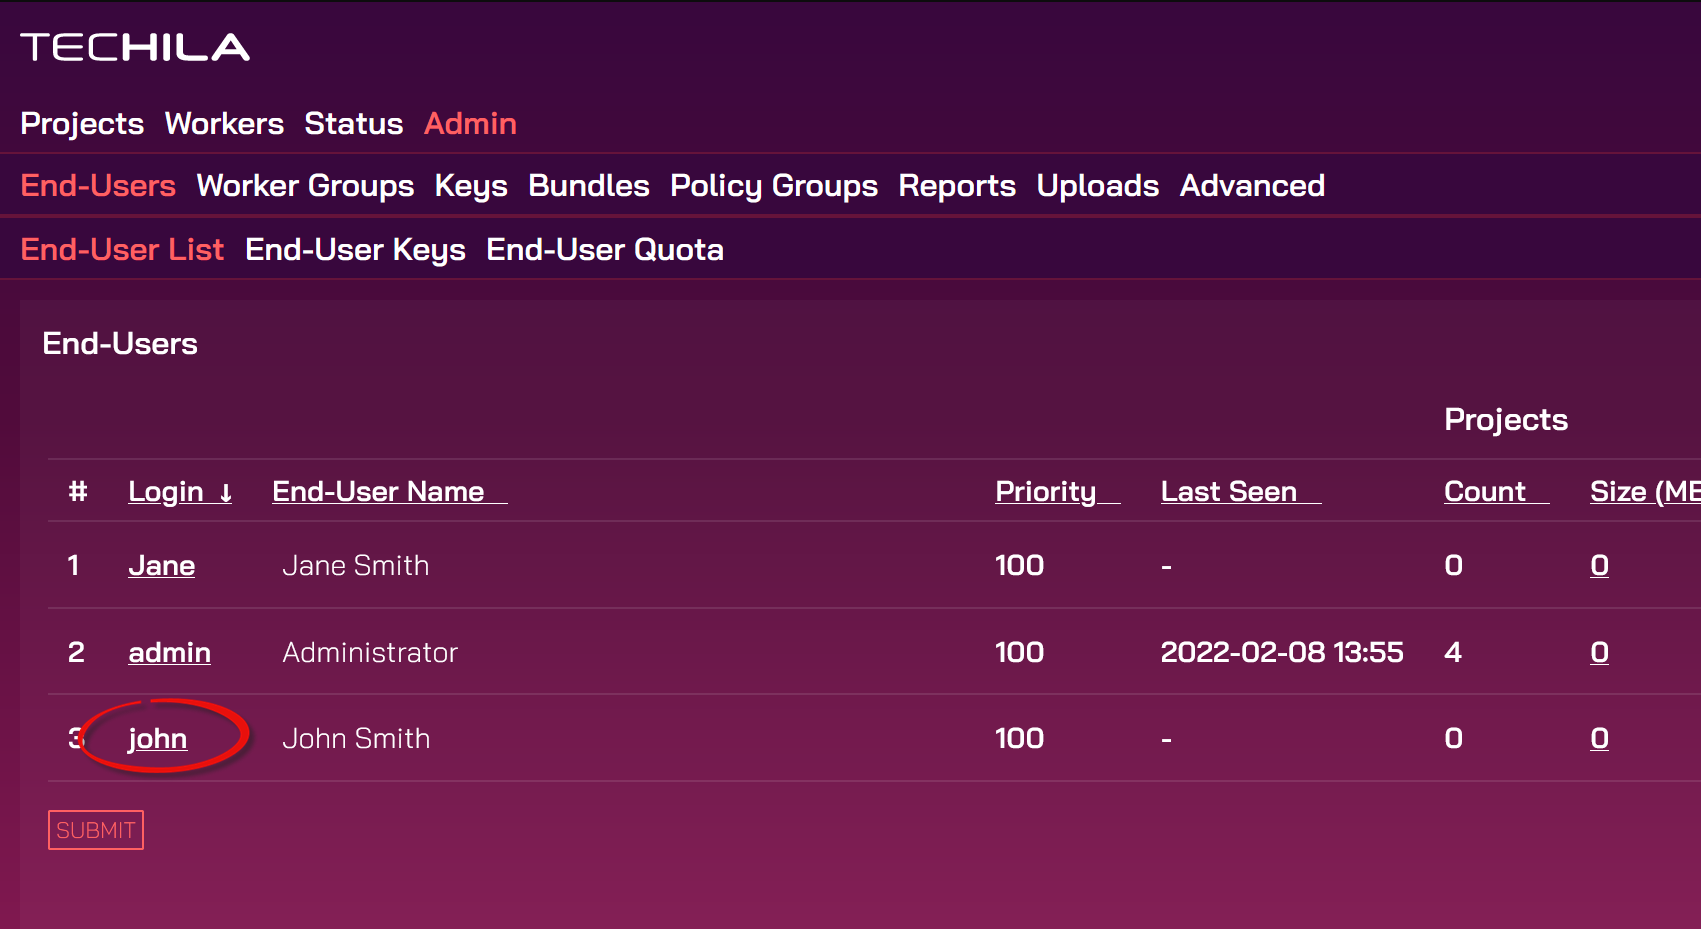
-
Scroll down and edit the
User Featurestable to contain the security groups you want the user to have access to during computations. Multiple security groups can be defined as a comma-separated list as in the example syntax below:[sg-0a3c9dfcc6c95d82e, sg-03657daed3e9c4b5f]
After listing the security groups, click the
Submitbutton to submit the security groups.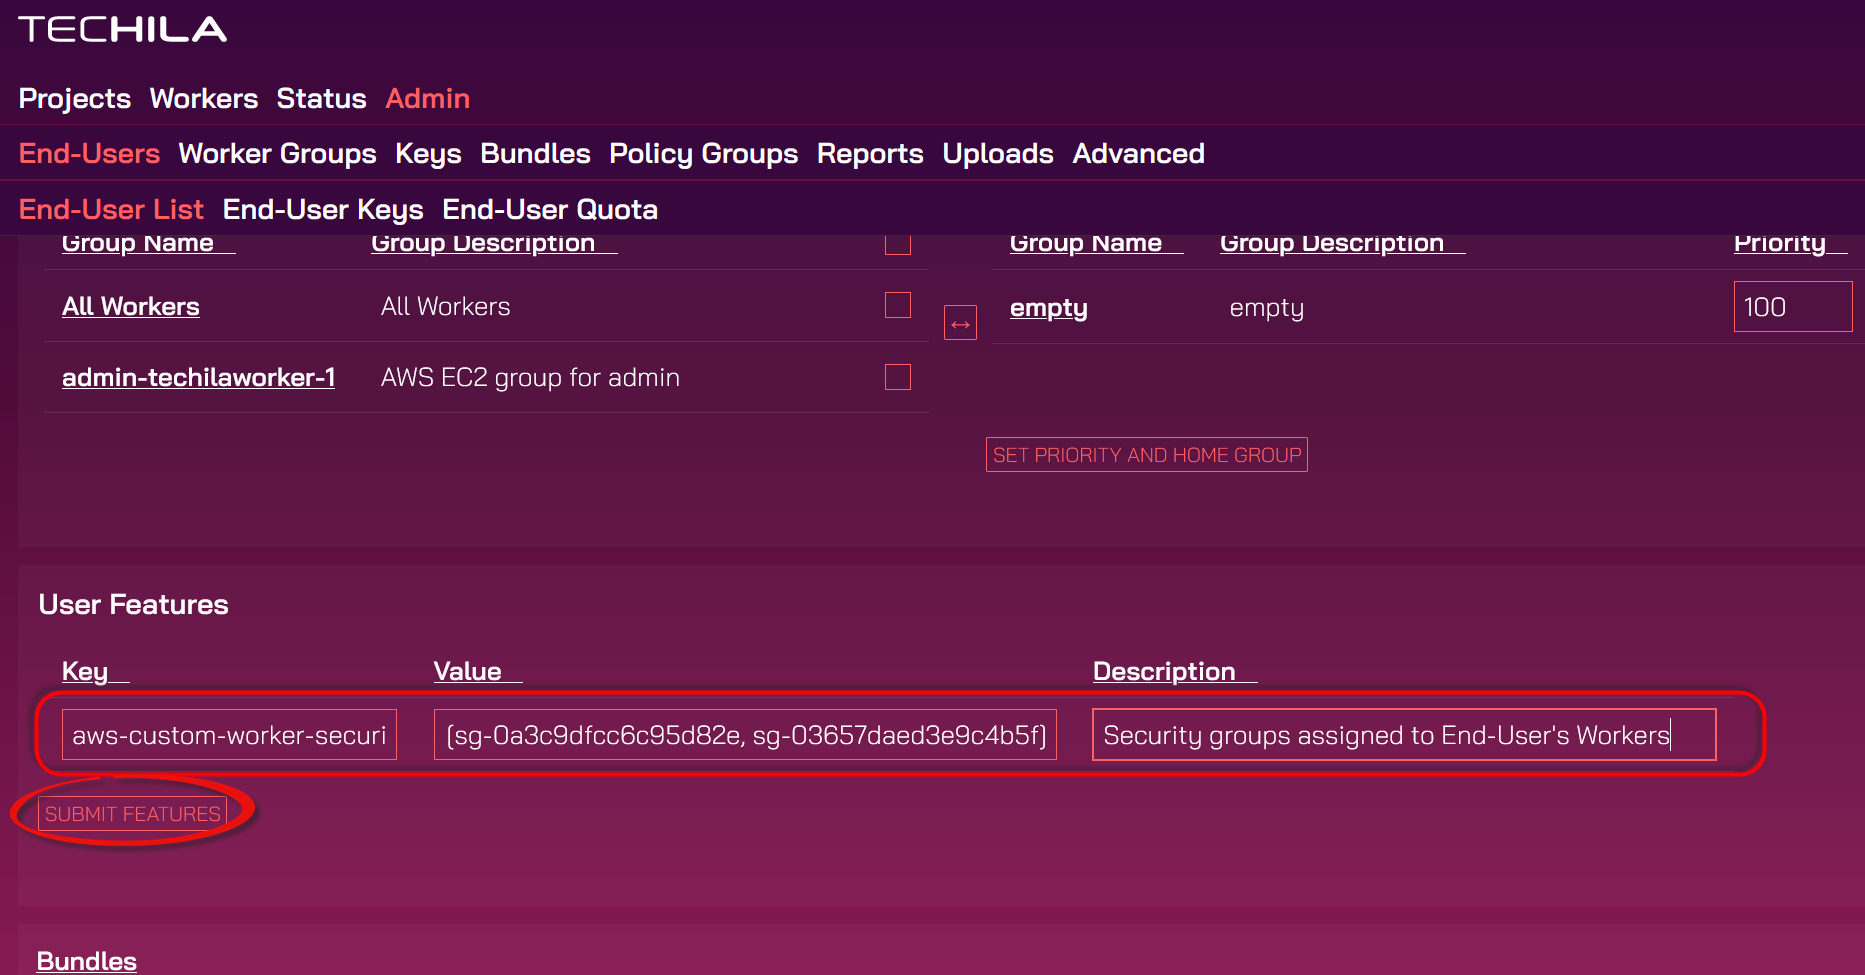
-
After clicking the button, the feature will be visible in the list. Any new Techila Worker instances started by the End-User will now be assigned to the listed security groups.