1. Introduction
This document contains information on how to configure the Techila SDK.
Please note that screenshots in this post are from a Microsoft Windows operating system. If you are performing the configuration on a different operating system, the appearance of screens might differ.
2. Configuration Steps
Please also note that in order to perform the configuration steps described here, you will also need access to the plugin components included in the TechilaSDK.zip package. The TechilaSDK.zip can be downloaded from the Techila Dashboard, after you have launched your Techila Distributed Computing environment.
If you have not downloaded the plugin components, please download the package (TechilaSDK.zip) before continuing.
Please follow the configuration steps for the programming language you are using:
2.1. MATLAB
Note! In order to complete the configuration, you will need the following:
-
MATLAB
-
MATLAB Compiler
-
C-compiler compatible with your MATLAB Compiler
Please also note that in order to perform the steps described here, you will also need access to Techila SDK.
If you have not downloaded the Techila SDK, please download the plugin package (TechilaSDK.zip) before continuing. The TechilaSDK.zip can be downloaded from the Techila Configuration Wizard, after you have launched the Techila Distributed Computing environment.
-
Extract the previously downloaded TechilaSDK.zip to your computer, e.g. to your home directory.
When extracted, the TechilaSDK.zip file will create a directory called
techilawith the folder structure illustrated in the example screenshot below. In this example, the TechilaSDK.zip file was extracted toC:\.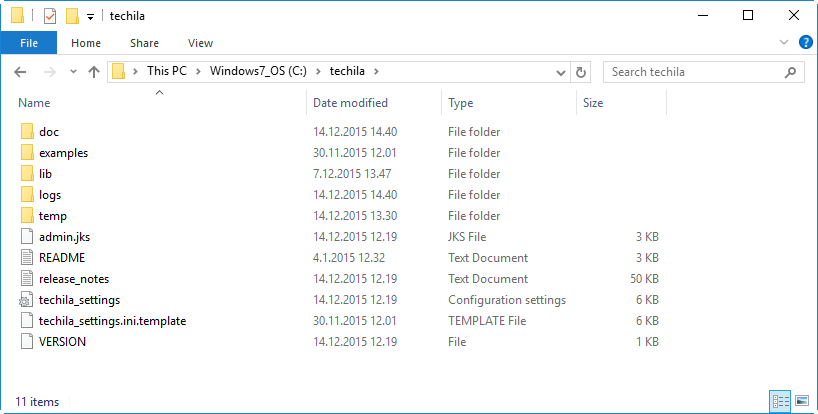
-
Launch MATLAB.
-
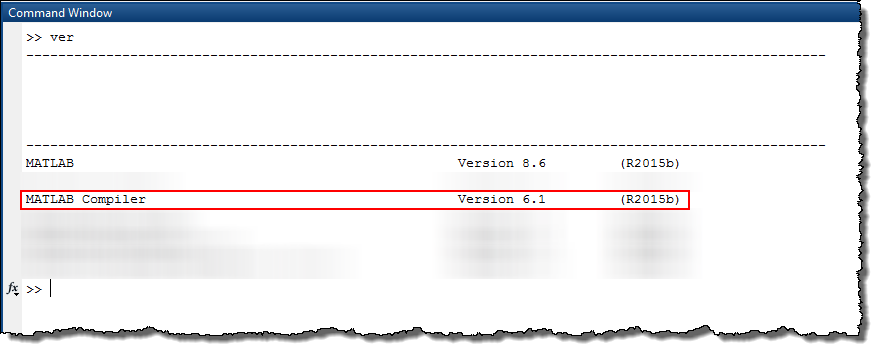
Verify that you have the MATLAB Compiler by executing ver in MATLAB and checking the output.
-
In MATLAB, change your current working directory to
techila/lib/Matlabin the Techila SDK. -
Execute command the following command in MATLAB:
installsdk()
This command updates the MATLAB’s search path to include the Techila SDK’s
techila/lib/Matlabpath.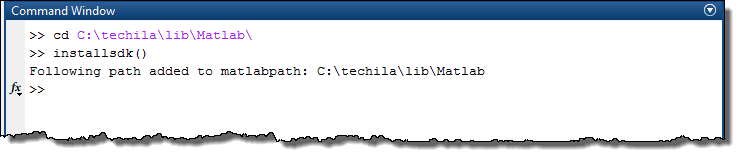
-
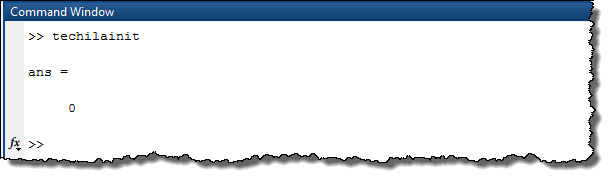
Test the network connection to the Techila Server by executing the following command in MATLAB.
techilainit()
If the network connection test was successful, the function should return the value 0 as illustrated in the example screenshot below.
-
Execute the following command in MATLAB and follow the on-screen instructions configure your MATLAB compiler:
mbuild -setup
The screenshot below illustrates what the output looks like when
Microsoft Windows SDK 7.1has been configured as the C compiler.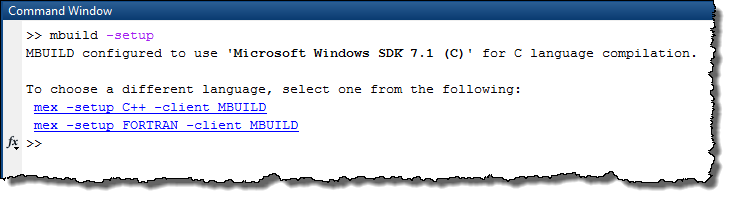
2.2. Python
This Chapter contains instructions for installing and testing the techila Python package.
2.2.1. Installing Techila Package
Note! In order to complete the configuration, you will need the following on your computer
-
Java Development Kit (JDK) or Java Runtime Environment (JRE) (version 8 or newer)
-
Python 3
When using Python 3 locally, it is recommended that you use one of the following Python 3 versions: 3.10.9*, 3.11.8, 3.12.2, 3.13.9, 3.14.0.
The above Python versions are available on Techila Workers. Other local Python versions can also be used, but the version differences might result in problems during computational Projects.
-
Extract the previously downloaded TechilaSDK.zip to your computer, e.g. to your home directory.
When extracted, the TechilaSDK.zip file will create a directory called
techilawith the folder structure illustrated in the example screenshot below. In this example, the TechilaSDK.zip file was extracted toC:\.
-
Launch a Command Prompt (Windows) or terminal (Linux)
-
Change your working directory to:
-
techila/lib/python3in the Techila SDK.
-
-
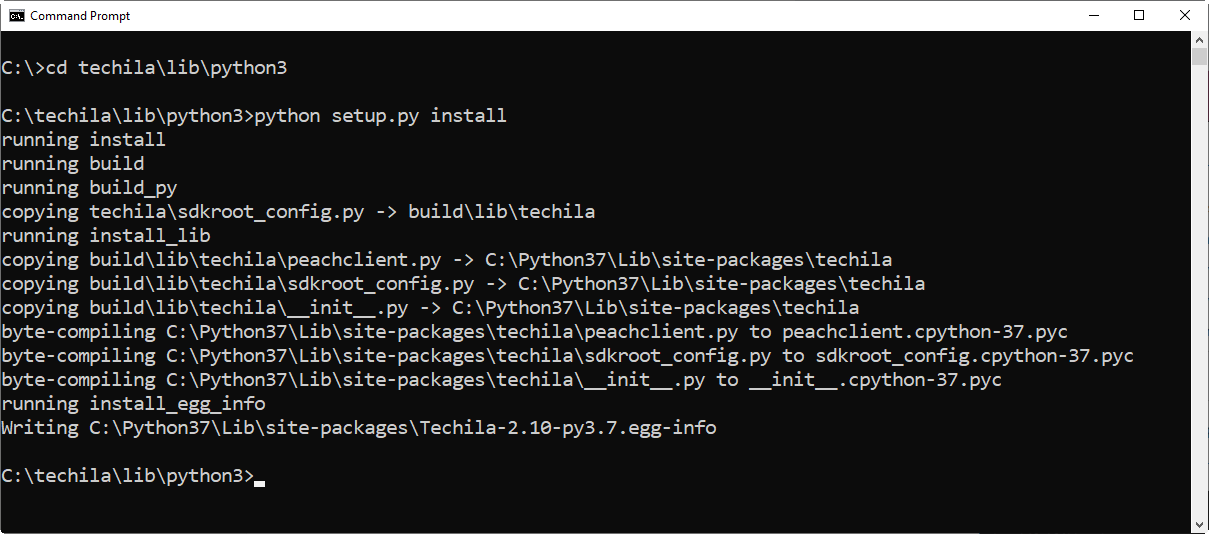
Execute command the following command to install the 'techila' Python package:
pip3 install --user .
After executing the command, the output should resemble the one shown below:
2.2.2. Installing Package Dependencies
The techila package has package dependencies, which are listed in the requirements.txt file in techila/lib/python3 directory in the Techila SDK.
You can install the requirements changing your current working directory to techila/lib/python3 and by running the following pip command:
pip install -r requirements.txt
Alternatively, you can use the --user parameter to install the packages under your own user account:
pip install -r requirements.txt --user
2.2.3. Testing Techila Package
The following steps describe how to use the init function in the techila package to test that the network connection between the Techila SDK and the Techila Server is working correctly.
-
Launch python. Make sure that your current working directory is NOT
techila/lib/python3. If needed, change your current working directory before continuing. -
Execute the following commands to test the network connection to the Techila Server:
import techila
techila.init()
techila.uninit()
Note! If you did not change your current working directory before launching python and you are in
techila/lib/python3, the 'techila.init()' command will generate an error stating that 'Unable to get sdkroot: (-1)'.If the network connection test was successful, the function return without any errors as illustrated in the example screenshot below.

2.3. R
Note! In order to complete the configuration, you will need the following on your computer:
-
Java Development Kit (JDK) or Java Runtime Environment (JRE) (version 6 or newer)
Steps:
-
Extract the previously downloaded TechilaSDK.zip to your computer, e.g. to your home directory.
When extracted, the TechilaSDK.zip file will create a directory called 'techila' with the folder structure illustrated in the example screenshot below. In this example, the TechilaSDK.zip file was extracted to 'C:\'.
-
Create an environment variable TECHILA_SDKROOT and set the value to point to the 'techila' directory. For example, if the 'techila' directory is located in C:\techila, then set the value to 'C:\techila'.
-
Launch R
-
In R, Change your current working directory to
techila/lib/Rin the Techila SDK. -
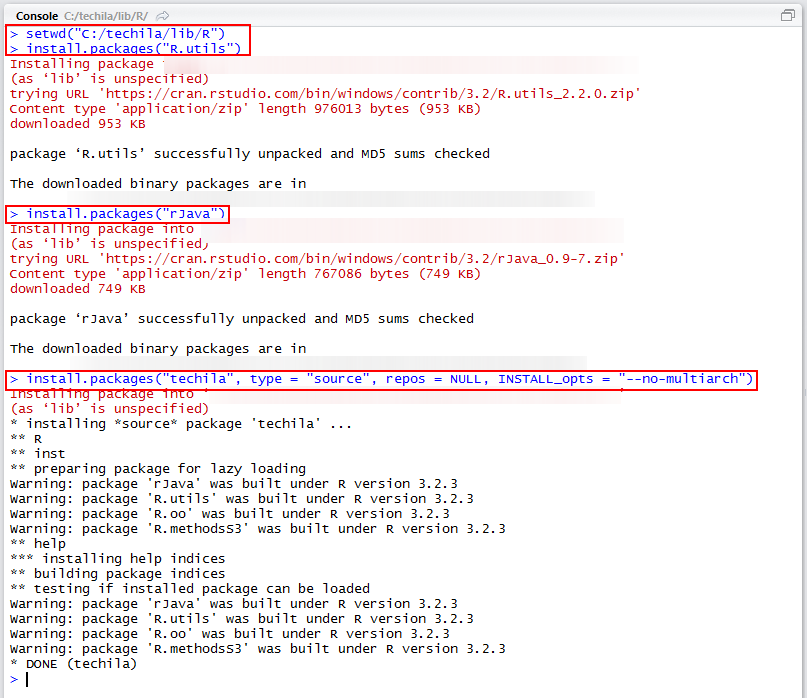
Execute following commands to install the
R.Utils,rJavaanddtechilapackages:install.packages("R.utils") install.packages("rJava") install.packages("techila", type = "source", repos = NULL, INSTALL_opts = "--no-multiarch")After executing the commands, the output should resemble the one shown below:
-
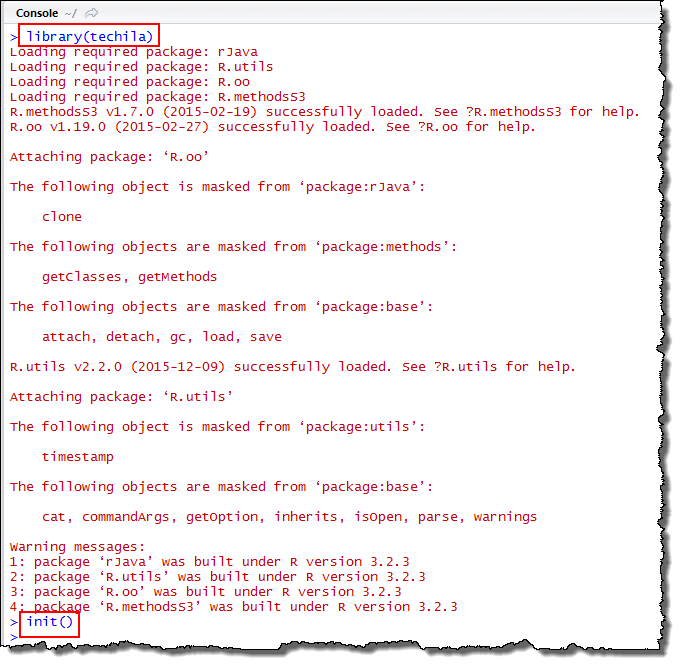
Execute the following commands in R to test the network connection to the Techila Server:
library(techila)
init()
If the network connection test was successful, the function should return without generating errors. The output of the above commands is illustrated in the screenshot below.
2.4. C
Note! In order to complete the configuration, you will need the following:
-
Compiler capable of compiling C code (e.g. the C compiler included in the GNU Compiler Collection (gcc))
-
Java Development Kit. Note! Java Runtime Environment (JRE) will not work, because the C compilation process will require access to the
jni.hfile, which is not include in the JRE.
Before using the TDCE C API, the following environment variables need to be defined as described below.
| Environment Variable | Content | Operating System |
|---|---|---|
JAVA_HOME |
Must point to the Java Development Kit installation directory. |
Windows, Linux |
LD_LIBRARY_PATH |
<full path>/techila/lib |
Linux |
PATH |
<full path>\techila\lib |
Windows |
Below are step-by-step instructions for making the necessary changes required for compiling C applications that use the TDCE C API.
-
Extract the previously downloaded TechilaSDK.zip to your computer, e.g. to your home directory.
When extracted, the TechilaSDK.zip file will create a directory called 'techila' with the folder structure illustrated in the example screenshot below. In this example, the TechilaSDK.zip file was extracted to 'C:\'.
-
Next you will need to create environment variables as described below. Please follow the instructions for the operating system you are using.
-
Windows
-
Using Windows Control Panel, create
JAVA_HOMEenvironment variable and set the value of the variable to match your Java installation directory. -
Using Windows Control Panel, modify the
PATHenvironment variable to contain the location of your 'techila\lib' directory. For example, if the path on your computer isC:\techila\lib, add this path to yourPATHenvironment variable. Note! If you do not have a PATH variable defined, create the variable and set the value to match your 'techila\lib' directory location.
-
-
Linux
-
Add the following line to .bashrc or other shell startup script.
-
export JAVA_HOME=<path of Java installation directory>
-
export LD_LIBRARY_PATH=$LD_LIBRARY_PATH:<full path>/techila/lib
-
-
If necessary, launch a new shell to make the changes take effect.
-
-
2.5. CSharp
This Chapter contains steps for creating an environment variable that will be used to define the location of the 'techila_settings.ini' configuration file. Instructions are also provided for updating the project references in Visual Studio 2010.
2.5.1. Create TECHILA_SETTINGS_FILE Environment Variable
The TECHILA_SETTINGS_FILE environment variable will need to be used to define the location of your techila_settings.ini configuration file. This will ensure that the configuration file is automatically found when executing the example material included in the Techila SDK.
Note! If this environment variable is not set, the system might not be able find the configuration file.
-
Launch the Windows Control Panel
-
Select "System" and "Advanced system settings"
-
In the "System Properties" select the "Advanced" tab
-
Click the "Environment Variables.." button
-
In the "Environment Variables" window, under "User variables" click the "New.." button
-
Enter the following information to the fields:
Variable name: TECHILA_SETTINGS_FILE Variable value: <path to your techila_settings.ini file>
In the example below, the 'techila_settings.ini' in directory 'C:\techila' would be used
Click the OK button to create the environment variable.

2.5.2. Update Visual Studio References
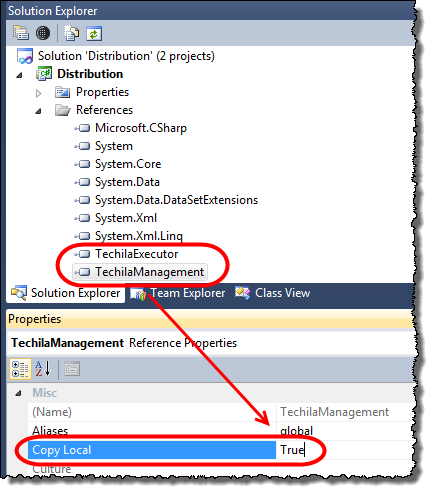
In order to access TDCE from your application, the following two components from the Techila SDK will need to be added as Visual Studio references. These files contain the TDCE C# API functionality.
-
TechilaManagement.dll (located in 'techila\lib' in the Techila SDK)
-
TechilaExecutor.exe (located in 'techila\lib' in the Techila SDK)
Please add these references whenever developing a new, TDCE-enabled application. Below are step-by-step instructions for adding the references to a new C# console application using Visual Studio 2010.
-
Extract the previously downloaded TechilaSDK.zip to your computer, e.g. to your home directory.
When extracted, the TechilaSDK.zip file will create a directory called 'techila' with the folder structure illustrated in the example screenshot below. In this example, the TechilaSDK.zip file was extracted to 'C:\'.
-
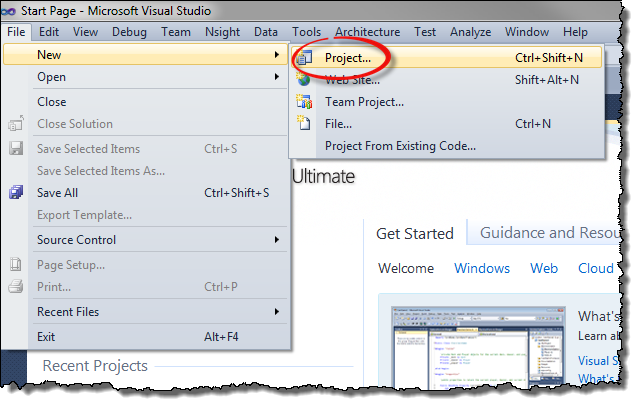
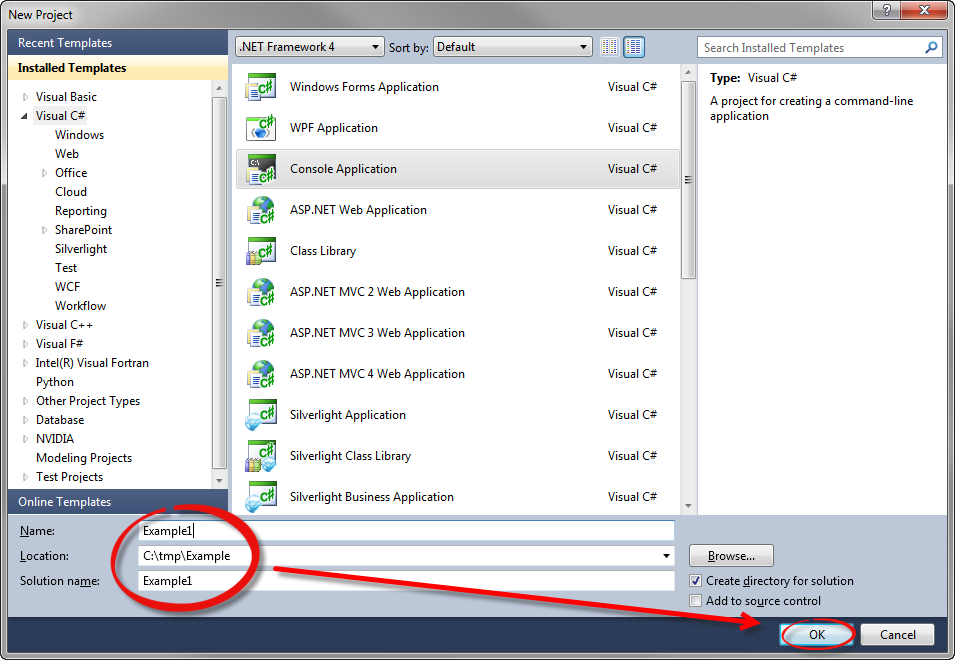
Launch Visual Studio and create the project.
-
Define name and location for the project.
-
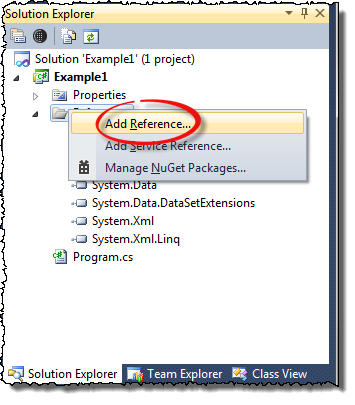
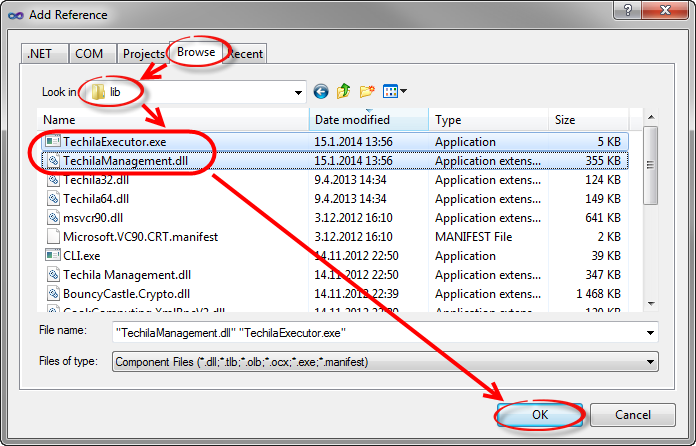
In the Solution Explorer view, right-click on References and click Add Reference.
-
Using the file dialog, select the Browse tab and navigate to the 'techila/lib' directory in the Techila SDK. Select the following files from the directory and click OK.
-
TechilaManagement.dll
-
TechilaExecutor.exe
-
-
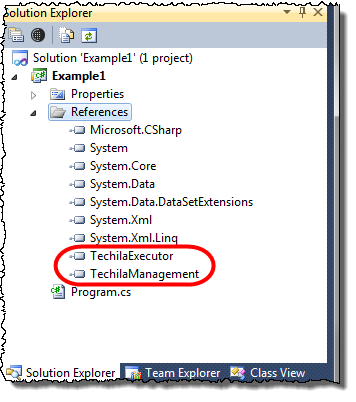
The new references should now be visible in the project references as shown below.
-
Set the 'Copy Local' setting to 'True' for both of the references that you added. This is required in orders to ensure that references will be copied to the same directory with the executable code when the solution is compiled in visual studio.