1. Docker Containers in TDCE
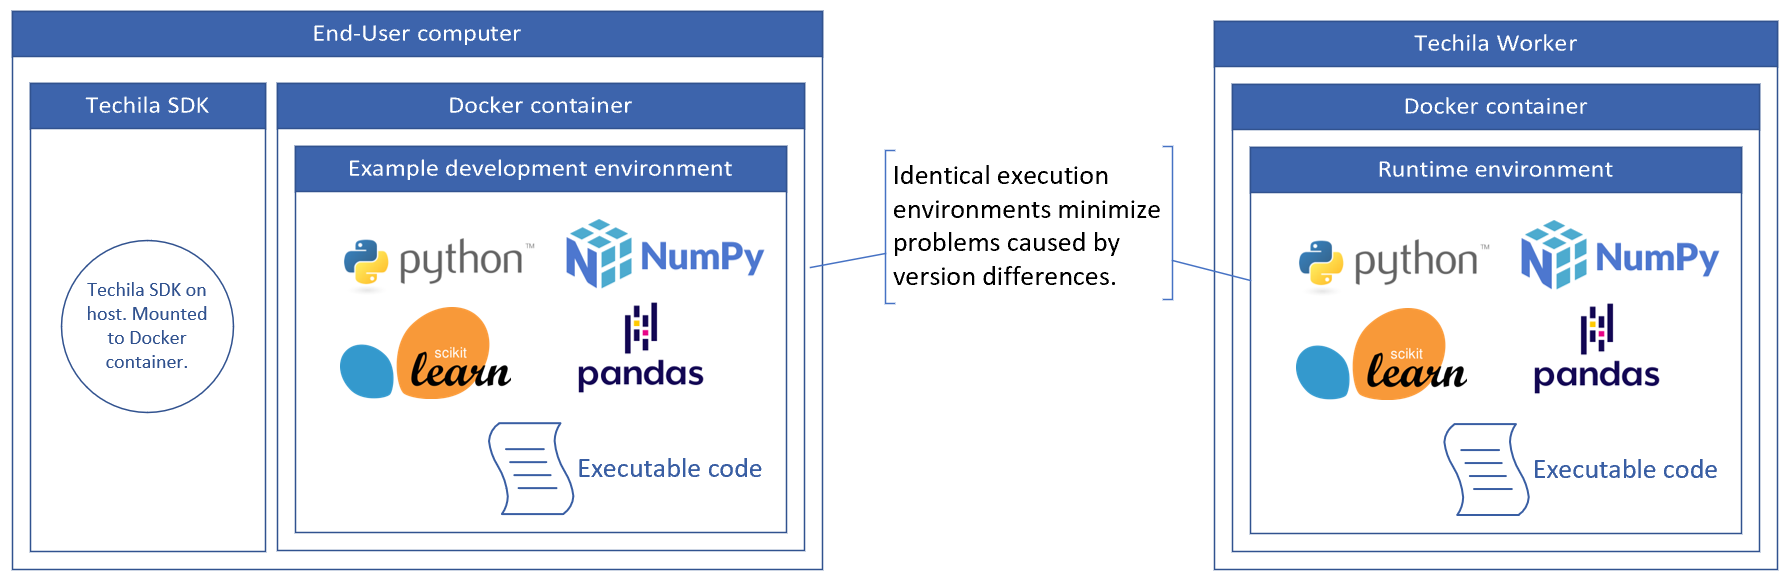
In Techila Distributed Computing Engine, Docker containers can be used like in many other systems. The benefits include the ability to transfer and use the same exact execution environment on multiple computers. This way the environment configuration does not change between computers and an identical execution environment can be easily ensured. Everything in the user computer (within the Docker container) is usable as-is in the Techila Worker computers.
TDCE APIs make it possible for the end-user to use the patented TDCE Bundle mechanism to package the Docker image from the local computer and upload it on to the TDCE environment for running on the Techila Worker computers. While the use of external container registries is possible, they are not required. The Bundle mechanism allows the transfer of the Docker images completely contained within the auto-configuring TDCE system without using external registries or the need to configure an internal one.

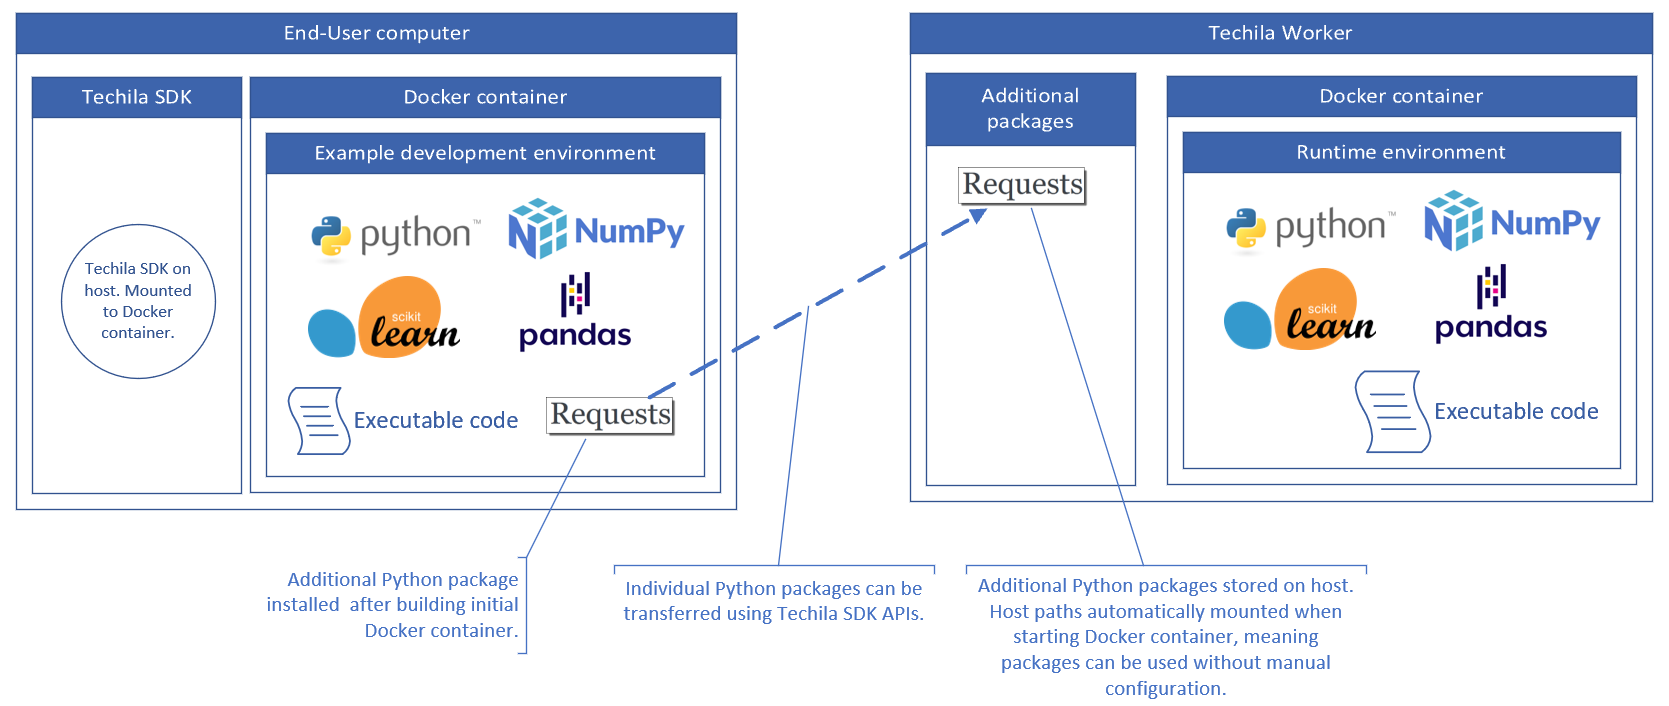
Running Docker containers with TDCE also allows for a hybrid solution where some of the data and code is not stored inside the container but mounted from the host (Techila Worker computer). This makes it easy to use changing data without the need to update the Docker image every time. Same goes for any code changes when developing the code: the Docker image does not need to be updated and uploaded every time a line of code gets changed. Even dependency packages can be Bundled and used when necessary from outside the container. Also, every change in code or data locally is detected and automatically uploaded to the TDCE.
The Docker container image to be used is defined when the TDCE project is started. This makes it flexible to change the running image even after the Techila Worker capacity has been started. Also multiple TDCE projects with different containers can be run simultaneously with the same Techila Worker capacity. This means that there is no need to know or define the used Docker images when starting the Techila Worker capacity. And there is also no need to restart and reconfigure the running capacity when changing or updating the Docker image.
2. General Flow
This chapter contains a high level description of how to use Docker containers in TDCE. More details can be found in programming language specific code samples later in this document:
-
Build your base Docker image.
-
Start a container using your base Docker image and continue making any further modifications needed. After this point, you should have a suitable Docker container for the next step.
-
Use
docker exportcommand to create atarfile from your modified container. -
Create a Bundle that contains the
tarfile and transfer it to the Techila Server. This step will be done by using the functionality included in the Techila SDK. -
Create a computational Project and import the Docker container Bundle in your Project. This step will also be done by using the Techila SDK APIs.
2.1. Requirements
2.1.1. Techila Worker Operating System
Docker containers can only be used on Techila Workers that have a Linux operating system. Techila Workers that have a Microsoft Windows operating system are not supported.
3. Python Examples
This chapter contains examples on how to use Docker containers when processing Python workloads.
3.1. Custom Container
This example shows how to create a custom Docker container containing a Python installation and how to use it during computational Jobs.
-
Launch a command prompt / terminal and change your current working directory to the following Techila SDK example folder:
techila\examples\python\Docker\1_custom_container
-
The example directory contains a simple `Dockerfile, which can be used to build the Docker image used in this example. Build the Docker image by using following command:
docker build -t myubuntu/python3 .
-
After building the Docker image, run the following command to establish an interactive bash session. The command will also mount the Techila SDK root directory using
-v C:\techila:/techila, if your Techila SDK is located in a different path, modify the command accordingly.docker run -it -v C:\techila:/techila myubuntu/python3 bash
-
In the container, check the path of the
python3executable using the following command:which python3
In this example the path is
/usr/bin/python3. If the path is different in your Docker container, you will need to modify the path later in the example accordingly. -
Exit the bash prompt using the following command:
exit
-
Exiting will stop the container. Get the container id with the following command:
docker ps -a
-
Next, create a
tararchive from the container usingdocker exportcommand. In the examples below, the container id isae088806831e, replace the container id with your container id.docker export ae088806831e > container.tar
After running the above command, your current working directory should contain a file named
container.tar. -
Next, set up a local development environment using the same Docker container. Start the Docker container:
docker start ae088806831e
-
Establish an interactive bash session to the Docker container.
docker exec -it ae088806831e bash
-
In order to use the Techila SDK and the
techilaPython package, you will need to run the following commands in the bash prompt to install required packages:apt install python3-pip apt install openjdk-8-jre pip3 install shutils
-
After installing the above packages, you can install the
techilaPython packagecd /techila/lib/python3 pip3 install .
-
Next, you can run the custom container example in the following Techila SDK folder:
cd /techila/examples/python/Docker/1_custom_container
python3 main.py
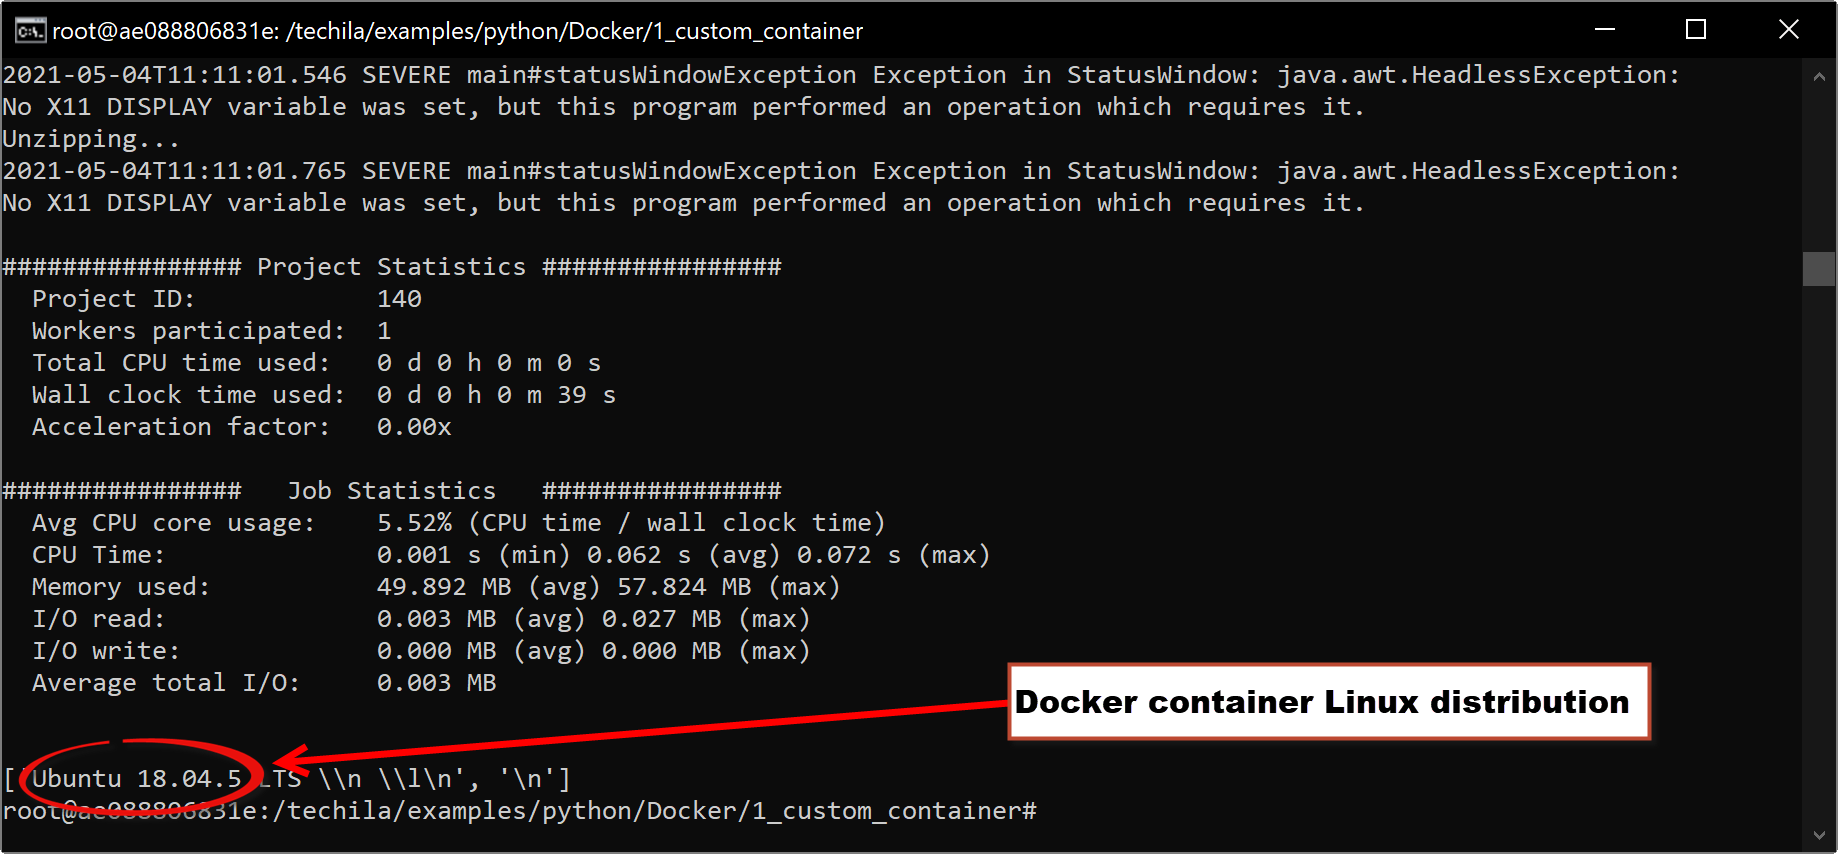
For reference, the code for
main.pyis shown below.# Copyright Techila Technologies Ltd. import techila # This function will be executed on the Techila Worker, inside the Docker container. def fun(): with open('/etc/issue', 'r') as f: d = f.readlines() # Verify that python is running inside the Docker container by getting the distribution details. return d # Create the Docker container Bundle print('Creating Docker container Bundle...') name = "my-custom-ubuntu" file = "container.tar" extrasht = dict() extrasht['ExternalResources'] = name + ';resource=' + name try: # Create a Docker container Bundle that will contain the tar-file created earlier. data_bundle = techila.create_signed_bundle( name=name, files={file: file}, resource=name, extras=extrasht, ) except techila.TechilaException as te: # If a Bundle with identical name already exists, skip Bundle creation. print(te.msg) data_bundle = te.msg2 def run_distribution_peach(jobs): res = techila.peach(funcname=fun, imports=[data_bundle], # Import the Bundle containing the docker image. realexecutable='/usr/bin/python3', # Pointer to the executable in the Docker image. run_as_python=True, # Run using python in docker project_parameters={'techila_docker_image': 'my-ubuntu-on-worker', # Name of the image on Techila Worker. 'techila_docker_tar': file, # The tar-file in the Bundle. 'techila_docker_resource': data_bundle}, # Bundle to be used. jobs=jobs) print(res[0]) # Create a small Project to verify that python code is indeed run inside the container on Techila Workers. run_distribution_peach(1)After the command has been executed, the
container.tarfile will be placed in a Bundle and transferred to the Techila Server. The Techila Server will then transfer the Bundle to all participating Techila Workers. On the Techila Workers, Python code will be executed inside the container. In this example, the code will simply retrieve the Linux distribution name, which should be Ubuntu as it was used as the base image.Note! Depending on your
techila_settings.inifile settings, you might also see graphics related warning messages:2021-05-04T11:11:01.546 SEVERE main#statusWindowException Exception in StatusWindow: java.awt.HeadlessException: No X11 DISPLAY variable was set, but this program performed an operation which requires it.
These error messages can be disabled by editing the
techila_settings.inifile and replacing the following parameter:statuswindow=fi.techila.user.GraphicalStatusWindow
With value:
statuswindow=fi.techila.user.ConsoleStatusWindow
3.2. Custom Container + Additional Python Packages
This example expands on the previous Custom Container example and shows how you can use additional Python packages in your computations without having to create a new Docker container Bundle. This means you can easily make incremental changes, like additional packages, to your code while keeping the data transfer amounts small.
This example will use the Docker container Bundle created in Custom Container. If you have not run the previous example yet, please run it before continuing.
-
If required, start your local Docker container.
docker start ae088806831e
-
Establish an interactive bash session
docker exec -it ae088806831e bash
-
Next, we will need to add a Python package to the local Docker container so we can use it in the example.
pip3 install requests
-
Next, you can run the example in the following Techila SDK folder:
cd /techila/examples/python/Docker/2_additional_packages
python3 main.py
For reference, the code for
main.pyis shown below.# Copyright Techila Technologies Ltd. import techila # This function will be executed on the Techila Worker, inside the Docker container. # The 'requests' package and its dependencies will be transferred to the # Techila Workers using the 'packages' parameter in the 'peach' function. def fun(): import requests response = requests.get('https://api.github.com') return response # Create the Docker container Bundle. print('Creating Docker container Bundle...') name = "my-custom-ubuntu" file = "container.tar" extrasht = dict() extrasht['ExternalResources'] = name + ';resource=' + name try: # Create a Docker container Bundle that will contain the tar-file created earlier. data_bundle = techila.create_signed_bundle( name=name, files={file: file}, resource=name, extras=extrasht, ) except techila.TechilaException as te: # If a Bundle with identical name already exists, skip Bundle creation. print(te.msg) data_bundle = te.msg2 def run_distribution_peach(jobs): res = techila.peach(funcname=fun, imports=[data_bundle], # Import the Bundle containing the docker image. packages = ['requests','chardet','certifi','urllib3','idna'], # Transfer the requests package and its dependencies to Techila Workers. realexecutable='/usr/bin/python3', # Pointer to the executable in the Docker image. run_as_python=True, # Run using python in docker project_parameters={'techila_docker_image': 'my-ubuntu-on-worker', # Name of the image on Techila Worker. 'techila_docker_tar': file, # The tar-file in the Bundle. 'techila_docker_resource': data_bundle}, # Bundle to be used. jobs=jobs) print(res[0]) # Create a small Project to verify that Python code is indeed run inside the container on Techila Workers. run_distribution_peach(1)After running the command, a small computational Project will be created consisting of one Job. This Project will use the same Docker container Bundle created during the previous example. Additional Python packages (
requestsand its dependencies) will be transferred by using thepackagesparameter from your development environment (=local container) to the Techila Worker(s). On the Techila Worker, the packages will be stored on the host file system. The required host paths will be automatically mounted to the Docker container when it is started, meaning theimport requestscommand can be used to import the package.